I’ve successfully installed one switch so far in an outlet with neutral and ground wires, but have had trouble with some other switches. Any help would be appreciated. To my knowledge I only have single-pole switches in my house, and a mix of switches with neutral and no neutral.
den switch
images
There is no neutral wire and I’m not even seeing a ground wire. It’s in a metal box and there is a bare copper wire wrapped around a screw, so maybe that’s the grounding? I’m not 100% sure. I tried installing the switch with just the line/load, and it was working fine at first other than some flickering when dimming the light. By flickering, I mean the brightness would go up and down and sometimes not be consistent. The lights are made for dimming. I came back a little later and the lights appeared to be on at the lowest dimmed setting, but the switch was turned off. Had this issue in both dimming and on/off mode. I took the switch out just to be safe and reinstalled the old one to ask for some advice.
hall switch
images
This switch appeared to have both a neutral and a ground wire, so I thought it would be an easy install, but then I looked closer and saw that there were 3 wires attached to the switch. Not wanting to screw anything up I didn’t even try to hook it up because I knew I’d need advice on that first.
Here’s an overview of my questions:
Do I need to ground the den switch? Is it grounded from the metal box? If it needs to be grounded, how do I go about doing that?
How do I stop the flickering?
How do I insure the lights stay off when I turn the switch off and don’t just go to the lowest dim setting?
What is the purpose of the extra wire in the hall switch, and how do I go about installing the smart switch with it?
you could extend the ground wire (while keeping it wrapped around the green screw in the back of the box to tie into the switch. Or attach the ground wire to the switch and add another piece of ground wire back to the box to keep the box grounded.
You most likely need a bypass (Aeotec Bypass or similar; sold on Inovelli) as your switch is configured as a non-neutral switch. That should help with flickering as others have had similar results.
The bypass will also help with this.
this is a 3-way switch. You’ll need to locate the other half and we’ll be able to help you map it out for your switch connections.
Thank you! That’s really helpful information.
I’m not totally sure what you’re describing here. Do you mind expanding on this some, or do you have any examples? I’m still a bit confused with what the copper wire at the back of the box is even for. I didn’t realize the box itself had to be grounded.
okay, I was assuming this was an issue with faulty wiring or a faulty switch, so I’m glad to hear that’s not the issue. Is this only an annoyance, or does it cause any safety concerns? Could it damage anything? I’m planning on getting the bypass, but just wondering if I can go ahead and install it before it comes in.
same as above
Unless I’m blind this is the only switch to this light. I will double check when I get home, but is it possible that this is anything else, or possibly that there used to be another switch and there no longer is?
Basically you need to pigtail off the ground and feed it to the switch. Non painted switches (like what’s installed now) don’t need a ground because the box is grounded and it has a metal-to-metal contact effectively bonding the switch to the box (GND). The Inovelli is painted and is a poor conductor.
2 &3) Install a bypass (at the light fixture) and see if that settles your issue. It’s defintely worth it. Otherwise you may be able to run a neutral conductor down (if you have conduit installed between light and switch) as an alternative.
Definitely a 3-way switch. you could have had a bad electrician install the circuit, but never completed the other half. I would look for a switch that maybe you’re not used to using and see if that turns the light on/off. If not…then hopefully it’s not hidden behind a wall.
I’m guessing I would need to get some extra copper wire to do that? And then just pigtail it to the little nub of ground wire sticking out? I also saw on another post someone suggest scraping some of the paint off the light switch to ground it. I wasn’t sure what they meant, but what you said makes sense now. Could I do that instead of wiring directly to the ground port?
2/3. There are two light fixtures attached to that switch. Could I install the bypass by putting it into the load port on the inovelli switch and then pigtailing it to the load line leading to the lights to avoid needing two bypasses?
I’ll double check that when I get home. I could very well have just not noticed the second switch. I have noticed those lights acting weird in the past, so hopefully there isn’t some bad wiring in there. If that’s the case my fiancé should feel vindicated because I always get on to her for turning off the lights because they currently have smart lights in them and she swears she doesn’t.
Yes. You can either get bare Cooper or a spool of green jacketed copper wire. I would try to pigtail 2 copper wires to the copper wire already attached. One wire would go back to the metal box and the other would go to the switch.
Grounding the switch via the faceplate May work. I actually haven’t put a meter to check continuity between the ground screw and faceplate. If it was me I’d just do the pigtail method to ensure a good bond.
2/3 - are the lights daisy chained to one another? E.g. switch-> light 1 → light 2?
If so you only need one bypass. You would have to install it at one of the light fixtures. One wire would connect to the load wire (coming from switch). The other wire of the bypass would connect to the neutral bundle. You have to place the bypass in parallel to load and neutral. In your case, the light is the only place with a neutral.
4 - yea double check switches. It may solve WAF issues.
I will have to check and see if the lights are daisy chained or not. Is there any way to test that? Looking at install instructions for the bypass and how they work, I see why wiring them at the switch wouldn’t work.
Also, I checked and the hall switch is definitely a 2-way. I’ll look at the wiring guide for that.
edit: also, I’m still having a hard time understanding what you mean about pigtailing two copper wires to the one already attached.
It most likely is. If you only have one load wire at the switch, it has to be daisy chained. Otherwise you would have two load wires at the switch connected (not that it doesn’t happen but unlikely).
By 2 way, I hope you mean 3 way switch?
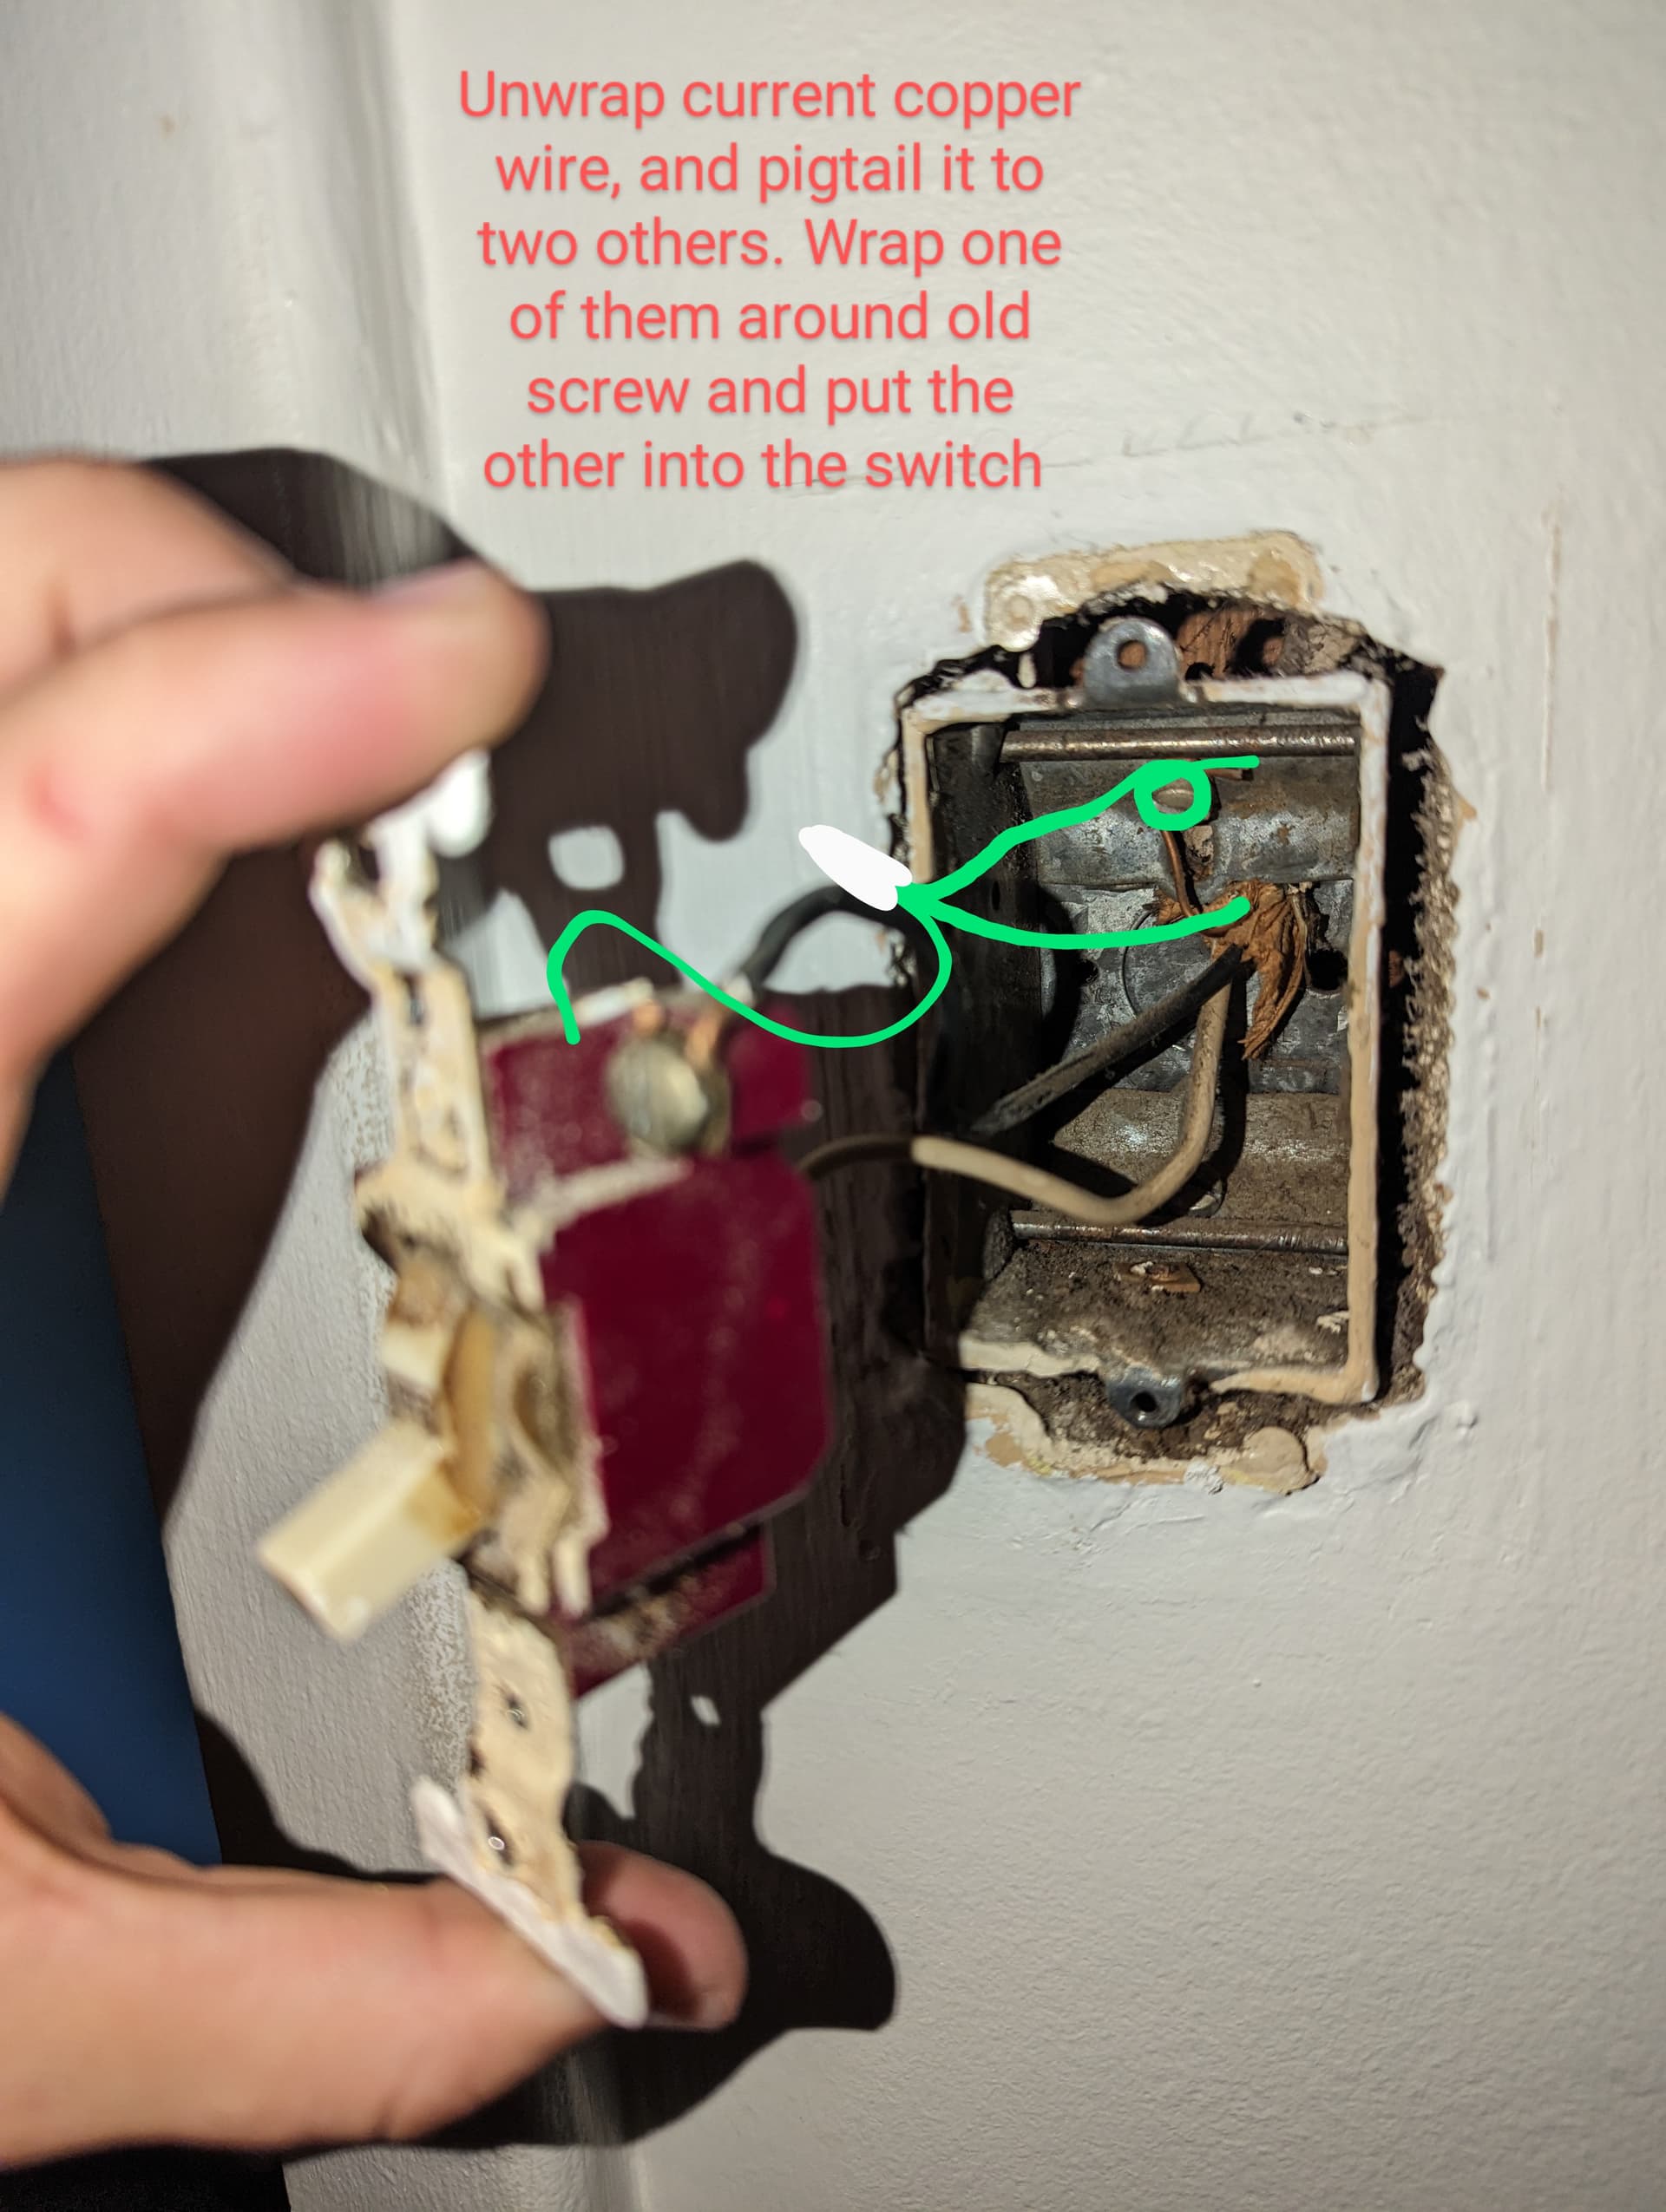
I’ll see if I can get a better picture. But basically you would use the ground wire there and connect two additional copper wire with a wire nut to extend the bare copper. One of the wires would go to your switch. The other wire would go back to the box ground screw.
Yes, I meant 3-way switch, thanks for checking me on that. Here’s a quick sketch of what I’m planning on doing based on your advice - this look right to you?