I just installed my first Inovelli switch and got it working with my hub of choice (Home Assistant). One of the key learnings for me on this install is that the form factor of the switch is significantly larger than the dumb switches I’m replacing.
My question for the community is this:
How do you work with multiple switches side-by-side while accommodating the form factor of the smart switch?
More background: my house (in the US) has many two and three switch panels that are quite limited on space, with neutral wires and 3-way wiring sharing a common box. Stuffing a smart switch on the single switches (only the bedrooms and a few closets; I wouldn’t bother) doesn’t get me all my common area lights on smart switches.
I’m pretty handy so I would hate to have to factor in an electricians labor to install new boxes/wiring just to make room for 3 smart switches side by side. If this is unclear, I’ll see if I can take a picture to illustrate the limited spacing…
If you are handy, carefully cut out the old box, and install an old work box. They are usually deeper than old boxes, depending on the age of the house.
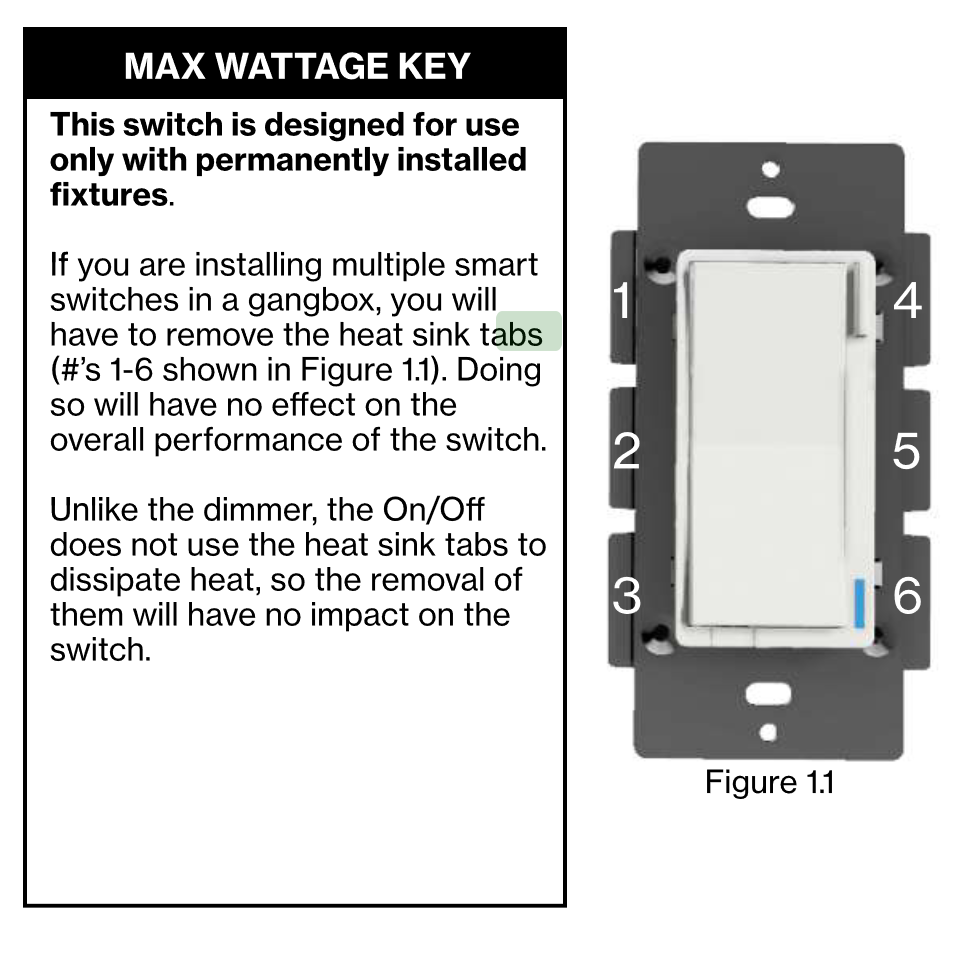
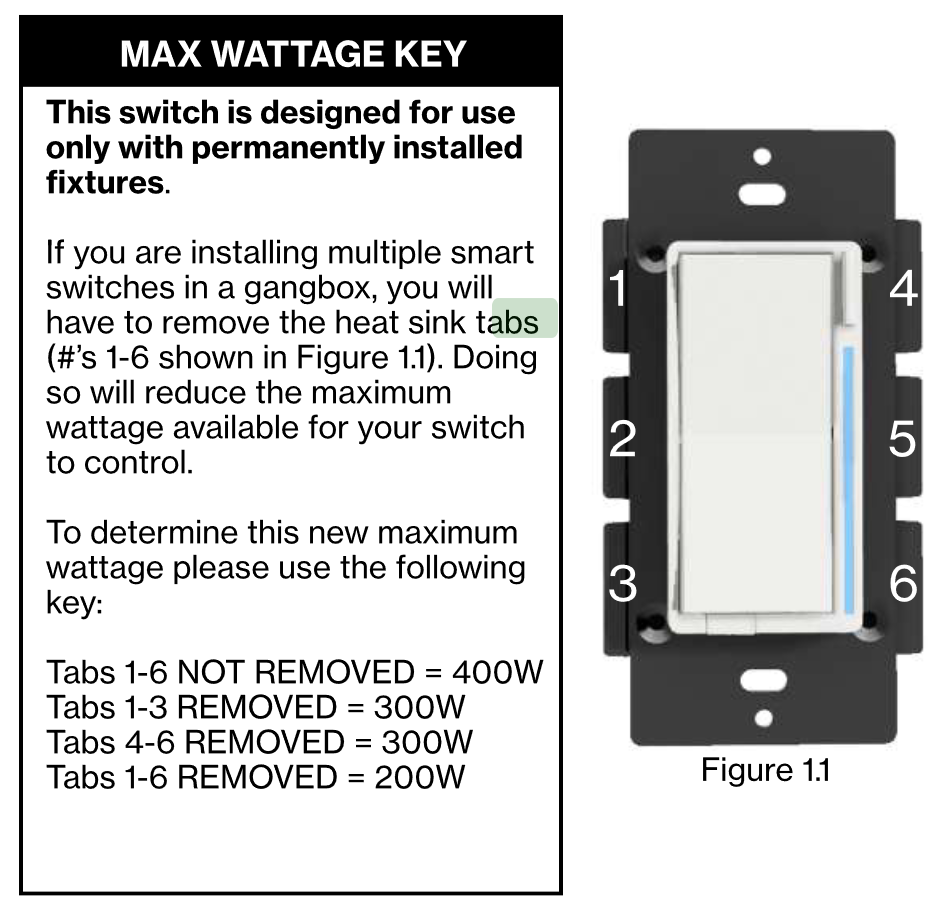
If you are just concerned about side-by-side fit and not box capacity, then you can remove the heat sink tabs on the switches to allow for a side-by-side fit.
Inovelli switches do not need the heat sink tabs, so you can remove them as needed. I would only remove the ones needed to fit next to another switch. Sometimes it helps if the tabs grab the side of the box.
Dimmers are a little different. They do make use of the heat sink tabs. Removing tabs will reduce the load capacity of the dimmer. Refer to the manual that came with your dimmer.
I have multiple boxes with 3 - 4 switches/dimmers installed. It was tight, but I got it all to fit. Just need to finesse the wires (groom) and ensure they have enough length to service the switch (to pull out of the box).
Yes, it’s always a tight fit. It has helped me to use Wago lever connectors sometimes when you’ve got a lot of wires coming in. They take up a bit less space.
Problem with size of switches / plastic side corners.
And this is with the heat sink tabs removed. On that way not make the heat sink tabs half the thickness with on on left side of switch on top and one on right bottom. Problem solved keeping tabs and heat sink too.
I installed a 8 different smart switches to test out what I want to install throughout the house. Using inovelli red and black dimmer, Zooz 26 and 27, Leviton dimmer and On//Off.
My house was just rebuilt from the studs in 2017. The electrical was done with flex and pulling wires and metal boxes. The cover plate is standard on the metal boxes and that is where I am having problems. Only the Leviton switches have rounded corners so they can fit 2 in a double gang box. On the inovelli and Zooz I had to get the dremel out, round the corners close to the the screws holding them together.
And chance this will be addressed in the next round of updates. It is not much that has to be taken out but there is no way 2 will fit in a standard metal box with the standard metal plate. Would be a easy size change for design but production I am sure would be harder.
Not sure about the future form factor, but one solution in the interim might be to replace the metal mud ring with a plastic one, unless there is some reason your local code requires a metal one. The problem is, which I’m sure you’re aware of, is that it may take some surgery to get it out.
Carlon makes a plastic mud ring that might work better. I haven’t tried them, however. Since they’re plastic, they might be easier to modify with a rotary tool if surgery is required.
Thanks, good idea,
Unfortunately the kitchen has 4 locations behind drywall and tile and anther 18 locations behind drywall so that would be cost prohibitive.
Code may allow plastic with a metal box but then I would also need to add ground to each switch where with metal the box is grounded and the screws count for grounding with metal.
No worries for me I can do the Dremel on each switch but seems there would be a lot of others in the long run with the same problem and a easy change in the future. It doesn’t take to much grinding to but enough there is no way to force it all the way in the box.
I can take it off and take some pictures if it helps.
Can you explain a little further or maybe post a picture. Does the switch not fit all the way in, is the switch getting stuck when you first start to tuck it, etc?
Hi Bry, I have two locations where I’m trying to fit in a zooz 5 button controller and the inovelli dimmer. The backs were very tight to get in and now what’s left if the heat sinks won’t fit. If I were to move both switches slightly away from each other I think it would fit.
As @stu1811 pointed out, pop off the heat sink tabs from one side, presuming your wattage allows. The problem with just moving two heat sync tabbed switches away from each other is that the switch cover plate likely won’t line up well.
Thank you, I do have the tabs removed on the side where the switches are together, but it’s still extremely tight.
Also, that is a good point about the cover not fitting. I will try get them into the box during the next few days and I will report back. I hope I’m able to fit them as I really like the functionality of the dimmers!