Controlling Inovelli Switch LED color and brightness without creating child devices

Inovelli switch drivers provided by Inovelli can control LED color and brightness (when on) through adding a child device, but I found this to be awkward, and it didn’t provide me the flexibility I wanted. Inovelli drivers now (as of October 2020) support a custom command: setConfigParameter that sends any available configuration command to the switch. You set three numbers: parameter number, value, size, for each command you send. The package inserts for each of the switches has a list of switch parameter numbers, range of values, and size. As noted below, the inserts have occasional errors when it comes to size.

With that, I was able to put together some rules to change LED color of all switches, and to change the brightness of the LED when the switch is off so the LED is completely off in the daytime, and on dimly at night. Following are some examples. None of my rules have triggers. The actions are either run manually (like this first one), or run by another rule. The first changes the LED color to orange (for Halloween):

setConfigParameter(5, 21, 2) on Ext. Living Room, Hall to Family Room, Ext. Master Bedroom, Family Room Fan, Hall by Thermostat, Bath Middle, Hall Entry to Bedrooms, Kitchen Under Cabinets, Hall by Kid's Bathroom, Kitchen Main, Kitchen Prep Counter, Office light and fan, Bedroom Front, Ext. Front, Living Room Fan, Bath Half Light, Bedroom Master Fan, Bath Half Fan, Bedroom Master Hall, Ext. Kitchen, Laundry Fan, Ext. Garage Side, Bath Master, Bedroom Middle, Kitchen Dining Island
setConfigParameter(13, 21, 2) on Bedroom Master, Dining Room, Entry, Bedroom Master Sinks, Living Room Light, Family Room Light

I have two types of Inovelli switches: black on/off, and red dimmers. They use different parameter numbers, so the switches have to be separated into two actions. The first action is for the black on/off; the second for the red dimmers.

Note that when you add parameters to the action in RM, you add one at a time rather than typing all three on the same line (which is what I naturally tried first). Also note that the configuration parameter information in the Inovelli documentation for the Inovelli red dimmer for LED color is wrong: the parameter size is 2 (the last number of the three in setConfigParameter), not 1.

I then cloned this rule for all my other LED actions. Cloning meant that I had to type this list once only, and just had to edit the parameter numbers.

Another example: setting the LED off brightness to zero (none):

IF (Variable InovelliLEDsOn(false) = true(F) [FALSE]) THEN
	setConfigParameter(7, 0, 1) on Ext. Living Room, Hall to Family Room, Ext. Master Bedroom, Family Room Fan, Hall by Thermostat, Bath Middle, Hall Entry to Bedrooms, Kitchen Under Cabinets, Hall by Kid's Bathroom, Kitchen Main, Kitchen Prep Counter, Office light and fan, Bedroom Front, Ext. Front, Living Room Fan, Bath Half Light, Bedroom Master Fan, Bath Half Fan, Bedroom Master Hall, Ext. Kitchen, Laundry Fan, Ext. Garage Side, Bath Master, Bedroom Middle, Kitchen Dining Island
	setConfigParameter(15, 0, 1) on Bedroom Master, Dining Room, Entry, Bedroom Master Sinks, Living Room Light, Family Room Light
	Set InovelliLEDsOn to false
END-IF

Here I used a global variable (InovelliLEDsOn) so that I wouldn’t needlessly send out configuration commands if the LEDs were already set to off. This simplified using this rule in other rules, since the logic is closely tied to the actions. Similarly, the actions for turning LED brightness when switch is off to 1:

IF (Variable InovelliLEDsOn(false) = false(T) [TRUE]) THEN
	setConfigParameter(7, 1, 1) on Ext. Living Room, Hall to Family Room, Ext. Master Bedroom, Family Room Fan, Hall by Thermostat, Bath Middle, Hall Entry to Bedrooms, Kitchen Under Cabinets, Hall by Kid's Bathroom, Kitchen Main, Kitchen Prep Counter, Office light and fan, Bedroom Front, Ext. Front, Living Room Fan, Bath Half Light, Bedroom Master Fan, Bath Half Fan, Bedroom Master Hall, Ext. Kitchen, Laundry Fan, Ext. Garage Side, Bath Master, Bedroom Middle, Kitchen Dining Island
	setConfigParameter(15, 1, 1) on Bedroom Master, Dining Room, Entry, Bedroom Master Sinks, Living Room Light, Family Room Light
	Set InovelliLEDsOn to true
END-IF

In another rule, I run the actions in these rules when appropriate (e.g., LED brightness when switch is off set to 1 at night, 0 during the day). Keeping these separate from the rules calling them makes editing and cloning much simpler.

I just manually run the LED orange rule actions on Halloween and other LED rule actions (e.g., red on Xmas) on the correct date. It’s so rare that those run that I don’t put any automation on them.

1 Like

@Eric_Inovelli
@EricM_Inovelli
@bcopeland
In Hubitat how do you run a rule from a rule? Do you need to create a virtual switch and then turn that virtual switch on to run it?

Also, I’m using 2 Inovelli Red Dimmers, LZW31-SNs in a 3 way situation where the load is in one box (which is my Den side switch) and the line is in the other (the Hall side switch). I set up the 3 way by associating groups 3 and 4 to each other in both switches and setting Param 12 to 11 for both. In order to get dimming to work from the Hall side switch I set Param 1 to 3 for the Den side switch and set Param 1 to 0 on the Hall side switch. That works pretty well. But I also want to set button 7 (the Favorite/Config button) to dim the lights to 40%, but without the 3 second delay (which is caused by setting Param 1 to 3 in the Den side switch, but was necessary to not have it react too fast to holding the Hall side paddle up or down).

I tried to use setConfigParameter in a rule I created for button 7 but it doesn’t seem to be working. I’ll post that below. BTW, I used 2 for the byte size as using 1 didn’t seem to work. (I know it is “1” in the printed instructions, but as you pointed out above, those can’t be relied on. So other than trial and error do you also know of any way to reliably know what the byte size should be?).

Below is my rule, which doesn’t seem to do anything as it is still taking 3 seconds for the light to turn on from button 7.

I also included a screen shot of my Parameter/Preference settings for the Den and Hall side switches.

Thanks,

Stuart

Button 7 Rule:

Den (Load) Side Parameters/Preferences 1-12:

Hall (Non-load) Side Parameters/Preference 1-12:

I can’t speak to the rest currently, but this is definitely at least one decent way of doing it. I have a couple virtual switches that are set to auto turn off after 5s and then I use Rule Machine to trigger Modes and/or Scenes when those switches turn on. For example a bedtime switch that gets hit by a Google routine that swaps my Mode and uses a Scene to turn off all the lights and turn on the appropriate fans, etc.

Thanks for the reply. Do you have any idea on how to create the rule that does what I outlined above? i.e. Have switch 1 or 2 set Param 1 of switch 2 to zero, turn on the light physically attached to switch 2 to 40% and then set Param 1 of switch 2 to 3?
@rsjaffe

@skarden Are you opposed to using the child devices for LED control? I’m currently testing a few things to see if I can replicate the behavior in the OP.

If I could do it that way it would be just fine with me. In fact, may very well be easier. I use the Red Fan + Light, LZW36 child devices for the fan and light separately now so I can turn them on and off independently.

In fact, I’d love to see what you are doing with a child device to set the LED as I have a situation where I can’t use an association but would love to have the LED up move/down on switch 1 when I use it to dim a light that is attached to switch 2.

Stuart

@skarden You can ignore what I said about doing a virtual button to kick off another rule if it’s not needed for something else, you can just straight run a different rule via rule machine too.
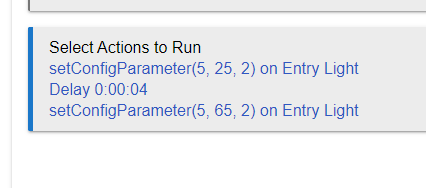
Ok, got it working -
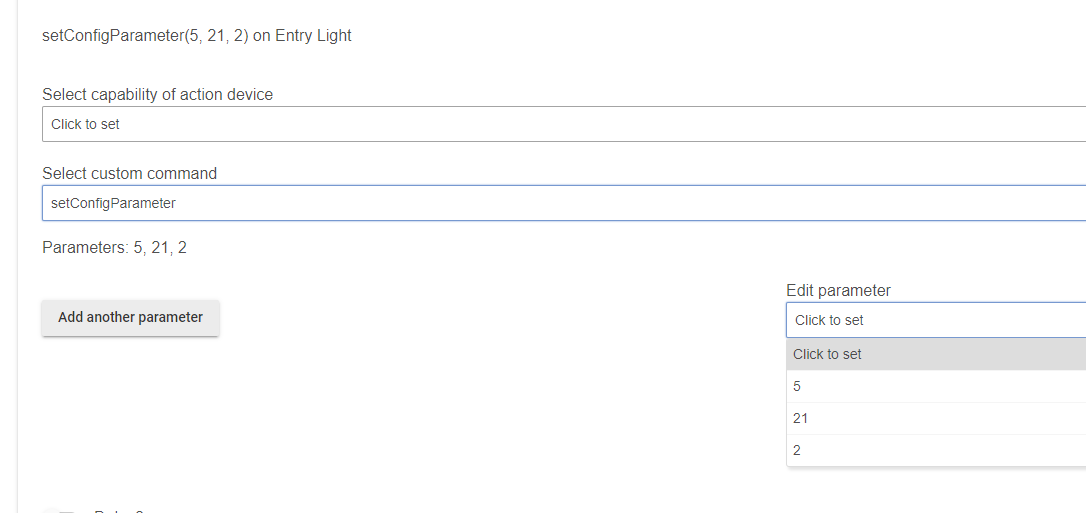
Actions are going to look like this, where each of the 3 parameter values are separate numbers -

I don’t have a dimmer myself, but I would expect you would have something like what you already do. I tested it myself on an on/off switch and this is what it looks like and it works fine based on visual confirmation and watching the logs-

image

Edit, saw the update with the child device, give me a second and I’ll do the same through that :slight_smile: < I’ll have to come back to this later, forgot I’ve got to run to pick up stuff for tonight and then have plans. I’ll circle back tonight if I can.

Thanks!!! I know how pesky it can be for real life to interfere with our virtual lives. :grin:

If I could do it with a child device vs. creating a rule to setConfigParameter I’d much prefer that as I’m just guessing what is the correct byte size for Param 1. (Since I’ve seen reports that the #'s in the pamphlet that came with the switches may be incorrect.)

Stuart

I see you may have already got this figured out, but if you use “setLevel” with any duration it will override the parameters that effect dimming speed and ramp rate. So in rule machine if you set button 7 to set the level to 40% with a duration of 0 it will instantly set the lights to 40%.

1 Like

Thanks. I’ll try that. Ironically, I had been setting that to zero at first, then thought not to do it as I figured the default was zero and setting it would be an extra step for it to process.

I’m just going to agree with @EricM_Inovelli on the super useful point of just using setLevel and not worrying about the parameters and the effort when it comes to the dimming :slight_smile:

If it’s any consolation, there are 3 options (1,2,4) so if you play with each parameter to confirm, you’ll be able to figure it out after a couple tries worst case.

That said, for messing with LED colors, it seems the easiest way if you want something a bit more fixed is to use the Notifications (up to 5) that are built in with the Inovelli drivers and you can just configure an On action for the switch as seen here when I was messing with doing both back to back with my setConfigParameter testing -

image

I didn’t have as much luck doing any kind of customization against the LED Color child device unfortunately, was simpler at that point to just go with the parameter config straight against the parent. Is that what you’re looking to do here with the LED strip or am I getting it mixed up?

So I think we can consider this 99.9% resolved at this point. I went back into my rule to set button 7 on either switch to set the Den/Load side switch to 40% but with the addition of setting the Fade (Delay) to zero. (BTW, I don’t know if this is an Inovelli thing or a Hubitat thing, but they should use the same term in the rule as inside the device. In the rule it is “Fade” and in the Device it is “Dim”)

I’m attaching a screen shot of the rule overview and detail.

Thanks again for all the help.

Stuart

Overview:

Detail:

1 Like