LED Lightstrip Group Pixel Effect w/ Hubitat?

Sorry if this was already discussed somewhere (please point me in the right direction). I have searched both here and the Hubitat forums with no luck.

Setup:
I have 3 separate Inovelli LED light strips (among other products) above my kitchen cabinets. Gaps and locations prevent me from just using 1 controller.
Everything is connected to a Hubitat hub

Question:
How can I control the Pixel Effect (either cycle through or set a specific effect 1-46) for all 3 light strips at one time?

Attempts:
I have grouped them, which allows on/off, color, dim, etc. But not Pixel Effect.
Attempted to set up a rule using Rule Machine. I am not very experienced with Rule Machine and have not been able to figure this out yet…

Thanks in advance for any details you can provide!! :slight_smile:

I don’t have a light strip myself to compare, but I think you’d be able to do this at least one at a time (and then go through all 3) via rule machine by running custom actions and using the set config parameters option similar to what I was showing here -

And the main relevant information from the documentation is -

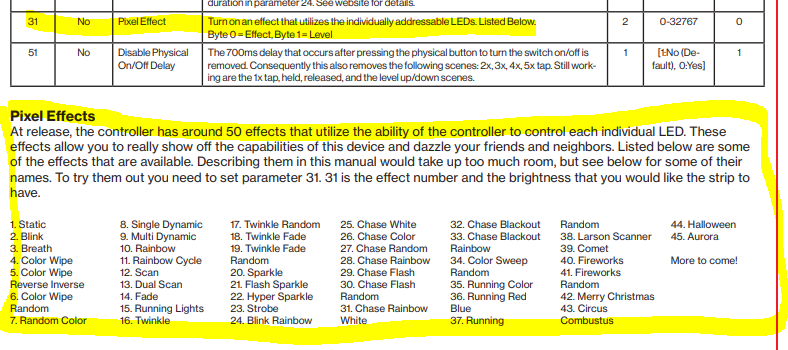
So I’d lean towards doing what I did in that link and going parameter 31, 10, 10 for example to get the rainbow effect (may have to play around with it if you can mess with it while watching it too). I’ll note from that thread that you’ll also want to do each of the 3 numbers on their own line, you can’t write “31, 10, 10” in the setConfigParameters, you’ve got to do “31” “10” “10” as separate values and it’ll organize it.

In rule machine you can use a custom command and send a pixelEffectStart command with the number of the desired effect from the manual like shown in the post above.

1 Like

Thanks for the details and for pointing me in the right direction! I was able to get it working with setConfigParameters, but ended up finding an easier way. I will detail both options here in case others are looking for something similar.

Initial setup for either option

  • Next I created a Dashboard tile with the ‘Variable Number’ template. My global variable was named ‘CabinetPixelEffect’.
    image
    image
  • Use Rule Machine to define a new rule.
  • Select Trigger Events.
  • Select ‘Variable’ for the capability for the new Trigger Event.
  • Set your Variable to the Global Variable you created previously and set the Comparison to * changed *. This will kick off this rule anytime you change the global variable from the dashboard tile.
    image

Using setConfigParameters (Going to show you the complex way first and this is how I learned :slight_smile: tl;dr->skip down to using pixelEffectStart section )

  • Before we set the actions, I created a local variable (‘PixelEffectByte’) with a variable type of ‘number’. (you will see why shortly) The initial value should not matter as you will be changing it.
  • Next up, Select Actions to run.
  • Select Action Type of ‘Set Mode, Variables or File, Run Custom Action’.
    image
  • Here is where it got interesting… Looking through the driver code for setConfigParamter, I found this when you start a pixel effect.

    image
  • The way I understand this is that when setting the parameter, I need to pass in the following:
    • ‘31’ for the Pixel Effect parameter as @chack mentioned above.
    • Some numerical value representing the Pixel Effect and Dim Level. The Dim Level (1-99) needs to be multiplied by 256. And the Pixel Effect (1-45) needs to be added to that number.
    • And 3rd is the number ‘2’ representing the size. This is also shown in the image @chack posted above.
    • So, 25345 would be Pixel Effect 1 (Static) and Dim level 99. 25389 would be Pixel Effect 45 (Aurora) and Dim level 99.
    • Since I only care about the Pixel Effect and always want the dim level to be 99 for this use case, I used the Operation ‘variable math’ as seen below. 25344 = 99 * 256 and CabinentPixelEffect is the global variable we created above.
    • I can now enter 1 - 45 in the CabinetnPixelEffect variable (via the dashboard) and it will calculate the correct number to send into setConfigParameter…
  • Finally, I had to create one additional action. This time with ‘Run Custom Action’ and a capability of device ‘Dimmer’. This allows you to select the LED Strip devices and select the ‘setConfigParamter’ custom command. From there you add each parameter that I covered above. One at a time, using the ‘Add another parameter’ button.
  • That leaves you with this. And allows you to edit the dashboard tile with 1 - 45 and see the effects change on all of your LED strips.

Ok… I know that was a lot… But it was awesome learning for me, so I wanted to share :slight_smile: Now if you made it this far… Here is the easier method.


Using pixelEffectStart

  • Select Actions to Run and Type of ‘Set Mode, Variables or File, Run Custom Action’.
  • Then select ‘Run Custom Action’, select Dimmer, select your LED Devices, and wait for it… Select ‘pixelEffectStart’ as the custom command.
  • Finally you can set the parameter to your Global Variable. %CabinetPixelEffect% for me. And tada… you have the same effect (no pun intended).
  • Now your rule should look like this.

Ok, once again sorry for the long post! But I wanted to provide as detailed instructions as I could in case someone else was trying to do the same thing.

Next up, I would love to figure out how to create a drop-down list on the dashboard to allow you to select the specific Pixel Effect you want… If you know how to do this, please let me know!!

Thanks!

2 Likes

Thanks for sharing, that’s awesome!

For the dashboard, not a lot of options off a quick search. You can use cobra apps (free but separate site) to cycle between up to 4 with button presses, or you could use MakerAPI and run a webpage using html/css/javascript on a Pi to make your own dropdown?

Thanks! I will look into those. For now, I just added an image to help the wife know what is what.
image

Also, I probably could have saved myself a lot of trouble and just created a button to always take it 45. Rainbow Aurora for the win! This is the way and is what ends up being on the LEDs 98% of the time. @Eric_Inovelli I will be looking for my Rainbow Aurora badge soon :crazy_face:

@Eric_Inovelli I will be looking for my Rainbow Aurora badge soon :crazy_face:

I got you!

1 Like

HAHA, THANKS!! You guys rock!

1 Like

@Jonathan.Cochran I appreciate all the detail you provided, because I am trying to accomplish the same thing using a global variable. I’m pretty new to all of this, but I feel like I followed what you laid out fairly well. I must be missing a critical piece though. When I use my dashboard to send a new PixelEffectStart command, I can see that the value changes on both my dashboard as well as the global variable, but the led strips never change the parameter. I can see in their detail they still are running the same pixel effect. I can see in the logs that as soon as I change the variable in the dashboard and the rule fires, I get an error code for all six strips that I’m trying to control. Any advice based upon the error code and my setups shown? Thanks in advance for any assistance.


I am noticing one difference based on the screenshots, it looks like the parameter you’re passing to pixelEffectStart is ‘CabinetPixelSetting(40)’ what happens if you remove the ‘quotes’? It looks like Jonathan’s rule just passes CabinetPixelEffect1 (also worth double checking that your variable is in fact Setting and not Effect?).

Thank you @chack. I noticed the same thing regarding the quotes around my Global Variable in the Actions section. When I added it there, I added it as a string with % at the beginning and end of the name. That was the only way I could see to add it as a parameter. I can’t figure out how to get rid of the quotes as they seems to be automatically added in. I was wondering if that could have something to do with the errors. As for your comment about setting vs. effect, I named my GV %CabinetPixelSetting%, because I had failed the first time with %CabinetPixelEffect% and was trying to start over fresh. I setup a GV with the new name and a “number” type. It was in Rule Maker that I defined that a change in the value of the variable would trigger the PixelEffectStart to be sent. At least I believe that is what I’ve done. I can see the values of the GV being changed and I can see the rule kicking off. It appears that what I am sending to the PixelEffectStart parameter for the light strips is coming across as something they don’t understand. I was wondering if the quotes played into it and I’m sending over the whole string when they are only looking for a value.

1 Like

I don’t have any devices left in Hubitat to properly test myself (though just walked through adding a bogus virtual device to see it), but I’m willing to bet that’s the issue. You get that exception error which in my experience typically meant there was something wrong with the way the data was being formatted, etc.

Can you expand out the section of your rule running the custom command and how the parameter is formatted? Because my quick attempt doesn’t end up with the quotes here and I’m wondering if that’s the issue -

That solved it! I was adding the parameter as a string (thus the quotes), because I was getting an error message in the parameter field when trying to add the GV as a number. It might be that I wasn’t using % signs or something…not sure what drove the error. This time, I left the integer value field as I had it set for the string parameter and I just used the parameter type drop down to change from string to number and…boom. It all works now. Whew…I have been playing with this for hours trying to figure it out. Thank you so much for the discussion. Huge help. If you are ever in Nashville, I’ll buy you a beer! :beers:

2 Likes

Glad to hear it!

1 Like

can you teach me how to create a global variable?

In the ‘Rule Machine’ app there is an option to ‘Create, Set, or Delete Global Variables’. Once you click on that, you can click on ‘New’ to create a new one.

1 Like