I came looking for a solution to this one (or at least knowledge that I wasn’t crazy), but figured I’d share some data, I am seeing it too, 3 of 15 right now.
2 Likes
Just to note - I just received 5 White Aux switches. Of the 4 that I’ve installed, 3 had the ground screw problem. So it isn’t just the Blues that have this issue.
1 Like
I’ve also seen this at a similar rate as others. I don’t recall it being an issue with any switches in my original batch, but of my 15 replacements, 2 had the stuck ground plate. Wasn’t a big deal to just disassemble and dislodge the plate so I didn’t bother posting about it at the time
1 Like
I’m installing 19 blue series switches and had ground screw wonkiness on the majority of them.
@Eric_Inovelli from what I can tell the underlying issue occurs because the ground screw plate (? not sure what this piece is called - the little metal plate that the ground screw screws into) is getting hung up on a thin seam/shelf of plastic where two plastic pieces meet towards the wall side of the ground wire terminal.
I was generally able to get the ground plate free after carefully taking off the plastic front switch plate and then wrenching the ground screw/plate until it sheared/cleared the aforementioned plastic seam that was hanging it up in the first place. Not ideal, probably added 5-10 minutes of labor per switch. The issue was compounded by the fact that most of the ground screws themselves were “mushroomed” at their ends and couldn’t be easily unscrewed from the stuck plate without considerable force applied. This would be a non issue if I wasn’t trying to deal with the stuck plates in the first place but it definitely didn’t help.
2 Likes
Hey Eric,
Another data point for you, I have 4 switches of the 28 replacements that had the ground clamp plate stuck like this as well.
I’ll attempt the repair like in the above post and see how it goes.
EDIT: I was able to get the ground plates freed up. There is still a lot of binding with the plate. I have the feeling once I install a ground wire, it will not let go if I ever need to pull the switch for what ever reason.
Just installed 30 from the second bath and ~1/3 of them has this. Hadn’t seen this thread, but on about half was able to unwedge with a jeweler’s screwdriver.
These shipping in the closed position (unlike the other 4 terminals) isn’t awesome, especially with the relative position of the jbox screw.
I need to go back and check it out, but I believe I also shorted one of the first ones out, getting the ground below the plate and into the switch housing.
I’ve installed 12 from the most recent batch (recieved 2 weeks ago) and about half have this issue with the plate being stuck to the top of the case.
I had 7 unopened and selected 4 at random. All 4 had the darker green screw. 1 of the 4 worked as expected when unscrewing the green screw (the plate visible in the 2 wire holes descends as the screw is loosened). 3 of the 4 showed the failure mode (the plate does not move and continues to block the 2 wire holes). I’m over 50% on the failure mode now out of my 20 switches.
On the ‘good’ switch, when the green screen is fully loosened, the screw and plate travel together and freely. IE: If I turn the switch upside down the screw travels out and the plate falls to touch the inside of the top (which is down in this orientation).
I used a manual screwdriver to loosen the screw on the 3 ‘fail’ switches and they travel smoothly until meeting resistance and when I apply more force I can see the plate turning in the direction of the force but it still never disengages from the top of the switch body. Turning the switch upside down results in no movement of either the screw or the plate. Applying a significant amount of force does not seem to present any risk of the screw disengaging from the body.
The issue is the ground plate is getting stuck in a ground-plate-shaped hole. If you take the back of the switch off it’s trivial to push it out from behind, but it does require taking the back off and reassembling.


1 Like
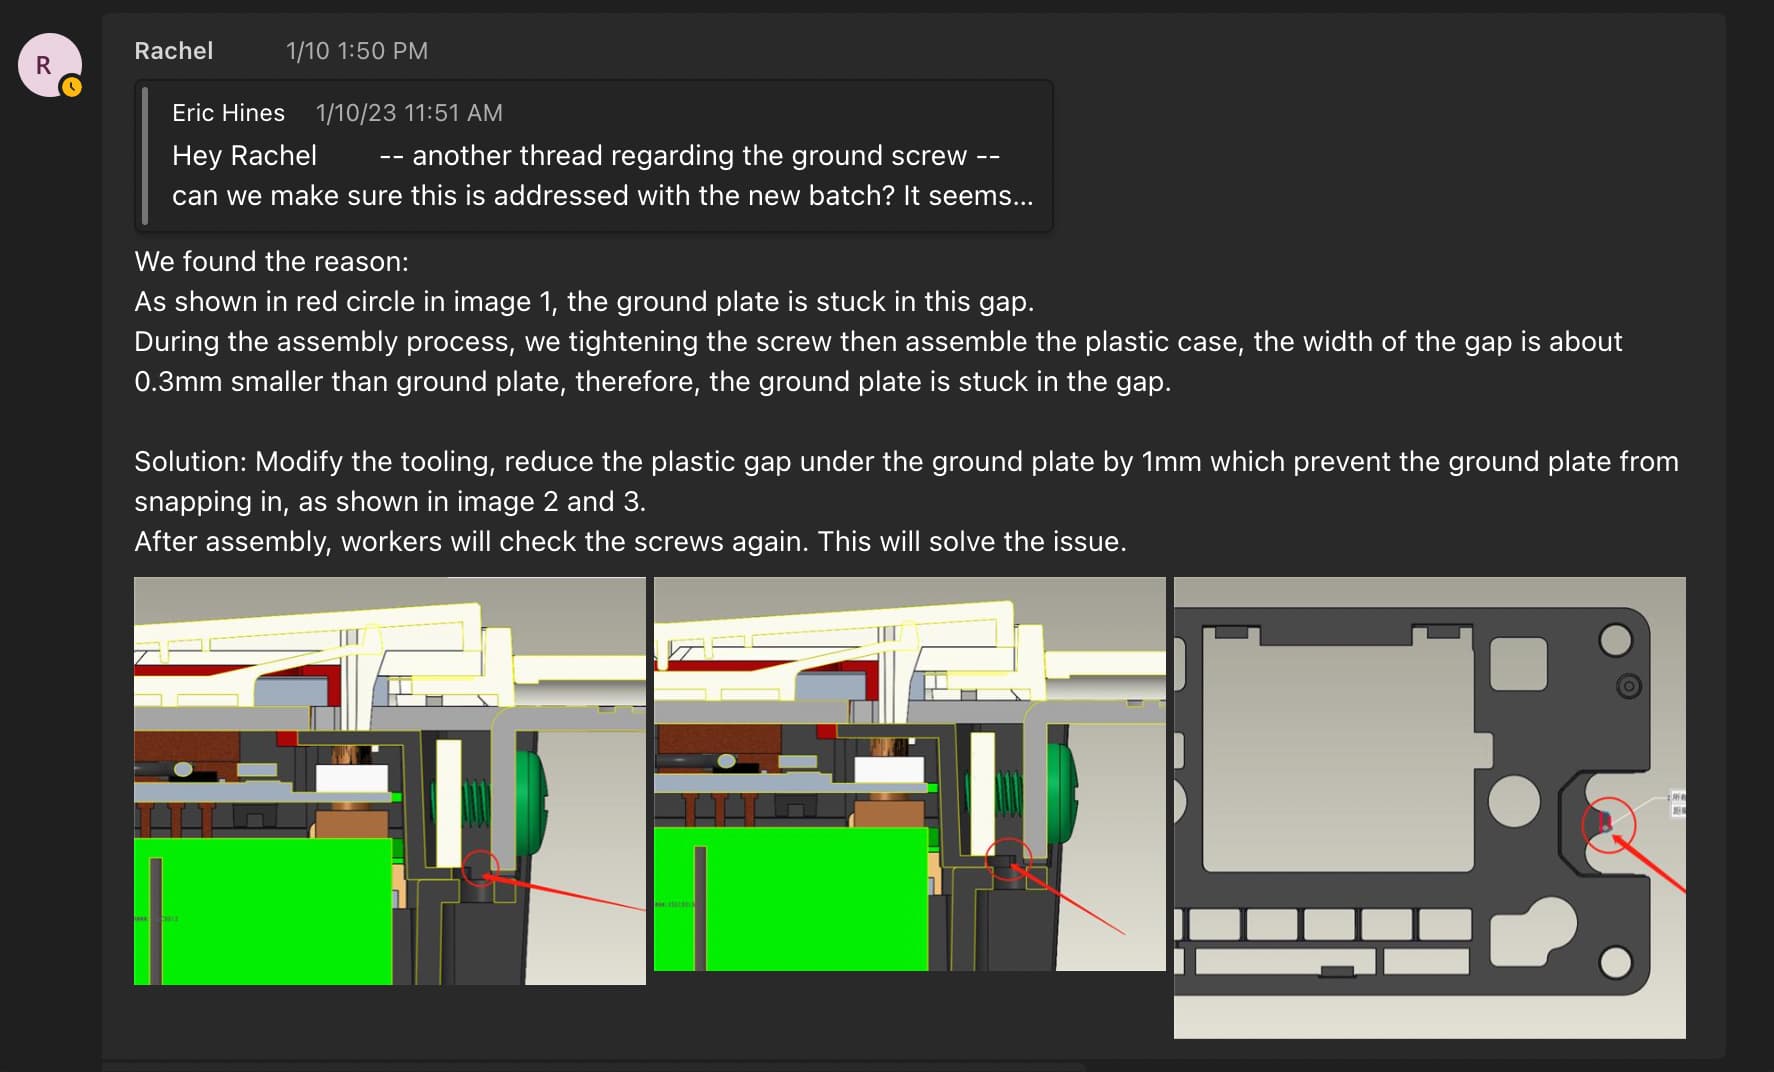
Hey guys, I forgot to share with you that this will be solved on the next batch and I want to thank you all for letting us know about it. Here’s the solution straight from the manufacturer:
11 Likes
This topic was automatically closed 67 days after the last reply. New replies are no longer allowed.