
Hmm. I’m not sure what is going on so I’m just going to step through what I see on mine to see if you’re doing something different.
- New app
- Hamburger menu, SmartApps
- Smart Lighting, then select New Lighting Automation
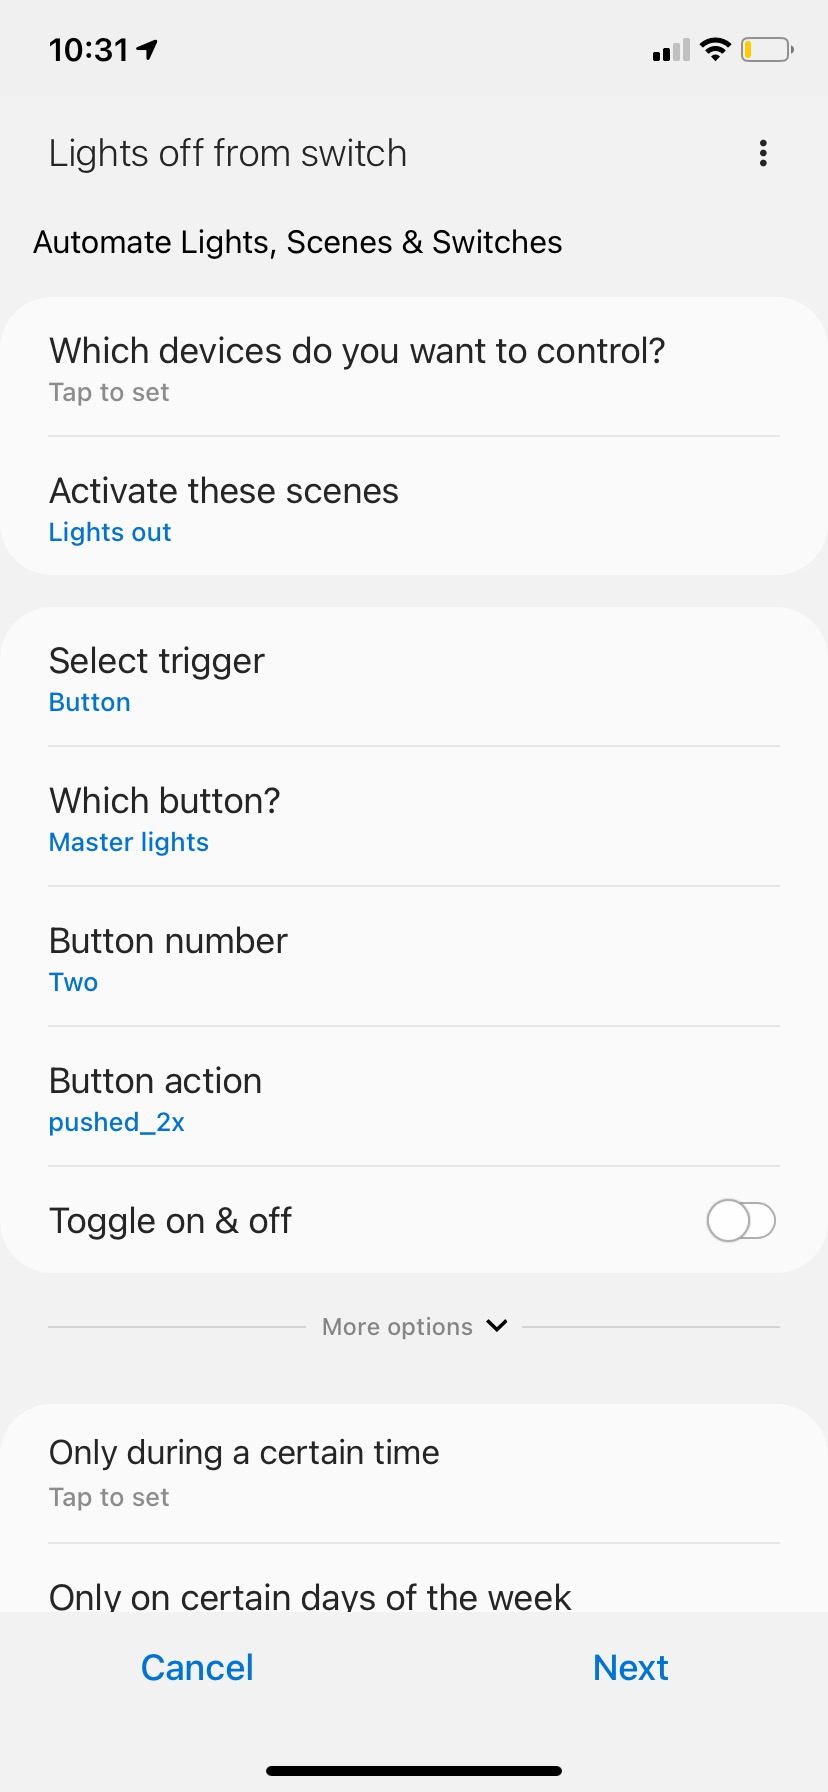
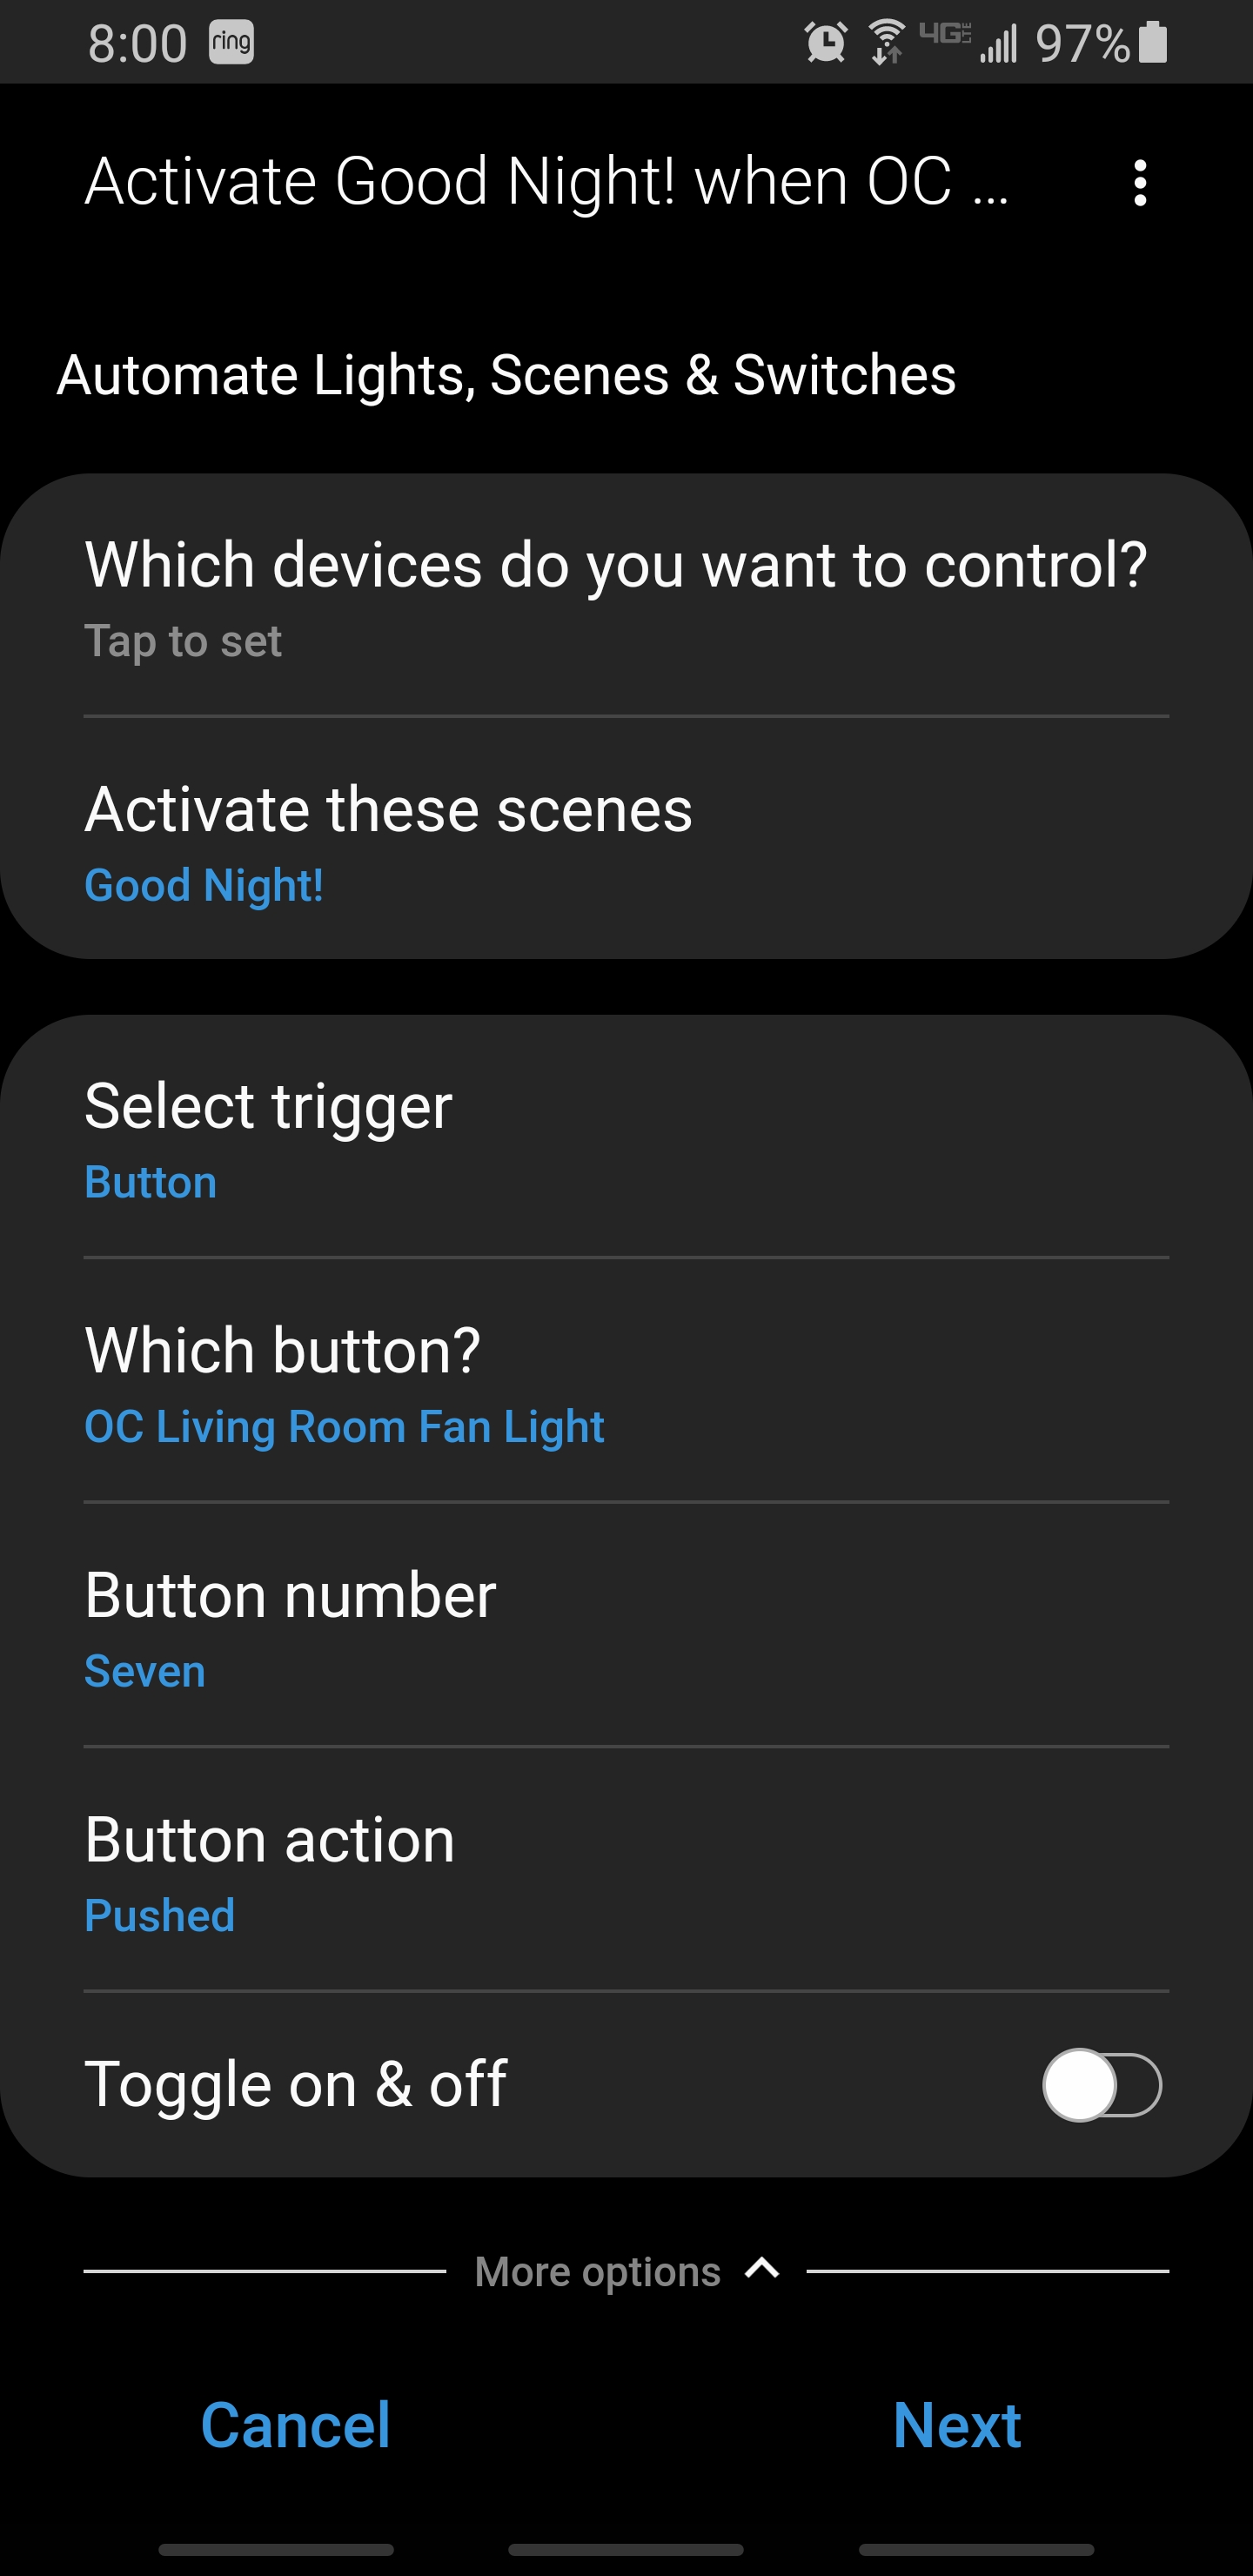
- Activate these scenes: pick your scene
- Select Trigger:Button
- Which Button:pick your switch that is going to control the scene
- Button Number:pick something, One through eight are displayed.
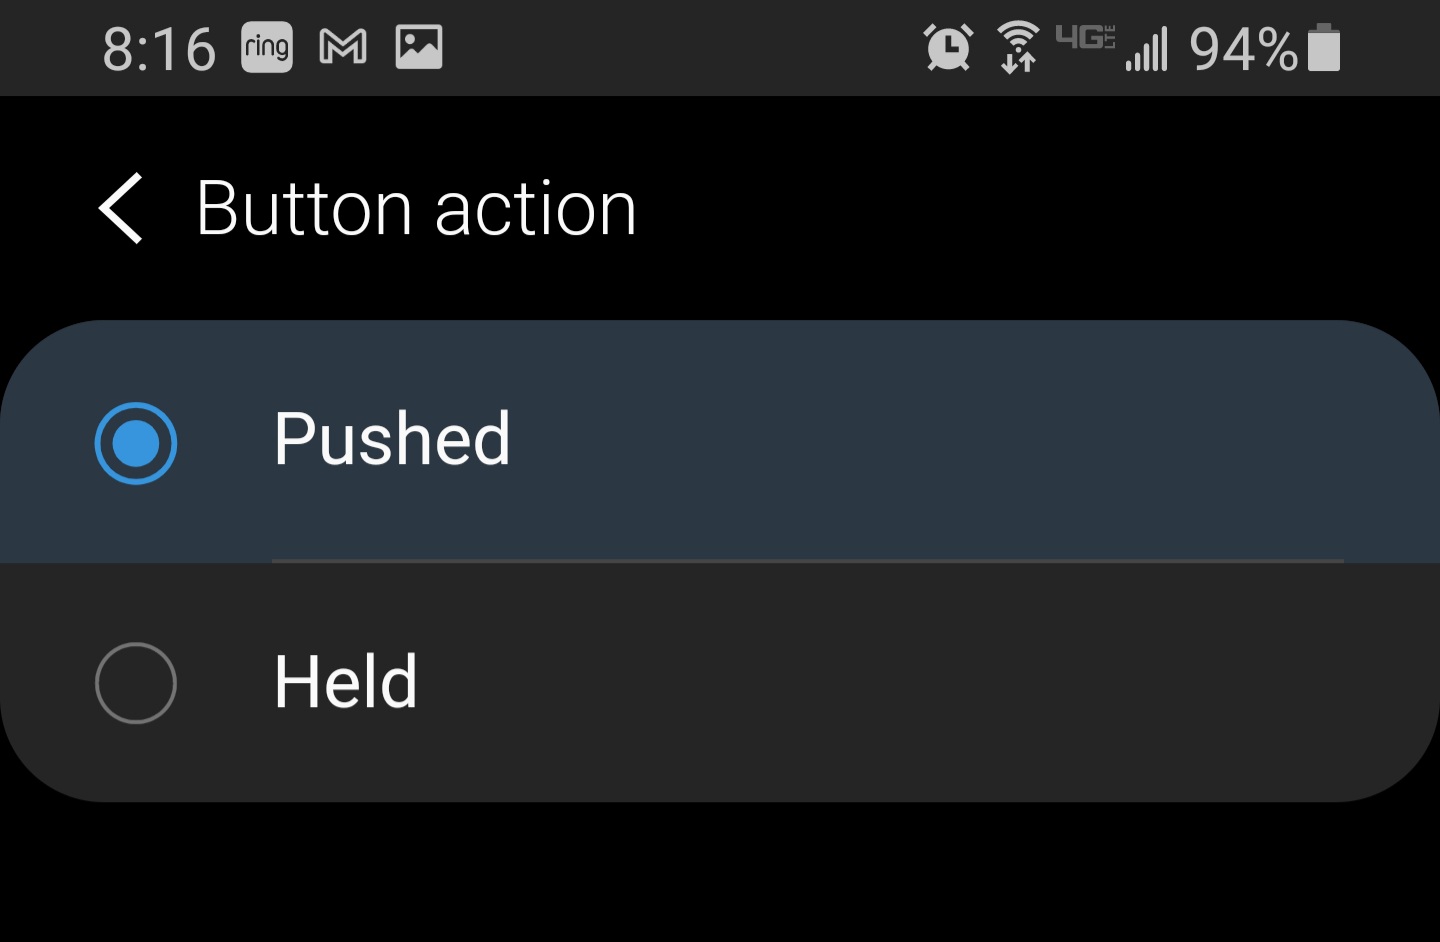
- Button action: Pick either Pushed or Held. (I think this is where you are seeing different options)
- Toggle on & off: Up to you. Probably no for a good night scene
- Done & Done
If for some reason Smart Lighting isn’t working correctly, you can always assign the scene to the switch’s button by using a button controller app. The end result will be the same.
I have 2 Hue bulbs that are controlled currently by a dumb switch, I am replacing that switch with the Inovelli Red Dimmer.
I was thinking that instead of having the bulbs fully powered off/on by the switch, I should have the bulbs always powered (so they are always accessible via Hue app and Home Assistant) and then instead turn them off via Hue bridge when i toggle the switch and control them via Hue instead of power on/off (and dim through Hue especially since Hue dims better via Hue than adjusting voltage like old school dimmable bulbs).
Should I just connect the lights directly to 120v full time? Or should I wire them to the switch as the load? Ive been looking at thee manual that came with the switch and I cant find a setting to disable the load though or more specifically set thee load to always be on.
Ideally I would connect the lights to the load of the Inovelli and set the Inovelli so the switch is always providing 120v on the load output. Then I can grab the events through home assistant from the button presses of the switch and use them in automations to control the bulbs.
thanks
You want to do two things with the bulbs wired to the load:
1 - Set Smart Bulb Mode to On. This will insure that the switch always powers the bulbs at full power. (Dimming is handled by applications, not by varying the voltage to the bulb.)
2 - Set Disable Local Control to On. This will prevent the switch from cutting or dimming power to the bulb directly. You can then trap the paddle presses via however you care to do it to control the bulb programatically.
THanks much, I think i found local control in the manual, I assume its “disable the internal relay”.
However, I cant find anything about smart mode in any of the manuals. Is there documentation for this? thanks
Yes, it is. But when you go into the settings to turn it on, it’s labeled “Disable Local Control”. Disable the internal relay is more of a slang now.
I’m not sure but probably no, other that what is discussed here in the forums. Inovelli is constantly improving their products via firmware releases, but the documentation doesn’t always keep up.
But all you really need to know is that you turn it on in the switch’s settings and it will always power the bulb at the maximum, which is the proper approach for powering a smart bulb. The switch will no longer work like a dimmer.
Thanks Bry, when you say “Settings” do you mean z-wave configuration paramters or settings that need to be programmed via the switch with button presses? I use open z-wave so i am hoping when i pair the switch to openzwave I will see the settings you are talking about in the config params.
I see. I was thinking you were using SmartThings since you posted in the SmartThings forum post. With SmartThings, you can set them through the ST app. But you can also set them directly at the switch. (At least disabling local control. Not sure about Smart Bulb Mode.)
Hopefully someone using Open Z-wave can share some insight.
I restarted from scratch and still getting the same results, even after using your steps. Same when trying to configure different scenes using the display light color. How do I install a button controller? I see things about an ABC app but nowhere to download it.
@bds123123 Please refresh my recollection and there as multiple things going on in this thread. You are trying to run a scene from an Inovelli switch, right?
You have the scene set up and working properly, right? When you go into the Scenes menu you can press on the scene and it works properly, right?
Yes I was. Had issue having pushed/vs held coming up. I also tried just recreating a new scene from scratch and changing which button was pressed and still no go.
Ok, one thing at a time . . .
You have a scene that can you can run manually and it works, right?
Let’s start from scratch as this is a thread for the setup instructions not the scenes. Can you PM me your order info? I just want to verify what you have Red vs Black series.
Can you let me know where you are in the process (ie: do you have the device handler installed, have you tried the Smart Lighting App, etc)? In other words, would you mind letting me know what you’re trying to accomplish?
Hang in there, we’ll figure it out.
Yes I understand. I have the Red series. I have device on SmartThings and it works fine on its own. I both device handlers installed, and tried doing the command through the Smart Lighting App. I already have a “lights out” scene programmed through Alexa, so was trying to make a manual button push just activate that. However I am only seeing “pushed” vs “held” in my options. The pushed command wasn’t responding either when I tested to it, either. Thanks for the response!

I also tried to make a “front door unlocked” example as above too using LED indicator but it didn’t work either.
I also tried to start a whole new scene through the Smart Lighting App to no avail.
Strange that you are getting a different set of button picks. Hopefully @Eric_Inovelli will recognize it once he confirms that they sent you a Red series dimmer.
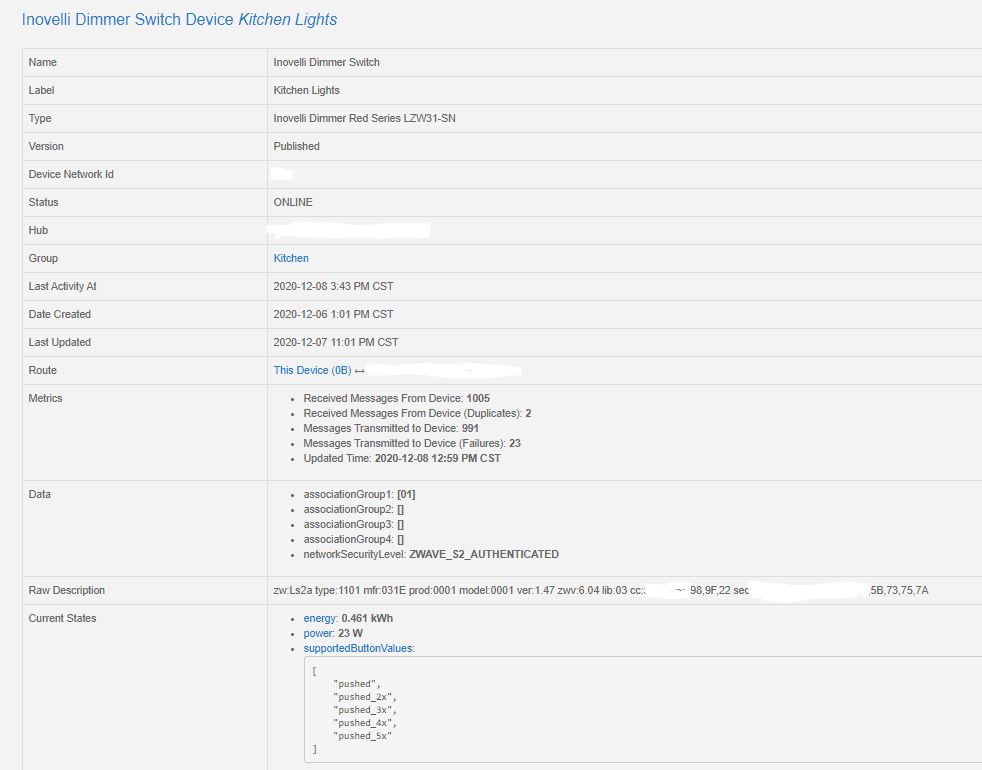
TLDR for Eric - OP says he has a Red dimmer. Loaded the proper DH and provided a screenshot. Trying to use SmartLighting to activate a scene via button. However, when he gets to the “Button action” selection, he doesn’t get “Pushed” or “Held” as selections; instead he gets “pushed_2x” etc.
@bds123123 Here is what it should look like:
Two suggestions:
1 - Open the dimmer’s page in the IDE and select “Edit”. Double-check to make sure the Selected Type is “Inovelli Dimmer Red Series LZW31-SN”.
2 - If #1 is OK, update the DH (the newer one is 2020-11-13). After you update the DH and publish it, remove the dimmer from the hub and then re-add it. Go back into the IDE and double-check as you did in #1.
I’m also seeing this, brand new dimmers installed a couple days ago with date codes from august. Grabbed the device handlers from the link in the instructions. On my red on/off switches, everything looks as expected, with Held/Pushed, but on the dimmers, I’m seeing Pushed, Pushed_2x, Pushed_3x, … as the options.
I double checked, device handler is latest, here is what I see in the smartthings device overview:
UPDATE: Deleting the device from smartthings and re-adding it solved the issue for me.