UPDATE: We’ve included instructions for the New App here: Knowledge Base Redirect – Inovelli
Note: This is a work in progress – I at least wanted to get the initial setup videos up
Hey everyone – I wanted to provide a centralized location that explains how to properly setup your LZW31-SN (Red Series) switches. This thread will be broken down into the following segments:
- Preparing Your Setup (Neutral, Non-Neutral & Limitations)
- Wiring Help (Getting Started, Guides, etc)
- Setting up a Multi-Switch (3-Way, 4-Way, etc)
- SmartThings Setup
- FAQ’s
1. Preparing Your Setup (Neutral/Non-Neutral & Limitations)
First, you’ll need to understand whether or not you have a neutral wire inside your gang-box. Here’s a video that actually is pretty helpful (shoutout to Leviton):

This switch can be used either with or without a neutral wire. However, if you do have a neutral, we strongly advise you use it as there are some trade-offs in performance if you install this switch without a neutral.
If you DO NOT HAVE A NEUTRAL here are the limitations:
- Bypass: You will need to install a bypass if your total load is below 25W
- Energy Monitoring: You will not be able to use the energy monitoring function
- 3-Way or Multi-Switch Installation: You can only install this switch in a multi-switch setup with an auxiliary switch such as GE’s or HomeSeer’s and you will not be able to use another smart switch or dumb (existing) switch.
Once you’ve identified whether or not you have a neutral wire, it’s time to figure out what setup you have (Single-Pole, Multi-Switch Setup).
Single-Pole Setup = 1 Switch controls a Load
Multi-Switch Setup = More than one switch controls a Load
- 3-Way Switch = 2 Switches controls a Load
- 4-Way Switch = 3 Switches controls a Load
- 5-Way Switch = 4 Switches controls a Load
For Multi-Switch Setups, there are various options you can use for installation depending on if you have a neutral wire or not.
- Neutral Wire Setup: You can choose to have either a dumb (existing) switch or an auxiliary switch. You can also choose to install another Inovelli smart switch on the other side, but there are some limitations here and we do not recommend it at this time.
- Non-Neutral Wire Setup: The only option here in a multi-switch setup is to use an auxiliary switch.
Please see FAQ’s below for questions around dumb vs aux switch benefits (in a nutshell, a dumb switch only allows for On/Off at the non-smart switch side, whereas the aux switch provides dimming at the non-smart switch side).
2. Wiring Help
Our official stance on offering help is that we cannot provide specific installation instructions outside of our wiring diagrams as we are not licensed electricians and the liability insurance would be astronomical. That said, there are times when we (along with the community) can provide input that may help. But please know we are not responsible for any damages and please use at your own risk. Our best advice would be to hire an electrician if you’re not sure what you’re doing.
Ok, now that that’s out of the way, let’s walk you through what you’ll need to do to get started.
- Acquire a Multimeter and/or probe
- Identify Your Wiring
- Review the Schematics
Let’s begin:
- Step 1 - Finding the Line (Hot) Wire: Determine where the line is by using your multimeter or probe. To do this, please follow the video below (the video shows a wall outlet, but the logic is similar).
- Step 2: Identify the remaining wires by following the schematics below (coming soon)
- Step 3: Wire up your switch (make sure power is off!) and move to Part 3 if you have a Multi-Switch Setup (if not, you can jump to Part 4).
Identifying the Line (Hot) Wire:
3. Setting up a Multi-Switch (3-Way, 4-Way, etc)
Once you’ve decided what scenario you have (ie: Neutral, Non-Neutral / Aux Switch, Dumb Switch, etc) it’s time to program the switch correctly to let the switch know what scenario it’s in.
In other words, the switches internal computer needs to understand that it’s installed in a Neutral or Non-Neutral setup and also whether or not it’s wired up to an Aux Switch or Dumb Switch.
To do this, you need to configure at the switch via the configuration button. Please follow the videos below for help.
Neutral Setup + Dumb Switch

Neutral Setup + Aux Switch

Non-Neutral Setup + Aux Switch
Once the switch is programmed, it should work manually from either side of the multi-switch setup.
4. SmartThings Setup
Once the switch manually works, it’s time to pair it to SmartThings. There are currently two apps that can be used, which are the Classic App (Android | iOS) or the New App (Android | iOS).
As of January 23, 2020, we still recommend the Classic App as it provides more functionality for our switches, however, we’ve also confirmed that the new app does provide some of the advanced features, so we’ll include directions for both.
There are 5 Steps:
- Pairing to SmartThings
- Installing the Device Handlers
- Understanding the Device Handler Settings
- Setting up Notifications
- Setting up Scenes
SmartThings Classic Setup
1. Pairing to SmartThings
- Restore power to your switch and if wired properly, the LED bar will light up (should flash a series of colors, then turn blue)
- Open up your SmartThings Classic app and click on the, “My Home” tab followed by the, “Things” tab
- Scroll to the bottom and click on, “Add a Thing” or click on the (+) at the top right of the screen
- Press the config button (A) 3x and the LED bar should flash blue (if it doesn’t, try pressing the buttons faster or slower) indicating the switch is in inclusion mode. If successful, the switch LED Bar (B) will turn Green. If unsuccessful, the LED Bar will turn RED.
- You should now see that your device is detected (it should say, “Z-Wave Dimmer Switch” or something similar)
- After your device is detected, press, “Save” (or if you’d like to rename your device, please do so and click, “Save”)
- Once you click, “Save” a pop-up will appear asking you to, “Confirm Paired Devices” — Click, “OK”
- Now, you should be back at the, “My Home” screen and you should be able to see your switch!
- Z-Wave Range Check: Easily check whether or not your switch is within range by holding the Config Button (A) for 5-10 seconds. The LED bar will indicate: RED = Not in Range, or = Within Range GREEN (Good Signal).
Final Thoughts / Tips: If you’re having issues pairing your switch, there’s a couple things you can try. The first one is to hold down the config button for 5 seconds until the LED bar indicates RED or GREEN, where RED = Not in Range, or = Within Range GREEN (Good Signal). If the signal is GREEN, then let’s try an exclusion to reset your switch. Please see below.
SmartThings Exclusion Steps:
- In the SmartThings Classic App, please click on the menu button
- Then click, “Hub is Online”
- Next, click on, “Z-Wave Utilities”
- Followed by, “General Device Exclusion”
- Press, “Remove” and tap the Config button 3x (should pulse BLUE)
- The LED bar should flash GREEN if successful
2. Installing the Device Handlers
In order to take advantage of Notifications and Scene Control, you will have to install two Device Handlers as SmartThings does not have these capabilities built in natively.
Open up IDE on your Computer/Tablet:
- Go to: graph.api.smartthings.com (it’s free)
- Login using the same Username/Password as your SmartThings Phone App
- Click on the green, “Login” button on the top right of the screen and login using the same credentials as your SmartThings Phone App
- Once logged in, click, “My Locations” (top left of the screen) — you should see your HUB’s location there
- Click on your HUB’s location underneath where it says, “Name”
- You may be prompted to login again — if so, please do
Now We’re Going to Install the LZW31-SN Device Handler
- While still in IDE, click on, “My Device Handlers” located at the top/middle of your screen
- Click the green button labeled, “Create New Device Handler”
- Then click, “From Code”
- Copy the code from the following URL: Inovelli Red Series Dimmer Switch DTH
- After the code is copied (above), paste it in the, “From Code” section (white space)
- Then click, “Create”
- Next click, “Publish”
- Finally, click, “For Me”
Finally, Now That the Device Handler is Installed, We Need to Apply it to the Switch
- While still in IDE, click on, “My Devices”
- Find your Inovelli Switch and click on it
- Scroll to the bottom and click, “Edit”
- Locate the drop-down menu titled, “Type” and click on it to see a list of device handlers
- Find the handler we just installed which is called, “Inovelli Dimmer Switch Red Series” (it will probably be at the bottom) and select it
- Finally, click, “Update” and you should be all set!
To confirm you have the handler installed, please open your SmartThings app, locate your Inovelli switch and click on it. You should see the following:
Open up IDE on your Computer/Tablet:
- Go to: graph.api.smartthings.com (it’s free)
- Login using the same Username/Password as your SmartThings Phone App
- Click on the green, “Login” button on the top right of the screen and login using the same credentials as your SmartThings Phone App
- Once logged in, click, “My Locations” (top left of the screen) — you should see your HUB’s location there
- Click on your HUB’s location underneath where it says, “Name”
- You may be prompted to login again — if so, please do
Now We’re Going to Install the Second Device Handler
- While still in IDE, click on, “My Device Handlers” located at the top/middle of your screen
- Click the green button labeled, “Create New Device Handler”
- Then click, “From Code”
- Copy the code from the following URL: Inovelli Switch Child Device DTH
- After the code is copied (above), paste it in the, “From Code” section (white space)
- Then click, “Create” (No need to Publish this one)
3. Understanding Device Handler Settings
Now let’s get to know the various settings built into the device handler. It’s a pretty powerful switch! After you’ve selected the switch on the, “My Home” menu, click on the gear icon at the top right (circled in red) of the screen to access the settings:
Let’s go through each of the settings one by one. Default settings are highlighted in Red .
Dimming Speed: How fast or slow the light turns on when you remotely dim the switch
Dimming Speed (From Switch): How fast or slow the light turns on when you manually hold the switch up or down
Ramp Rate: How fast or slow the light turns on/off when you remotely turn on or off the light
Ramp Rate (From Switch): How fast or slow the light turns on/off when you turn on or off the light manually
Minimum Level: The minimum level that the switch can be set at (ie: this is great if your bulb flickers at 10% — you can set the minimum level to be 11% to avoid flickering)
Maximum Level: The maximum level that the switch can be set at
Invert Switch: Honestly, I’m not sure why you’d want to use this, but we threw it in there for fun. Mess with your spouse, friends, etc.
- Yes = Inverts switch (Up = Off, Down = On)
- No = Does not invert switch
Auto Off Timer: This will shut off the switch after a certain amount of time.
- 0 = Disabled
- 1 – 32,767 Seconds = Enter in a value from 1 – 32,767 seconds
Default Level (Local): This is the default level you can have your switch turn on when you press the paddle on
Default Level (Z-Wave): This is the default level you can have your switch turn on when you turn the switch on remotely
State After Power Restored: If there is a power outage, you can select what you’d like your switch to default to when the power is restored.
- Previous = Switch returns to the previous state (ie: if the switch was off, it will return off)
- On = Switch will turn on (even if it was off prior) to a certain level
- Off = Switch will turn off (even if it was on prior)
LED Strip Color: Change the color of the LED Strip (bottom right of the switch)
- Choose from the default values which are: Red, Orange, Yellow, Green, Cyan, Blue , Violet, and Pink
LED Strip Intensity: Change the intensity level of the LED Strip (when switch load is turned on)
- NOTE: By default the LED Strip turns on when the load is turned on. If you’d like the LED Strip to be off when the load is on, set the intensity to 0%
LED Strip Intensity (When Switch is Off): Change the intensity level of the LED Strip (when switch load is turned off)
- NOTE: By default the LED Strip turns off when the load is turned off. If you’d like the LED Strip to be on when the load is off, set the intensity to anything above 0%.
Active Power Reports: A power level report will be sent based on a percentage level over the last report. For example, if you want a report sent when new power consumption is x% higher than the last report.
Periodic Power & Energy Reports: Choose a time period between when reports of energy and power are sent. Default is 6 minutes, but you can choose anywhere from 1 – 32767 seconds (NOTE: the more reports, the more congested your network can become).
Energy Reports: An energy level report will be sent based on a percentage level over the last report. For example, if you want a report sent when new energy consumption is x% higher than the last report.
AC Power Type: Select whether your house is wired with or without a neutral (by default, the switch is programmed to assume you have a neutral wire)
Switch Type: Select what type of secondary switch (non-smart) you’re using in your 3-Way (or multi-switch) setup.
- Load Only = This is the default and it assumes your switch is wired in a single-pole setting
- 3-Way Toggle = This is if you’re using a dumb switch
- 3-Way Momentary = This is if you’re using an auxiliary (or add-on) switch by GE or HomeSeer
Notifications: This is where you’ll set the notification type (color, intensity, duration, and animation). PLEASE NOTE: You must install the Child Switch Handler in Step 2 for this to work properly.
- Effect Color: Choose from the default colors
- Effect Level: This is the intensity (ie: how bright) the notification will be
- Effect Duration: How long you’d like the notification to last (double-tap to clear it)
- Effect Type: Here’s where you can choose what animation you’d like the notification to have
4. Setting up Notifications
With notifications, the sky’s the limit in what you can do. In this example, I’m going to set up a notification that alerts me when a door is unlocked between the hours of 10pm and 8am.
REMEMBER: you need to install both device handlers in Step 2 (above dropdown menu) for this to work.
SELECTING YOUR NOTIFICATION
- From the, “My Home” tab, click on your Inovelli switch
- Then, click on the gear icon at the top right of the screen to access the settings for the switch
- Scroll to the bottom where it says, “LED Notifications”
- Select your desired effect, level, duration and effect type under, “Notification 1”
- Click, “Save”
- If you’ve installed the Child Switch Handler properly, you will now see, “Notification 1” on the screen as highlighted below — turn it on to see how it looks on the switch
- Once you’re satisfied with the way the notification looks, we’ll setup the actual notification
SETTING UP THE NOTIFICATION
- Go back to the, “My Home” tab where all your devices show up and click on, “Marketplace”
- Then, click on, “SmartApps”, followed by, “SmartThings Recommends”
- Finally, click on, “Smart Lights”
- Under, “Which devices do you want to control”, we’ll search for the Child Device we just created (it will be called, “WHATEVER YOU NAMED YOUR SWITCH – Notification 1”) — in my case, since I named the switch, “Inovelli Switch – Red Series”, the Child Device will be called, “Inovelli Switch – Red Series (Notification 1)”.
- Click on the Child Device and click, “Done”
- Under, “What do you want to do”, select, “Turn On” (this will turn the notification on when triggered)
- Click on, “Select Trigger” and since I want to have the notification go off when my door unlocks, I’m going to select, “Lock”
- Click on, “Which Locks” and select your lock
- Next, click on, “Turn on when” and select, “Unlocked”
- Finally, since I only wanted to be notified during certain times, I’m going to select, “Only during a certain time” and select the times
- Click, “Save” and you’re done!
5. Setting up Scenes
With the device handlers installed, let’s set up some scenes! Before we do so, let’s go over a few basics so you can understand the logic behind how to properly map your scenes.
The way SmartThings works is that it recognizes this switch as a button controller and each button can be broken down into two separate buttons (scenes).
This switch is broken down as follows:
- The paddle has 5 buttons (Buttons 1-5)
- The config / favorites button is also considered a button (Button 6)
Buttons 1-5 are split into two scenes (Pushed and Held). Those words have no meaning in that you’re not pushing or holding — it’s just what they’re called.
IMPORTANT: Always remember that when you tap UP, it equals PUSHED and when you tap DOWN = HELD.
Here’s the correct mapping for reference:
- Tap UP 1x = Button 1 PUSHED
- Tap DOWN 1x = Button 1 HELD
- Tap UP 2x = Button 2 PUSHED
- Tap DOWN 2x = Button 2 HELD
- Tap UP 3x = Button 3 PUSHED
- Tap DOWN 3x = Button 3 HELD
- Tap UP 4x = Button 4 PUSHED
- Tap DOWN 4x = Button 4 HELD
- Tap UP 5x = Button 5 PUSHED
- Tap DOWN 5x = Button 5 HELD
- Tap the Config/Favorite Button 1x = Button 6 PUSHED
Now that we have a background, let’s configure our first scene. In this example, I’d like to turn off all lights in the house via a double tap down.
- From the, “My Home” screen, click on, “Marketplace” and then, “SmartApps”
- Then click on, “SmartThings Recommends”
- Next, click, “Smart Lights”
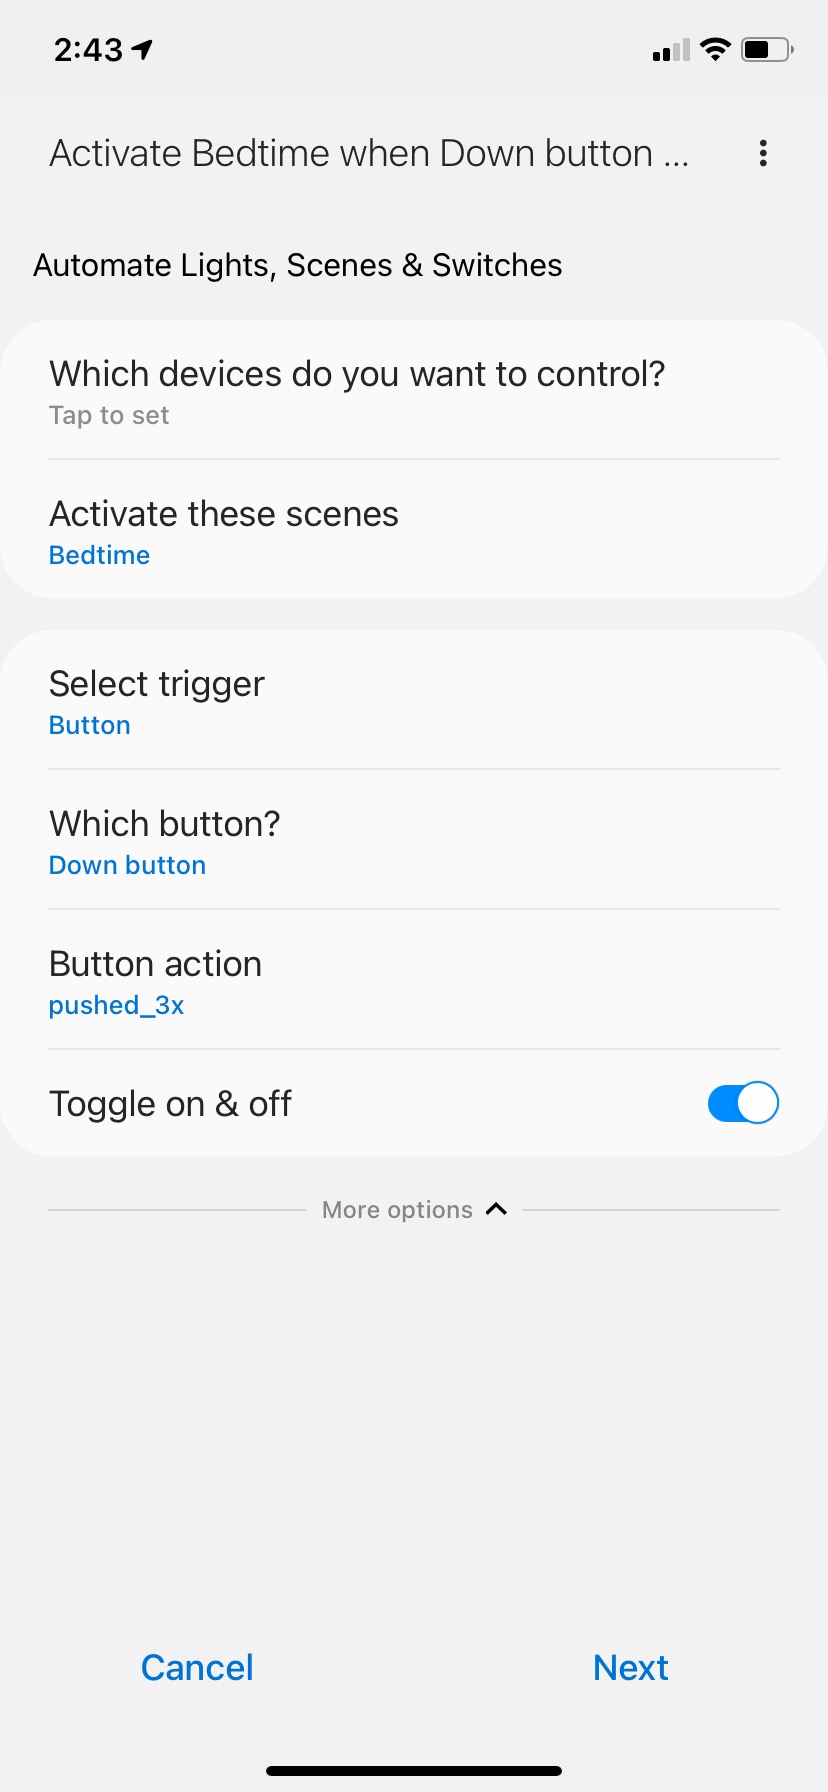
- Click on, “Which devices do you want to control?” and select all the lights you want to turn off and click, “Done”
- Next, click on, “What do you want to do?” and select, “Turn Off”
- Next, click on, “Select Trigger” and select, “Button”
- Click on, “Which Button?” and select the Inovelli Red Series Switch you just installed
- Where it says, “Button Number” since I want the scene to execute when I DOUBLE TAP down, I would select, “Button Number” and select, “Two”
- Again, since it’s a double tap DOWN , I would select, “Button Action” and select, “ HELD ” (if it was double tap UP, you’d select PUSHED)
- Deselect, “Toggle on & off” (unless you want to turn all your lights on from the same button tap sequence)
- If you’d like this button to only execute during certain times, you can click the, “More Options” and put your times in — otherwise, just click, “Next” and, “Save”
That’s it! If you want a more advanced option, consider downloading and installing the ABC SmartApp, which gives you the ability to lock doors and many other options.