Power Reporting Is Now Inaccurate

That is correct in my experience. And this PLAGUED my home of over 20 switches.

Same in my experience. I think something in one of the previous beta firmware updates caused it. I have not seen it since applying “the fix”.

Any details on the actual issue or fix?

Will we be able to apply this in zwave2mqtt as a firmware update? Any idea on when available?

Looks like there are other(s?) looking for it in Home Assistant. For me though, if the Hubitat fix becomes available first, I’ll gladly move my switches over to apply the fix (and then move them back).

If there’s anything I an do though to help test the Home Assistant aspect, let me know; I’m running Z-Wave JS to MQTT.

Here is the driver for Hubitat users. I tested this with the latest firmware (1.61 / 1.45), but I believe the functionality of this fix was implemented in an earlier version (1.57 / 1.45?). If you have any issues please check which versions you are at.

The process is as follows:

  1. Install the driver and temporarily apply it to the device.
  2. Estimate the maximum load connected to the dimmer by reading the wattage of the attached bulbs and adding them together. You can also set the dimmer to 100% and use something like a kill-o-watt to read what the load actually is, but this will require more work. An estimate will likely be good enough for most.
  3. Open the Log on Hubitat to capture any information for troubleshooting.
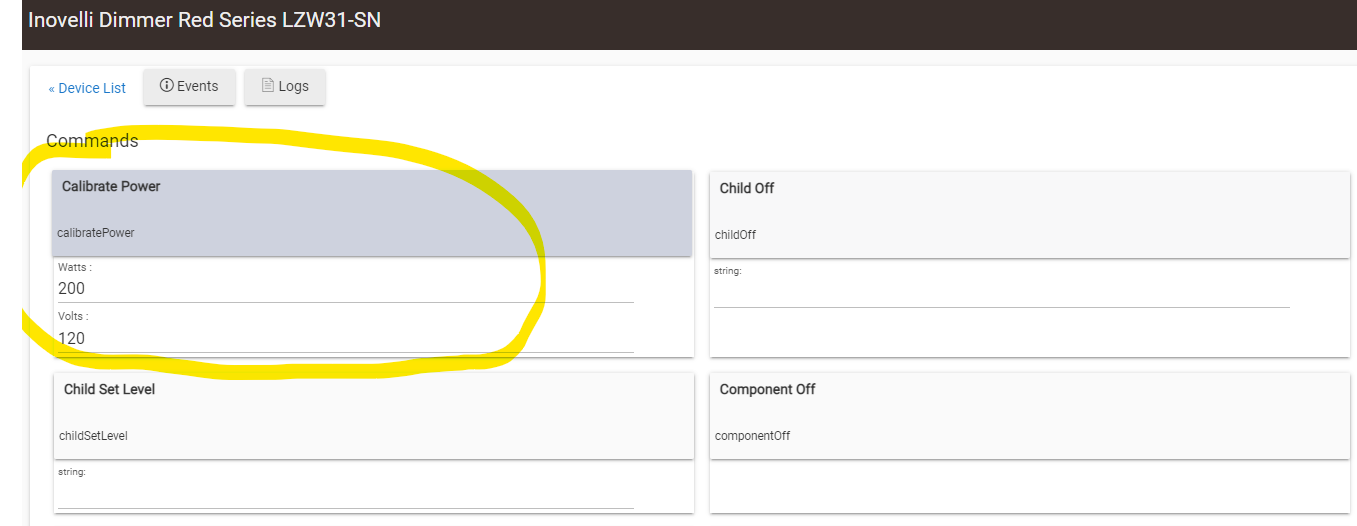
  4. Put the wattage measurement and the voltage of the circuit (Typically ~120 in the US) into the device via Hubitat.
  5. Make sure the load is attached and then hit the “Calibrate Power” button.

The dimmer will then set the load to 100% and set the calibration values that you have specified.

If there are any issues please respond with the logs that were recorded. Also, please make sure you set the driver back to the normal one afterwards so that the calibration isn’t accidentally changed.

1 Like

@bgreet @Stephen

Anyone know if you can send raw data via zwave2mqtt? You have to be at a certain firmware level as mentioned in my post above, but you then need to send these custom values to the device (Example code from Hubitat driver):

This will read the current calibration value:
“70FEFEFD03”

This will set the calibration value:
“70FEFEFD01${wattage}${voltage}”

wattage and voltage are supposed to be in hex format of course. So if the wattage is 300 and the voltage is 110, then the command would be as follows:

wattage = 300 = 01 2C
voltage = 110 = 00 6E

Complete command would be:
“70FEFEFD01012C006E”

Assuming you meant zwavejs2mqtt, it can call two driver functions for sending “raw” data, sendMessage and sendCommand. The first is to send custom controller commands, while the second is for custom node commands (Command Class).

Which one to use would depend on what the “raw data” actually is. Can you explain the other bytes in anymore detail? Is it an invalid Configuration CC (0x70) command (0xFE), or something else?

Yes, it is an invalid CC command that needs to be sent to the device.

I’m no Javascript expert, but here’s the Driver function code I came up with:

const { CommandClass } = this.require("zwave-js");

async function calibratePower(nodeId, watts, volts = 110) {
	delay = (milliseconds) => {
		return new Promise((resolve) => setTimeout(resolve, milliseconds));
	};

	const wattage = watts.toString(16).toUpperCase().padStart(4, "0");
	const voltage = volts.toString(16).toUpperCase().padStart(4, "0");

	const setCC = new CommandClass(driver, {
		nodeId: nodeId,
		ccId: 0x70,
		ccCommand: 0xfe,
		payload: Buffer.from(`FEFD01${wattage}${voltage}`, "hex"),
	});
	console.log(
		`set payload = ${setCC.serialize().toString("hex").toUpperCase()}`,
	);

	await driver.sendCommand(setCC);

	await delay(5000);

	const getCC = new CommandClass(driver, {
		nodeId: nodeId,
		ccId: 0x70,
		ccCommand: 0xfe,
		payload: Buffer.from("FEFD03", "hex"),
	});
	console.log(
		`get payload = ${getCC.serialize().toString("hex").toUpperCase()}`,
	);

	await driver.sendCommand(getCC);
}

await calibratePower(9, 300, 110);

In that example, I’m using node 9, watts 300 and volts 110.

To execute the actions, in the zwavejs2mqtt UI, go to Action → Advanced Actions → Driver function WRITE, and copy and paste the code above. Be sure to replace the parameters with your values. Click SEND when ready. You can monitor the z2m console logs, as well as the driver debug logs.

I don’t have an actual device to test with, so I just tried it with a device on my test network. The payloads look OK (to me), and the driver sends the data as expected. Of course my device does not respond with anything.

Here is the output from the zwavejs2mqtt docker console (with some output removed):

z2m  | 2022-08-06T17:31:13.642914674Z 2022-08-06 10:31:13.641 DEBUG SOCKET: Event ZWAVE_API emitted to sfSMU90N0ehBU2LkAAAC
z2m  | 2022-08-06T17:31:13.644145064Z 2022-08-06 10:31:13.643 INFO ZWAVE: Calling api driverFunction with args: [
<... snip ...>
z2m  | 2022-08-06T17:31:13.645156077Z     'await calibratePower(9, 300, 110);',
z2m  | 2022-08-06T17:31:13.645194180Z ]
z2m  | 2022-08-06T17:31:13.646682362Z set payload = 70FEFEFD01012C006E
z2m  | 2022-08-06T17:31:19.909381426Z get payload = 70FEFEFD03
z2m  | 2022-08-06T17:31:21.174043786Z 2022-08-06 10:31:21.173 INFO ZWAVE: Success zwave api call driverFunction undefined

The CC payload strings look the same as the example above, please double check.

Here is the driver output in my test case.

Set:

2022-08-06T17:31:13.658Z SERIAL » 0x011500a901090970fefefd01012c006e25000000000ca4                    (23 bytes)
2022-08-06T17:31:13.659Z DRIVER » [Node 009] [REQ] [SendDataBridge]
                                  │ source node id:   1
                                  │ transmit options: 0x25
                                  │ callback id:      12
                                  └─[Configuration CC (not implemented)]
                                      command: 0xfe
                                      payload: 0xfefd01012c006e
2022-08-06T17:31:13.666Z SERIAL « [ACK]                                                                   (0x06)
2022-08-06T17:31:13.668Z SERIAL « 0x010401a90152                                                       (6 bytes)
2022-08-06T17:31:13.669Z SERIAL » [ACK]                                                                   (0x06)
2022-08-06T17:31:13.671Z DRIVER « [RES] [SendDataBridge]
                                    was sent: true
2022-08-06T17:31:14.893Z SERIAL « 0x011d00a90c00007800ae7f7f7f7f01010300000000420100007f7f7f7f7fae    (31 bytes)
2022-08-06T17:31:14.895Z SERIAL » [ACK]                                                                   (0x06)
2022-08-06T17:31:14.896Z DRIVER « [REQ] [SendDataBridge]
                                    callback id:            12
                                    transmit status:        OK, took 1200 ms
                                    routing attempts:       1
                                    protocol & route speed: Z-Wave, 40 kbit/s
                                    ACK RSSI:               -82 dBm
                                    ACK channel no.:        1
                                    TX channel no.:         1
                                    beam:                   1000 ms

The Z-Wave JS logging shows the payload, which excludes the CC (0x70) and the command (0xfe). You can also see in the first line the raw Z-Wave command, with the entire payload embedded (bolded and separated with |): 0x011500a9010909|70fefefd01012c006e|25000000000ca4.

Get:

2022-08-06T17:31:19.921Z SERIAL » 0x011100a901090570fefefd0325000000000dec                            (19 bytes)
2022-08-06T17:31:19.922Z DRIVER » [Node 009] [REQ] [SendDataBridge]
                                  │ source node id:   1
                                  │ transmit options: 0x25
                                  │ callback id:      13
                                  └─[Configuration CC (not implemented)]
                                      command: 0xfe
                                      payload: 0xfefd03
2022-08-06T17:31:19.928Z SERIAL « [ACK]                                                                   (0x06)
2022-08-06T17:31:19.931Z SERIAL « 0x010401a90152                                                       (6 bytes)
2022-08-06T17:31:19.932Z SERIAL » [ACK]                                                                   (0x06)
2022-08-06T17:31:19.934Z DRIVER « [RES] [SendDataBridge]
                                    was sent: true
2022-08-06T17:31:21.146Z SERIAL « 0x011d00a90d00007700bb7f7f7f7f01010300000000420100007f7f7f7f7fb5    (31 bytes)
2022-08-06T17:31:21.148Z SERIAL » [ACK]                                                                   (0x06)
2022-08-06T17:31:21.149Z DRIVER « [REQ] [SendDataBridge]
                                    callback id:            13
                                    transmit status:        OK, took 1190 ms
                                    routing attempts:       1
                                    protocol & route speed: Z-Wave, 40 kbit/s
                                    ACK RSSI:               -69 dBm
                                    ACK channel no.:        1
                                    TX channel no.:         1
                                    beam:                   1000 ms

Raw Z-Wave command: 0x011100a9010905|70fefefd03|25000000000dec.

Of course, my device doesn’t send a response for this read command, so all I got was an ACK. I’m not really sure what Z-Wave JS will log. Since it doesn’t know the response format, it may just drop it. If the device is unencrypted, you can parse the response from the SERIAL log line.

Hope that works. Note that this is only possible with zwavejs2mqtt. The HA official add-on does not support this driver API.

:warning: Of course, as a disclaimer I am providing this code as-is and take no responsibility or liability. Use at your own risk.

2 Likes

Nice, looks like it is working for me. In this example the node id was 69. Got confirmation that it was working by the load turning on after sending the command and seeing the correct power reports afterwards.

I don’t see the return data in the logs so it looks like it is being discarded, but the function is working.

1 Like

Thanks for this! Worked in Home Assistant for me.

1 Like

I’m not sure if it’s coincidental, but I’m noticing a flicker on all three of my switches since applying this. It seems intermittent, but regular. Two switches are in one room, the third is in another. The two rooms are on different breakers. I really don’t remember seeing this before. Anyone else see anything like this?

I haven’t heard reports of this. It may be worth a try to do a factory reset on one them to see if it makes a difference. I think most users that have done this fix have excluded / included (since they have done it with PC Controller). So that would trigger a reset. That is the only difference I can think of.

I have not/did not.

Installed this and tested. Power reporting seems high, but definitely works again. Much appreciated!

1 Like

I have an LZW30-SN on/off that doesn’t report power consumption (watts reading is always 0). Would this be expected to work for the on/off switch too (firmware v1.22), or only the dimmer?

(Using Home Assistant with zwavejs2mqtt.)

Just a note, you should be sending the calibrating command modified to the value of a known load. The above example I think was 200W, which is what the factory tests to. You need to send it the calibration value you want (for example, 28W @ 121V or something).

2 Likes

I actually measured the connected load at 16.8w which is very close to the rated 16.5w. When I enter these numbers in it shows 19w connected.

I imagine this has something to do with how small the load is.

I actually have not heard of this problem being on the LZW30-SN. You can test out the HA fix, but I am not sure it will work.