Sooooo… Got my new switch, got it wired up correctly thanks to the excellent documentation. However, everything else on the configuration side just isn’t there yet, which is really frustrating. Hubitat driver’s on inovelli website weren’t there… Although i eventually found them on the github page. And all of the shortened links in the manual are broken. Ok, no big deal, figured I’d just find the manual on the product page. Nope. States it’s coming soon. Looks like this new version handles notification lights and button presses completely different from the inovelli gen2 red series switches. When can we expect to get documentation for this? Specifically for notification lights and button multi taps in Hubitat c7. Super excited…i love my innovelli switches… And this new one has amazing parameters I’ve never seen before which I’m super excited to dig into. Just wish i didn’t have to come post here to find a full copy of the documentation. Maybe it’s hiding somewhere in plain sight and i just can’t find it?
Hey sorry for the documentation, I had an, “oh crap, the documentation” moment late last week and realized I hadn’t done it yet for the Red Series.
We should have most of it up now. I double checked all the short-links for Hubitat, and they appear to be working, so I’m not sure when you tried it, but they should be working now.
This page should have most of the answers you’re looking for: Knowledge Base Redirect – Inovelli
Animated Notifications can be found on the same page: Knowledge Base Redirect – Inovelli
Parameter Explanations can be found here: Red Series 2-1 Switch • Parameters | Inovelli Help Center (it likely wasn’t short-linked when you scanned it as I just updated it yesterday)
I’ll work on the Scene Control documentation today, but it will also be on that main page under the scene control section.
If there’s anything else you’re looking for specifically, let me know and again, sorry for the poor documentation.
Thanks for the quick response Eric. Hope my message didn’t come off too snarky. I was up late last night installing the switch hoping to have it all configured for greater WAF in the morning when she woke up. i read through the documentation that you just linked to. Three things…
First, the section on Scene Control references a “video below” and “written instructions below”. I’m not seeing either. I’m trying to use a button 7 pressed trigger (configure button), but nothing is happening. I’m guessing maybe buttons are mapped differently on this new switch and button 7 is no longer the config button?
Second, I really liked the way notifications worked w/ the 700 series red switches… super simple… configure the notification once and any scene could activate that animation. I’m assuming you went away from this method because you were limited to just a handful of notification animations per switch. New method seems a bit more complicated, although admittedly, I haven’t tried installing and fooling around with the LED mini dashboard app yet, so maybe that’s really easy? I did see on their github that they added support for this switch 4 days ago.
Third, I also liked how I could have a child device for the normal switch color. I had all of my switches grouped together, and I could set the color once from a dashboard for all of the devices. Really slick… made it simple to change it up on the holidays, and the kids loved doing it from their tablet. I’m not so sure I’ll be able replicate this… and I defiintely can’t see how to do this so that i could control the color of the 700 series switches and the 800 series switches from one dashboard.
Thanks for being so active in the forums Eric.
The LED Mini Dashboard app is awesome, easy to use, and works great. I don’t have any of the new Reds, but it’s been a big win with my Blues.
Nah it’s all good – I didn’t take it that way.
Whoops, that was a copy/paste from the SmartThings page that I didn’t delete. I will update it this afternoon.
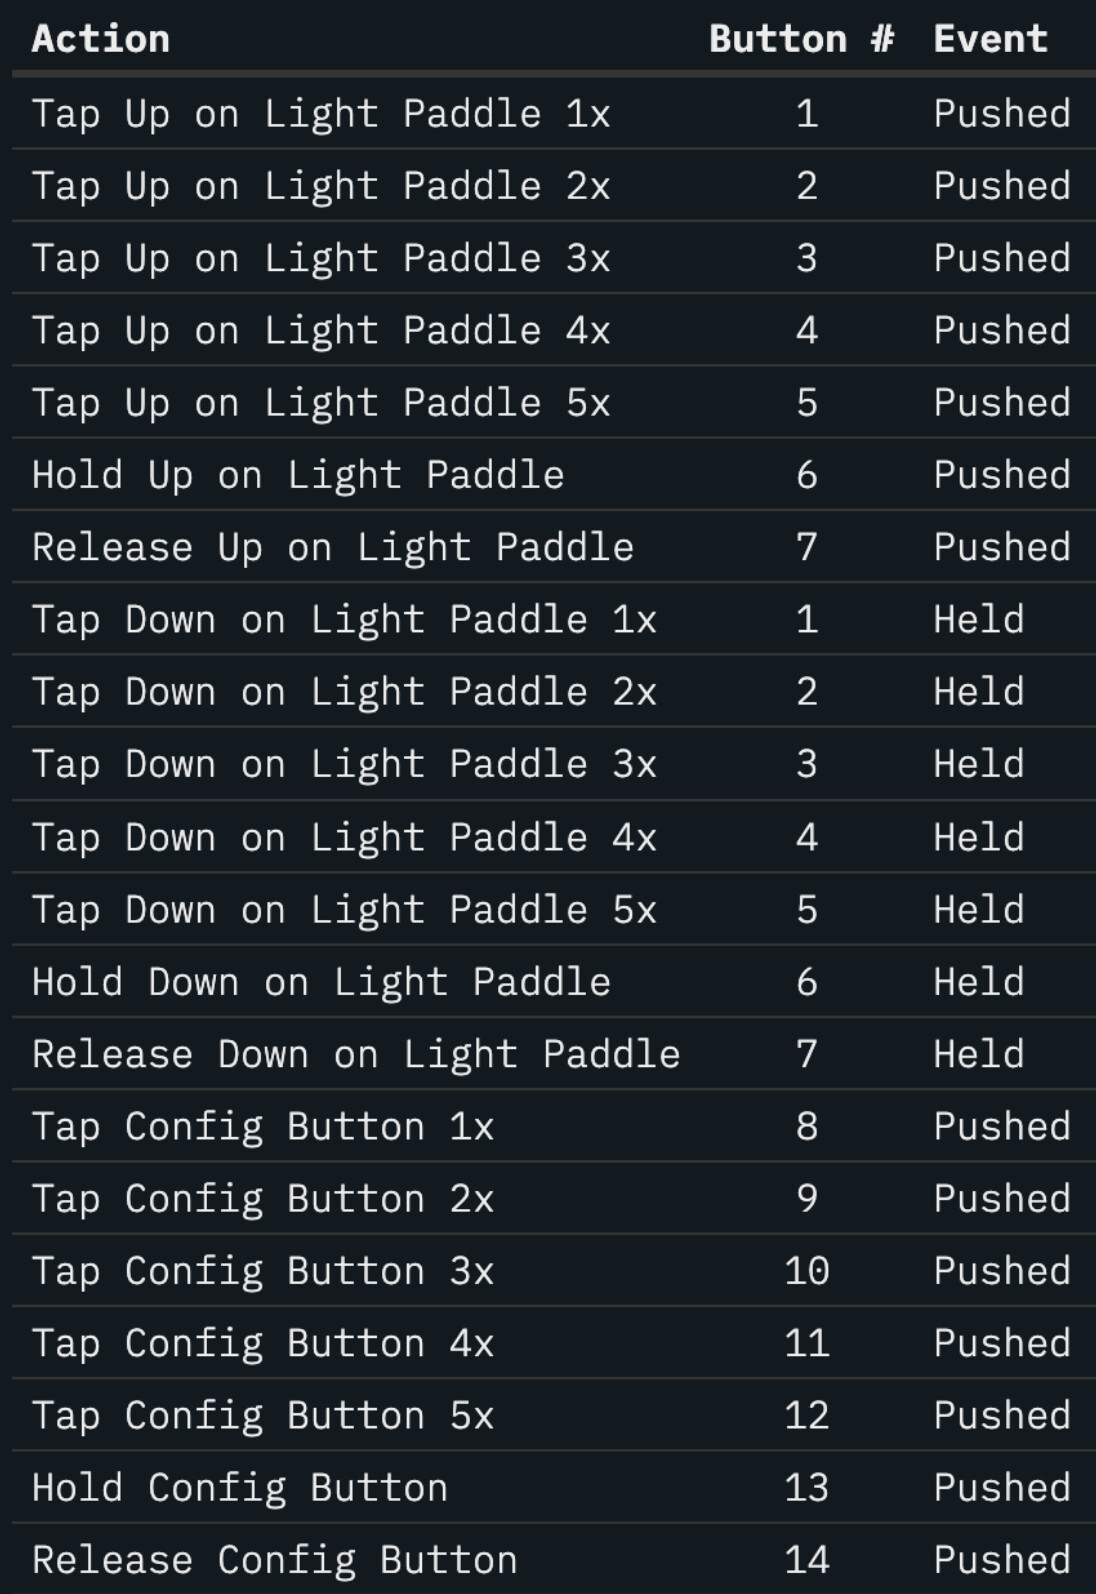
Let me check on the button mapping. I thought it was the same, but now that I think about it, I think it’s different because you can do up to 7 different scenes on the config button (tap 1-5, hold down, release).
Here is the updated button mapping. I’m going to make it more user friendly, but figured I’d at least share it in the meantime:
Yeah it should be really easy with the LED Mini Dashboard. The author was super quick to implement support for the Red Series (same day I reached out to him). I’m going to draft up instructions this afternoon as well.
I’m not that familiar with Hubitat and what you mean by everything being simple, can you elaborate a bit more?
Let me play around with this one.
@EricM_Inovelli – do you know an easy way to do this?
Yeah no problem – wish I was more familiar with Hubitat ![]() – but I’m happy to learn. Hopefully we can get the documentation in a good place. Definitely a beast to take on with all the crazy things you can do with these switches.
– but I’m happy to learn. Hopefully we can get the documentation in a good place. Definitely a beast to take on with all the crazy things you can do with these switches.
In SmartThings I found the easiest approach was to create a scene for each notification style that I could call from any routine; it includes all the settings for each switch. If I install more switches with indicator strips, I can add them to each scene and they’ll be included by the existing routines. Not sure what the Hubitat equivalent is but I’d guess there’s a similar way to do it.
@stylekyle – here’s the updated Scene Control instructions:
I’ll work on the LED Mini Dashboard tomorrow morning when I’m back in the office.
I’m going through the steps to setup some automations with the LED Mini Dashboard and is there a way to make these automations based on a time of day?
Ex: I want the notifications to activate only between the hours of 10pm and 6am.
I couldn’t find anything in there on how to add rules to the notifications outside of, “if sensor is open, then turn on notification”. Is it possible to add the time-frame condition or is that something I should just use Rule Machine for?
That new button mapping works. Thanks!
Notifications animations were setup in the device itself. You could do up to 4 different notifications. Set the animation style (i.e. flash), color, brightness, and time. That would create a child device for that specific notification. So then any activity could just flip that notification switch on to start that animation. However, based on @MarkTr322 comment below, i could do something similar just using a rule for each notification style for each switch and then have other rule activities trigger them.
Thanks for updating. Looks great.
Would be great if you or @EricM_Inovelli could do this. I would imagine it would be as simple as copying over that code from the 700 series drivers? But then again, I’m not a programmer. ![]()
Yes, there are a few way this could be done in the current version of the app in Hubitat. Here are two:
- Setup 2 scenarios, the first would require both the notification trigger (switch as an example) to be on and the time to be after 22h00 (10pm). The second would require both the notification trigger to be on and the time be after 6am
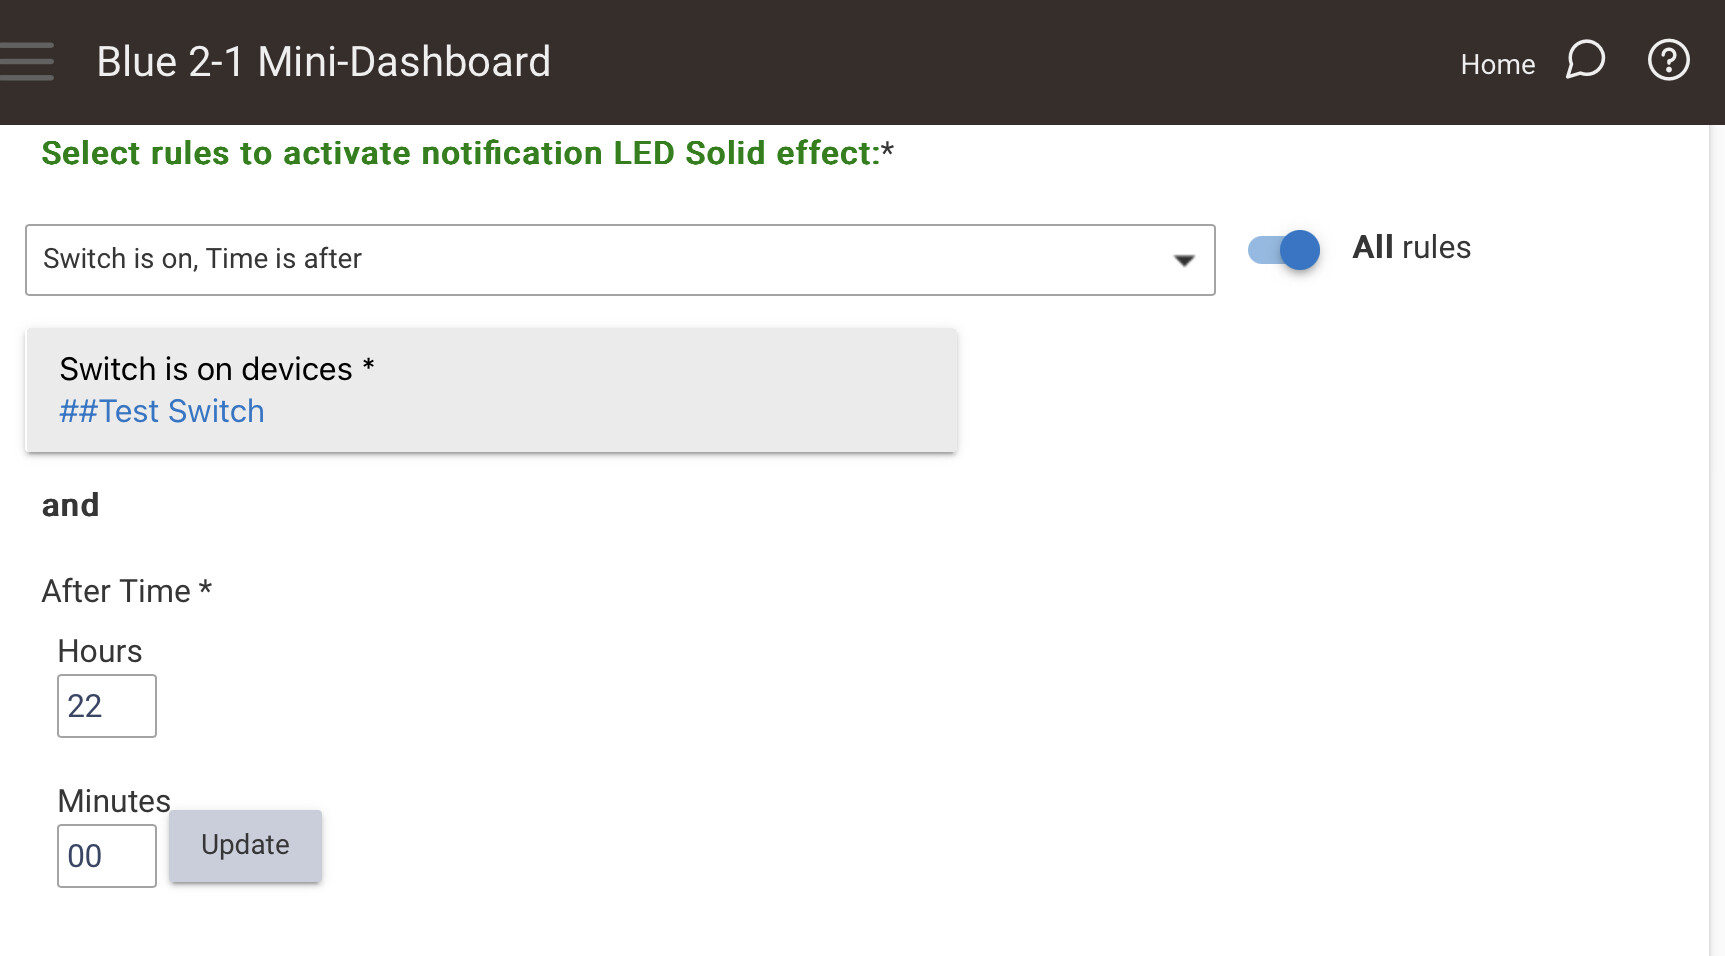
- Setup a virtual switch that is on between the two specified times. Trigger the notification on both they switch and the other trigger to be on.
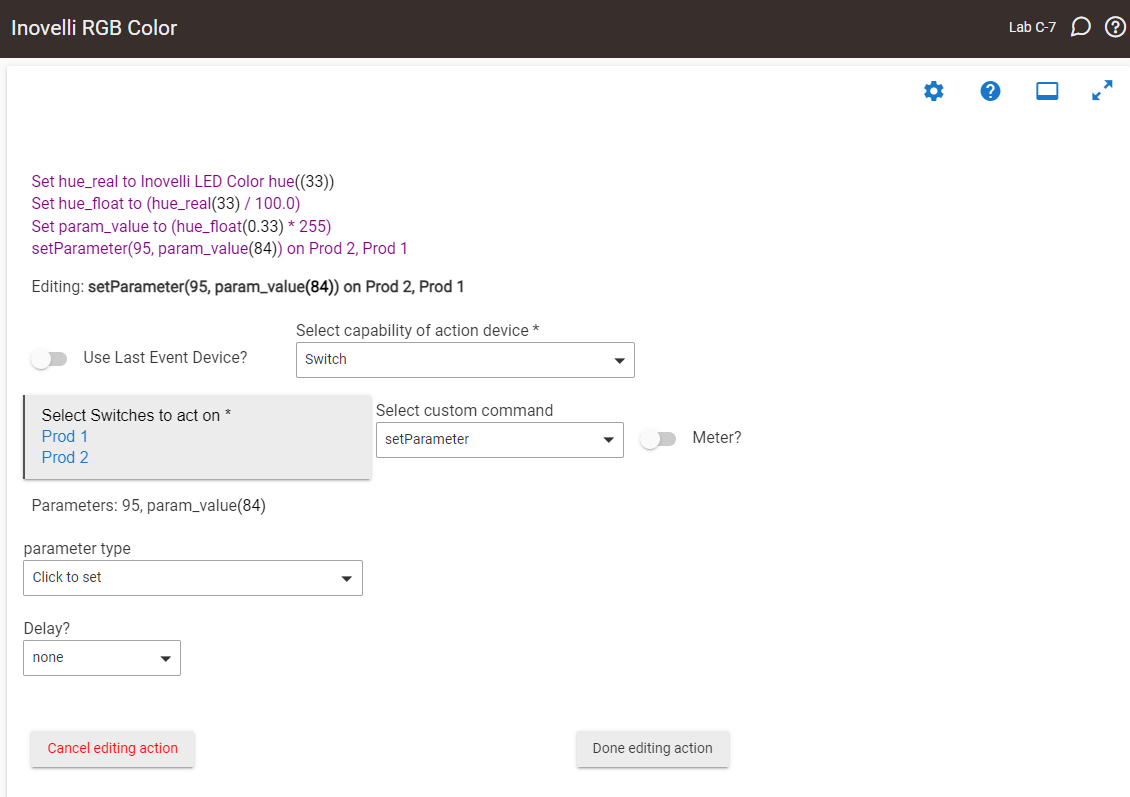
I am trying to think of the best way to do this. I did try to stay away from child devices in the newer driver to make for a cleaner interface, but I can explore putting them back in. There is a way to do it right now with rule machine and the “setParameter” custom command. The dashboard thing is what I am trying to figure out.
In ST I do the same thing as @MarkTr322, but instead of using actual scenes, I use virtual momentary buttons with routines tied to the “pressed” action to do the scene work. Scenes in ST still run on the cloud, where the virtual devices run locally. So I just created a room called “Scenes”, put the virtual scene devices in it and call them from other routines as needed. Works great!
I have a Hubitat and followed the Red Series 2-1 instructions for setting up the notifications. I created a new Rule in Hubitat, set up my trigger and added my ledEffectAll action using the Inovelli Switch Toolbox to generate the parameter code which I entered as a String. Unfortunately that doesn’t seem to work.
I tested several different ways, using Integer instead of String, using the 4 comma-delimited parameter values, etc. and nothing seems to work. I watch the Hubitat logs for the Red Switch debug and trace logs and I see the ledEffectAll action command going out with the string value but nothing happens on the switch LED. I can go in to the Hubitat devices and under the Red Series switch in question I can manually set the parameters and send the action from the dashboard (which is the edit device screen) and I get the intended result at the switch LED. I think the Hubitat driver for the Red Series 2-1 switch needs to be updated.
Dont use the delimitier. Add parameter for each notification parameter defined.
I’m pretty sure using the correct syntax works ![]()
You are sending a SINGLE parameter with commas in it. What you need to do is send 4 parameters, each as a single number with no commas
In Rule Machine you do this by clicking “add parameter” then enter a number (no commas) for the 1st parameter. Then click on “add parameter” again and enter a number for the 2nd parameter, etc. until you’ve entered all the parameters as separate numbers
I agree. With the new-generation devices having more effects and the ability to control each of the 7 leds individually, creating all those separate child devices was starting to get messy.
I also agree with this. It’s simple and clean and works consistently with others parameters as well as LED bar colors
Yeah me too. I’m pretty sure there is a way but I’m not a big user of the Hubitat Dashboard so I need to experiment more with that
Thank you, I got it working finally!
Thank you for the additional instructions, I was finally able to get it working. I was following the Inovelli instructions using the Inovelli Switch Toolbox and didn’t realize I could stack the parameters as such in the Hubitat Rule Machine. This was so helpful.
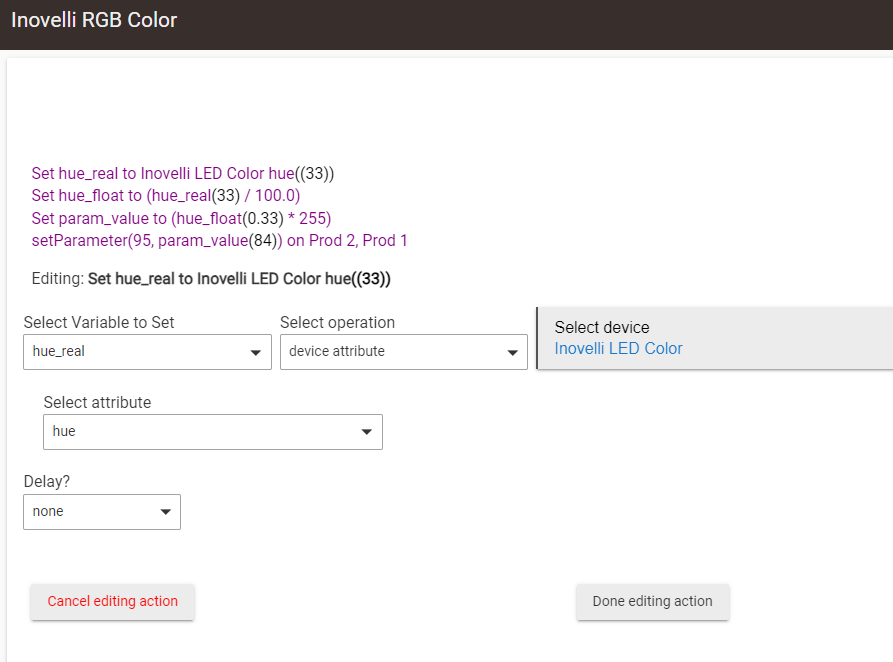
Ok, I’ve been messing around with Hubitat and found some cool stuff in Rule Machine that lets you use a Virtual RGB device to control the color (and level) of the led strip.
The first step is to create a new virtual device of type “Virtual RGB Device”.
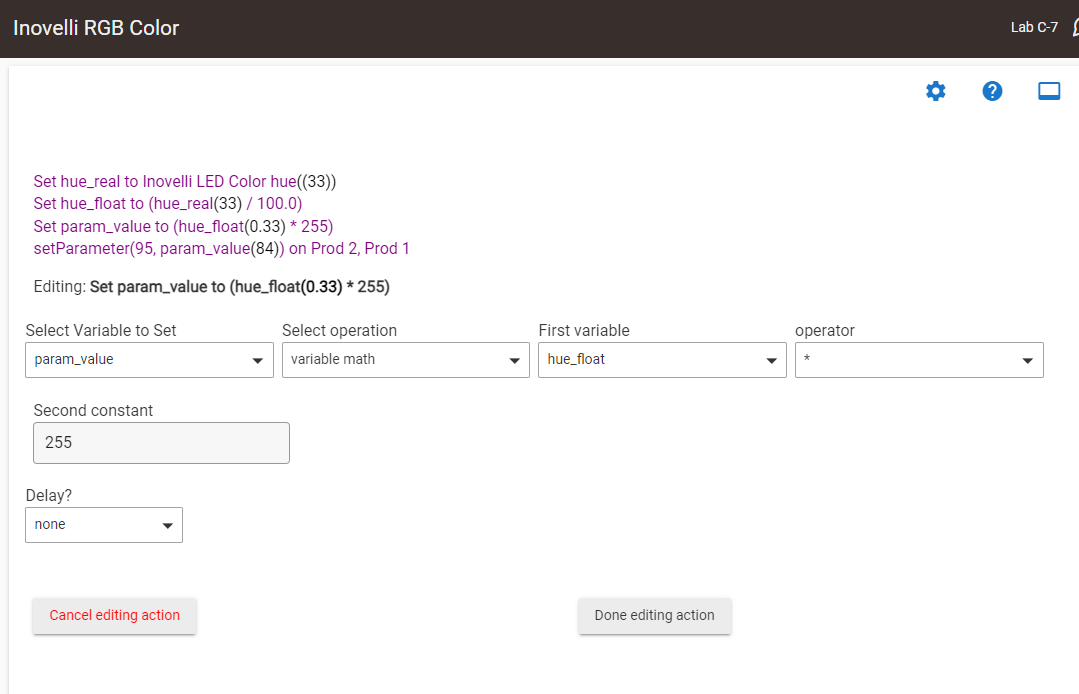
Then you create a rule that uses variables and variable math to control the LED color from the virtual device. Once it is setup then it is zero maintenance, but it does take a minute to at first. Here is my rule to change the color. You can add this virtual device to a dashboard.
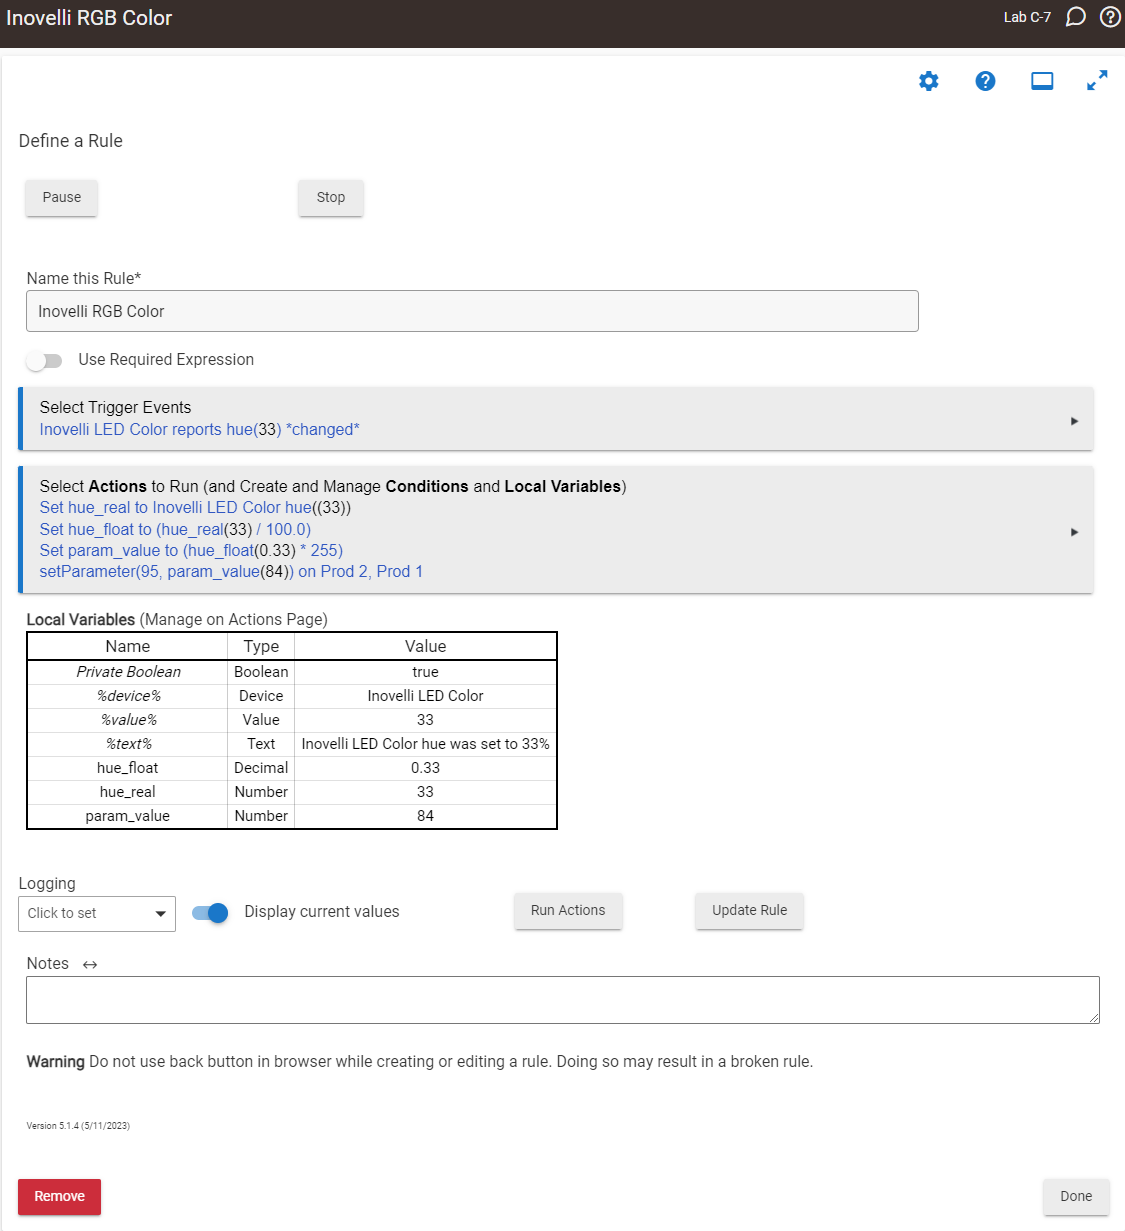
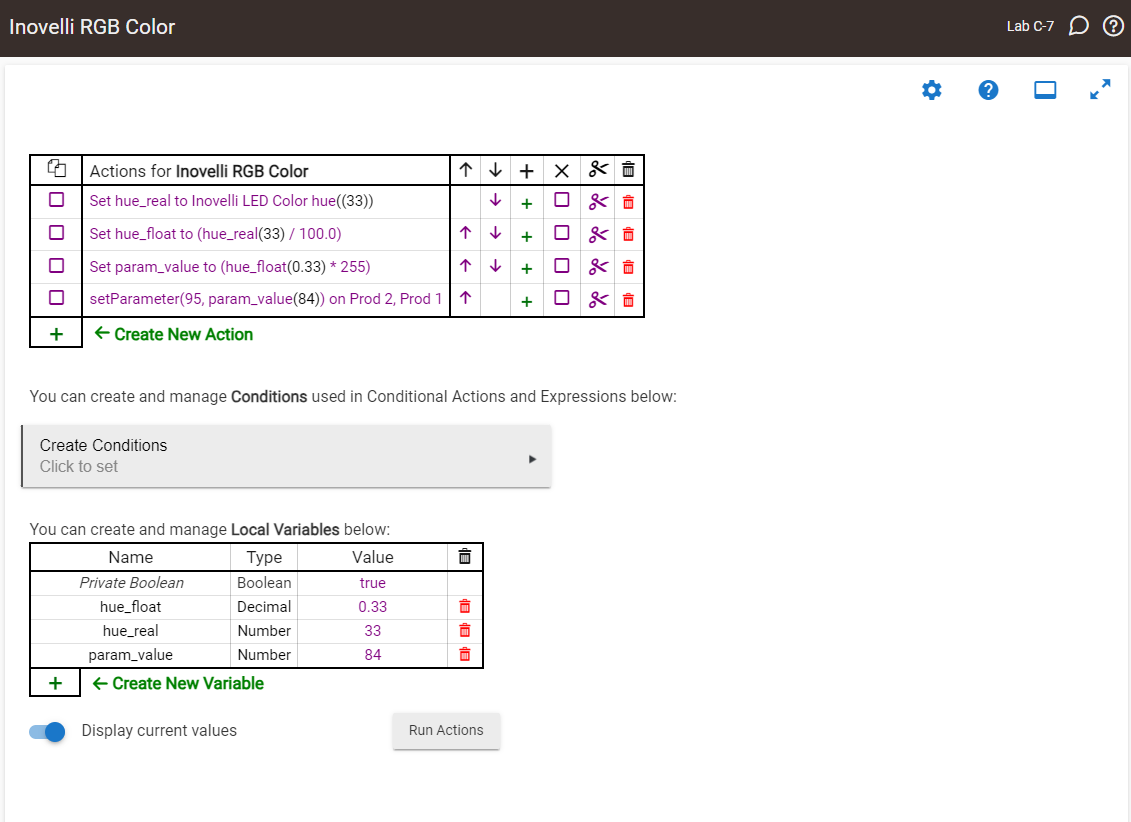
Here’s some more detail on the individual actions:
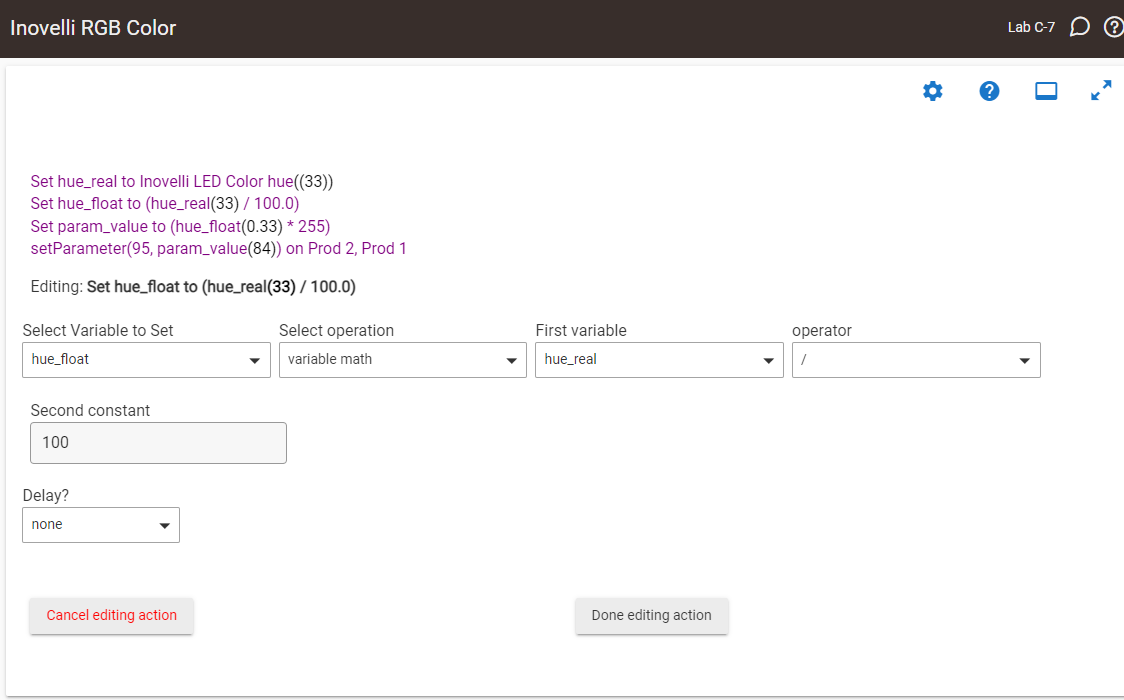
This is actually the first time I have done variable math in Hubitat so it is kind of new to me. If there is a better way then I’d love to learn. It was actually cool to figure out this kind of automation on Hubitat. ![]()
Right after posting I realized that the rule has a default %value% variable that can probably be used instead of saving it into a local variable. So, the first action can be removed and the second action needs to use %value% instead of “hue_real” as the variable?
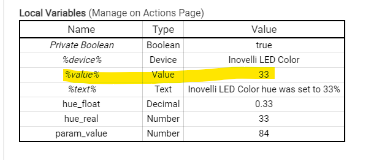
Edit: Nm, it doesn’t let me use %value% in the variable math action.