So…I’m making this thread specifically to call me out and make sure I do a mini write up…
I got a Red series switch yesterday and put it to GREAT use…(more on that in a minute). Now I just ordered another one after seeing an interesting feature (the relay disable) and it’s ability to function as pretty much solely a scene controller. I have a very unique setup in my basement bar where I have two zwave LED controllers for different “lighting effects” and also have a smart switch for a set of pendant lights over the bar which are also Sengled Zigbee color changing bulbs. I also have two recessed cans that have Hue bulbs in them. All of this makes for a super fun bar area, however, controlling it all is tedious. I have it all controllable via voice but it’s still a little involved especially dimming and color control. I think I have a crazy idea to really push what the red series switch could do using smartthings and WebCore to expand the functionality and mimic some functionality.
That’s all I’ll say about that…until I’m done and it actually works in which case I’ll post all my deets. Stay tuned and keep me honest folks!
As to the one red series I just put in…my interesting use case…I have a light switch at the top of my basement stairs. As you read above, I have a bar in the basement and a play area for kids, big screen, etc. Kids always leave lights on. So very obvious thing was to create a scene when at the top of the stairs on a double-click down, turn off all the basement lights!
But what I did using WebCore and ST was to create a piston (rule) that would change the notification light to red if ANY of the different downstairs lights were still on. So I can now visually see if any lights are left on downstairs with going down. It also transitions back to blue if everything is off. It’s damn near immediate too, the response. Trying to do a conditional statement for multiple lights like that in ST was tough but a breeze using webCore.
Anyhoo…well done Inovelli team…these things ROCK. Can’t wait to try and push the boundaries with rules and notifications when I get my other one tomorrow!
When I’m by a computer, I’ll edit this to share my setup. I just wanted to say thanks for sharing, this is exactly what I envisioned for this area. People just genuinely excited about what they can do in their homes. It honestly doesn’t even have to be Inovelli stuff. Just share some cool tricks and setups!
Alright, finally have a minute to post it. Spoiler Alert: Everything worked as planned!!! (Realized I had to break this into two posts - too much otherwise)
So Part 1: My setup (what is being controlled)
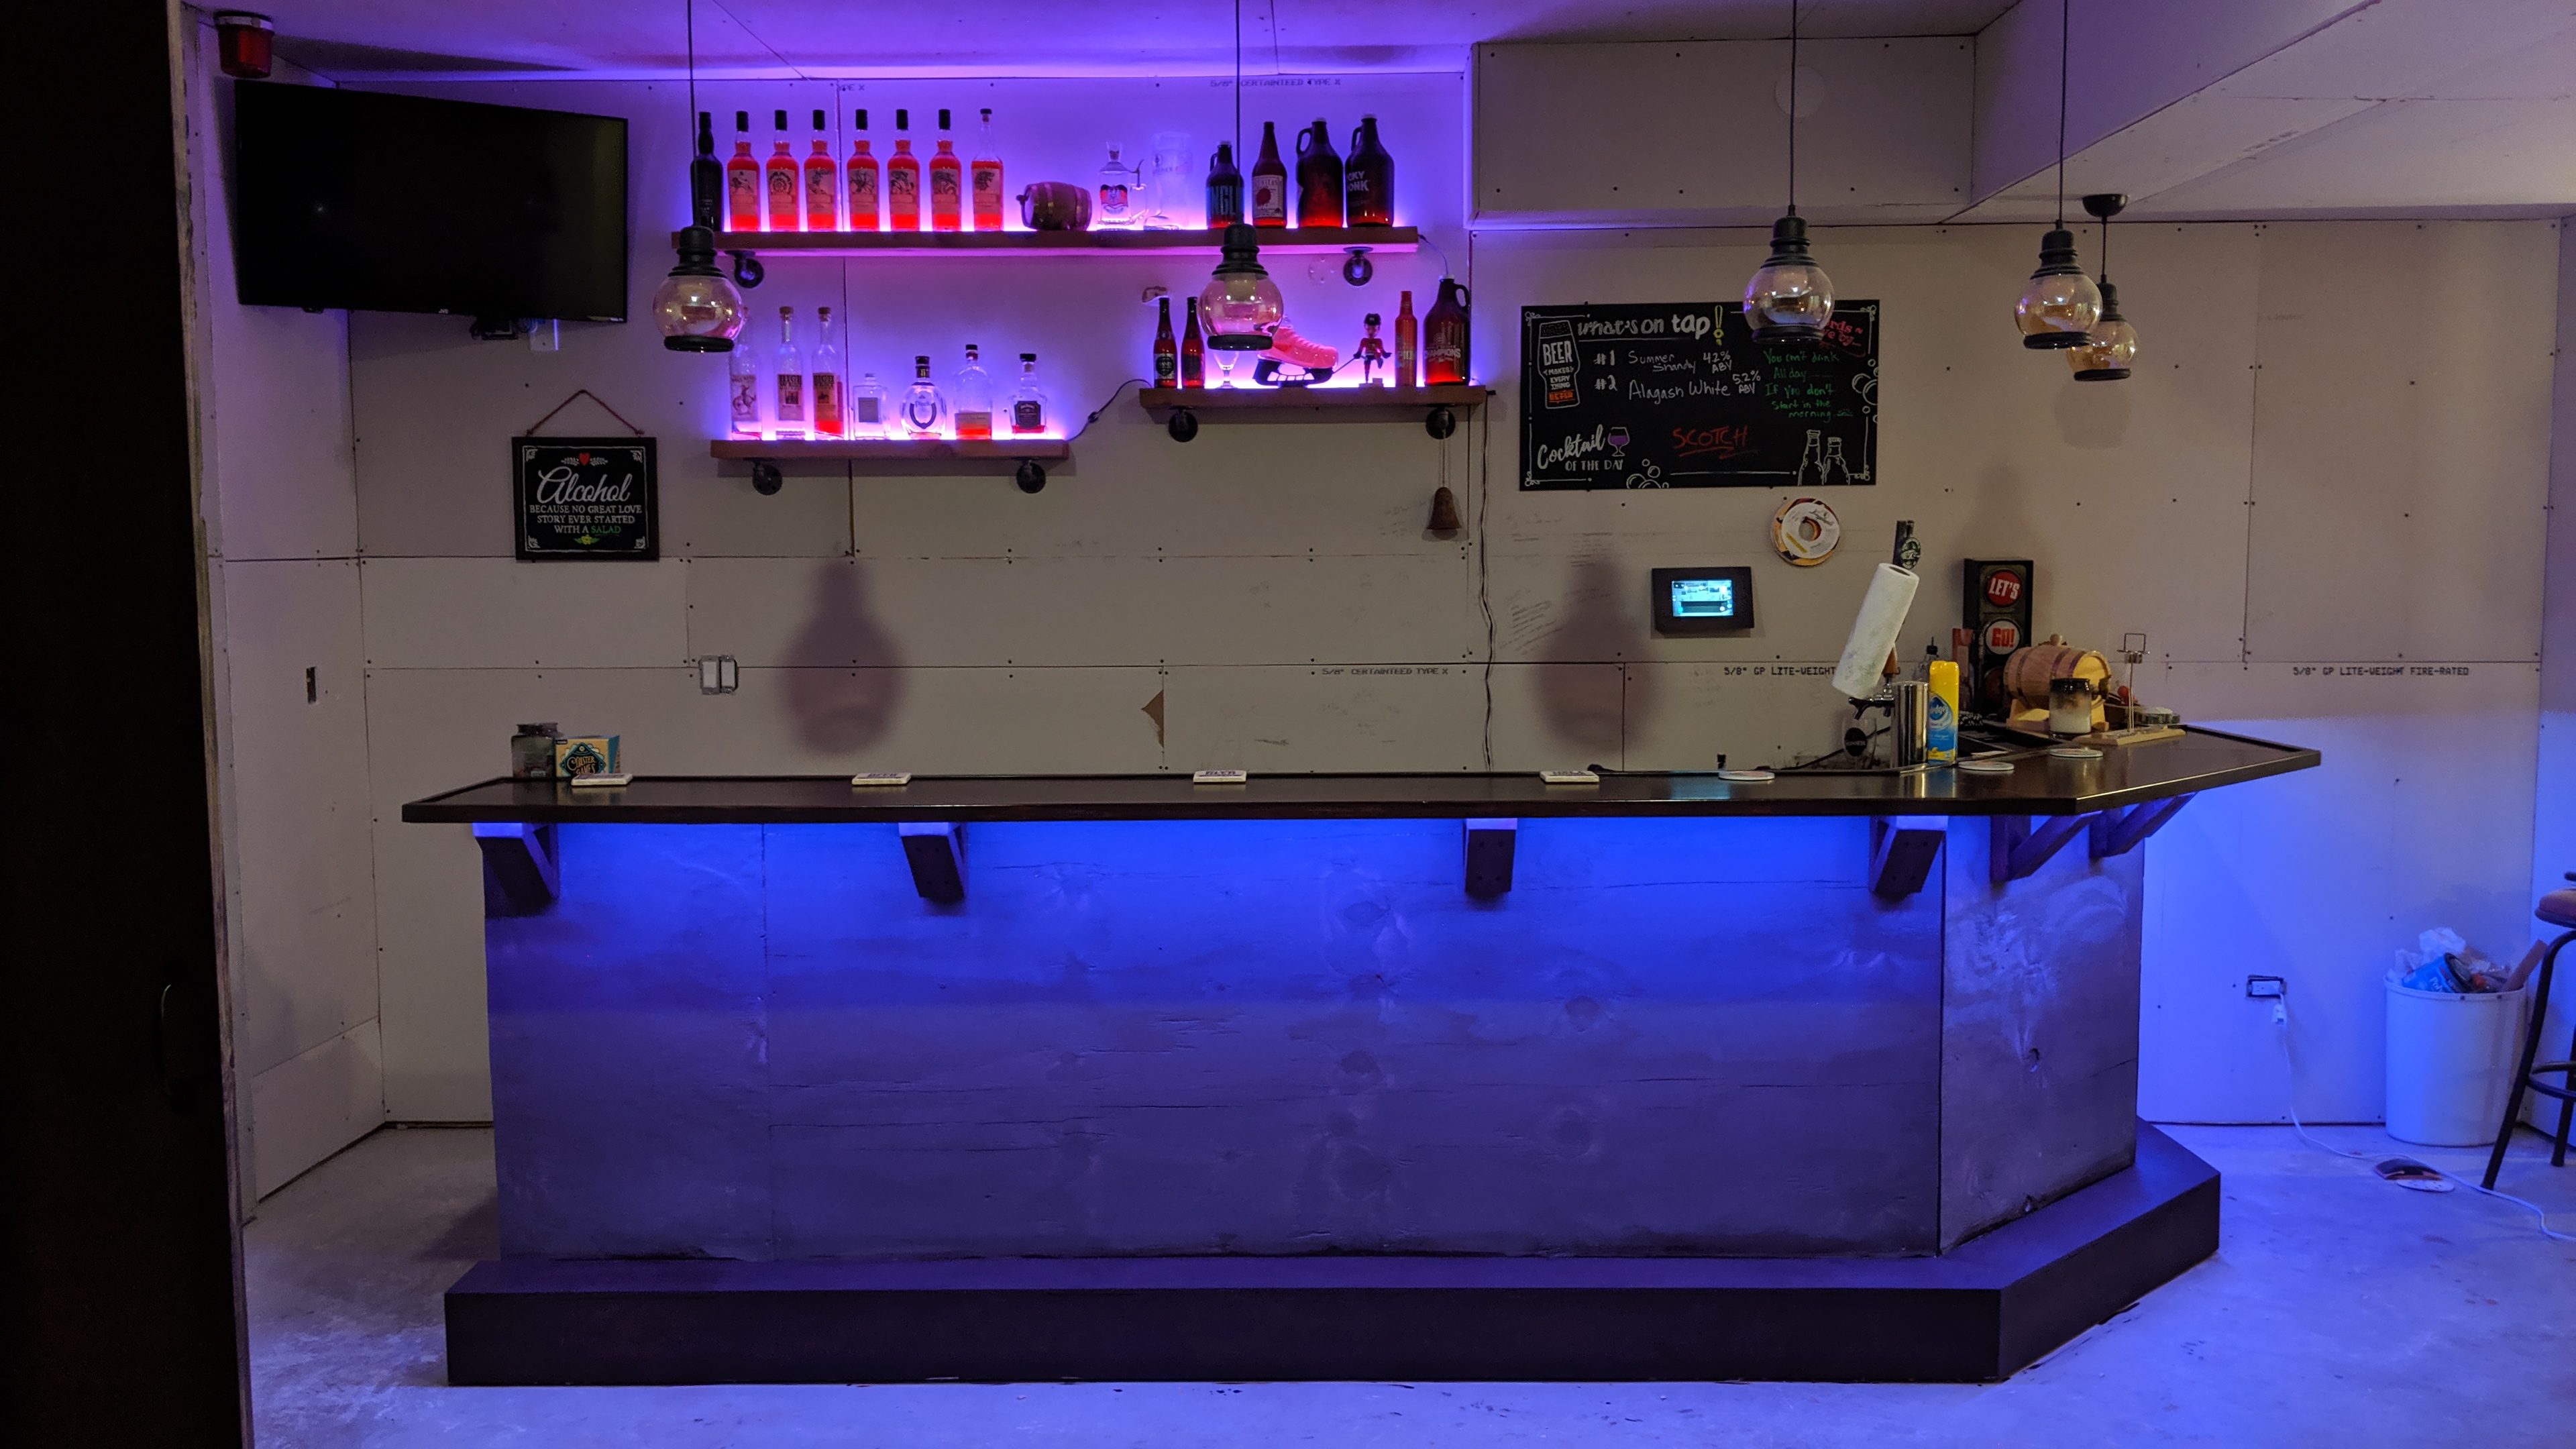
So I have a bar in the basement that has quite a bit of lighting elements to it. I have:
a set of two recessed BR30 Hue bulbs in my bar area - attached to Smartthings and Philips Hue
a set of “bar shelves” that I recessed some RGB strip lights into (they are solid wood shelves) which are controlled via a zigbee RGBW controller (GIDERWEL Home Smart ZigBee RGBW LED Strip Controller) - connected to Philips Hue bridge
a strip of RGB lights undermounted on the bar also connected using the same Zigbee controller connected to Philips Hue bridge
a set of 5 pendant lights that have Sengled Zigbee RGB bulbs connected to Smartthings
Part 2: Current Control
All elements are controllable via voice using Google Home and integration w/ ST and Hue.
The pendant lights are on their own smart switch just so I can turn them off or on as a whole simply and for manual operation behind the bar. Because all bulbs are connected via Smartthings and I don’t have a native app, synchronization is a pain across all the bulbs. Usually I control color with voice as it’s easiest but limits the colors to “preset” standard colors.
Bar shelves and underlighting are also voice controlled. I usually set the color though using the Hue app as it’s really easy to control level and any color using the hue app.
The recessed lights, I have a Hue switch that has some scene control and dimming, but typical just turn on and off and dim at switch and change color either via voice or Hue app.
So I put a red series on/off to be a master control behind the bar. I swapped it with a physical switch that controlled the outlet that the LED strip light power supplies were plugged into (so I could kill them as needed manually). The idea was create something to give me a LOT of flexibility without using voice that was easily accessible behind the bar.
What did I do -
disabled the local control and wire line/load together to keep the outlet powered
On/off - one click up and one click down turned on/off the bar shelves and underlighting
Selective control - 3 clicks down would turn off the underlighting and 4 clicks would turn off the shelves (this way I could easily use one or the other or both)
Dimming (this one was interesting) - On a doubleclick up or down the bar shelves and underlighting will dim either way respectively by 10%. Curious part here is that on my controllers 100% to 50% there is no noticeable change really. So I have it that if the level is above 50% - immediately drop it to 50% and dim by 10 or if it’s 50% or above jump it straight to 100% so I don’t have clicks that look like they don’t do anything. It also only dims IF they are already on…so I avoid accidentally turning one on if it was turned off.
Matching - So biggest issue was syncing all these lights as some are ST some are Hue and no really good unifying option (ST has some apps but it’s always or never). So I created a scene with 3 clicks up that matches the level, hue, color of my FIRST pendant light across all the other pendants AND the bar shelves. So all I do is set the one bulb and the rest will follow but ON DEMAND. Lastly on 4 clicks up, I also set the recessed lights to match creating a single color scheme across all color enabled lights and gives me the granular color control despite them all being different.
Color cycling - I wanted a way to give someone behind the bar an easy way to change the shelves and underlighting color if they didn’t know the voice commands. So I set it up if you click the setup button, it will cycle through 5 colors and the notification LED will match that color. For example, click once and the notification light goes red and sets the shelves and underlighting to red. click again and everything goes green, and so on. Once it reaches the 5th color it will loop back to the first one and continue cycling on every press. Again will only set it IF they are on already.
I still have the 5 click up and down left to play and not sure what if anything I will do.To be honest it seems like I have a lot to remember, but it’s incredibly intuitive and my son has already learned the options. Overall, super excited on how well it worked and can’t wait to tackle my projector room next once the real dimmers arrive (need REAL dimming there).
If you have any questions or want to know how or the code that I used (it’s not crazy complex) let me know.
Thanks Inovelli team…seriously, these things are cool - had a party yesterday and everyone was floored with what ONE switch could do.
Here is a shot of my bar if anyone cares - the drywall isn’t taped and mudded yet - happening soon. The pendants are also not on yet but you can see the shelves and bar lighting. If there are any other shots someone would like to see, let me know.
I think you are forgetting a couple scenes: hold on, and hold off. From what I can tell, when you hold either the on or off button, it will trigger a scene, and then when you release it a different scene is triggered. You might be able to set up a dimming loop that runs as long as the button is held down, and then stops running upon release.
That would free up your doubleclick action for something else.
@jtronicus I don’t believe there is a hold functionality built into the switch. I may be able to do that with WebCore - but I am not sure that’s a native functionality of the switch for scene purposes @Eric_Inovelli can you verify?
The “pushed” vs “held” for the buttons are just a way to designate up/down respectively so I don’t believe there is an actual “hold” scene trigger.
I could look into that via WebCore, but it would really depend on how the switch communicates - it may not send a constant push. Dunno though.
I would likely use that for dimming - don’t know what I would use the freed up space for…but I could get creative
Bro… this is insane. I love it. I seriously need to get into WebCore. Color cycling and matching the LED notification… wow.
We’ll gladly accept an invitation next time!
Put some Crown Royal on that shelf and I’m there! I’ll be the one mesmerised by the LED’s stringlights matching the Notification LED bar (seriously, this is awesome, I need to see a video lol).
Just one improvement I’d like to see… Drop the Blackhawks Bobblehead. I’ve got a couple extra Red Wings ones you can have.
Kidding, thanks so much for sharing, this is seriously really cool!
@jtronicus I will have to take a look at this and see if I can’t find them in smartthings…if that’s the case, i’ll rework my dimming functionality to use that as well and free up another scene spot.
I’m toying with the idea of a having a scene trigger a color cycle on all the LED lights to make it “party time!”
I’ll keep you updated when I have some time to fudge with it again.
@Eric_Inovelli I’ll get a video of the color cycling…it’s pretty cool really!
EDIT: So I looked into holding the button and there isn’t a good way at least in WebCore. I did find a way to do it, but the smooth dimming action is not good because of built up latency between ST and the rules engine. It’s much easier to do the tapping motion - plus because I’m only going down a few levels, i’ts a quick process.
It IS good to know though that a held option is in there though for button 1 up and down.
As you guys figured out the switch does support the “held” vs “released” scene. I’ve tried it in SmartThings and the experience for dimming things is just not a good user experience (I feel like). The latency just makes it to wishy-washy. With all local hubs though, I believe it would work well.
@EricM_Inovelli Quick question - how did you access the held/release in ST. I found a way in WebCore I think, but curious how you accessed that natively within ST?
I found another possible use of the hold scenes: delay timers!
When I hold the off button, Home assistant fires an automation that makes the led light blink.
When I release the button, another automation stops the blinking light and calls a script. The script subtracts the timestamp of the hold scene from the timestamp of the release scene (essentially calculating the number of seconds the button was held down), delays for a period of time related to the length of time the button was held down, and then turns off the light.
Huh that’s interesting…like an alarm arm/disarm delay that you can manually set…interesting idea. I don’t think I have a use for it in my setup but definitely a cool idea.