NOTE: This is a copy of the multipurpose sensor. We’re currently building out these pages.
DISCLAIMER
While we (and our community) try to keep these instructions up to date, it’s often hard due to the many updates to our firmware, various app & platform changes, as well as many other factors outside of our control. If any updates/edits need to be made to these instructions, please comment on this thread so we can keep it up-to-date:Wiki - General Feedback/Suggestions Thread
COMMUNITY DRIVEN
Our entire Knowledge Base (which includes manuals) is community driven. This means that we at Inovelli work together with our amazing community to keep articles up-to-date. We’d love it if you’d contribute in any way you can, be it making edits, submitting how-to’s so others can learn, participating in our innovation projects, or simply commenting on threads. Thank you so much for your support and dedication to really making an impact in the smart home market.Community Knowledge Base
NOTE: All of the pictures can be clicked on to be made larger. Also, if you’re on mobile, you can either click on the pictures or turn your phone side-ways and the pictures will become larger.
Digital Manual Overview
This is Inovelli’s rendition of the digital manual for the Aeotec Motion Sensor.
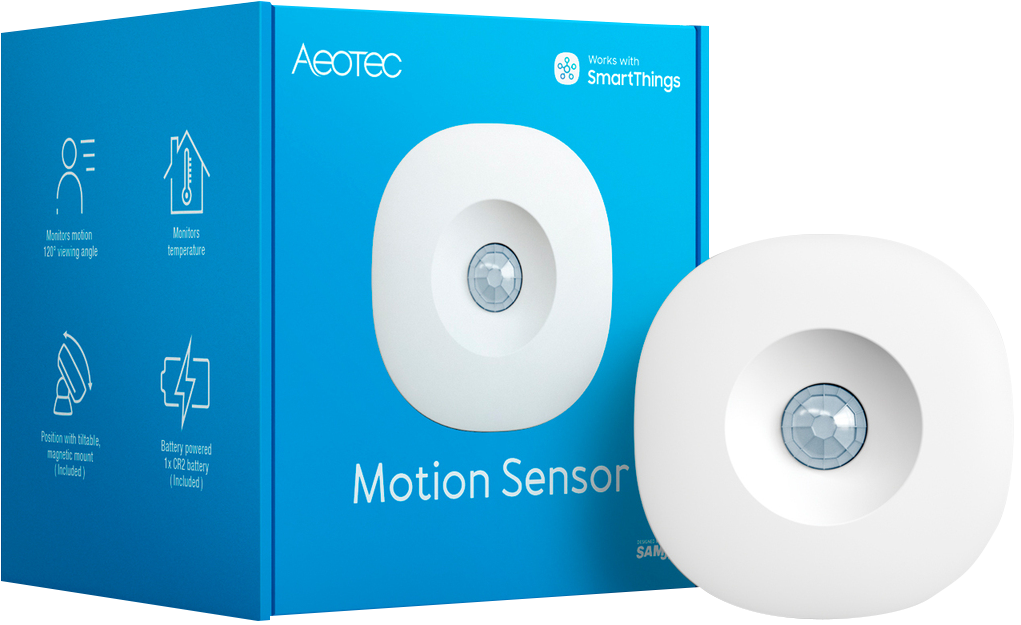
For Aeotec’s official version, please visit the following link: Official Aeotec Digital Manual
Navigating this Manual
For desktop users, the, “Table of Contents” is located to the right of the screen, whereas for mobile users, it can be found at the bottom of the screen.
NOTE: If you do not see the table of contents, click here: Resources | Aeotec Motion Sensor - Manual
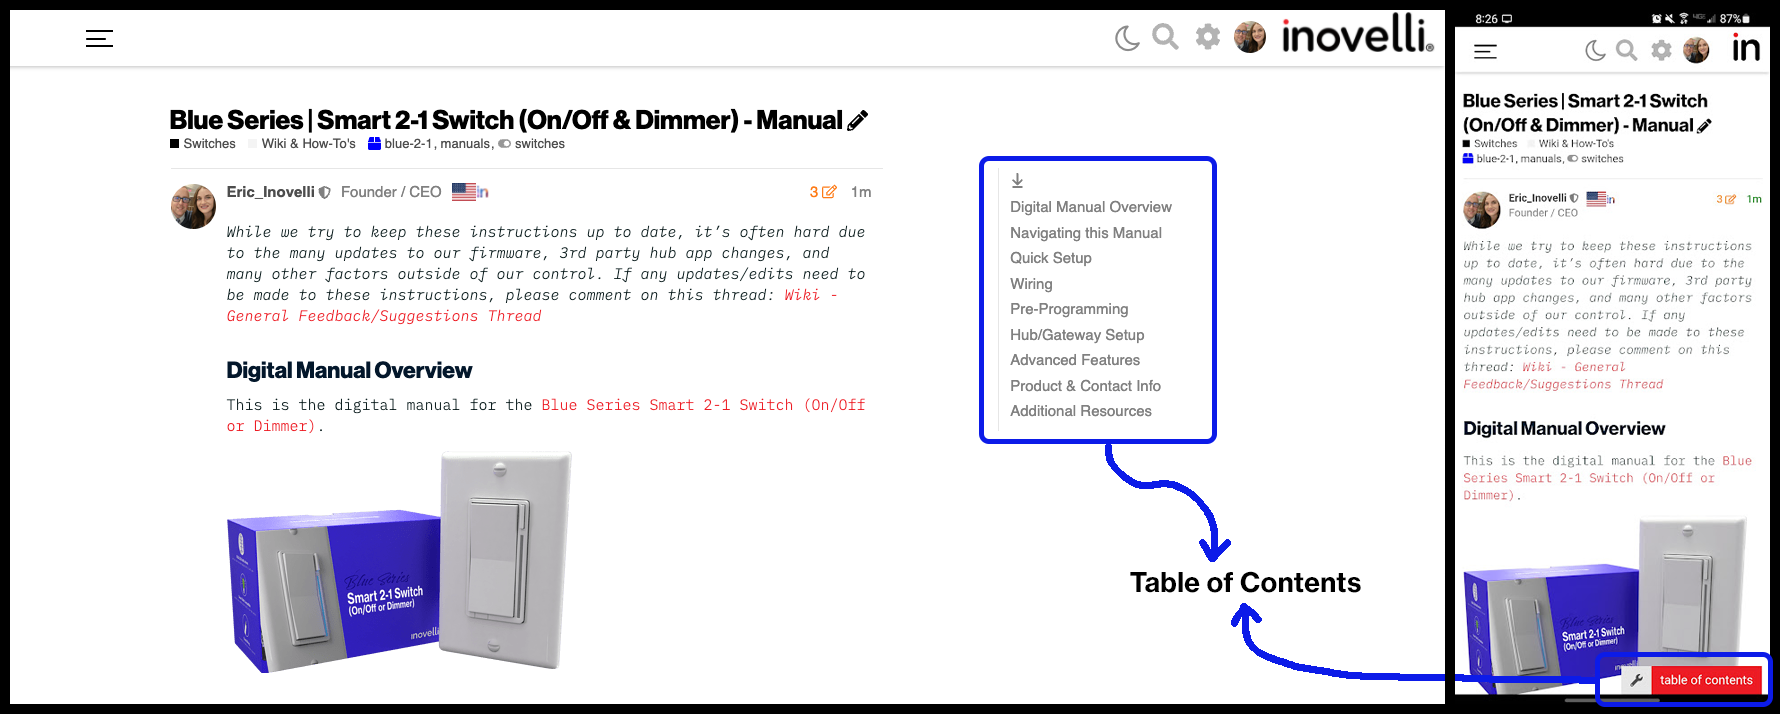
Please click on any of the sections to get started. We recommend working your way down as it follows an intentional flow that is user friendly and hub/gateway specific.
As always, any questions, please see the Additional Resources links section or submit a ticket, we’re happy to help.
Quick Setup
This section assumes you’re ready to pair to your hub/gateway, have not mounted your sensor yet and you know how to initiate the ZigBee pairing process on your hub.
If you do not know how to initiate the ZigBee pairing process on your hub or this is your first time installing this sensor, we suggest going to the Hub/Gateway Setup section for full installation instructions specific to your hub.
There are two ways to initiate the pairing process on this sensor. Please select the drop-down that corresponds to your situation.
- Make sure your sensor is blinking yellow and red by doing one of the following pairing methods:
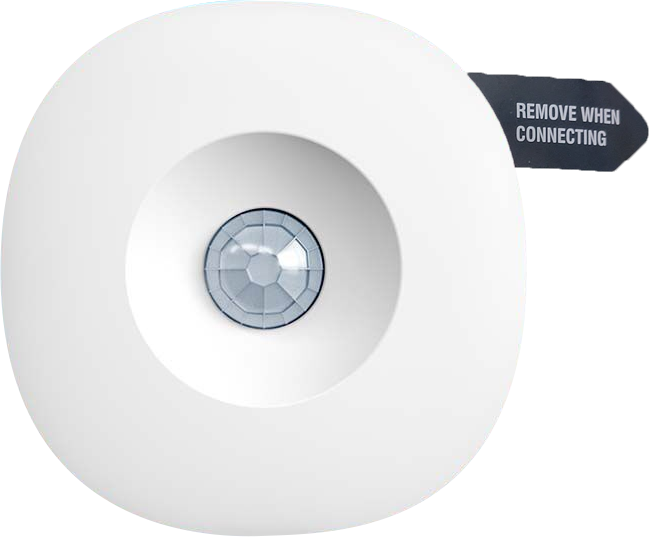
Pulling the Plastic Tab
Remove the plastic tab that says, "Remove When Connecting" and the sensor should start blinking yellow and red. If there is no plastic tab as shown below, please move on to option #2.
- With your sensor blinking, start the pairing process on your hub
- Your hub should then search for, find and initialize the sensor

Hub/Gateway Setup
To save space and keep this page from being extremely long, hub/gateway setup instructions will live on separate pages. This also helps us structure our Knowledge Base via the tag system (if everything was listed on one thread, it would be hard to search for specific terms as you’d have to sort through the entire thread to find it).
That said, please click the links below to be taken to the setup pages for your hub/gateway. If you don’t see your hub/gateway, please see the Quick Setup instructions above and reach out to us so we can work with you to add instructions so others can benefit.
Amazon Echo
SmartThings (Aeotec or Samsung)
Home Assistant - ZHA
Home Assitant - ZigBee2mqtt
Hubitat
Mounting Instructions
Show drop-downs on all the mounting locations.
Advanced Features
IMPORTANT: The advanced features shown below are what is built into the switch firmware, and may or may not be supported by your hub/gateway. If something is not working properly, please let us know and we and/or the community will investigate.
Parameter List
Please see below for the full parameter list. In each section, click, “More Details” to understand more how the parameter works. Each time we update the firmware, we will create a new section and you can click on a dropdown based on the firmware version you have.
COMING SOON.
Product & Contact Info
ZigBee Statements
[Enter any ZigBee required conformance statements]
FCC/IC Statements
Please click on the below drop-downs to see the FCC/IC statements.
FCC - English
FCC Caution: Any changes or modifications not expressly approved by the party responsible for compliance could void the user’s authority to operate this equipment. This device complies with Part 15 of the FCC Rules. Operation is subject to the following two conditions: (1) This device may not cause harmful interference, and (2) this device must accept any interference received including interference that may cause undesired operation.
NOTE: This equipment has been tested and found to comply with the limits for a Class B digital device, pursuant to Part 15 of the FCC Rules. These limits are designed to provide reasonable protection against harmful interference in a residential installation.
This equipment generates, uses and can radiate radio frequency energy and, if not installed and used in accordance with the instructions, may cause harmful interference to radio communications. However, there is no guarantee that interference will not occur in a particular installation. If this equipment does cause harmful interference to radio or television reception, which can be determined by turning the equipment off and on, the user is encouraged to try to correct the interference by one or more of the following measures:
Reorient or relocate the receiving antenna, increase the separation between the equipment and receiver, connect the equipment into an outlet on a circuit different from that to which the receiver is connected or consult the dealer or an experienced radio/TV technician for help. This equipment should be installed and operated with minimum distance 8in (20cm) between the radiator and your body.
IC - English
IC Caution: This device complies with Industry Canada licence-exempt RSS standard(s). Operation is subject to the following two conditions: (1) this device may not cause interference, and (2) this device must accept any interference, including interference that may cause undesired operation of the device.
IC - Français
DECLARATION DE CONFORMITE D’INDUSTRIE CANADA : Ce périphérique a été testé et reconnu conforme aux limites spécifiées dans RSS-210. Son utilisation est soumise aux deux conditions suivantes: (1) il ne doit pas provoquer d’interférences gênantes et (2) il doit tolérer les interférences, notamment celles susceptibles d’en perturber le fonctionnement.
Product Info
Make: Aeotec
Model # (Aeotec): GP-AEOMSSUS
Model # (Inovelli): AZG66
Amazon ASIN: B095TZTGNB
UPC: 810667025434
__
Power: Battery
Battery Type: CR123A x1
Signal (Frequency): 2.4GHz
Operating Temperature Range: 32-104° F (0-40° C)
Motion Field of View: 120° (15ft distance)
Indoor / Outdoor Use: Indoor Only
Range: Up to 100ft (40m) line of sight between the Wireless Controller (HUB) and the closest ZigBee Module
FCC Certified: PLACEHOLDER
IC Certified: PLACEHOLDER
ZigBee Certified: PLACEHOLDER
For indoor use. Specifications subject to change without notice due to continuing product improvement.
Company Info / Warranty
If you run into any issues, feel free to submit a submit a ticket. We typically answer them within 24-48 hours and are staffed by actual smart home owners.
All products sold by Inovelli (including Aeotec) come with a one (1) year warranty (defined as 365 days). This warranty protects you from breakdowns in the material or workmanship under normal use. This warranty is limited in a couple areas:
- Purchases must be made from Inovelli or an authorized reseller.
- The product should be used in the manner directed in the instructions.
- The product must only be used and/or installed in the United States or Canada. Products installed outside the United States or Canada will forfeit this warranty.
The Limited Warranty is one (1) year (defined as 365 days) from the date your product is delivered. If there is no delivery date on record, we will default to seven (7) days after the purchase date.
If your issue arises past your warranty period, reach out and we will do what we can to help you out.
Inovelli + Aeotec
List out reasoning why we believe in Aeotec products.