DISCLAIMER
While we (and our community) try to keep these instructions up to date, it’s often hard due to the many updates to our firmware, SmartThings app & platform changes, as well as many other factors outside of our control. If any updates/edits need to be made to these instructions, please comment on this thread so we can keep it up-to-date:Wiki - General Feedback/Suggestions Thread
COMMUNITY DRIVEN
Our entire Knowledge Base (which includes manuals) is community driven. This means that we at Inovelli work together with our amazing community to keep articles up-to-date. We’d love it if you’d contribute in any way you can, be it making edits, submitting how-to’s so others can learn, participating in our innovation projects, or simply commenting on threads. Thank you so much for your support and dedication to really making an impact in the smart home market.Community Knowledge Base
NOTE: All of the pictures can be clicked on to be made larger. Also, if you’re on mobile, you can either click on the pictures or turn your phone side-ways and the pictures will become larger.
Setup Instructions Overview
This is the digital setup instructions for the Red Series Smart Dimmer Switch on the SmartThings platform.
Navigating these Instructions
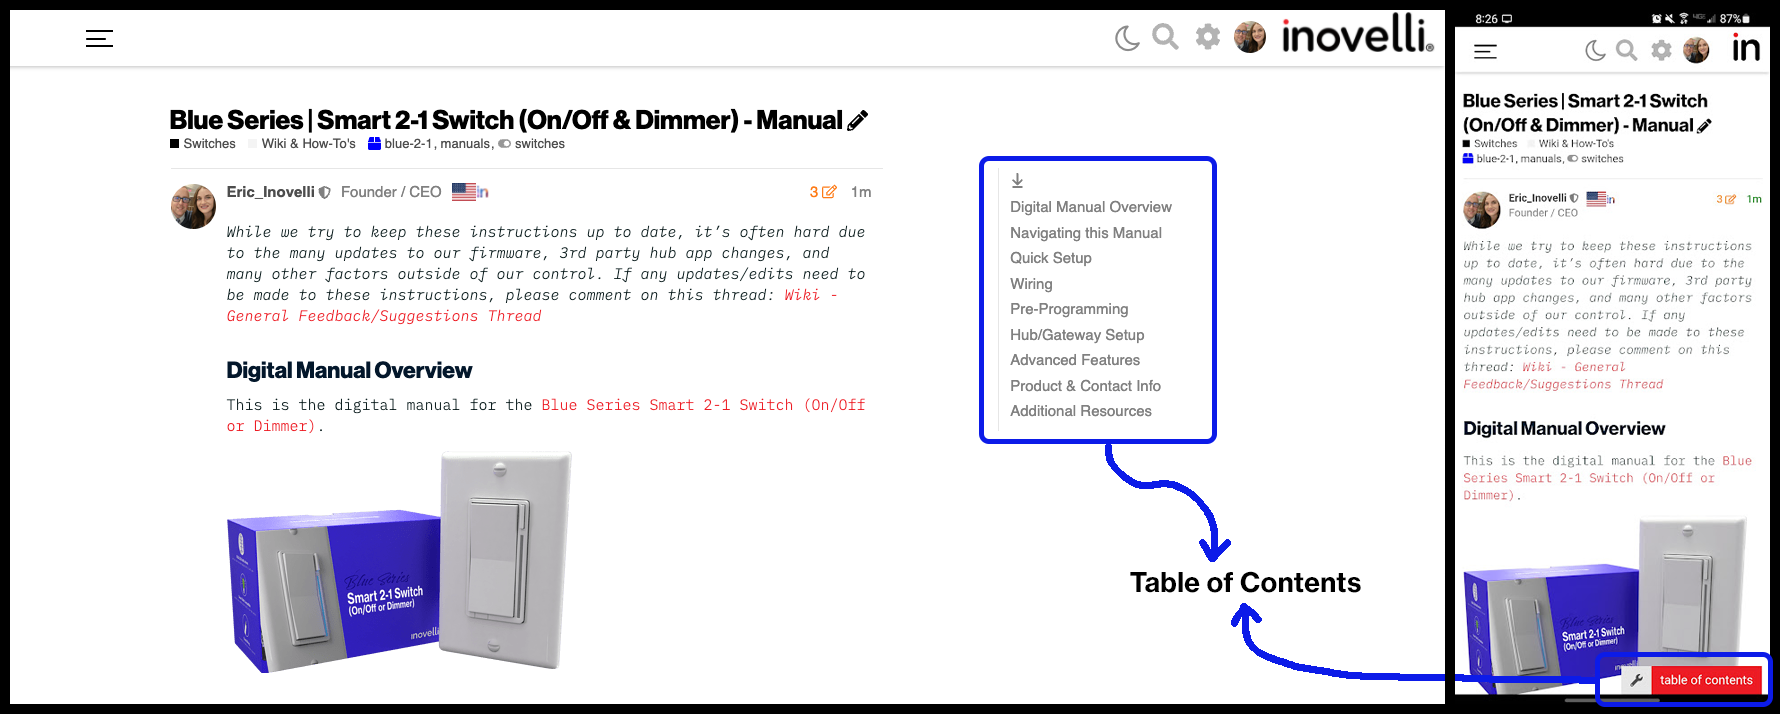
For desktop users, the, “Table of Contents” is located to the right of the screen, whereas for mobile users, it can be found at the bottom of the screen.
NOTE: If you do not see the table of contents, click here: Setup Instructions | Blue Series Smart 2-1 Switch (On/Off & Dimmer) - SmartThings
Please click on any of the sections to get started. We recommend working your way down as it follows an intentional flow that is user friendly and hub/gateway specific.
As always, any questions, please see the Additional Resources links section or submit a ticket, we’re happy to help.
Quick Setup Instructions
Follow these if you have already installed the dimmer switch before and are just looking for some quick pairing instructions. If this is your first time installing the dimmer switch, please skip this section and work your way through the various sections below starting with the Prerequisites.
This section assumes the following:
- You’ve installed the Edge Driver
- You’ve wired the switch and it works manually
Let’s begin:
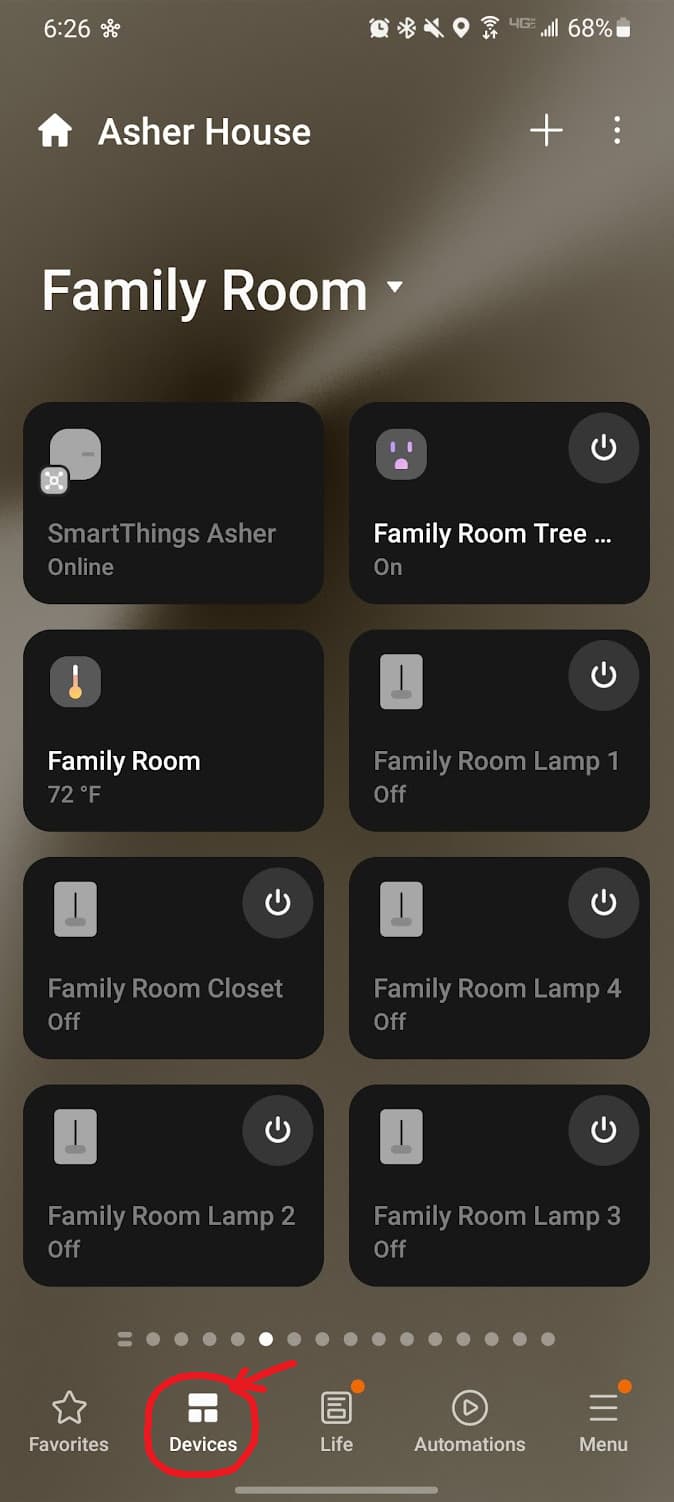
- Open up your SmartThings App to the, “Devices” tab and click on the + at the top right
- Click, “Add Device”
- Then under, “Scan for nearby devices” click, “Scan”
- Press the config button (button at the top right of the switch) 3x – the LED bar should then start pulsing blue (if it isn’t, then try pressing it faster)
- If was successfully paired, the LED bar will flash Green briefly
- If it was unsuccessfully paired, the LED bar will flash Red briefly
- SmartThings should then search for, find and initialize the switch
Prerequisites
The only prerequisite to pairing this switch is the following:
- Installation of the Device Edge Driver
While this switch will also pair without it, for full functionality, you’ll want to install the Edge Driver.
Device Handler Installation
As of October 15th, 2022 Device Handlers will no longer be allowed to be installed on the SmartThings platform. For more information please see the following community post in the ST forum: The End of Groovy Has Arrived - Announcements - SmartThings Community
Because of this, we are recommending you install the Edge Driver using the directions below.
Device Edge Driver Installation
To install the Edge Driver, please follow the instructions below:
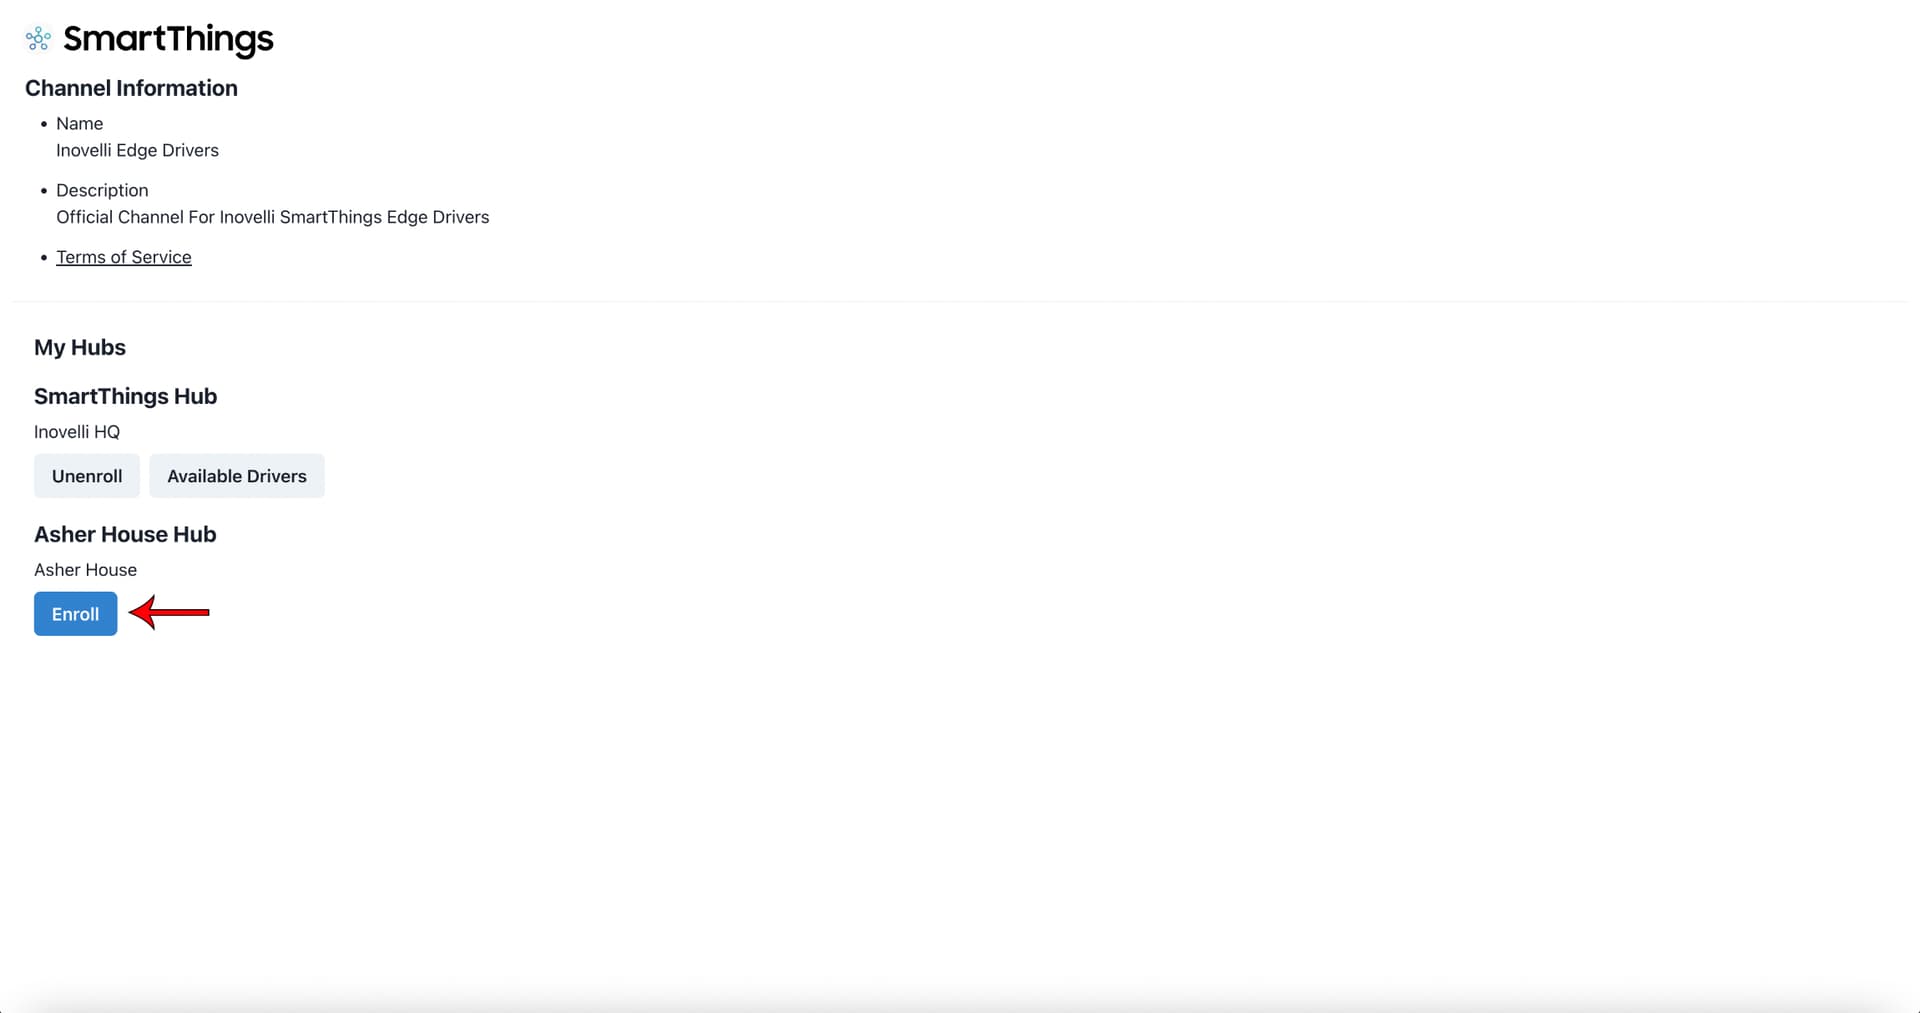
- Click on the following link Samsung Edge Driver Access and sign into your Samsung account (you may have 2-Factor Authentication on – if so, please follow the directions Samsung gives you to attain a code)
- Next, click, “Enroll” by the hub your devices are paired to
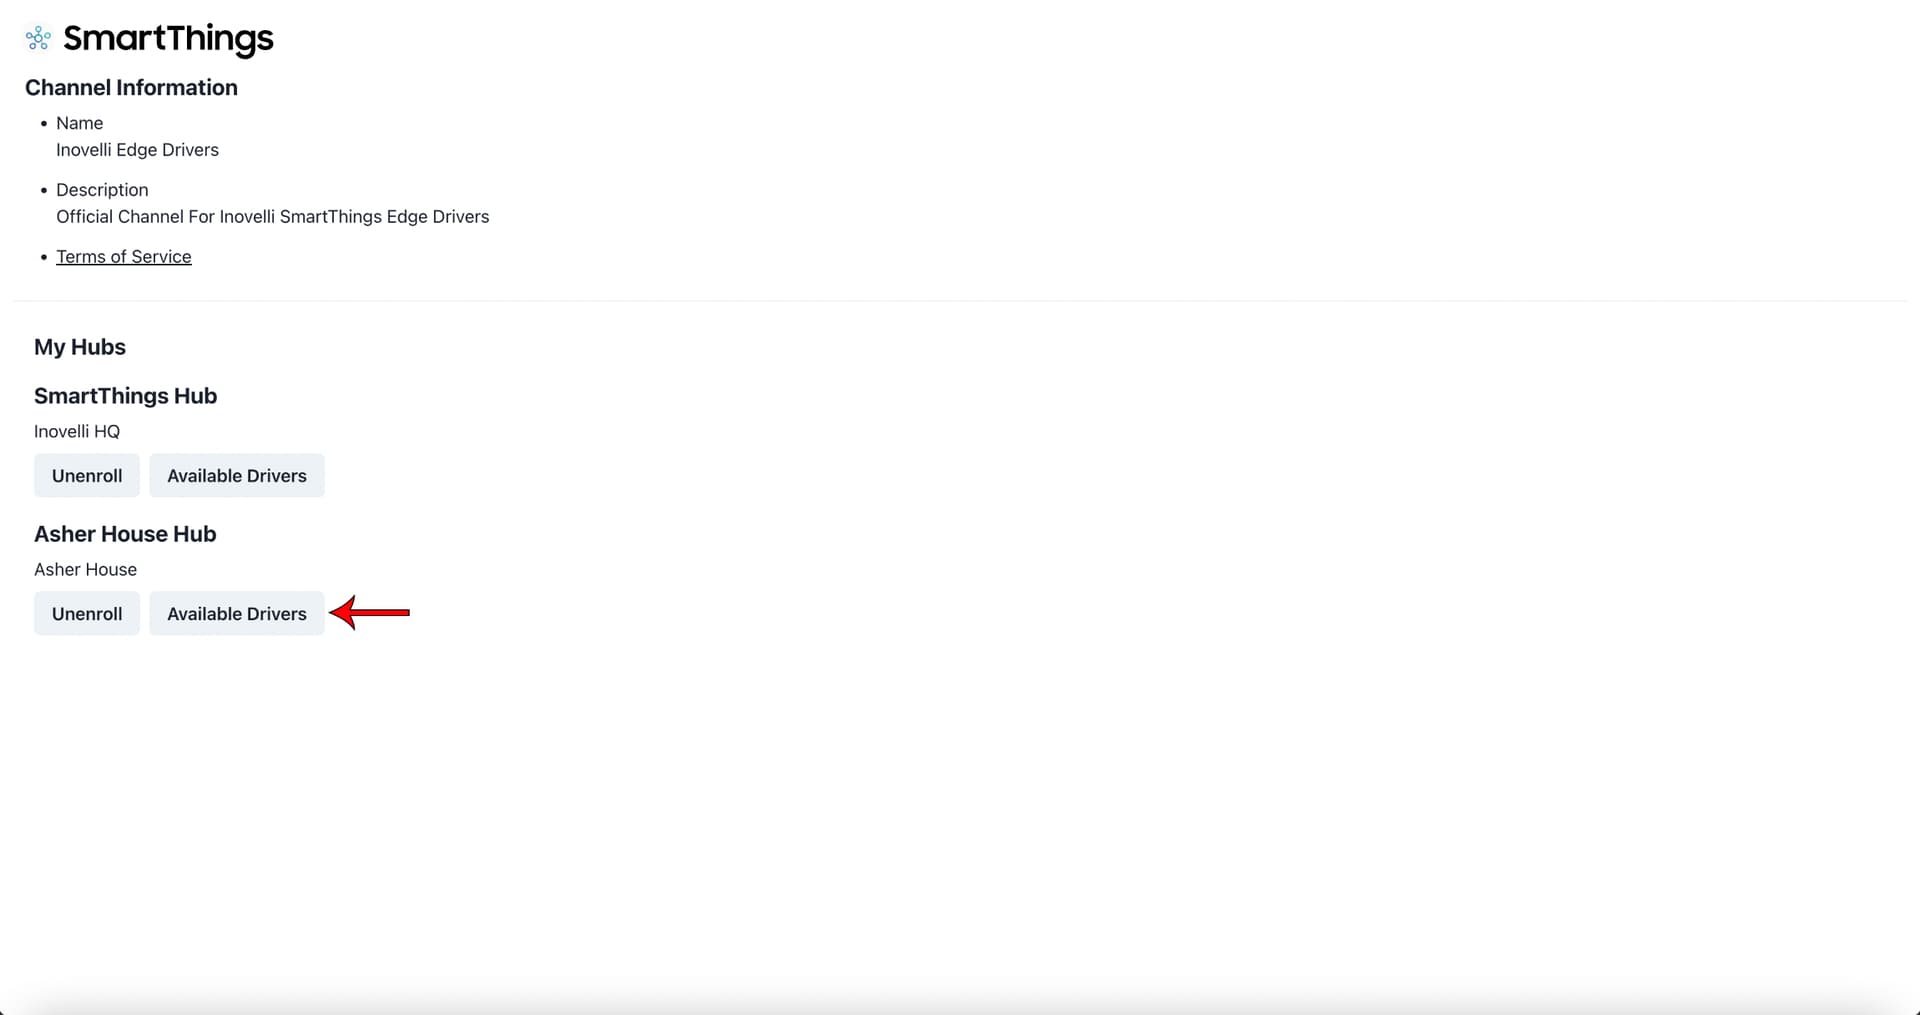
- Next, click, “Available Drivers”
- Finally, click on the driver you’d like installed by clicking, “Install” (NOTE: In this case, please install, “Inovelli Dimmer Red Series”
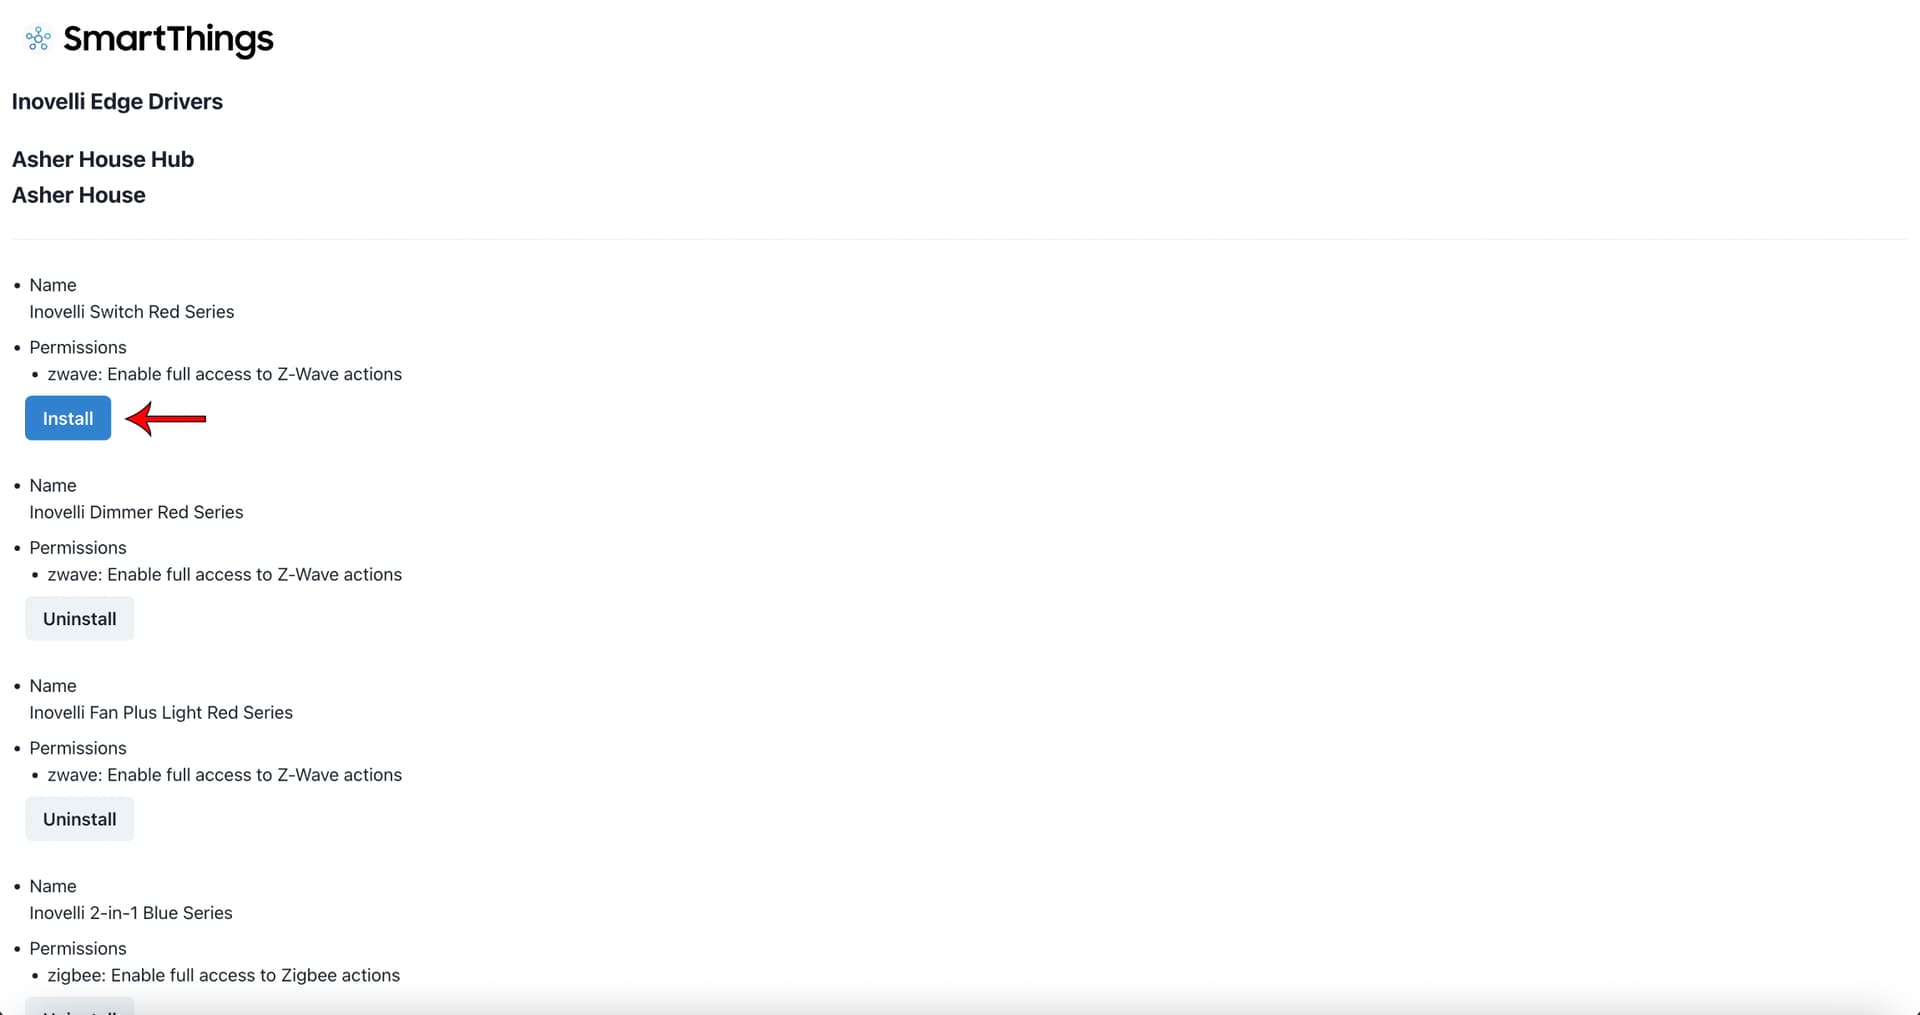
Now when you pair your switch, it should automatically pick up the Edge Driver. Feel free to move onto the next section of the Setup Instructions below.
Installation Instructions
Various steps of the installation instructions can be found by clicking the links below. The reason they are not listed here is to save space and to only have one area that requires updating (rather than multiple locations with the same data).
IMPORTANT: Please follow both steps below (Wiring & Pre-Programming) before making your way to the Pairing Instructions
- Wiring Your Switch
- Full Instructions (Recommended if not familiar with schematics and/or this is your first time setting up this switch)
- Schematics (skip directly to reading the schematics)
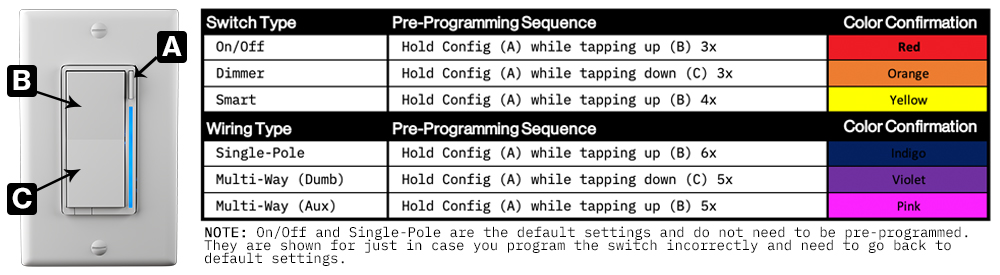
- Pre-Programming
- Full Instructions (Recommended if this is the first time installing this switch – NOTE: This is only needed if using the switch as a dimmer and/or multi-way setup)
- Quick Reference Chart (skip directly to the pre-programming sequence chart)
Pairing Instructions
NOTE: The below instructions assume you have installed the Edge Driver prior to pairing.
1. Initiate Inclusion (Pairing) on the Hub
The first step is to put your SmartThings hub in inclusion (pairing) mode.
Feel free to follow the written instructions below by clicking the drop down:
Written Instructions
- Open your SmartThings App and go to the, “Devices” tab
 —
—Picture Visual
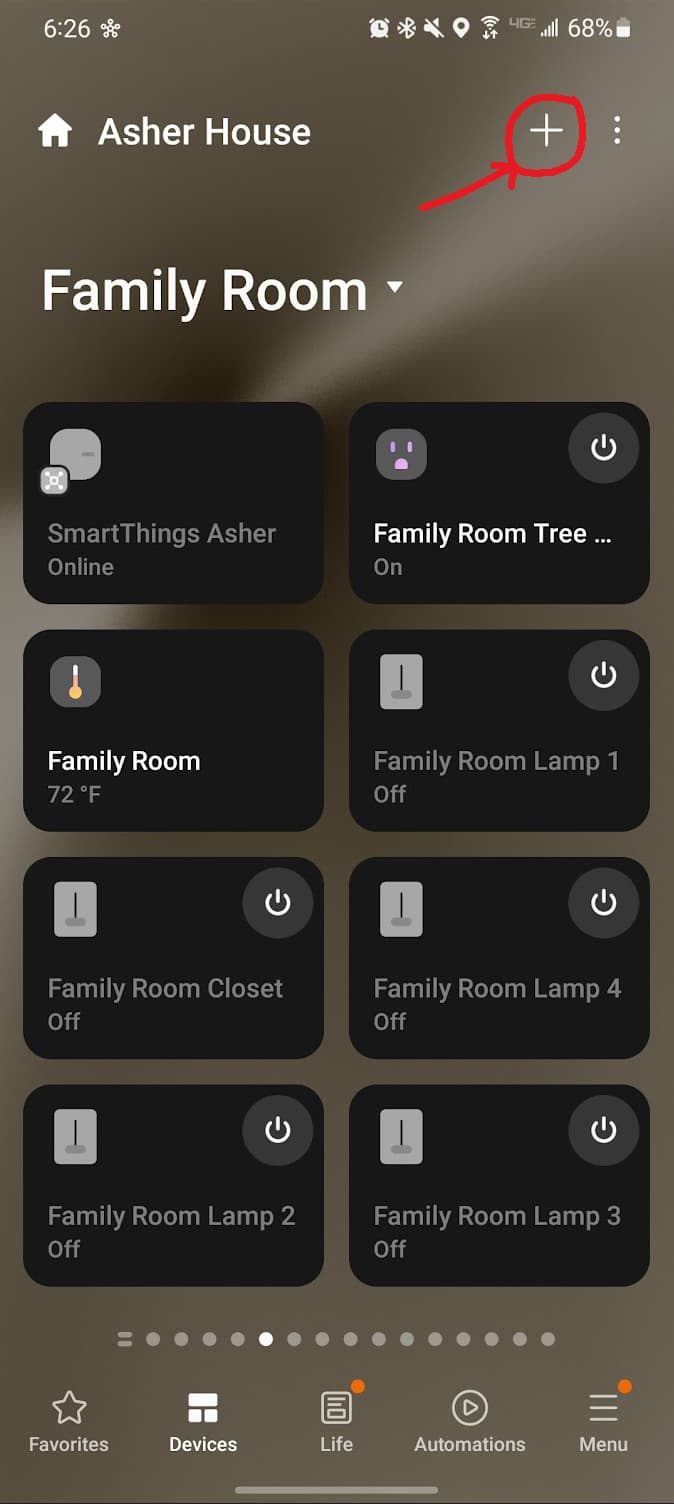
- Press the (+) button at the top right of the screen—
Picture Visual
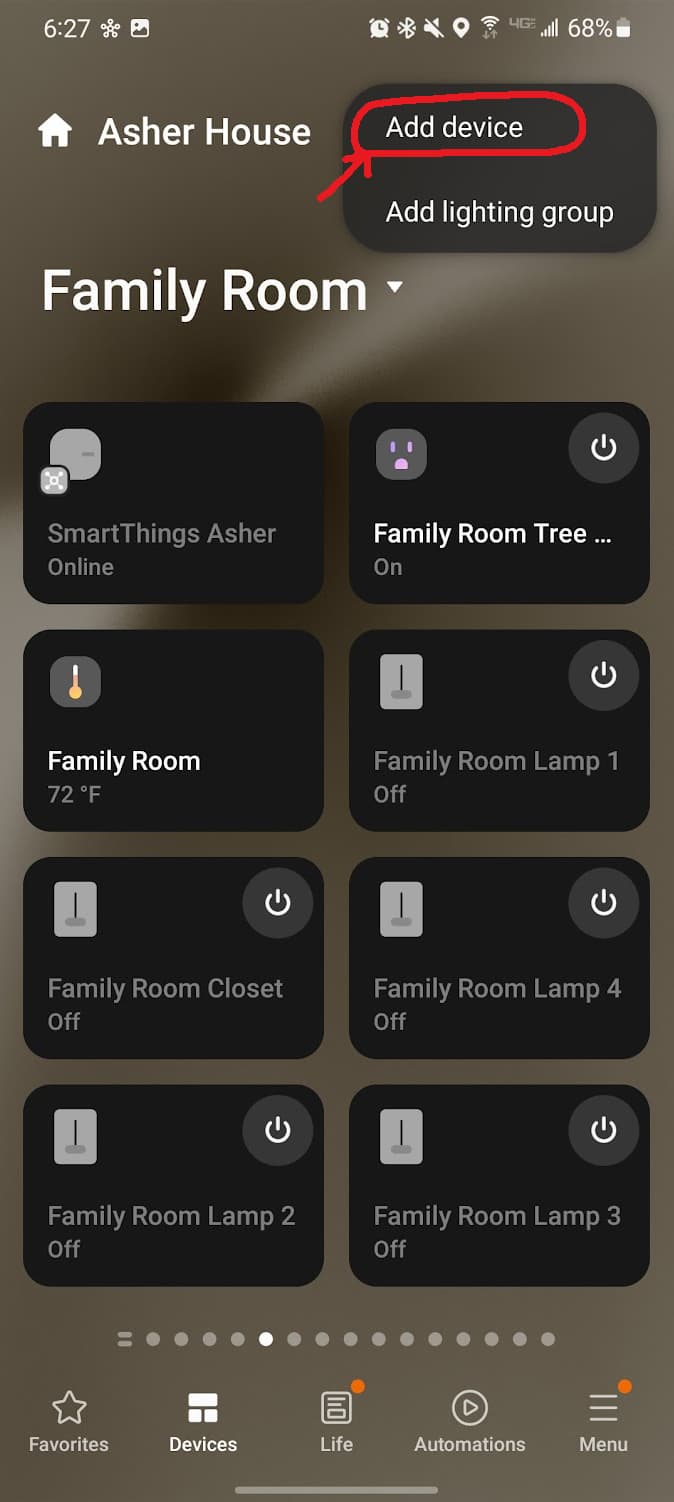
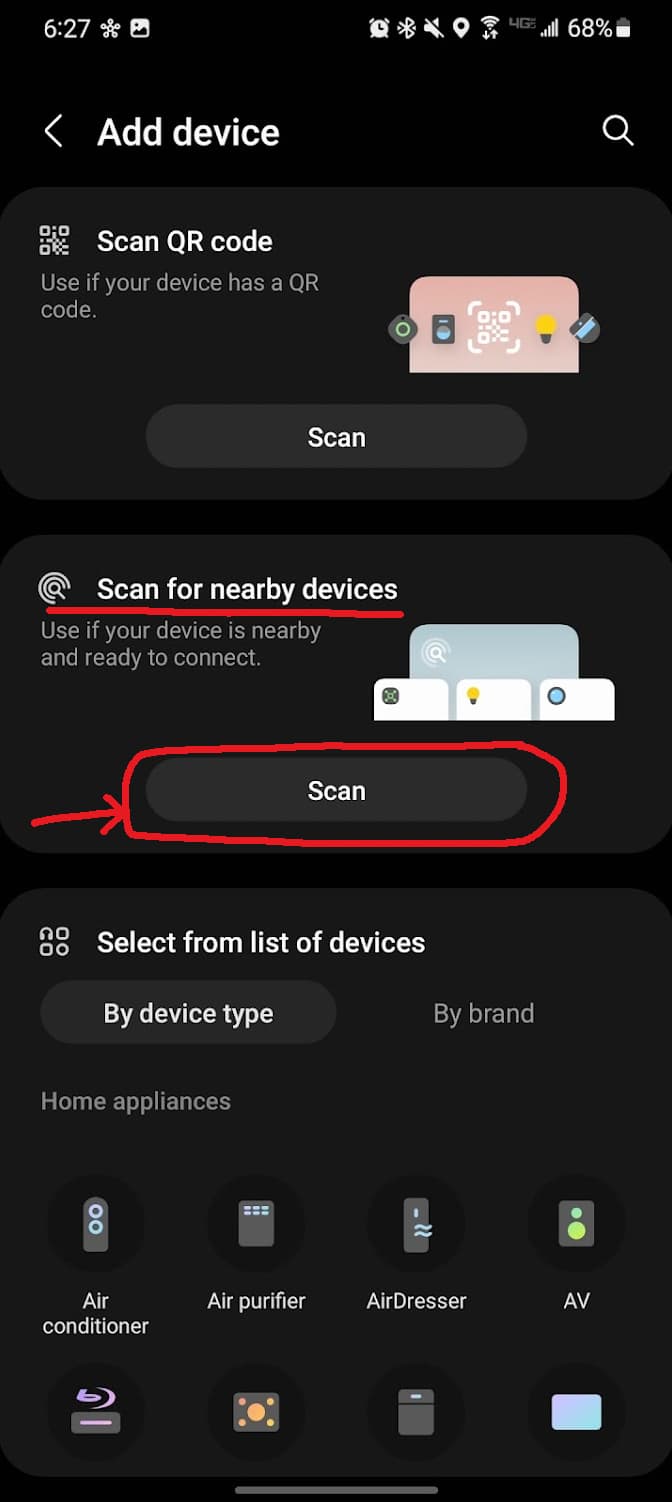
- Click on, “Add Device”—
Picture Visual
- Under the, “Scan for nearby devices” section, click, “Scan” and your hub will search for devices—
Picture Visual
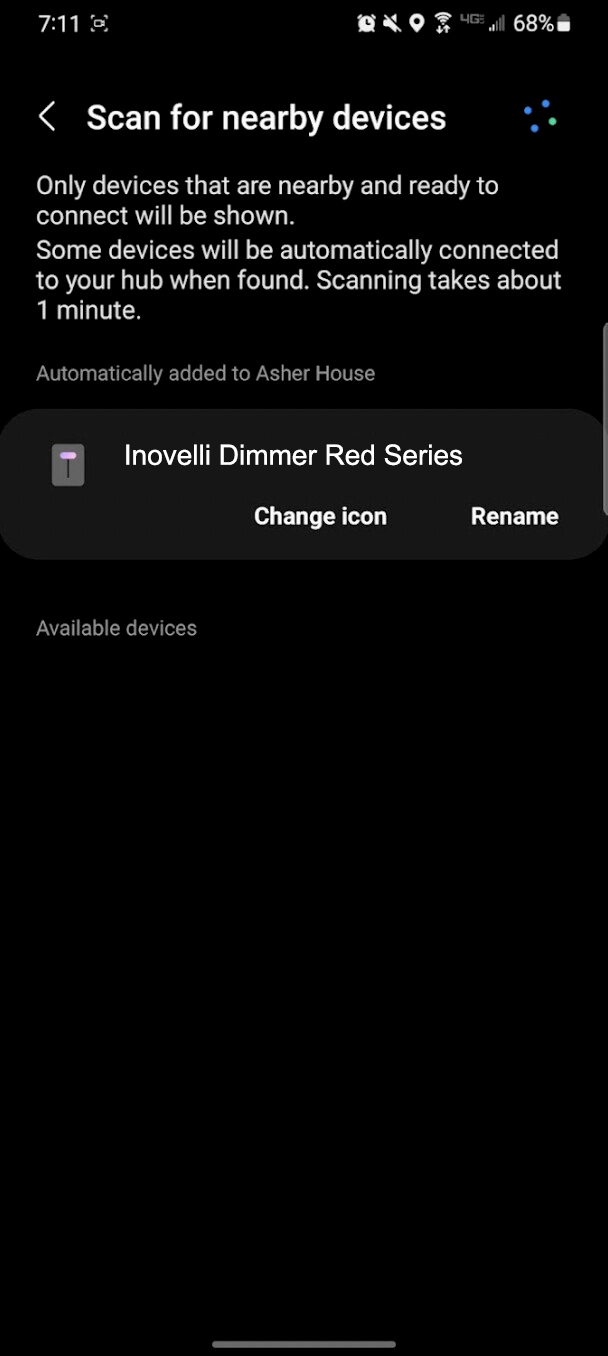
- If successful, the LED bar will turn green (if unsuccessful, the LED bar will turn red)—
GIF Visual
- In addition, your app will show your switch (likely called, “Inovelli Dimmer Red Series” or something similar)—
Picture Visual
- Press the back arrow at the top of the screen to go back to the main menu—
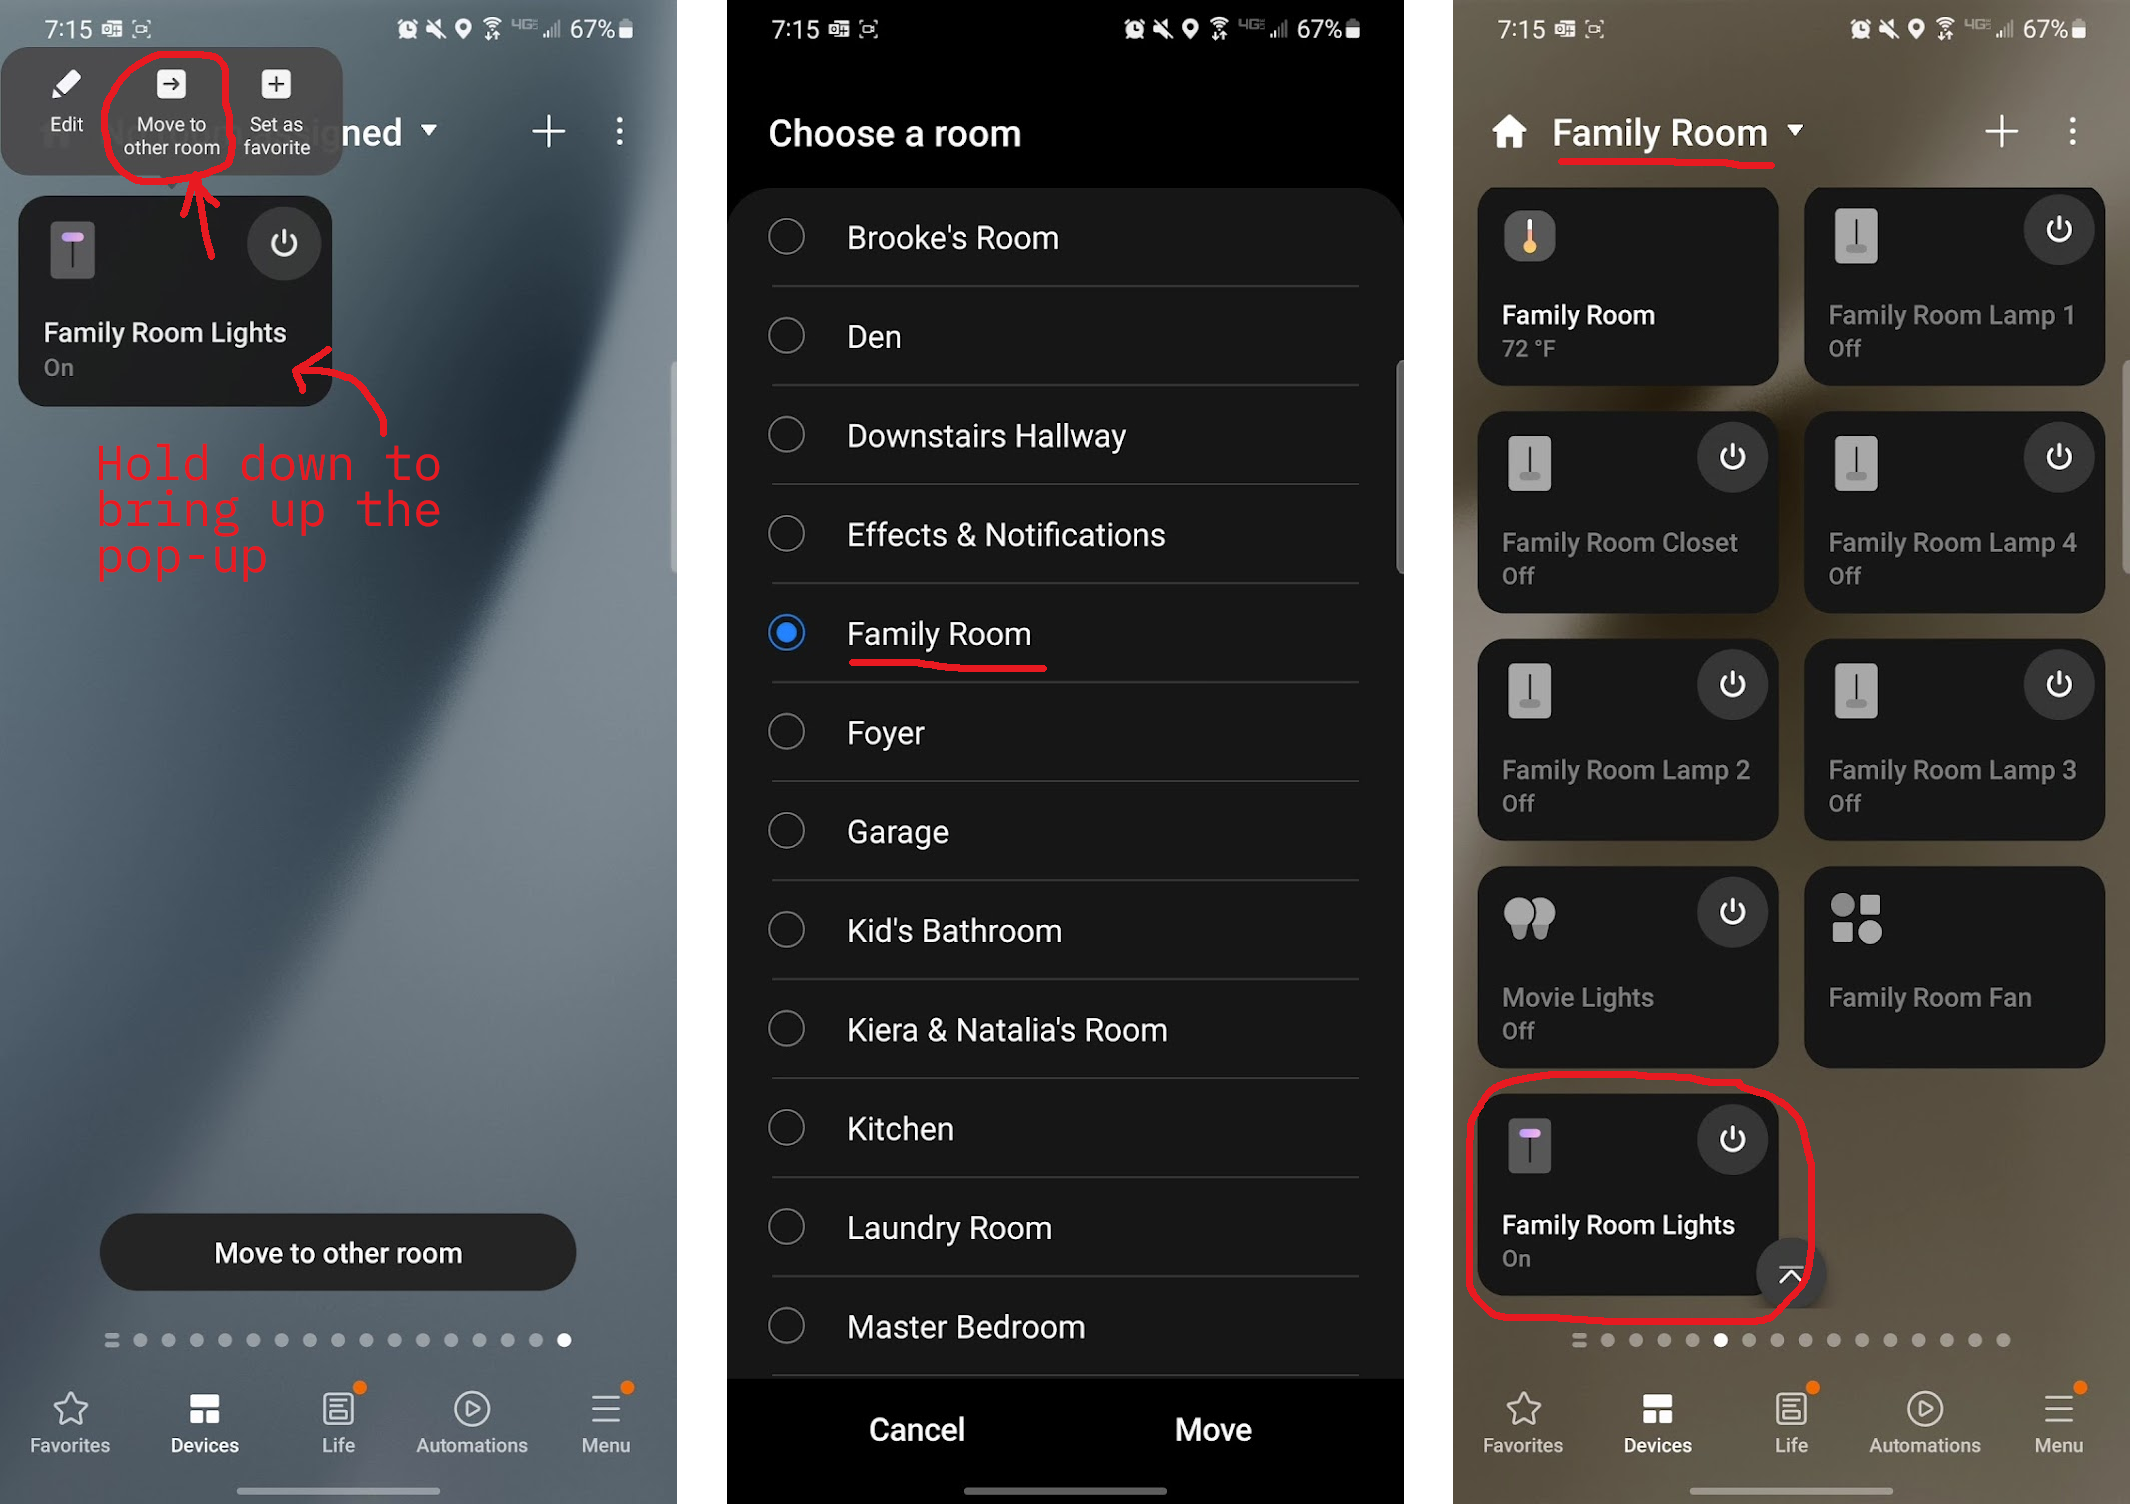
- Next, click on the, “Devices” tab and look for your switch – it should show up under either, “No room assigned” or the room your hub is in—
Picture Visual
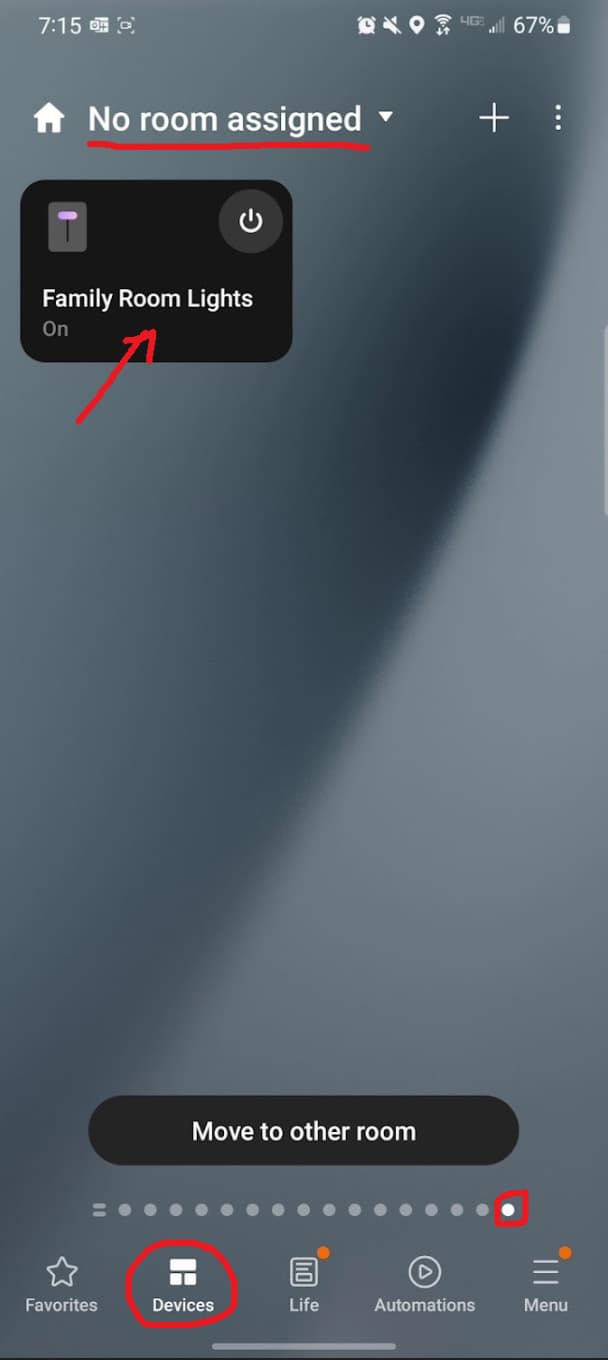
- Feel free to rename it and assign it to the proper room (to do this click on the switch, then click on the three dots and select, “Edit”)—

Once your switch is successfully paired, check to make sure you have basic functionality of your switch by dimming it and turning it on/off in the app.
If successful, we can move onto customizing your switch and setting up some advanced features (animations, scene control, etc) in the next section.
Advanced Feature Setup
This switch is packed with features and most of them come directly from this community. They’ve been debated back and forth, added to wishlists, and talked about over the course of 3+ years. Below we will explain all the parameters and show you how to change them from within SmartThings and then we’ll go into some of the advanced features and explain how to set them up in SmartThings. If you have any questions along the way, feel free to create a post as there are many SmartThings users here who are excited to help.
Parameter Explanations
NOTE: You will need to install an Edge Driver prior to accessing any of these features from within the app. Instructions can be found here: Edge Driver Installation
__
A parameter is a setting within the switch firmware that allows you to change how the switch operates. For example, you want to change how fast your lights dim on and off, the color of the LED bar, minimum dimming level and much more – all with a few clicks within the app.
The video below will show you how to access the parameters once the device handler is installed.
")
For a list of parameters, descriptions, etc. please visit our GitHub where you can find the most up-to-date firmware files, release notes and change-logs.
Animated Notifications
Animated notifications are used when you want to have a visual cue on your LED bar notify you of a certain event. A few examples would be:
- LED Bar pulses purple if your garage door is left open past 9pm
- LED Bar chases red if your front door is unlocked
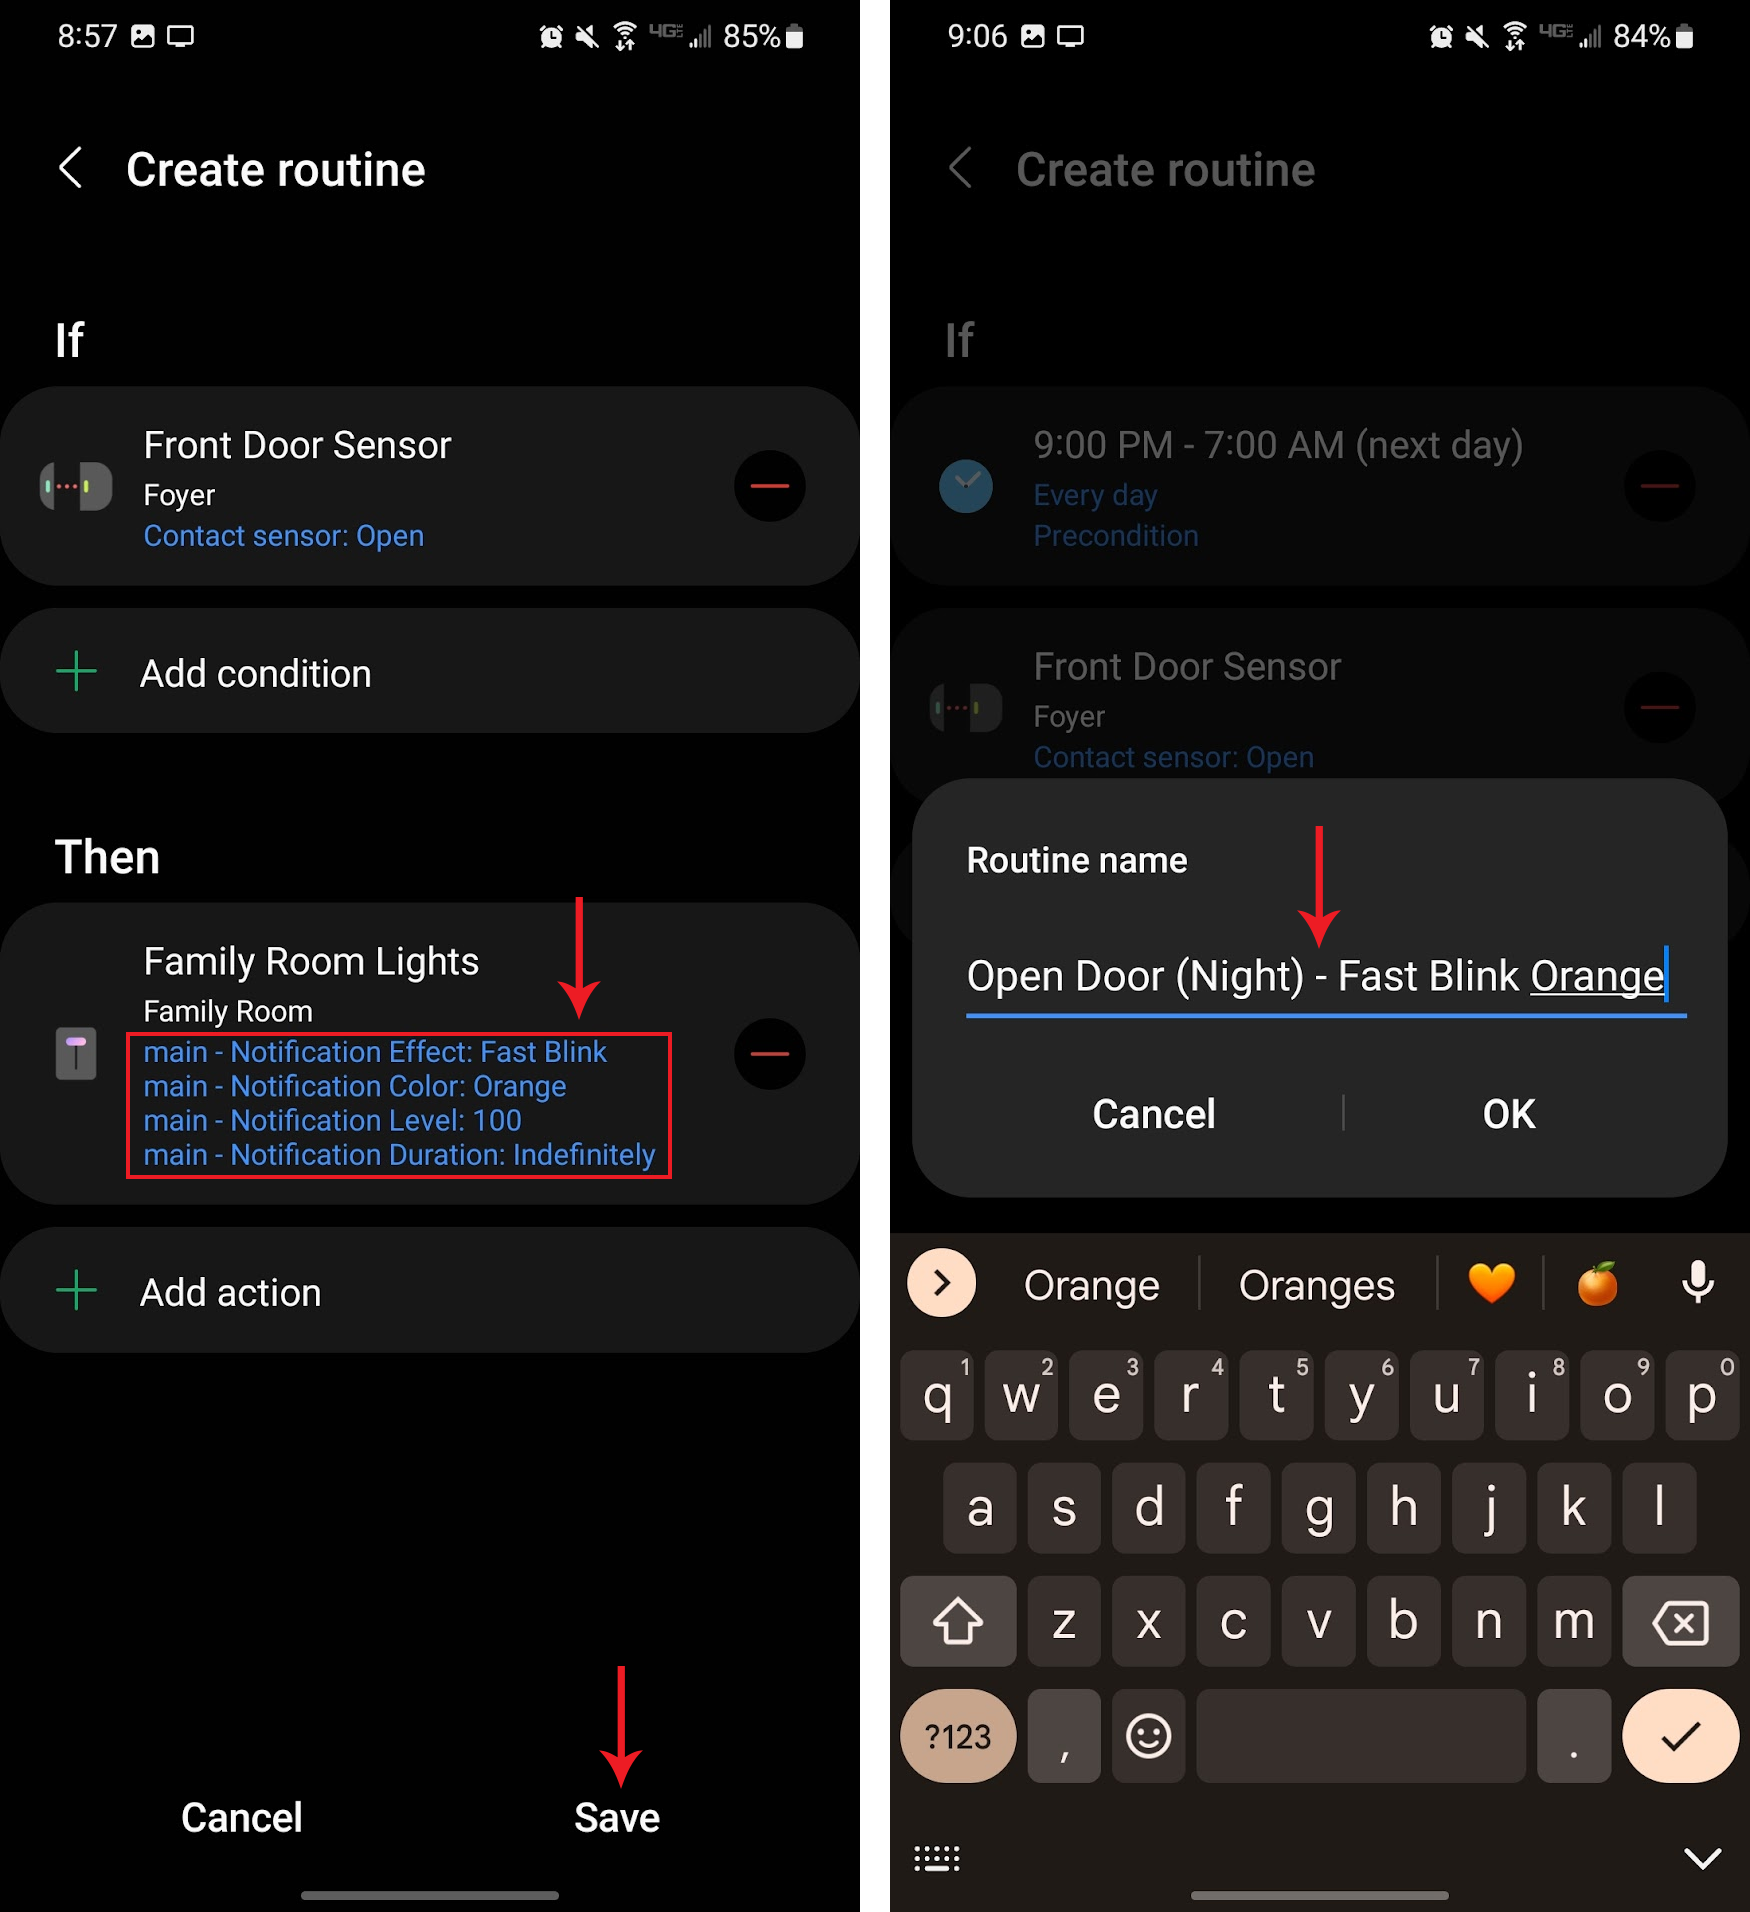
- LED Bar fast blinks orange if a door is opened at night time
These notifications are accomplished by using, “Routines” within the SmartThings App. In this example, we’ll setup a simple notification that alerts you if a door is opened between the hours of 9pm and 7am.
Written Instructions
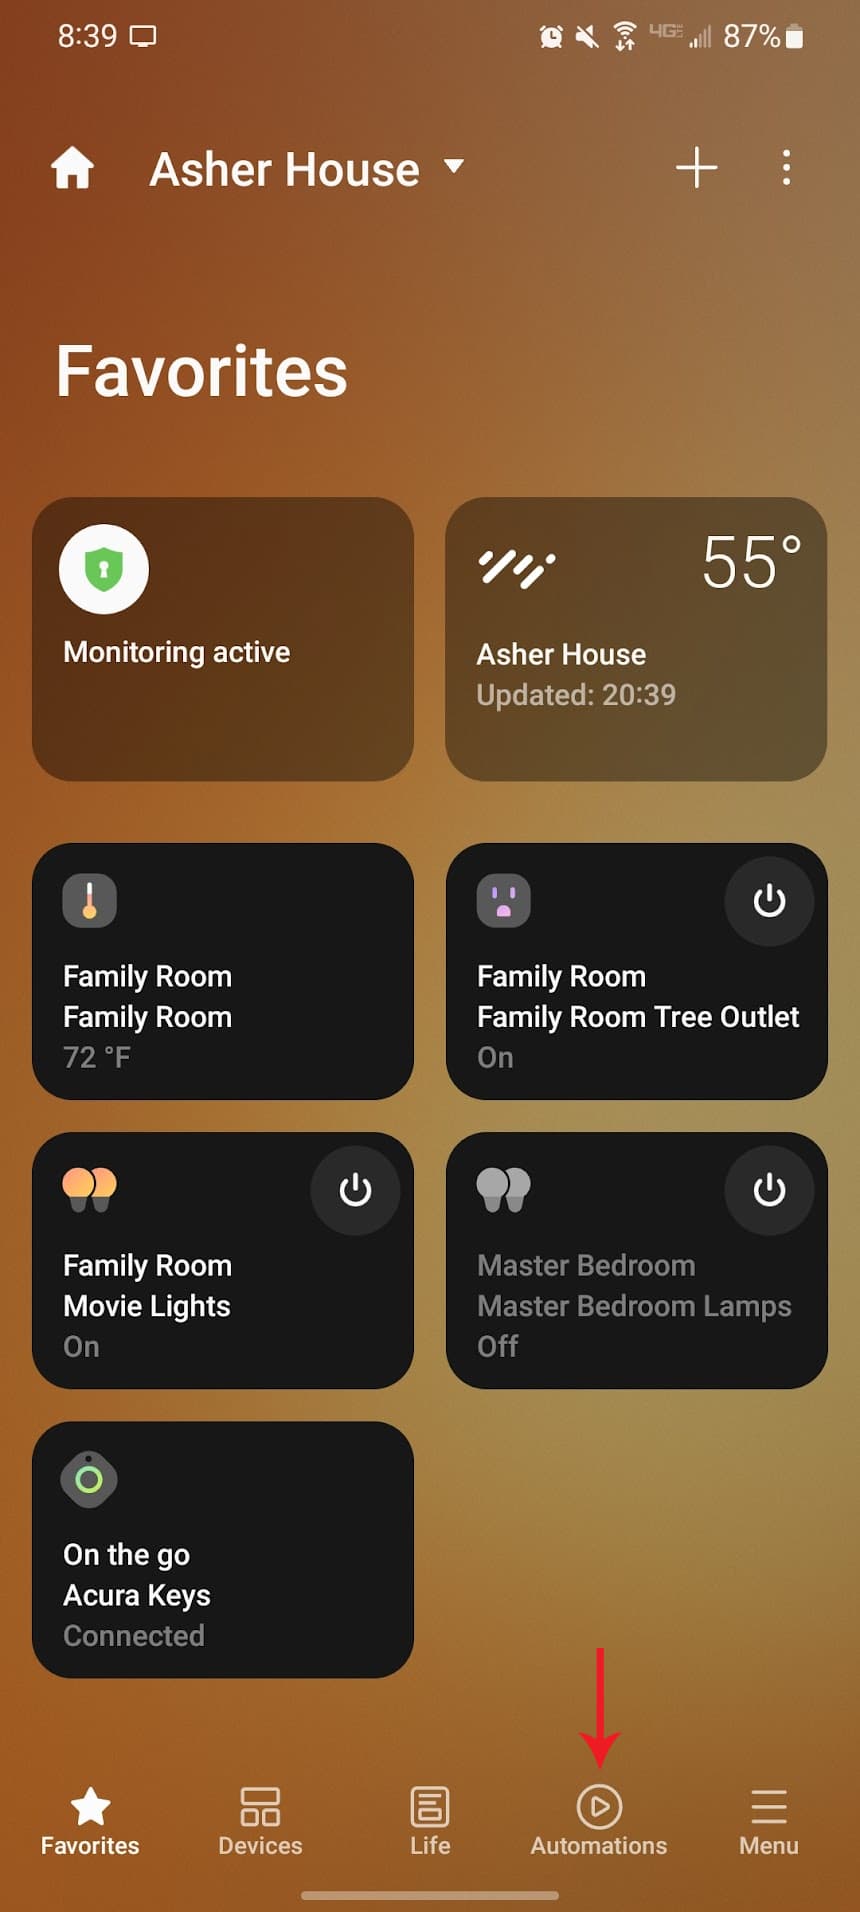
- Open your SmartThings App and click on the, “Automations” icon at the bottom—
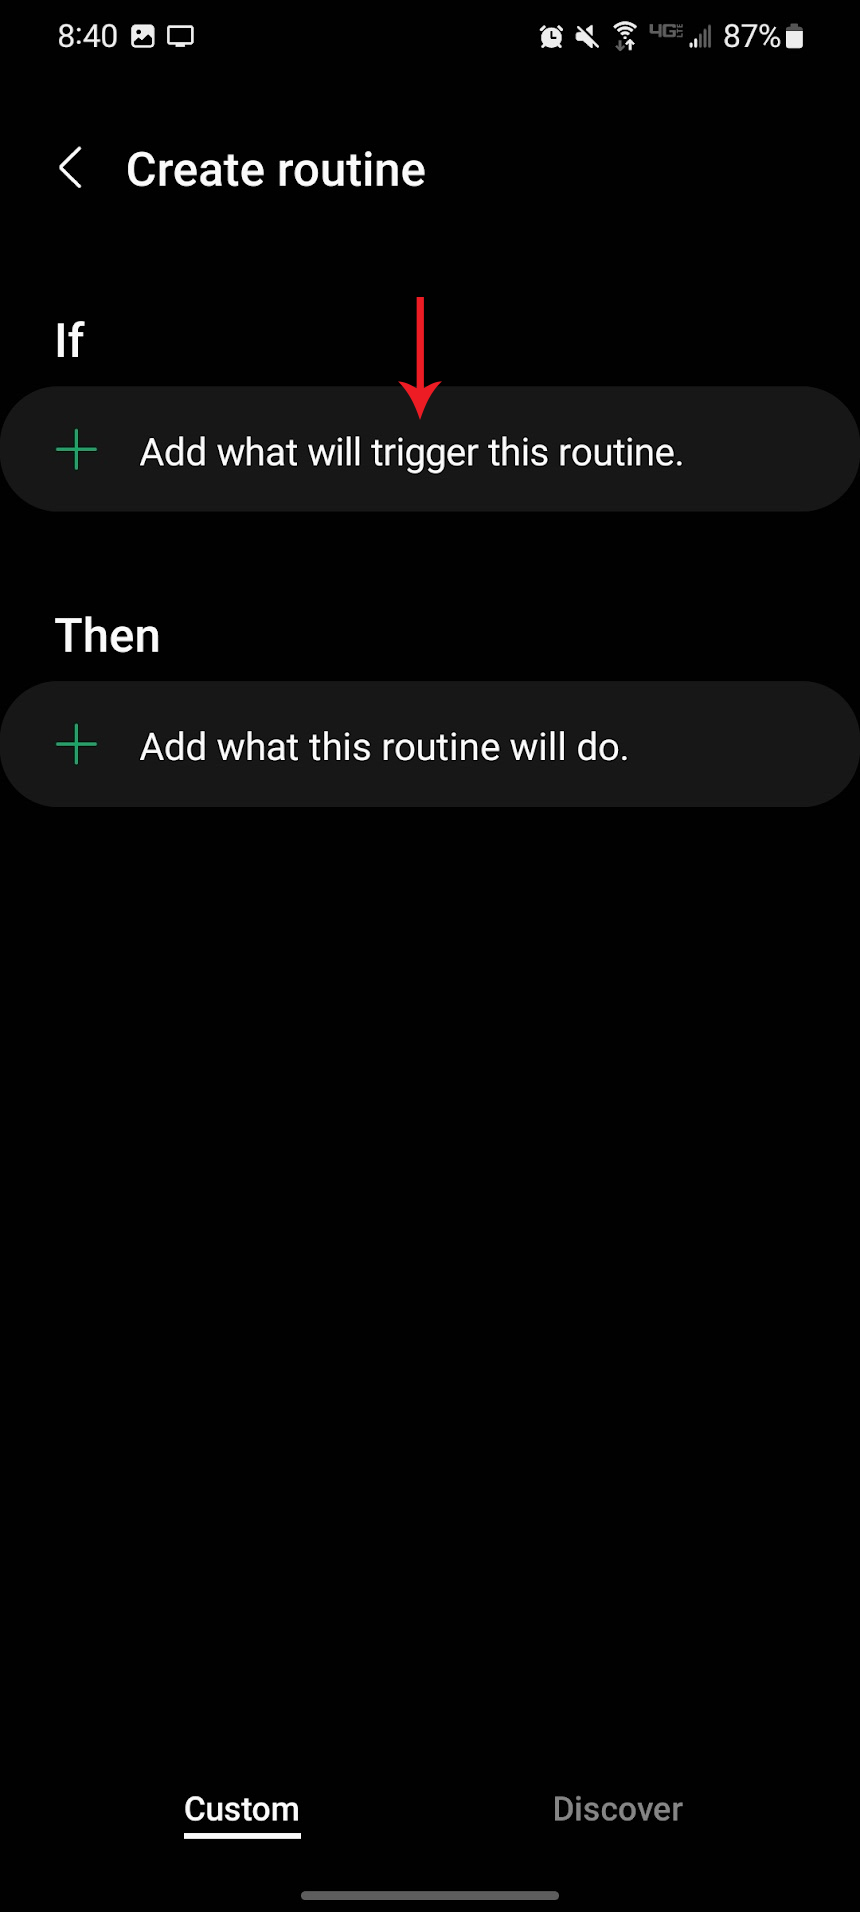
- Click on the, “+” button at the top of the screen and select, “Create routine”—
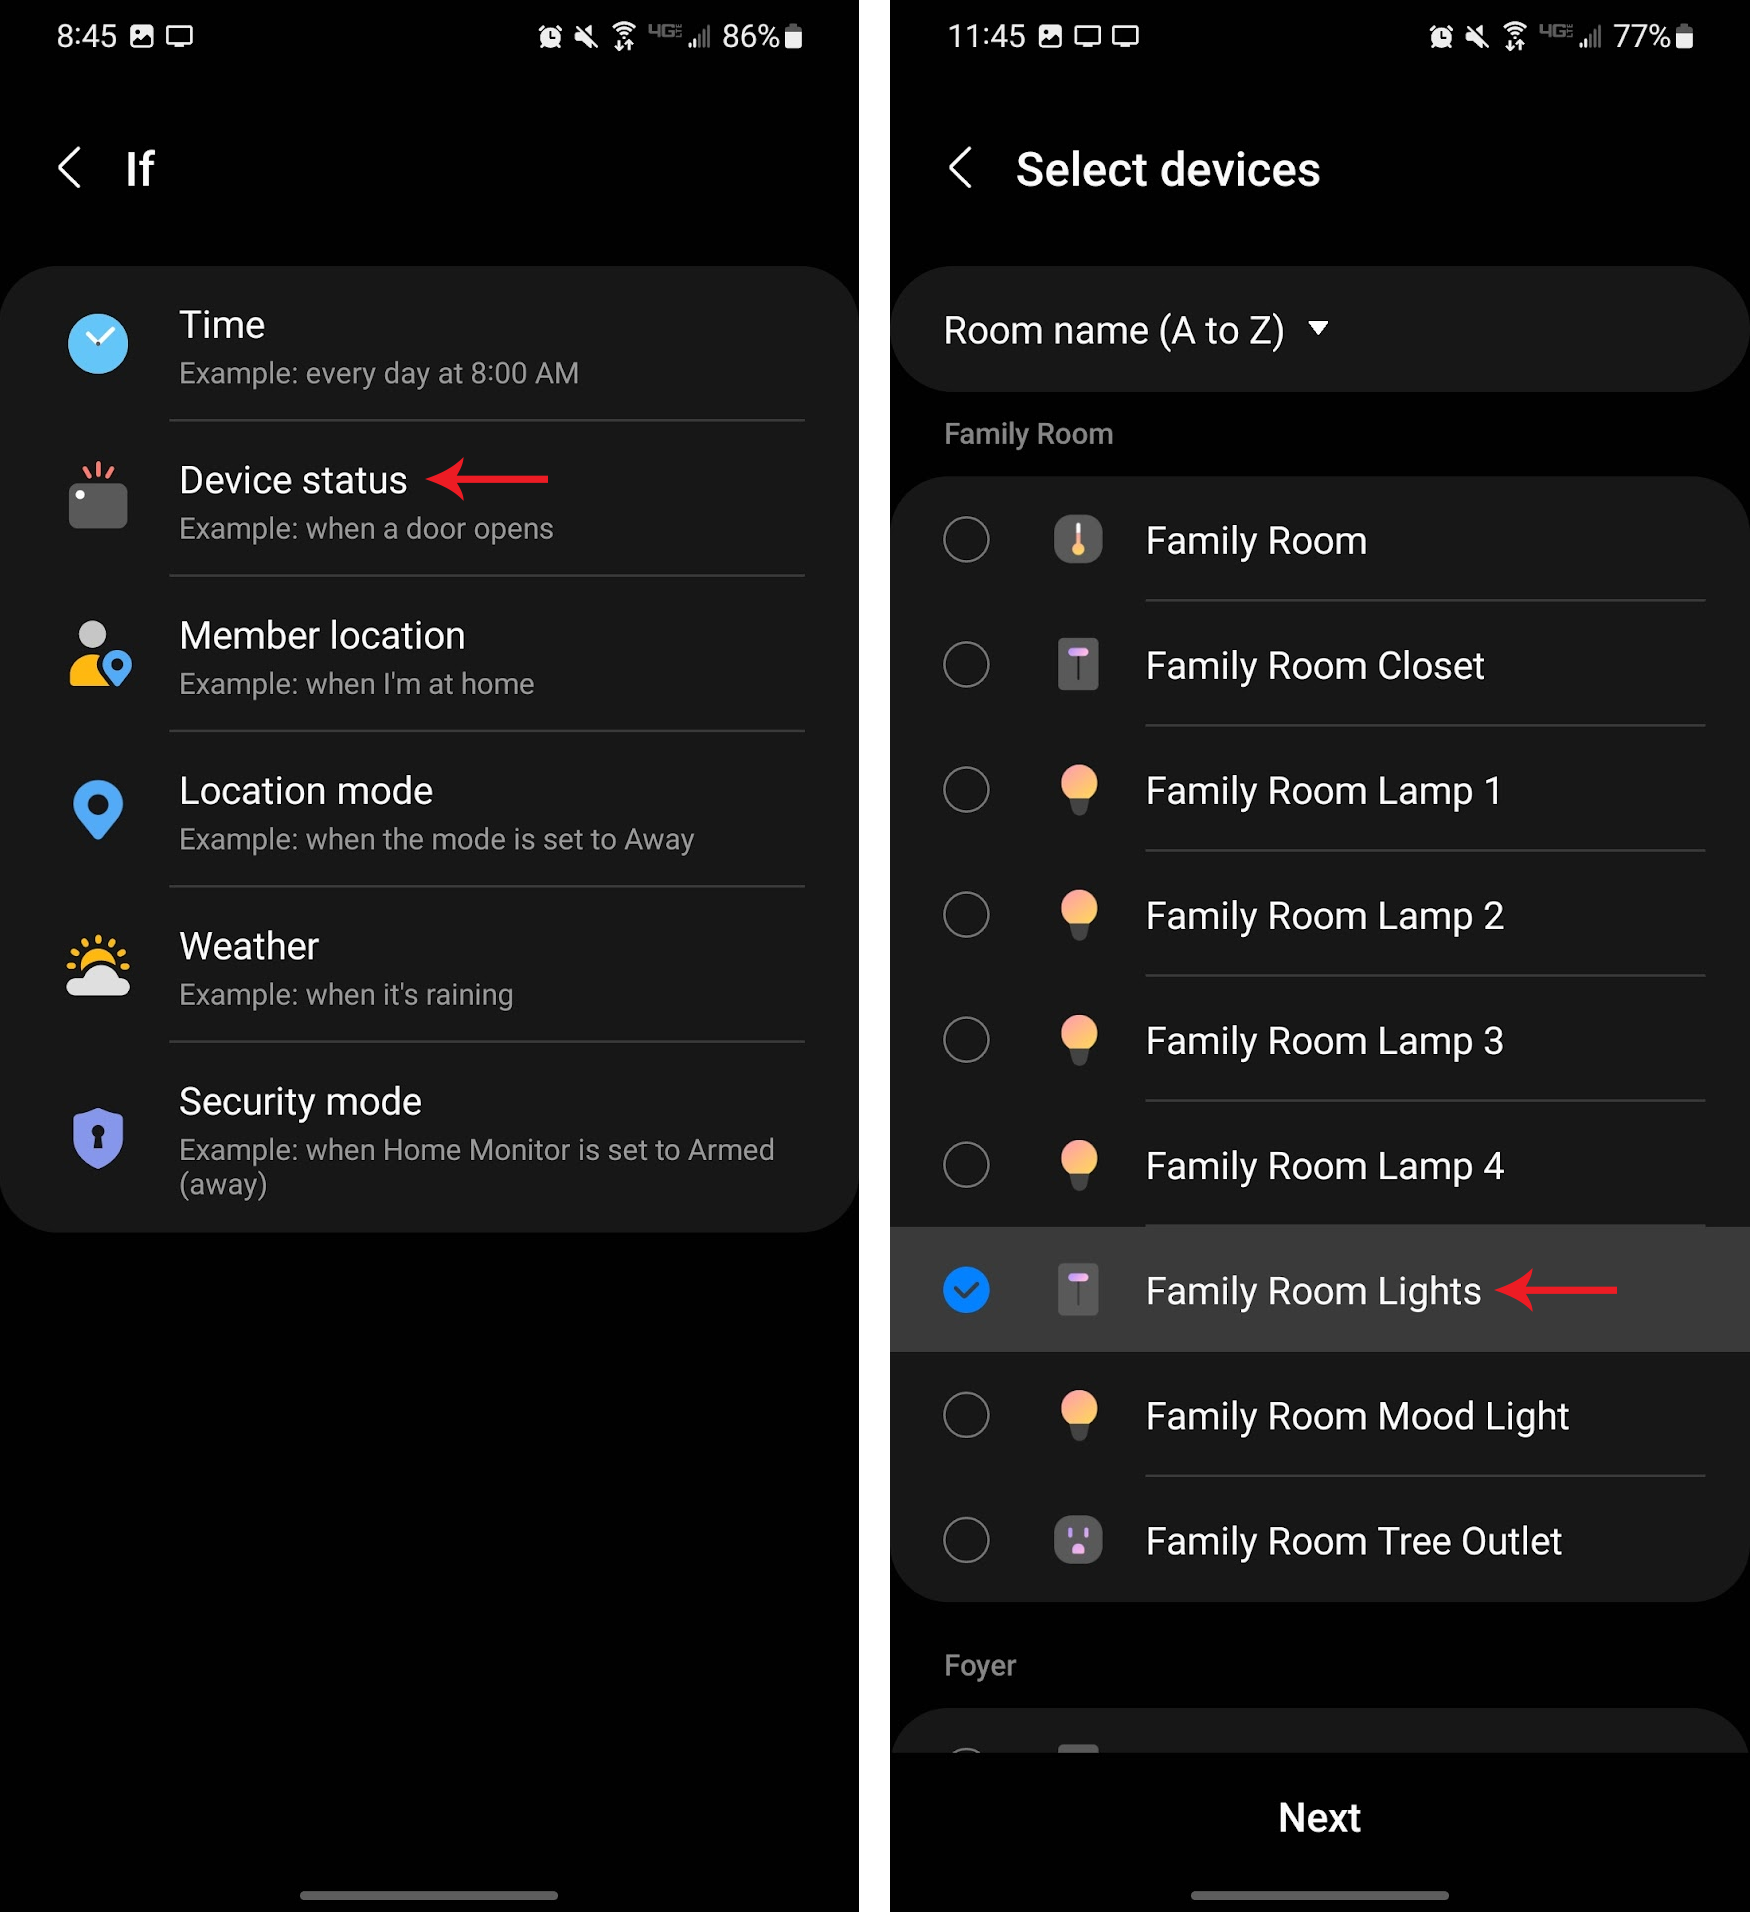
- Under the, “If” section, click on the, “+ Add what will trigger this routine” button—
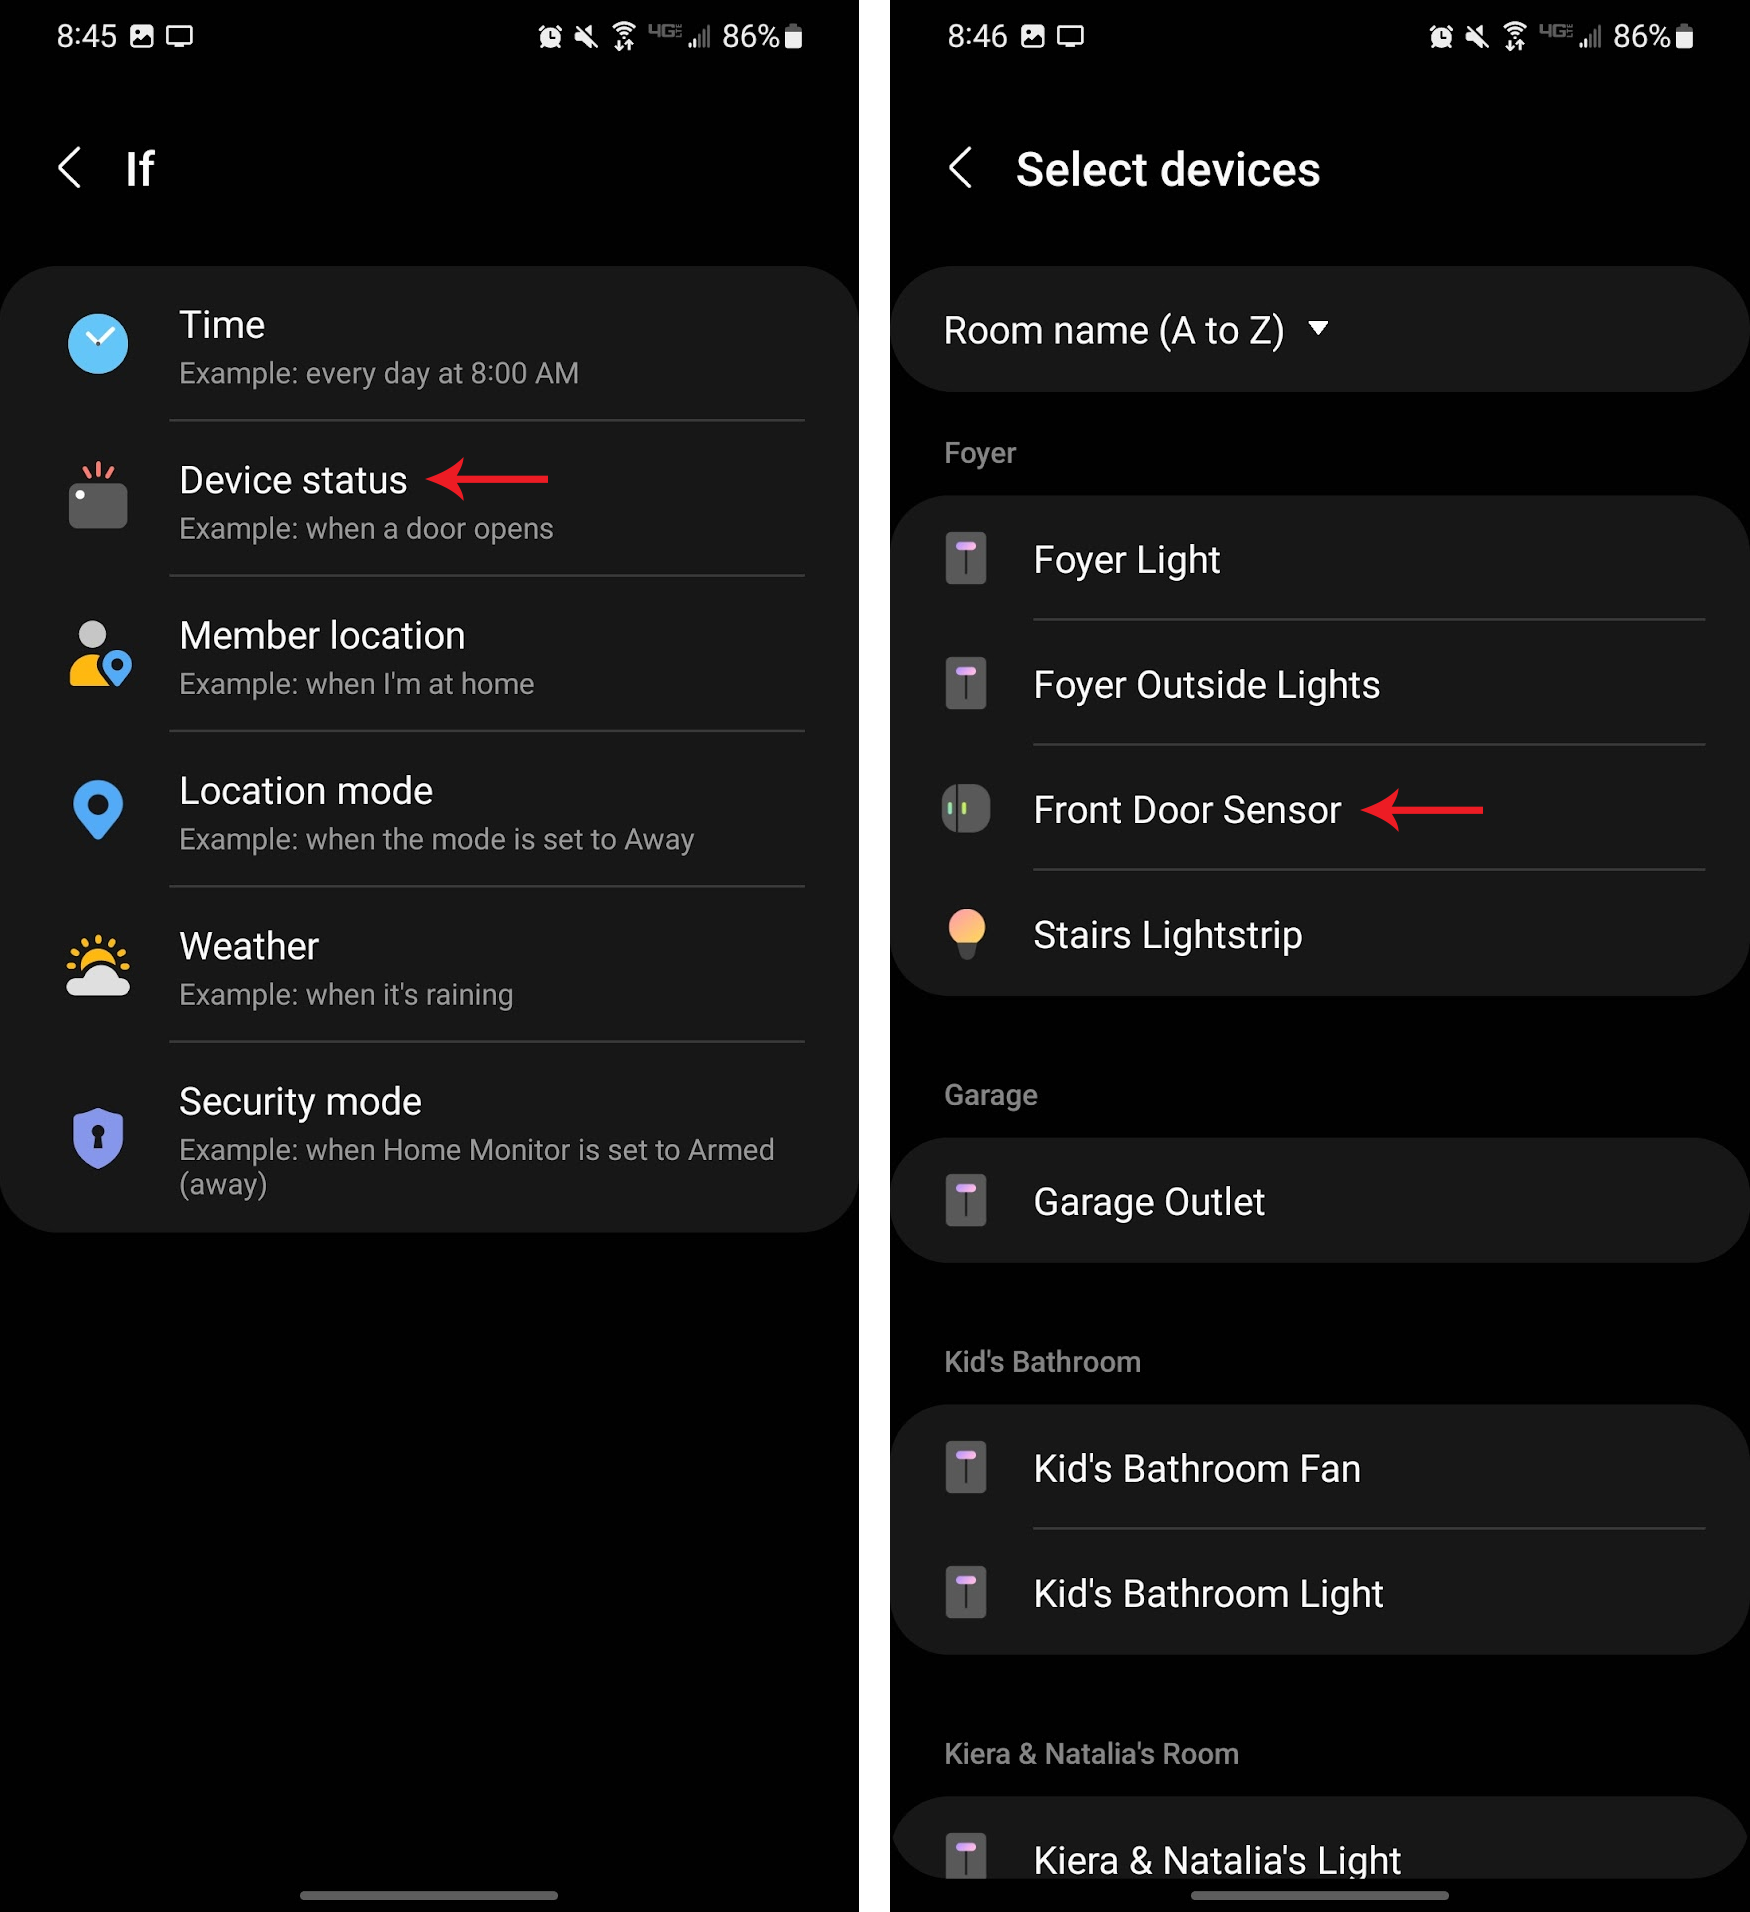
- Click on, “Device status” and find your contact sensor to click on—
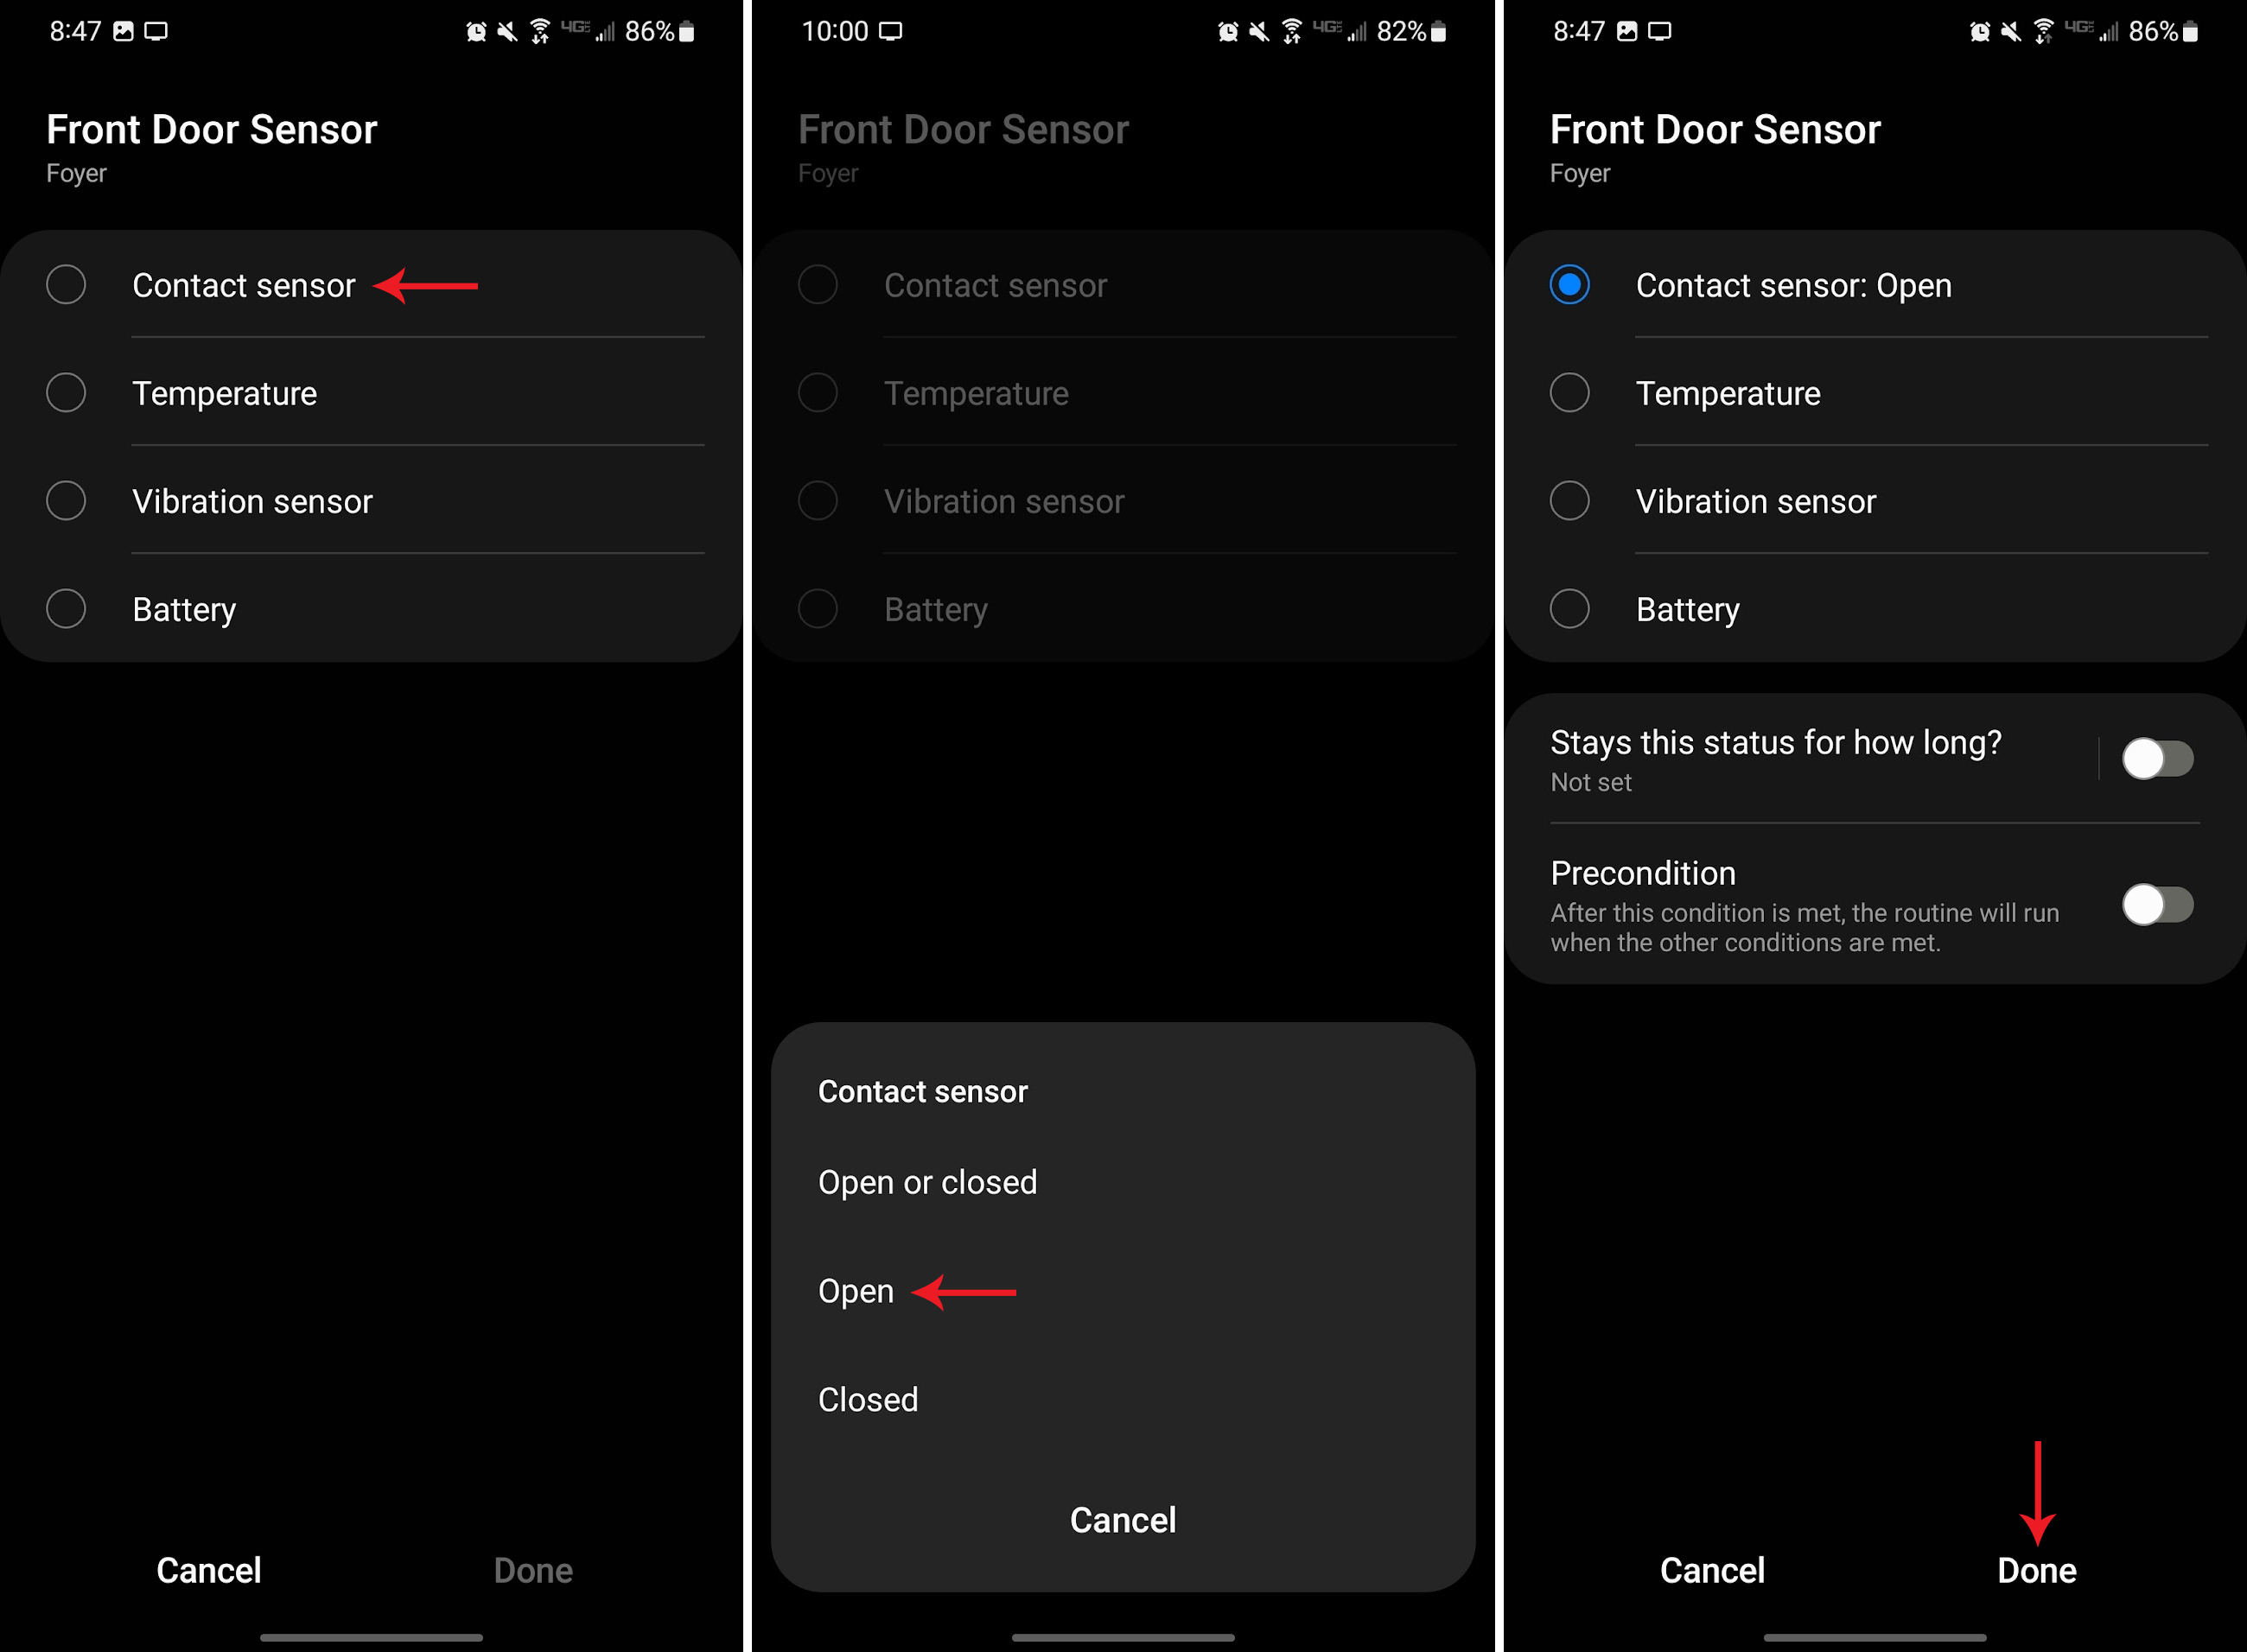
- This part may vary depending on your contact sensor, but the important thing is to select, “Contact sensor” and then, “Open” – then click, “Done”—
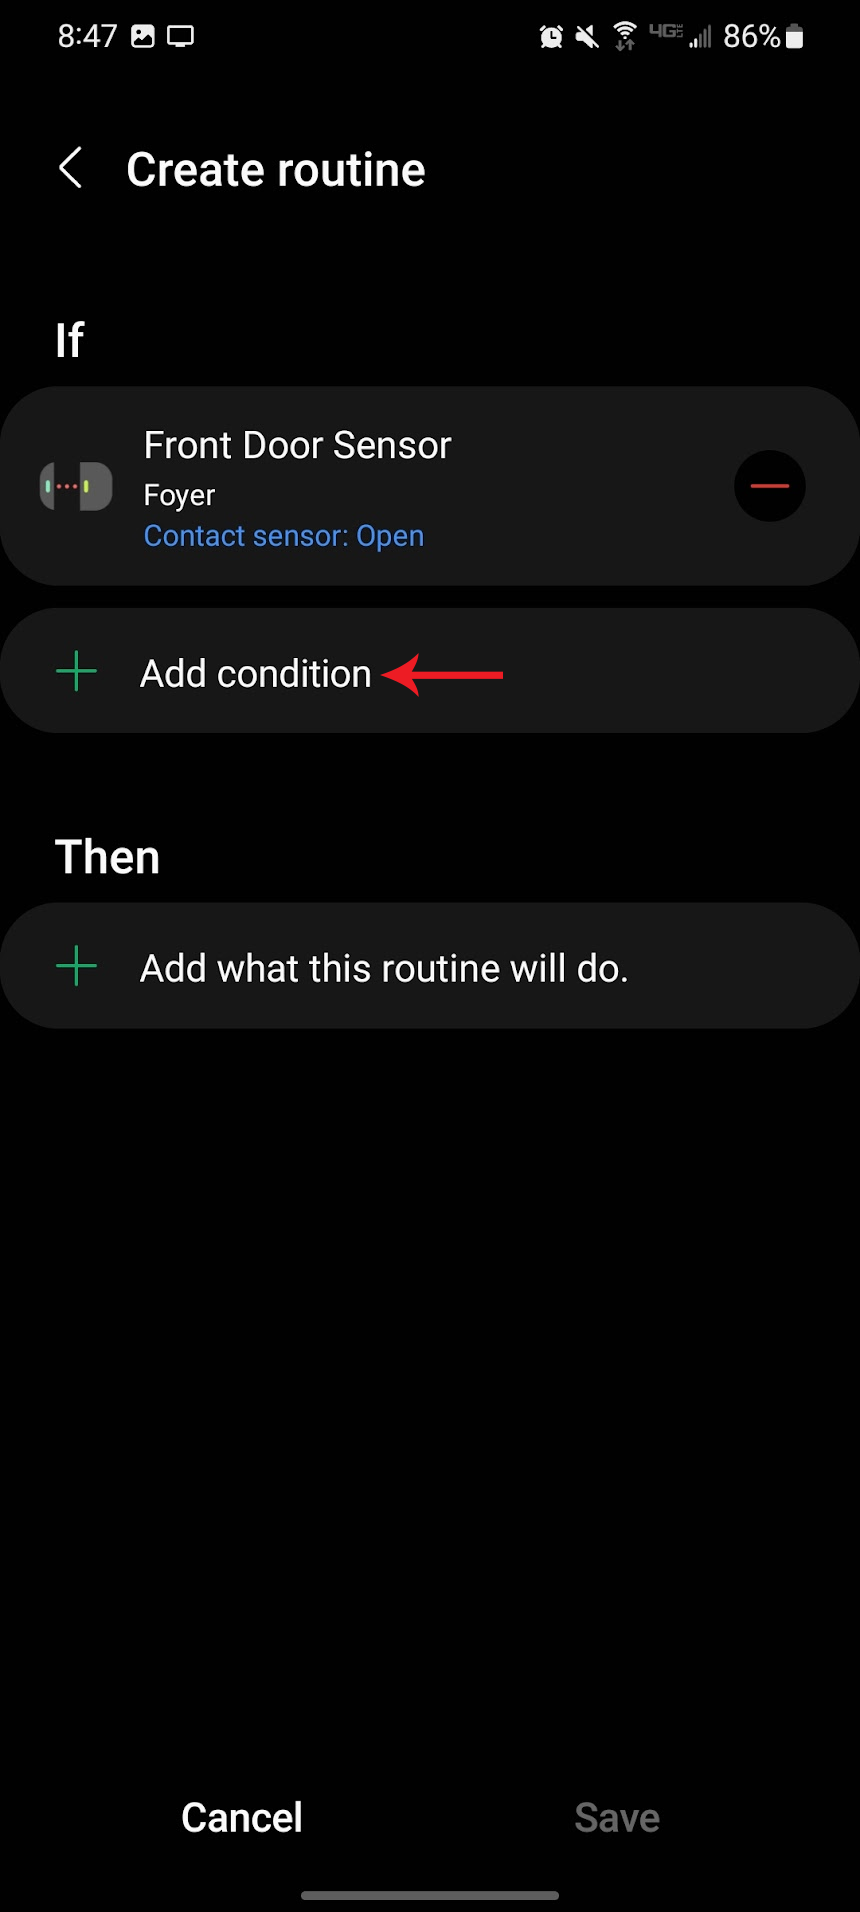
- Now, we’ll add another condition to set a time value (ie: we only want this notification to run between the hours of 9pm and 7am) – Click on, “+ Add Condition”—
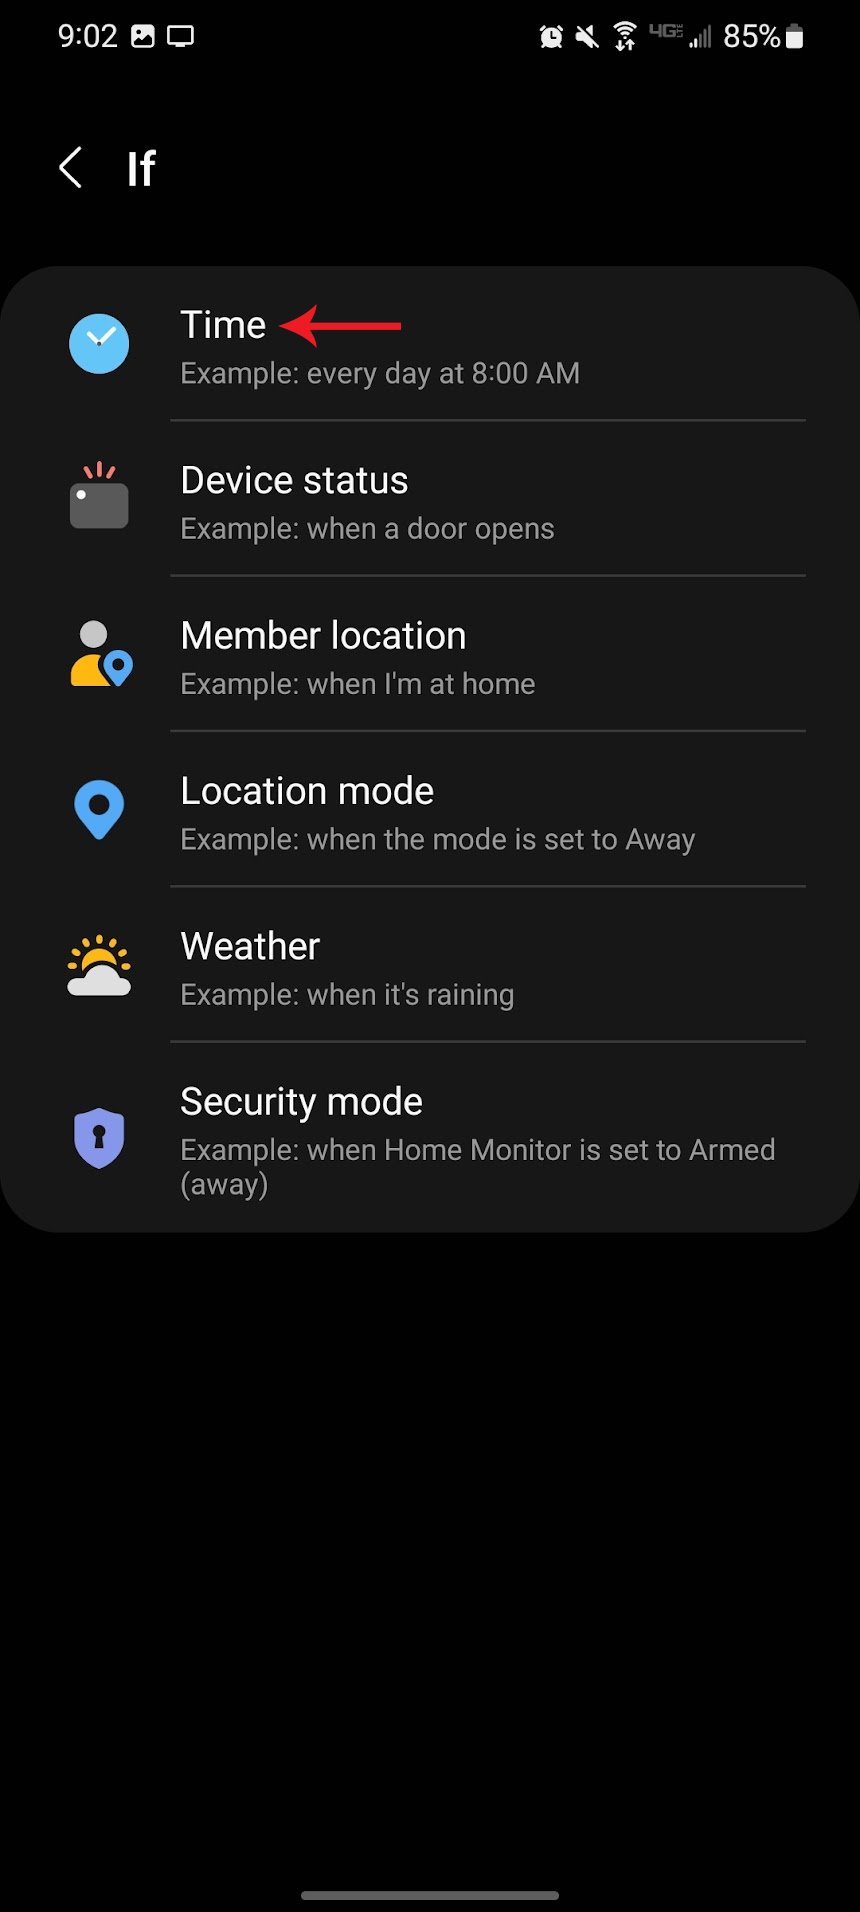
- Click on, “Time”—
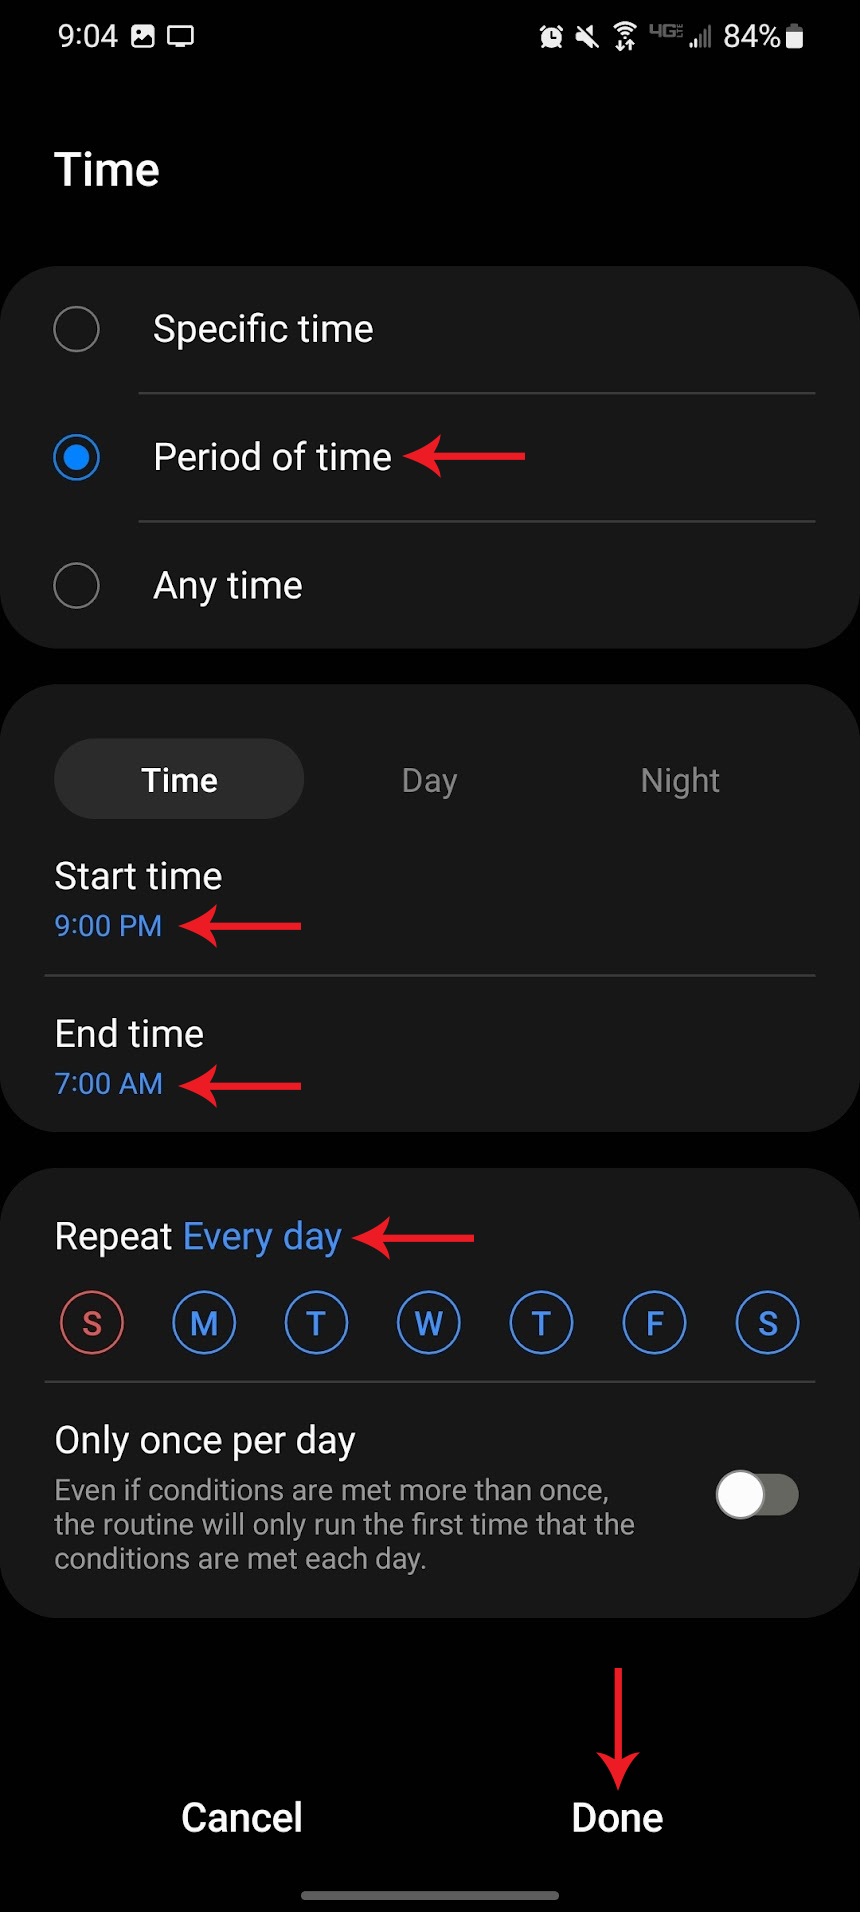
- Select, “Period of time” and then adjust where it says, “Start time” and “End time” and set those values to 9pm and 7am (then select the days you want this to be applicable and select, “Done”)—
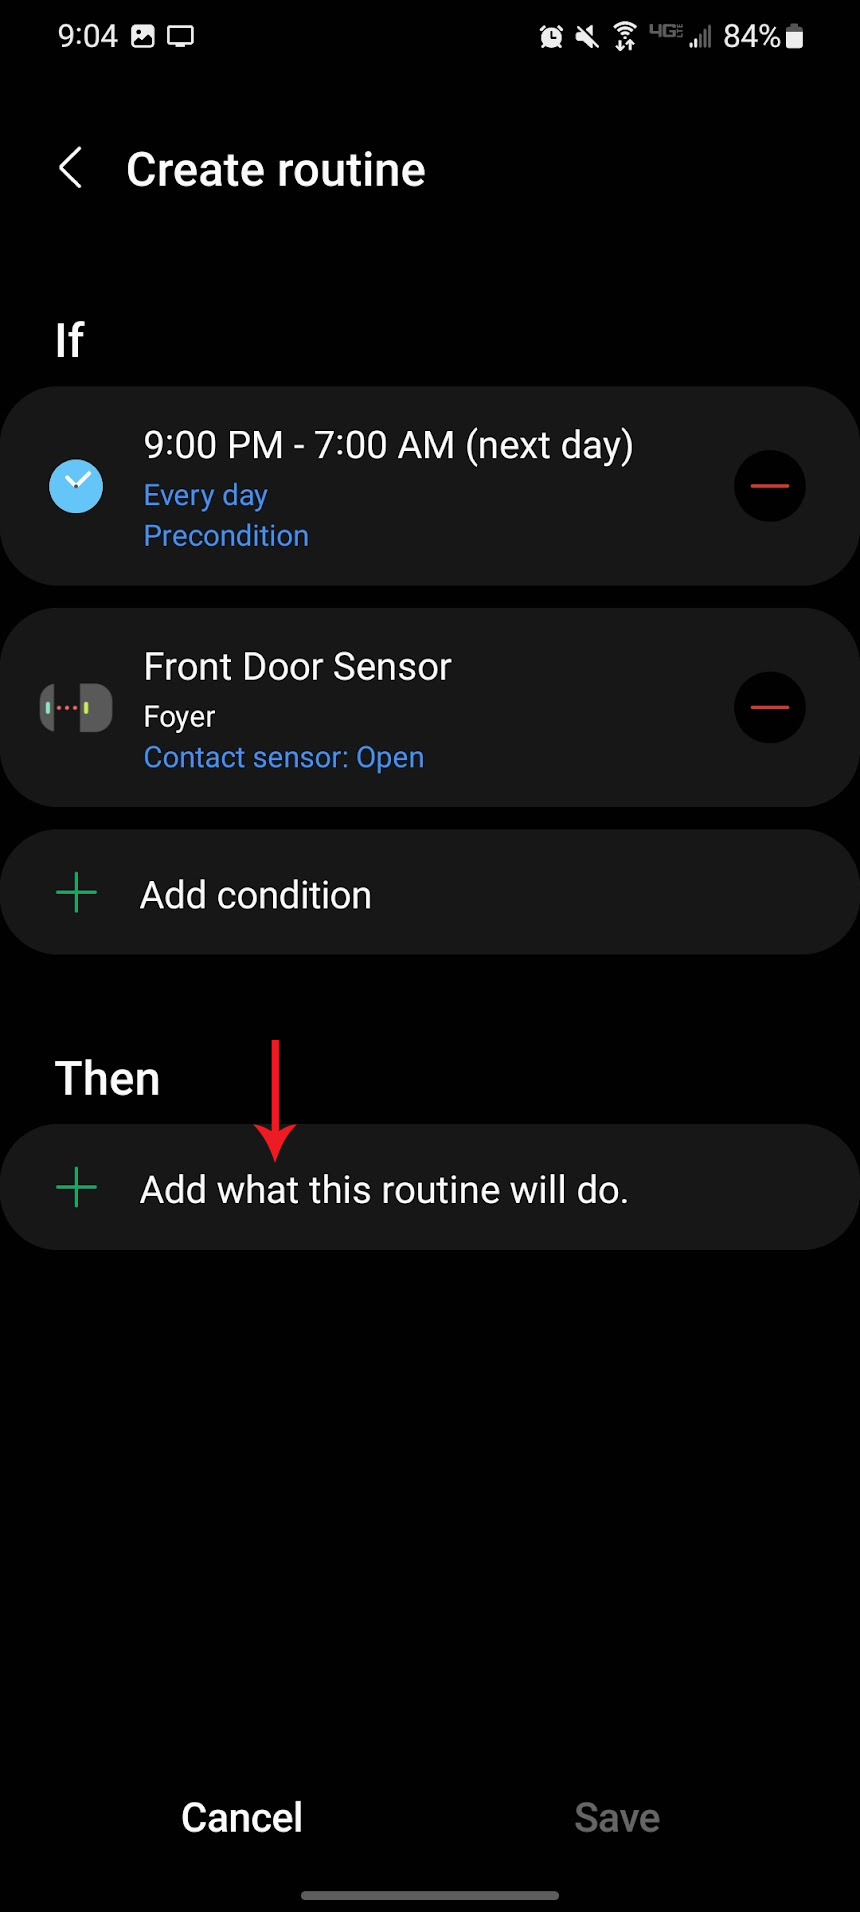
- Under the, “Then” section, click on the, “+ Add what this routine will do” button—
- Click on, “Control devices”—
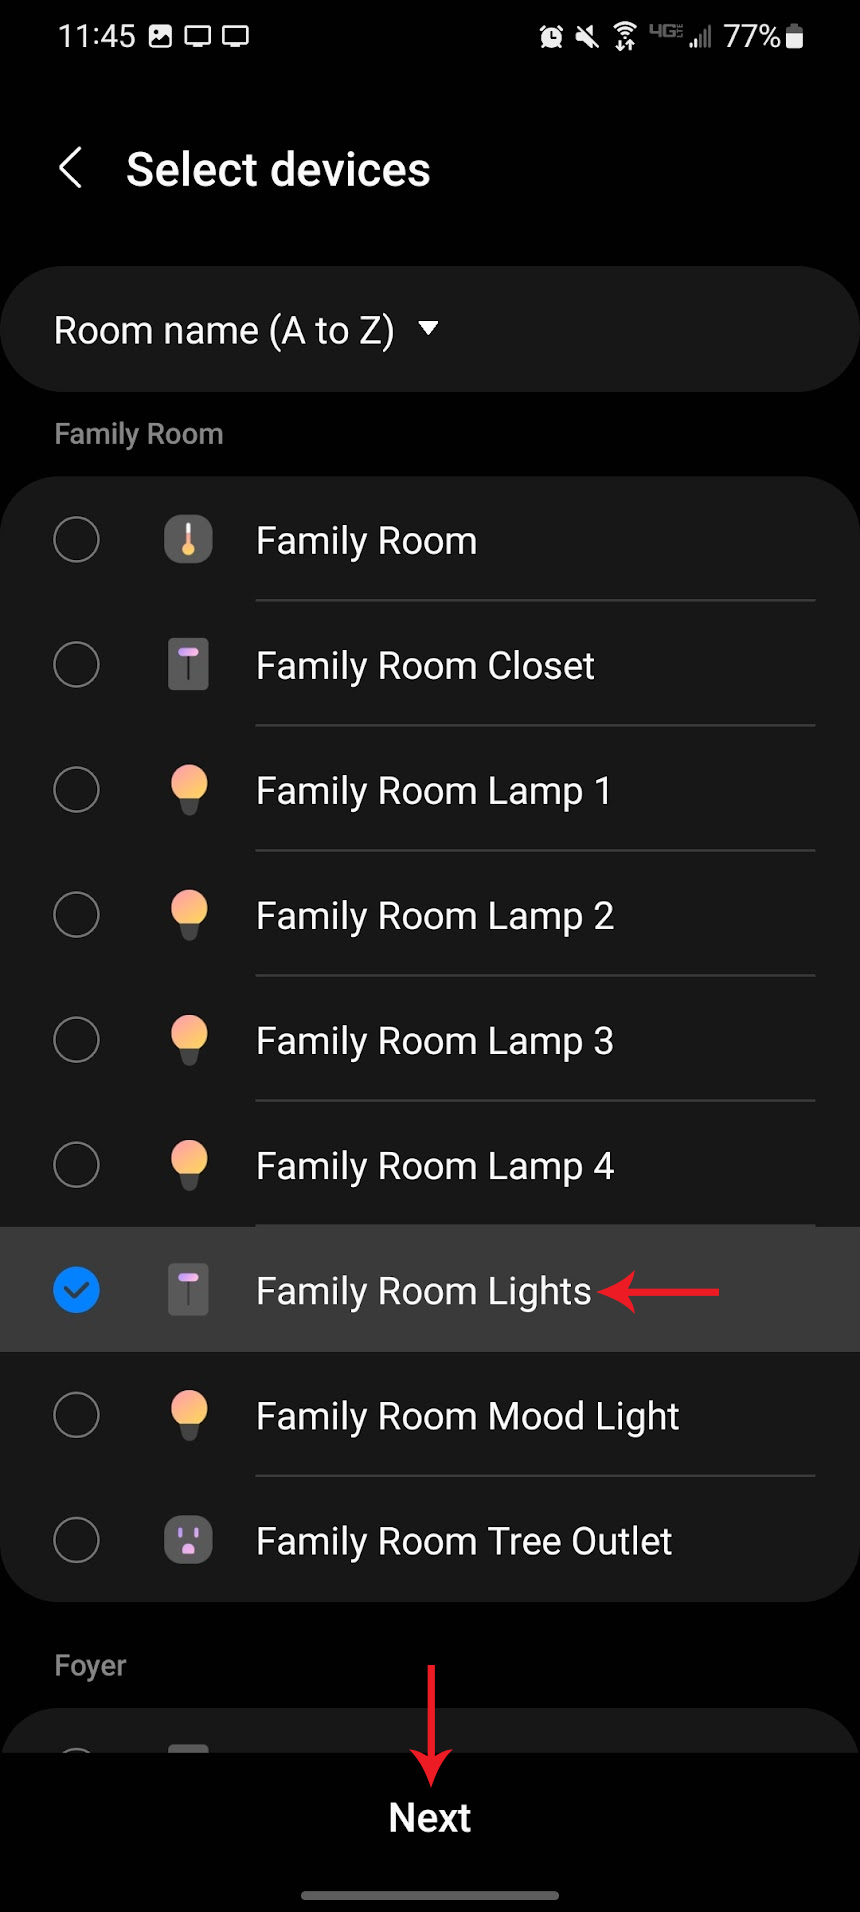
- Find your Inovelli Blue Series 2-1 Switch and click on it, then select, “Next”—
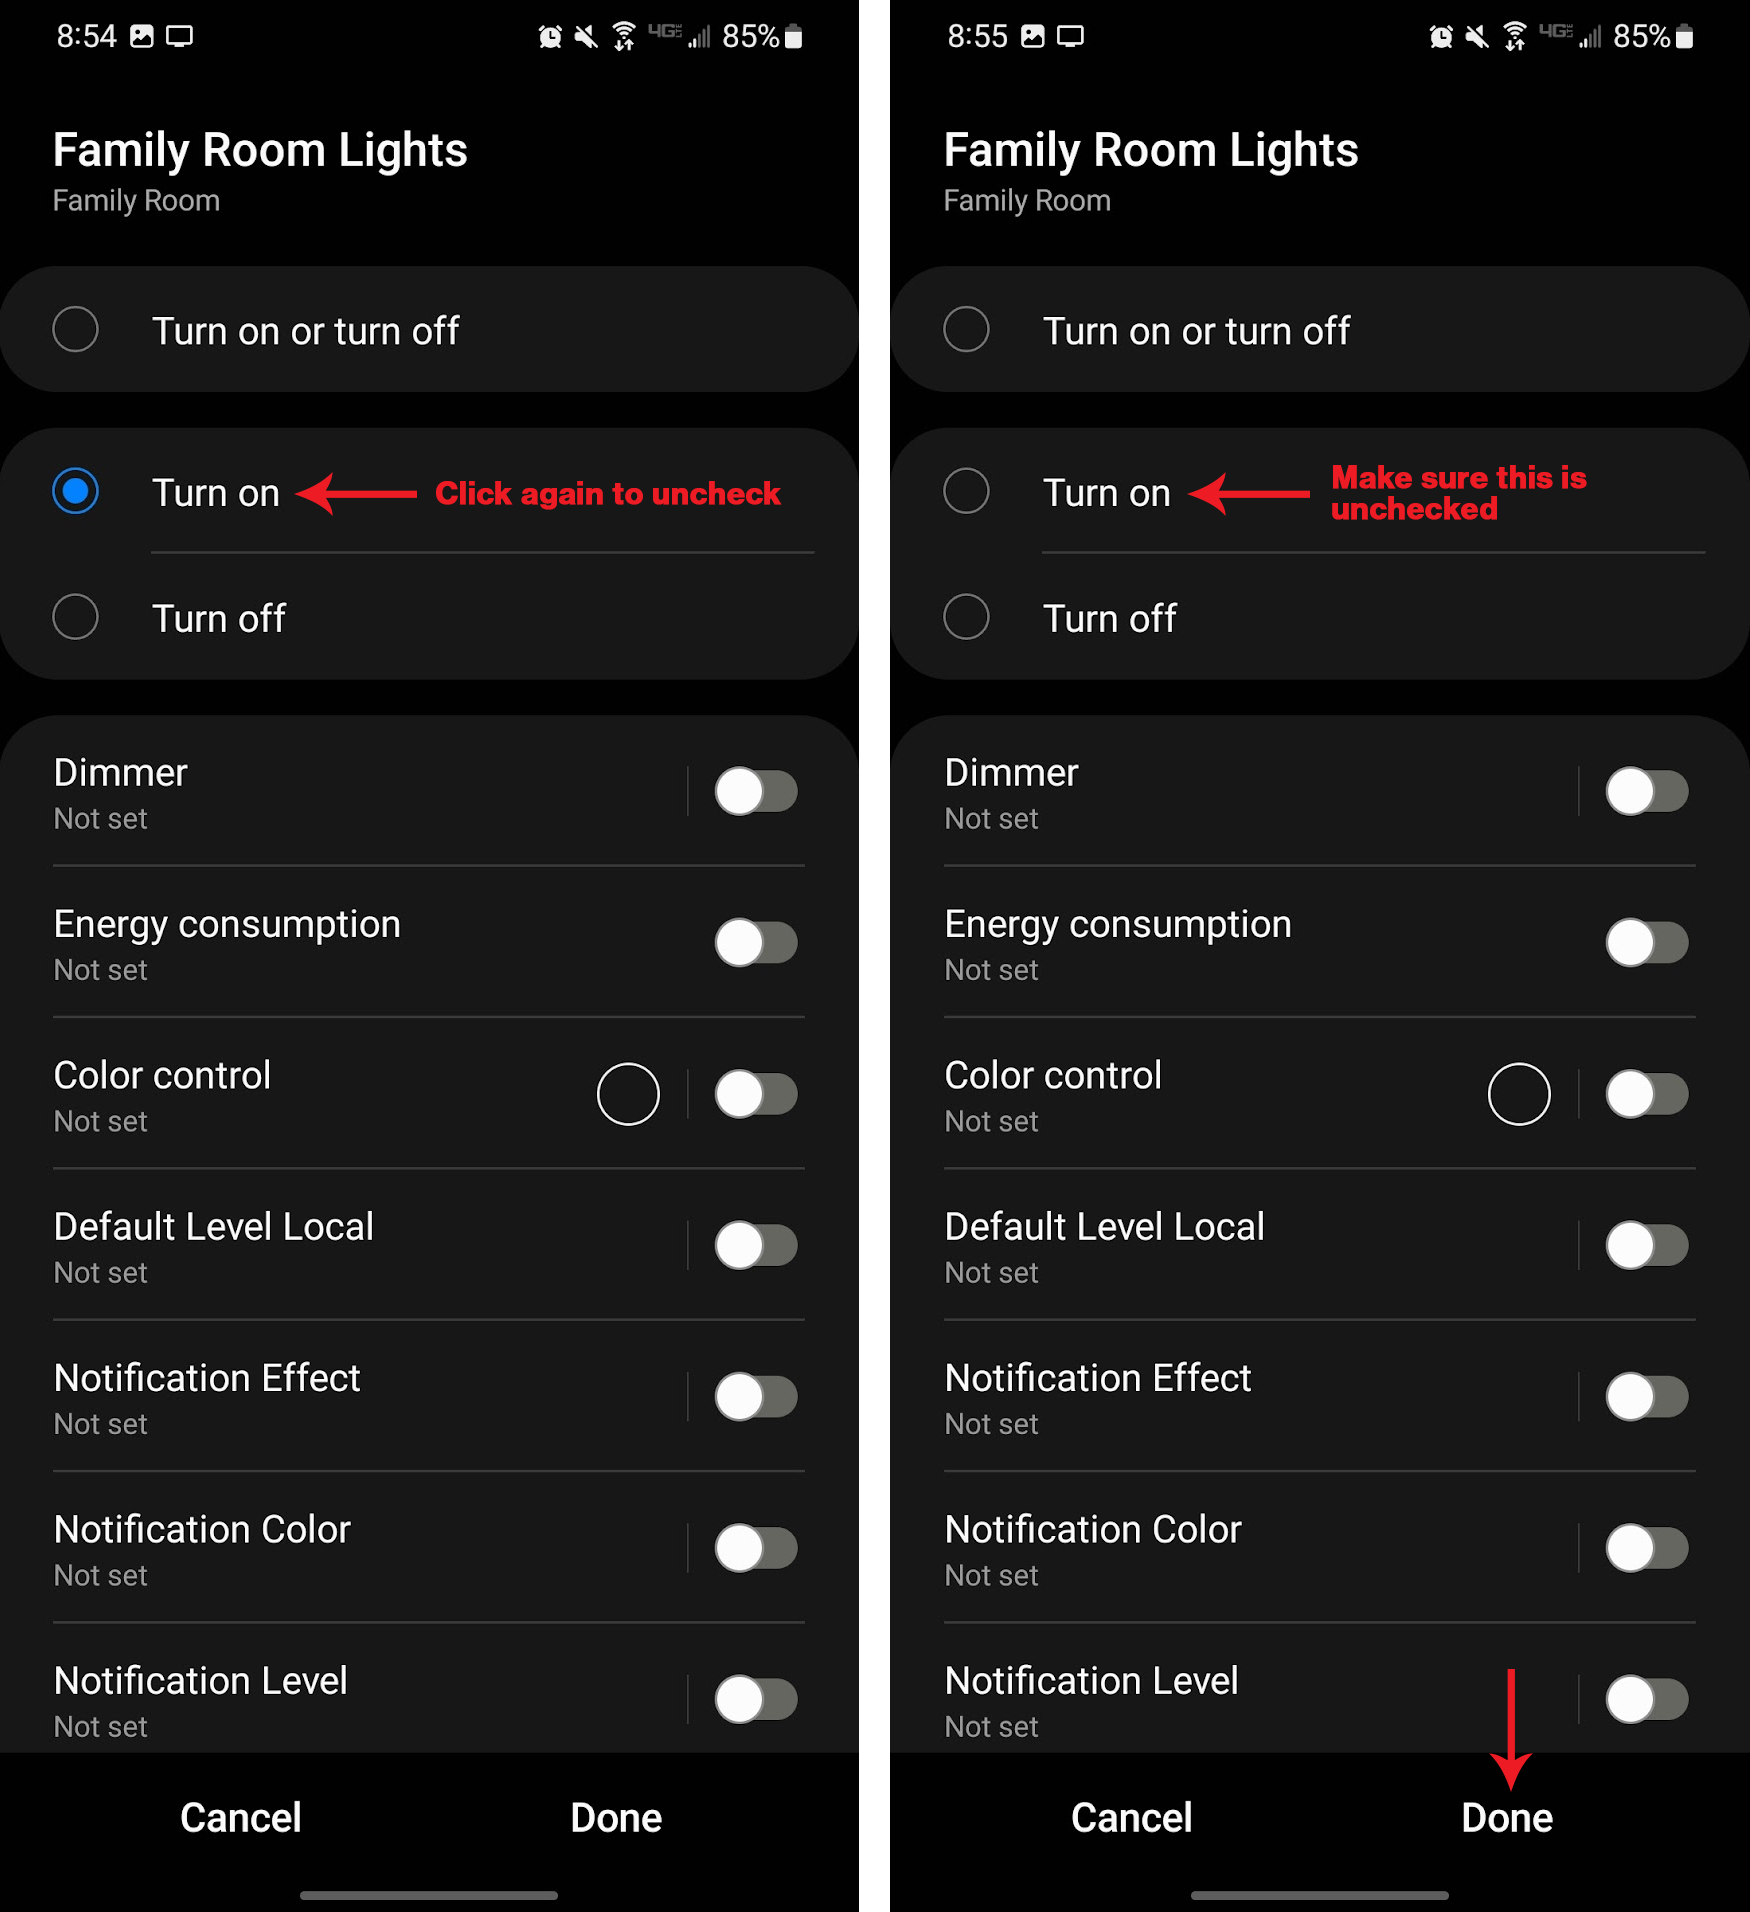
- If, “Turn on” or “Turn off” is selected, click on it again to unselect it—
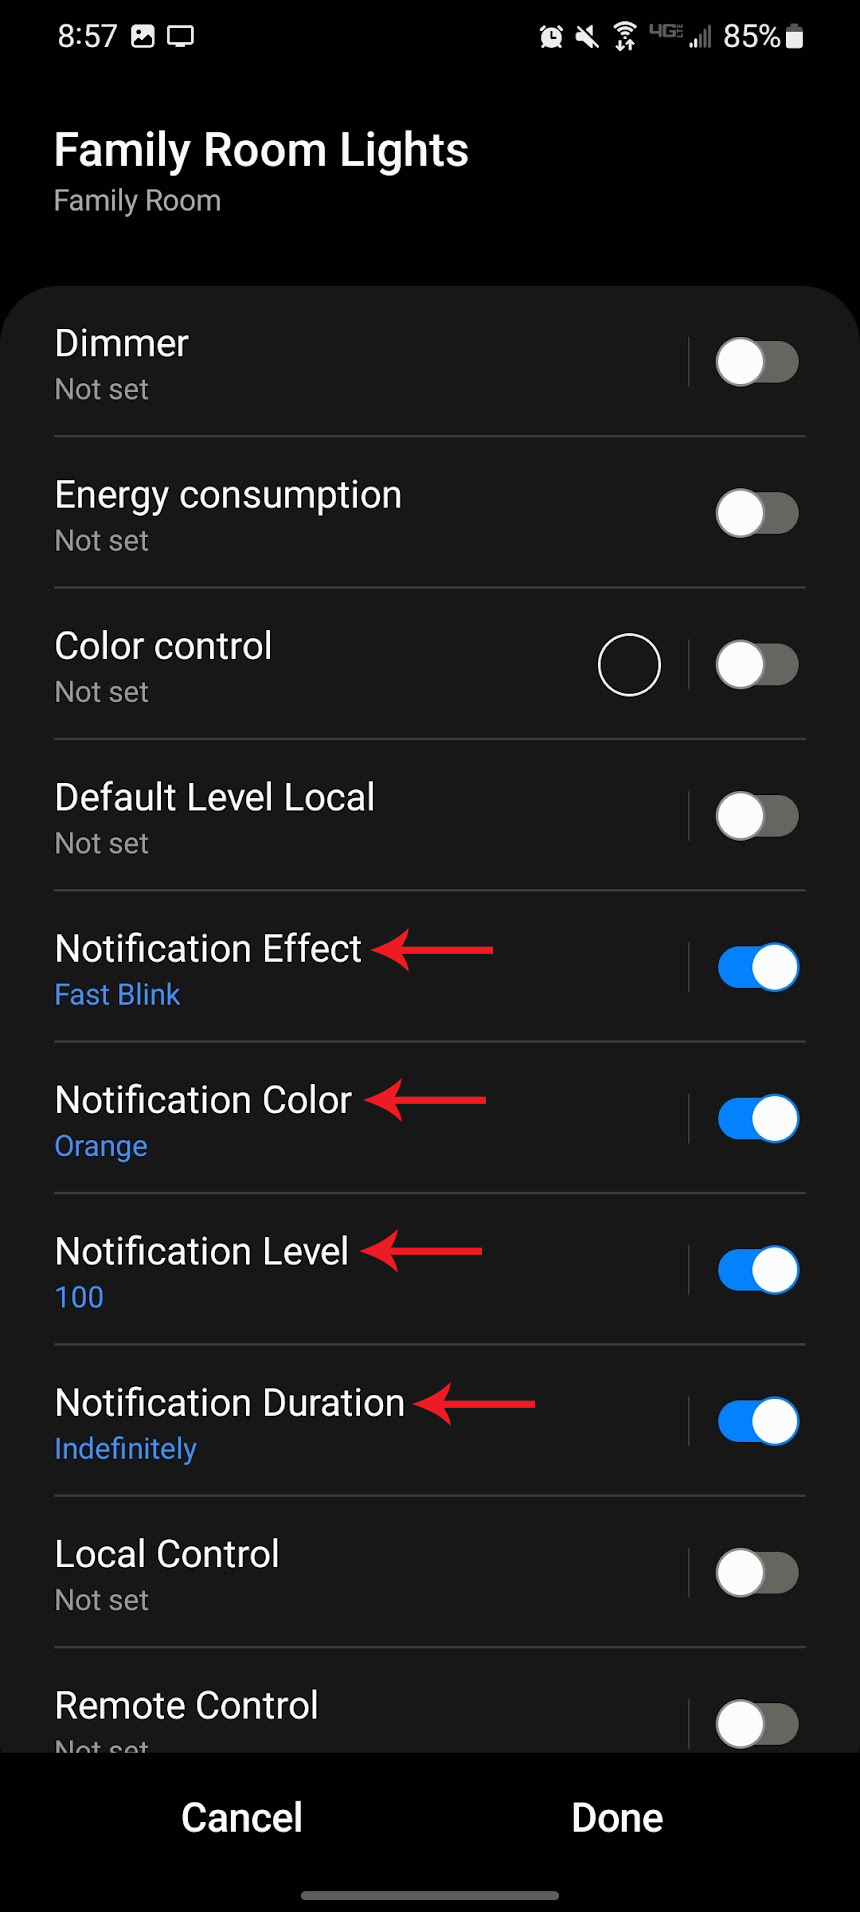
- Select the Notification Effect, Notification Color, Notification Level and Notification Duration by pressing each button (in this case, we selected: Fast Blink, Orange, 100 (%), and Indefinitely) – click, “Done”—
- Ensure the correct notification values are selected, click, “Save” and name your routine—
- Test your routine (to manually clear the notification, double-tap the config/favorites button)


Scene Control
Scene control, in this context, refers to activating a scene from your light switch via a tap sequence (ie: double-tap, triple-tap, favorites button, etc). This is not to be confused with setting up scenes in your SmartThings app, which is different.
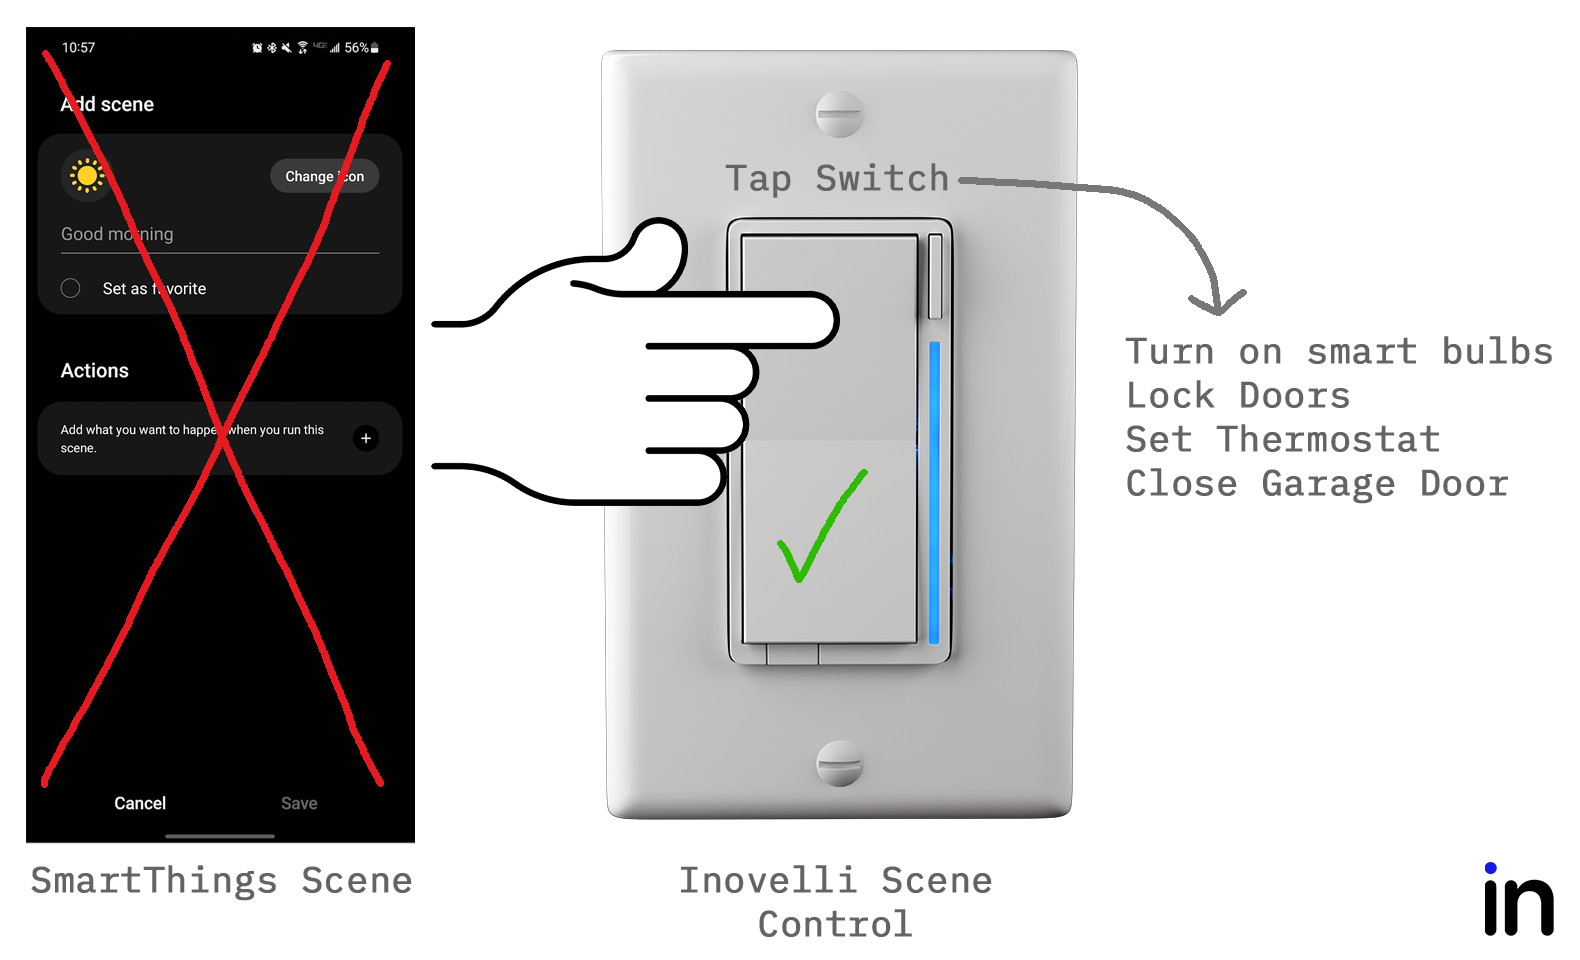
In the below example, we will create a simple scene of turning on movie lights and setting them to blue at 80% with a double-tap up of the light switch. Feel free to follow the written instructions below by clicking the drop down or follow along with the video below:
Written Instructions
- Open your SmartThings App and go to the, “Automations” tab
 —
— - Click on the, “+” button at the top of the screen and select, “Create routine”—
- Under the, “If” section, click on the, “+ Add what will trigger this routine” button—
- Click on, “Device status” and find your Inovelli Blue Series 2-1 Switch to click on—
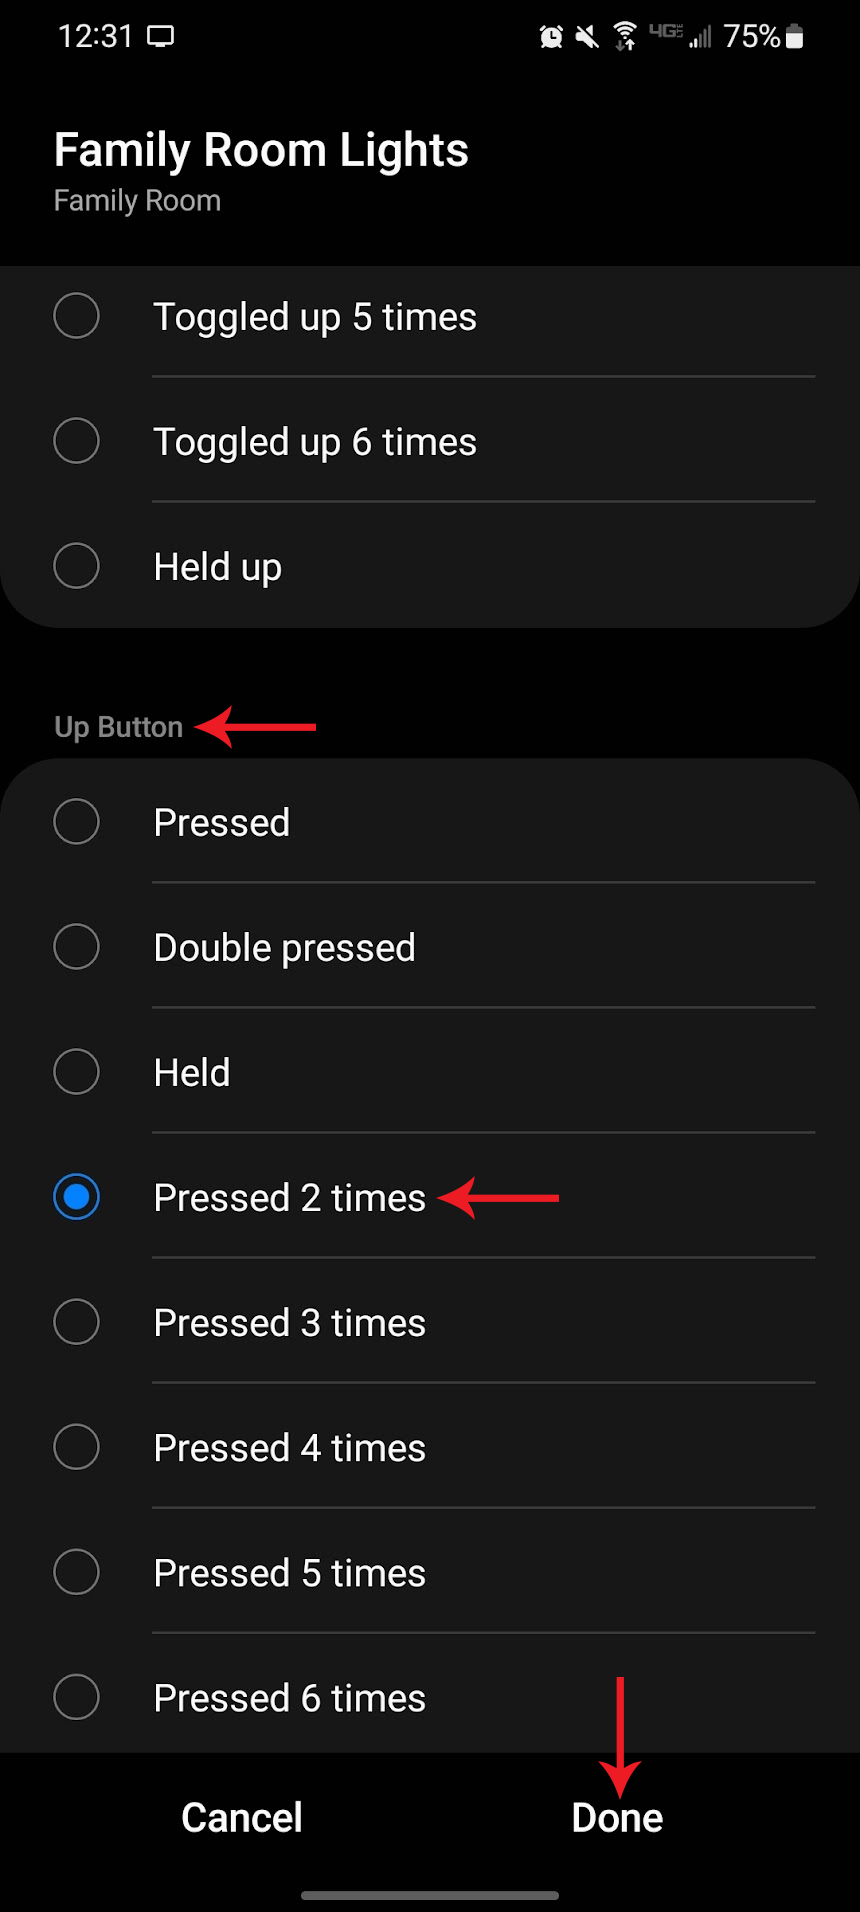
- Scroll to the section that says, “Up Button” and click on, “Pressed 2 times” followed by, “Done” (NOTE: If you want something other than double-tap up, please select a different sequence)—
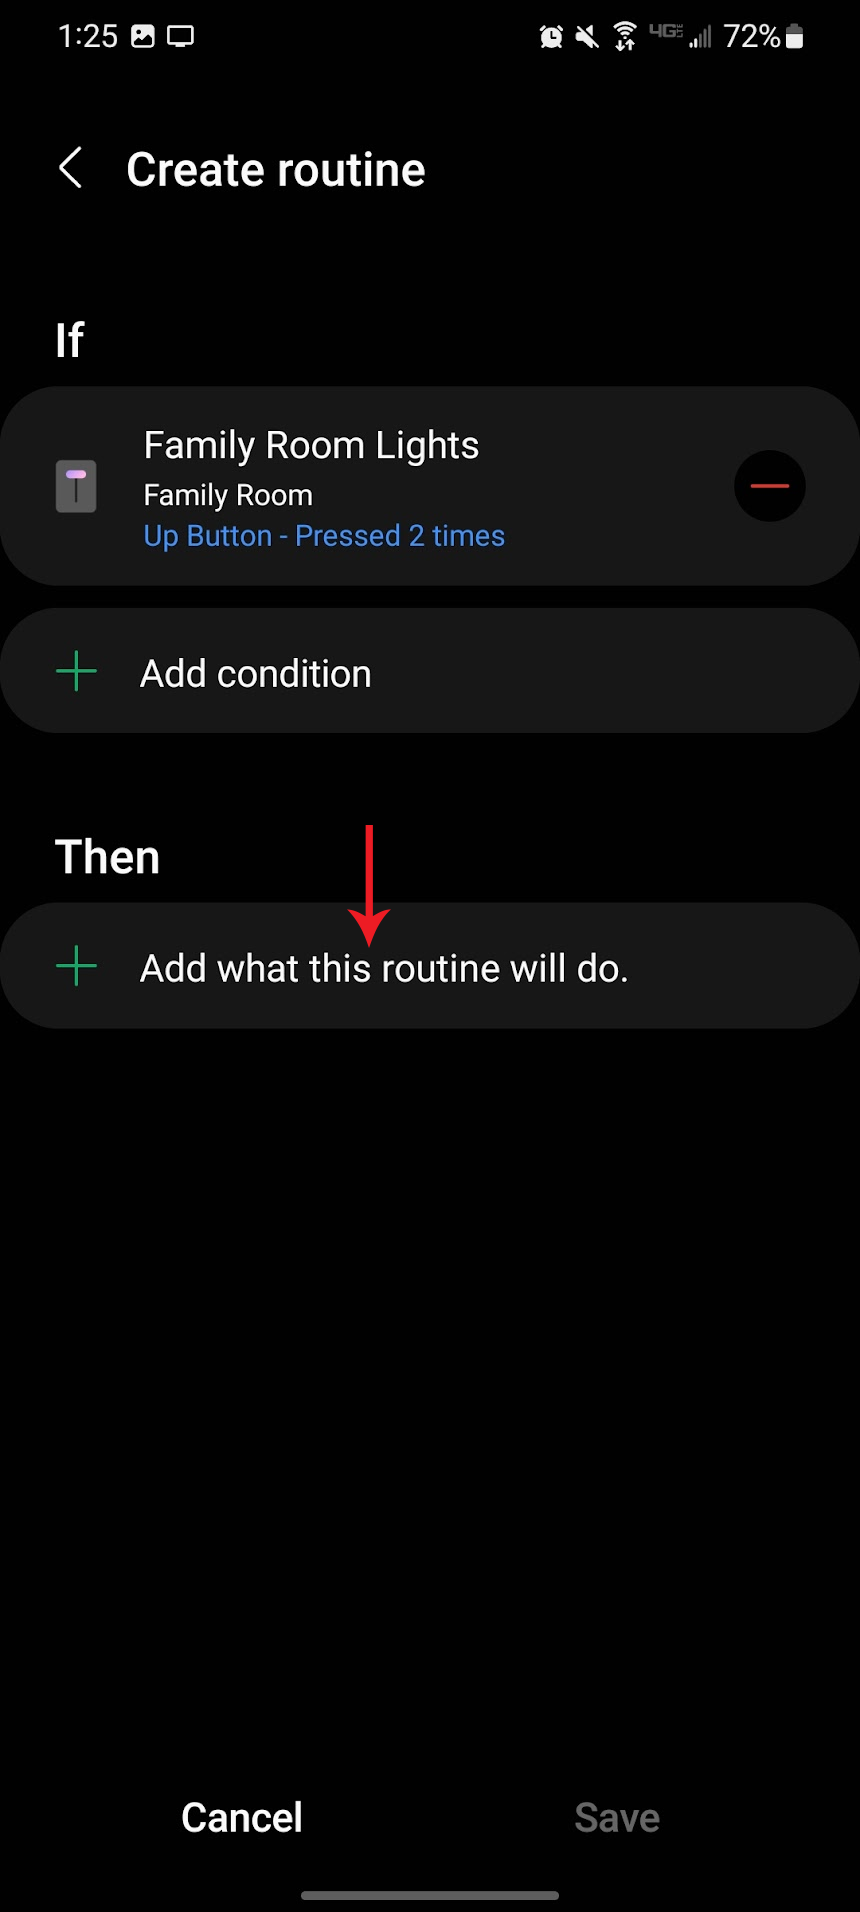
- Under the, “Then” section, click on the, “+ Add what this routine will do” button—
- Click on, “Control devices”—
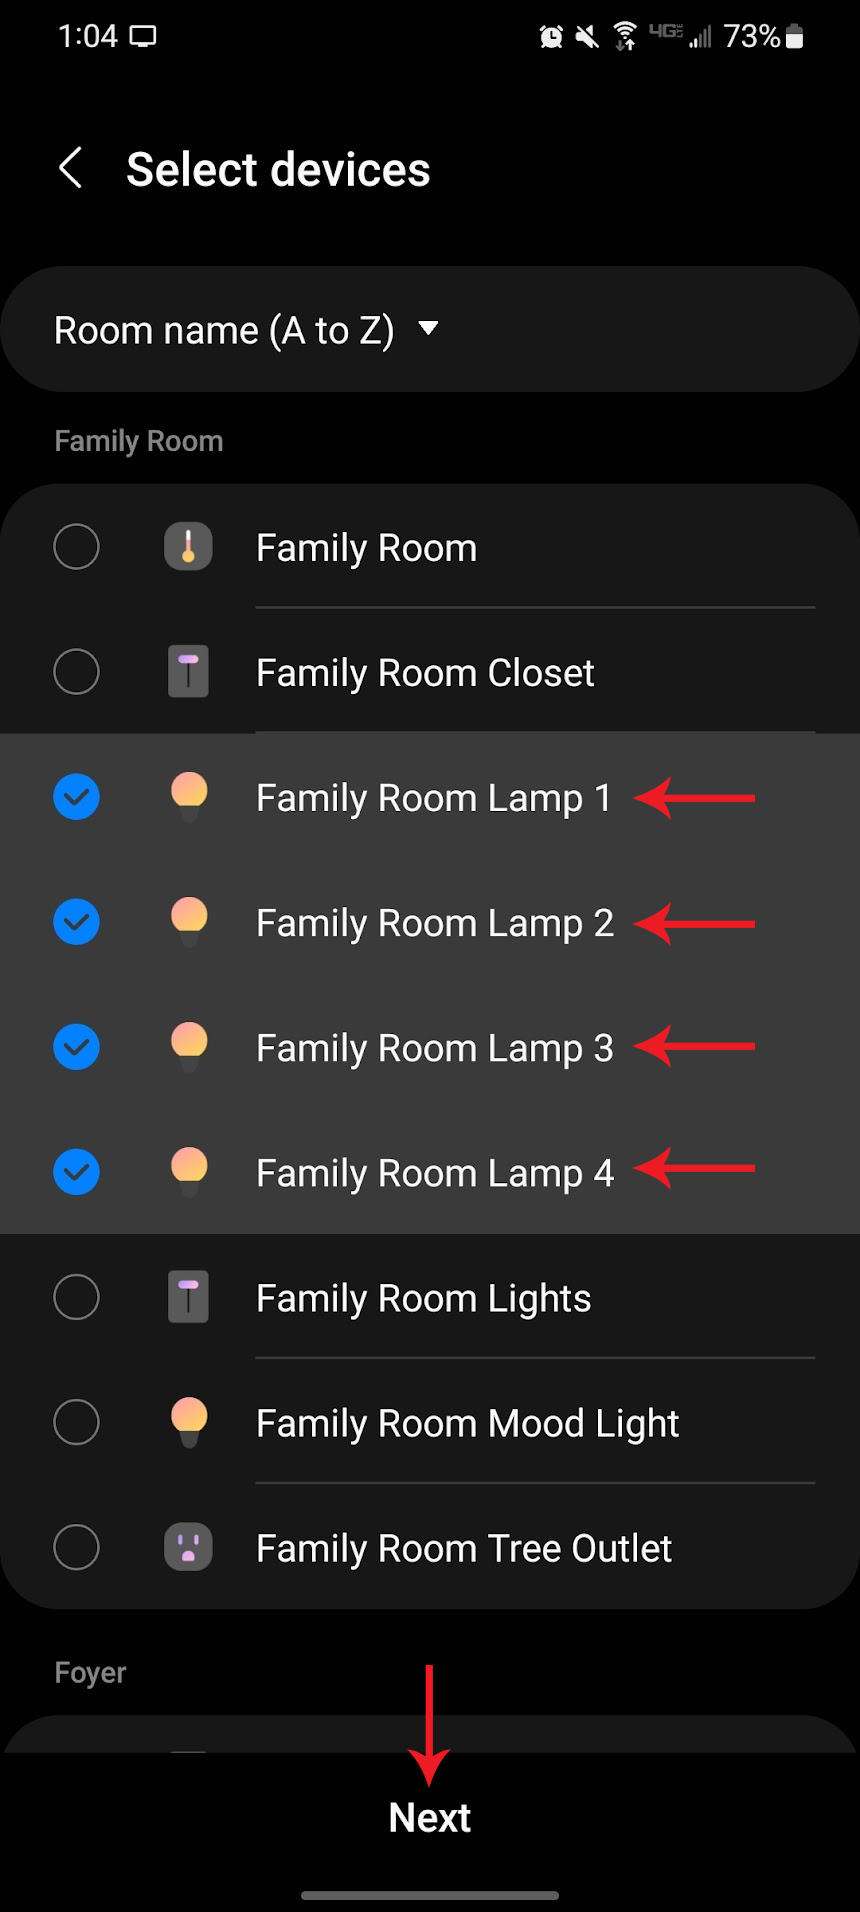
- Select the movie lights you want to turn on and click, “Next”—
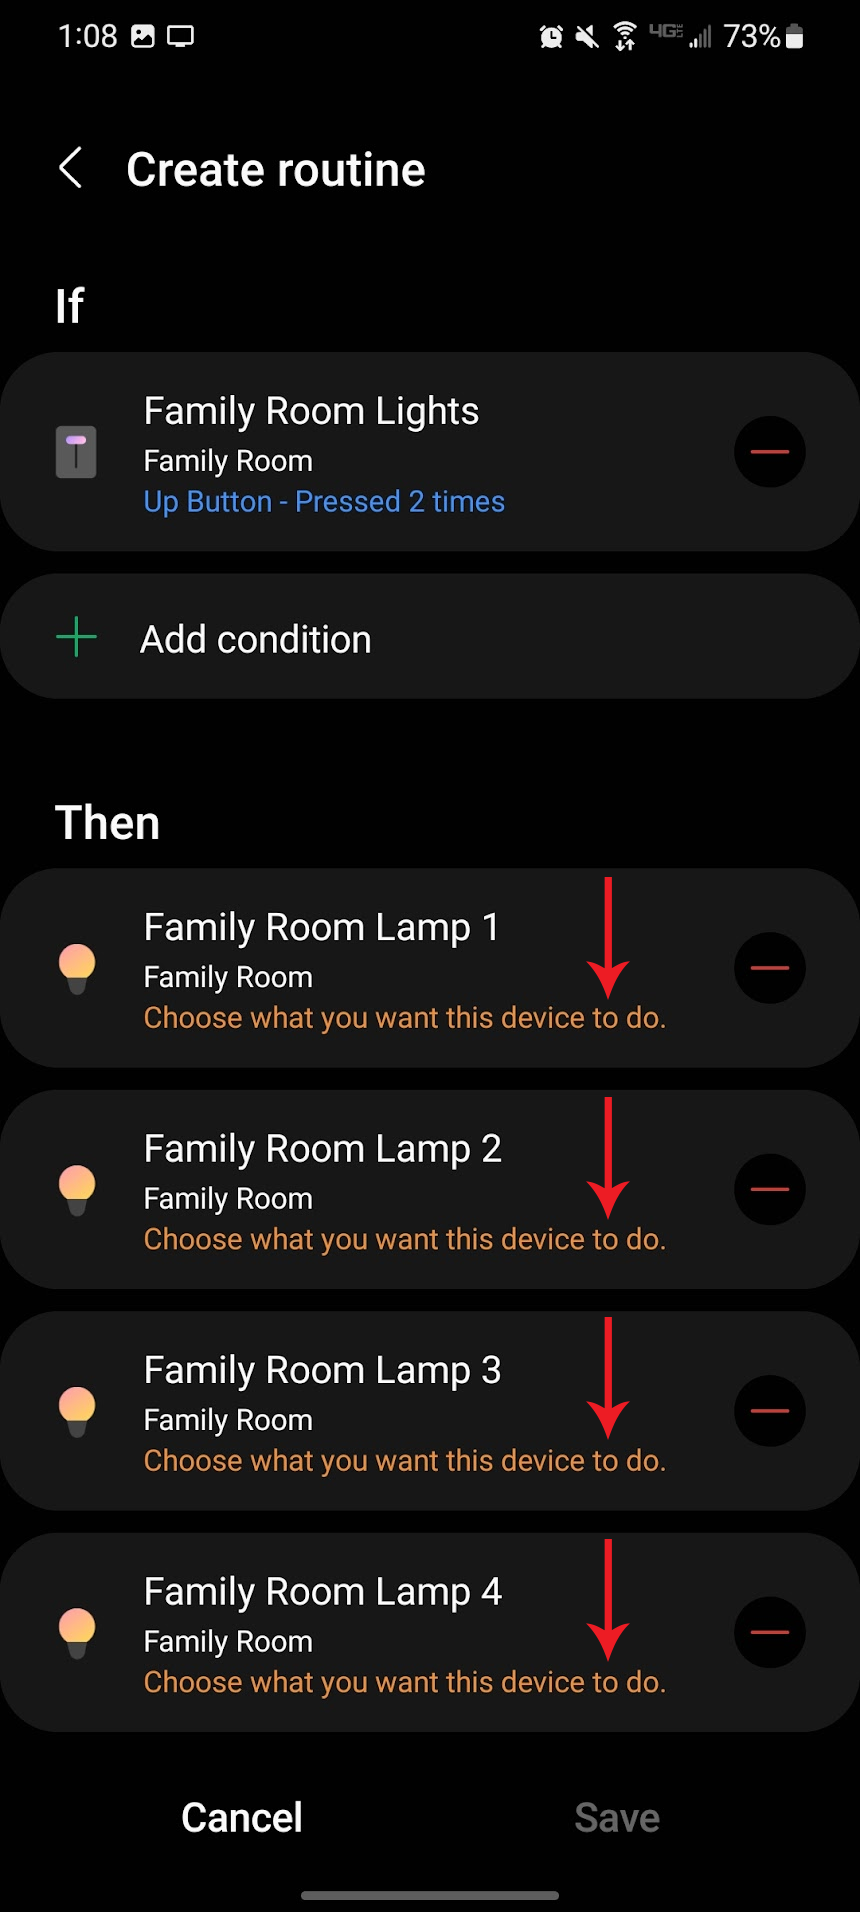
- Then go through each light and click on, “Choose what you want this device to do”—
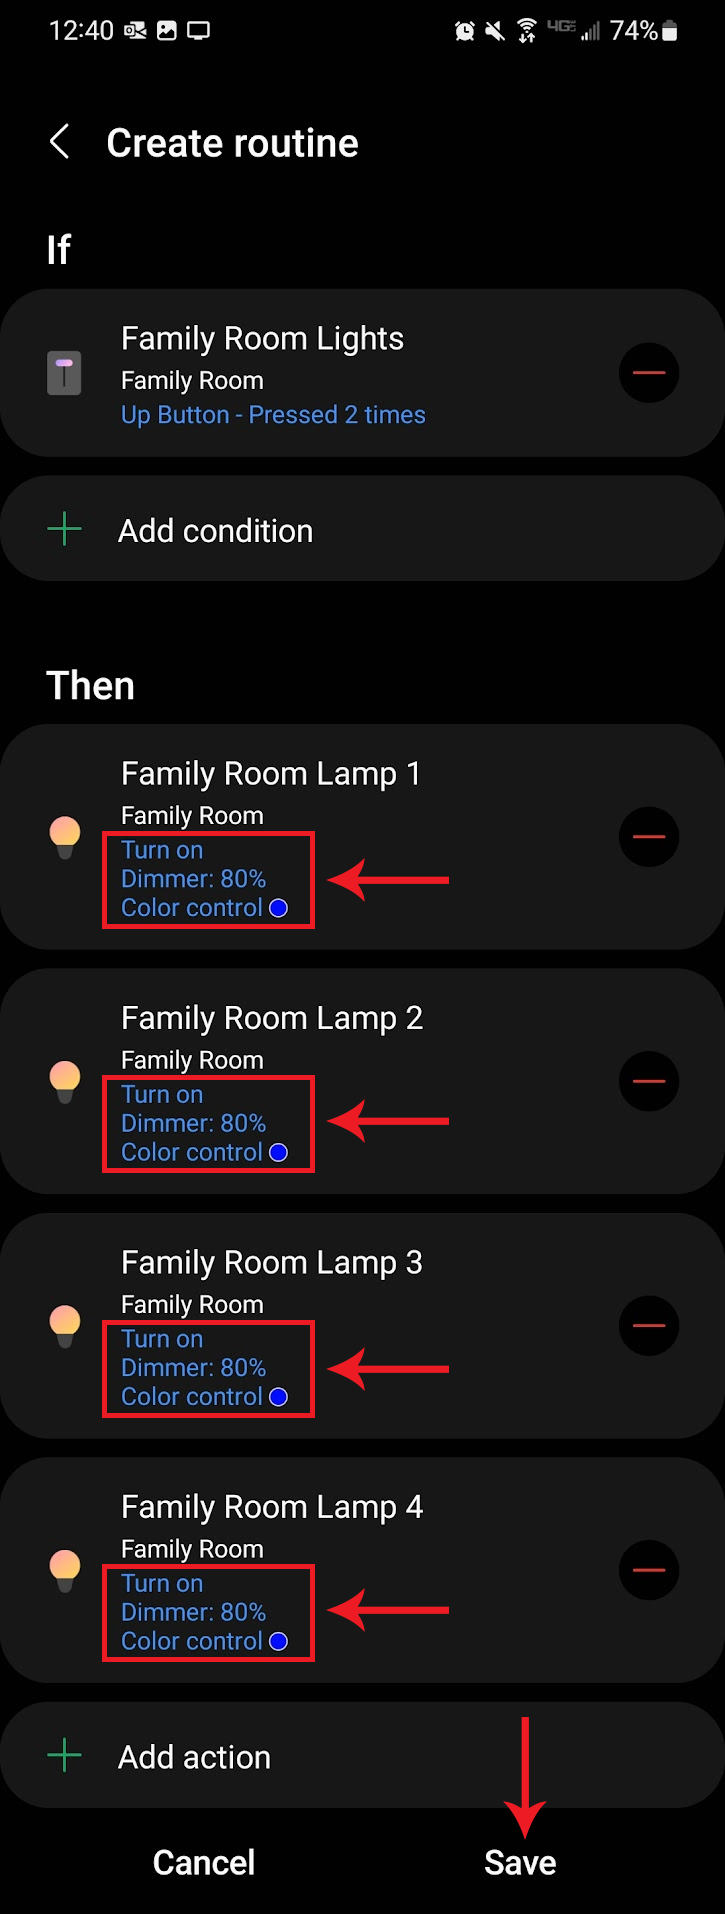
- Click on, “Turn On”, followed by, “Dimmer” (set it to 80%), and, “Color control” (select blue) – then click, “Done”—
- Ensure the correct status, color and level values are selected, click, “Save” and name your routine—
- Test your routine by double tapping up on your Inovelli Blue Series 2-1 Switch and see if your movie lights turn on

Smart Bulb Mode
Using Z-Wave Bulbs
Using Non-Z-Wave Bulbs
To setup Smart Bulb Mode using Non-Zigbee bulbs (or Zigbee bulbs), please use the combination of putting your device in Smart Bulb Mode and utilizing scene control.
Z-Wave Associations
For Zigbee binding instructions, please click here: How-To: Setup Z-Wave Associations - SmartThings
Troubleshooting
Placeholder - Bulb Flickers, Turns off too soon, etc (bulb calibration)
Additional Resources
Community Contributions
See a Mistake?
If you see a mistake and would like to report it, please comment on the feedback thread or send a message to our support team.
Hub instructions can quickly become outdated and we rely on the community to let us know if something is wrong so we can quickly update it. Thanks so much for your support!