DISCLAIMER
While we (and our community) try to keep these instructions up to date, it’s often hard due to the many updates to our firmware, SmartThings app & platform changes, as well as many other factors outside of our control. If any updates/edits need to be made to these instructions, please comment on this thread so we can keep it up-to-date:Wiki - General Feedback/Suggestions Thread
COMMUNITY DRIVEN
Our entire Knowledge Base (which includes manuals) is community driven. This means that we at Inovelli work together with our amazing community to keep articles up-to-date. We’d love it if you’d contribute in any way you can, be it making edits, submitting how-to’s so others can learn, participating in our innovation projects, or simply commenting on threads. Thank you so much for your support and dedication to really making an impact in the smart home market.Community Knowledge Base
NOTE: All of the pictures can be clicked on to be made larger. Also, if you’re on mobile, you can either click on the pictures or turn your phone side-ways and the pictures will become larger.
Setup Instructions Overview
This is the digital setup instructions for the Blue Series Smart 2-1 Switch (On/Off or Dimmer) on the SmartThings platform.
Navigating these Instructions
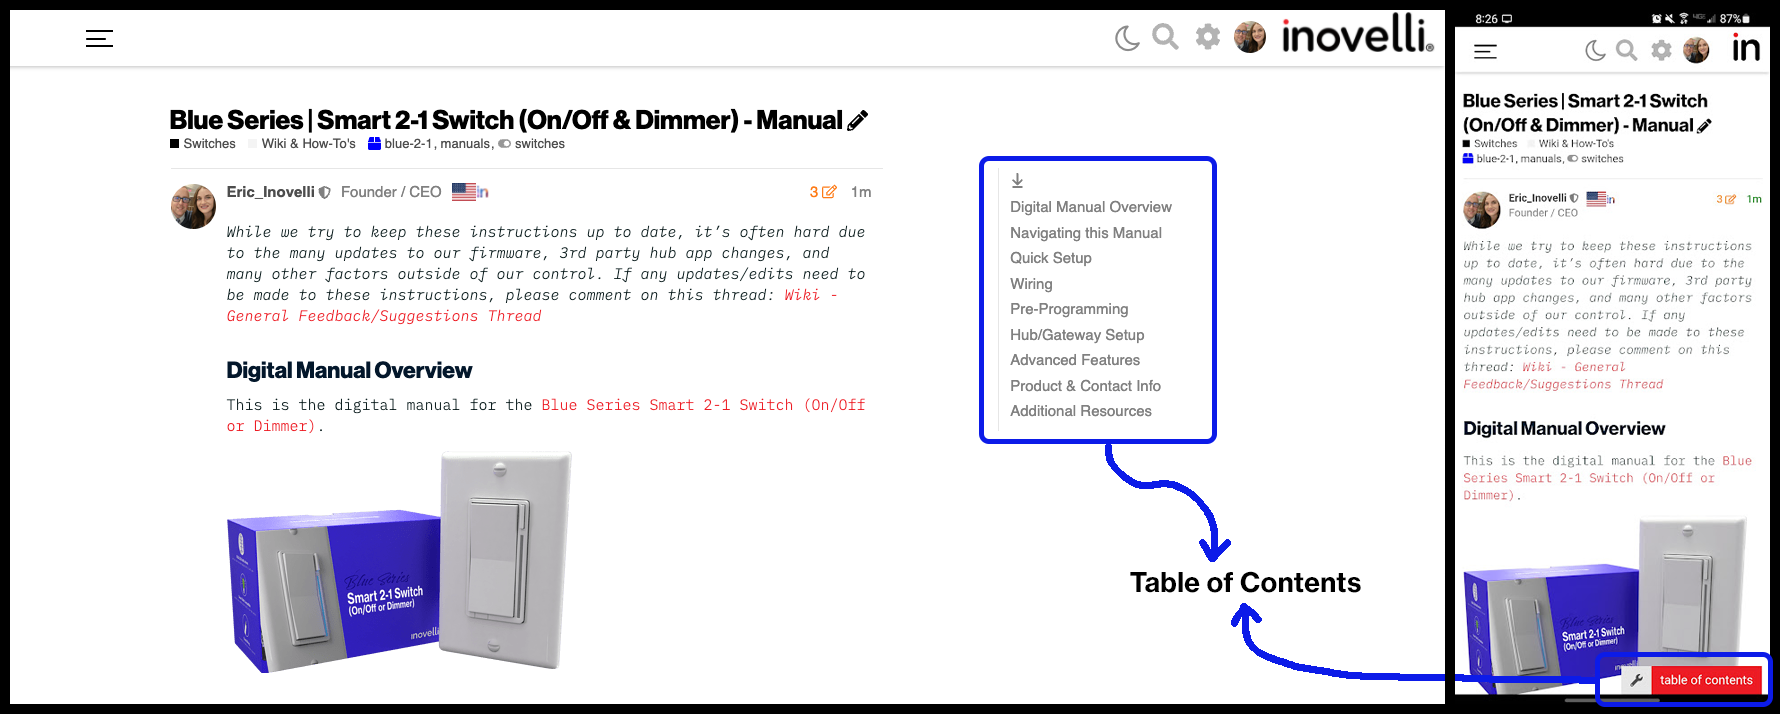
For desktop users, the, “Table of Contents” is located to the right of the screen, whereas for mobile users, it can be found at the bottom of the screen.
NOTE: If you do not see the table of contents, click here: Setup Instructions | Blue Series Smart 2-1 Switch (On/Off & Dimmer) - SmartThings
Please click on any of the sections to get started. We recommend working your way down as it follows an intentional flow that is user friendly and hub/gateway specific.
As always, any questions, please see the Additional Resources links section or submit a ticket, we’re happy to help.
Quick Setup Instructions
Follow these if you have already installed the 2-1 switch before and are just looking for some quick pairing instructions. If this is your first time installing the 2-1 switch, please skip this section and work your way through the various sections below starting with the Prerequisites.
This section assumes the following:
- You’ve installed the Edge Driver
- You’ve wired the switch and it works manually
Let’s begin:
- Make sure your switch LED is pulsing blue – if it’s not, hold down on the configuration button (located at the top right of the switch above the LED bar) and then the top of the paddle (ie: the on portion) for approximately 20 seconds until it turns/flashes red – then release the config button followed by the top of the paddle and wait a couple seconds
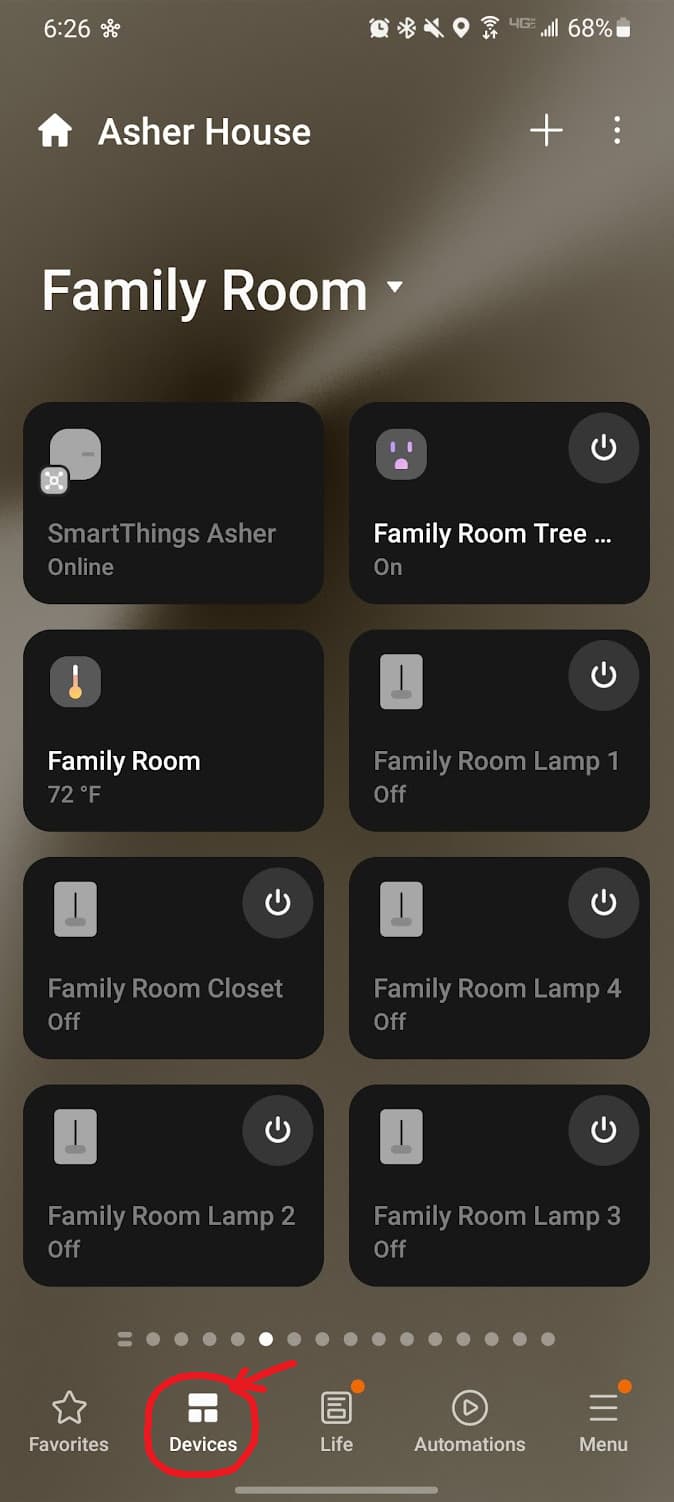
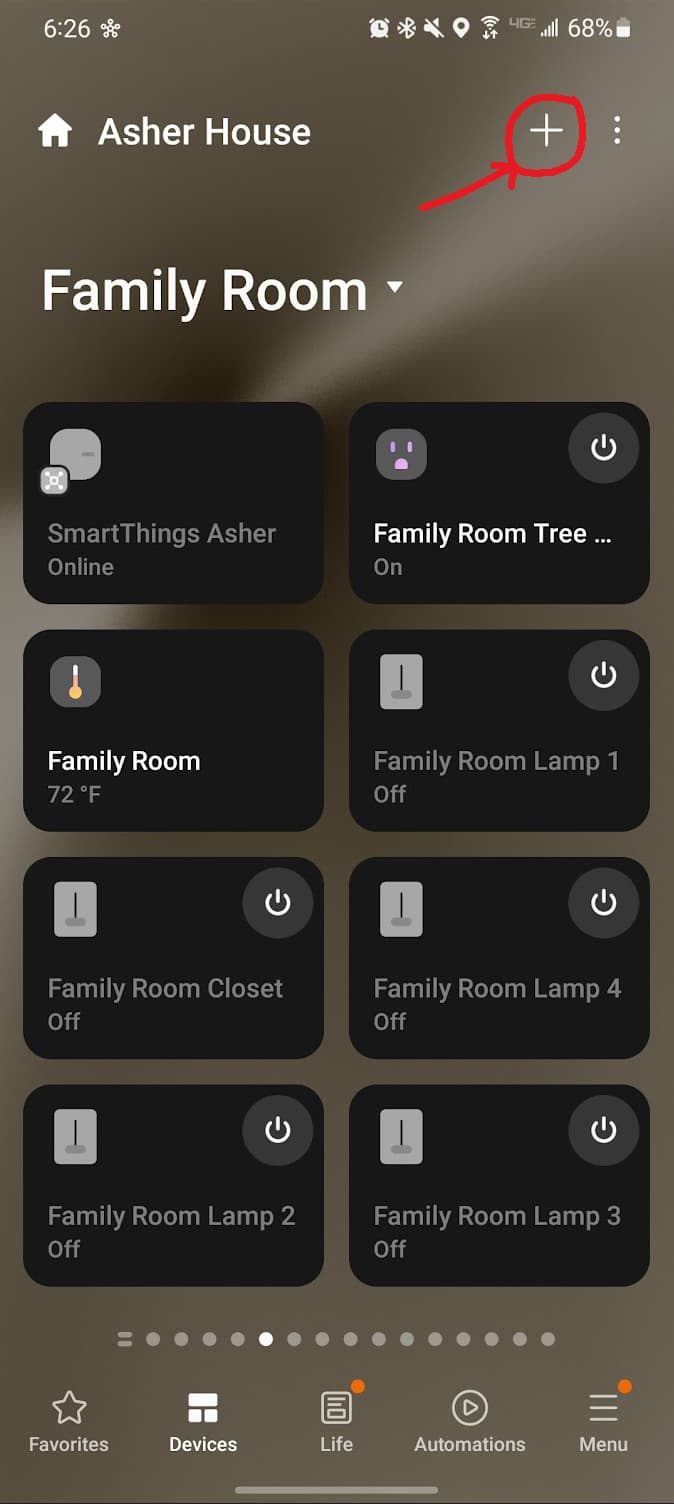
- With your LED pulsing blue, open up your SmartThings App to the, “Devices” tab and click on the + at the top right
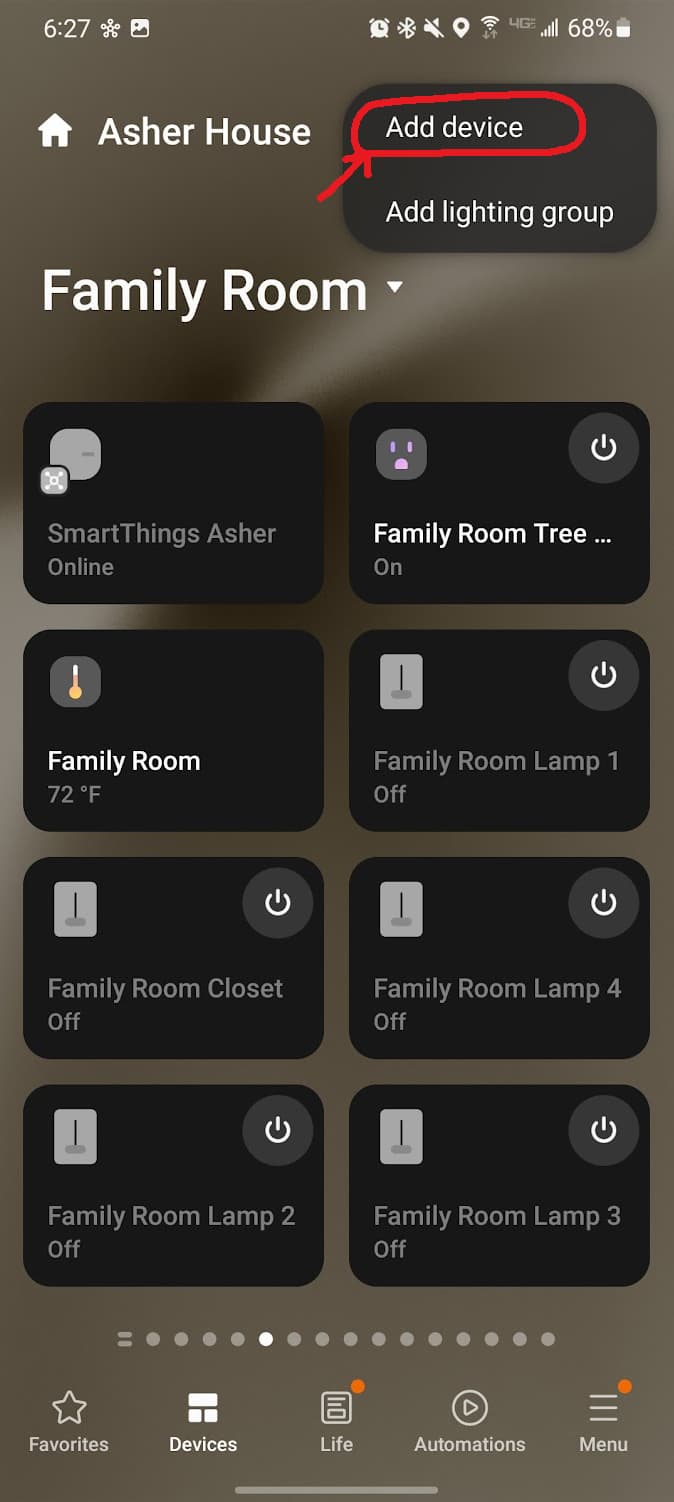
- Click, “Add Device”
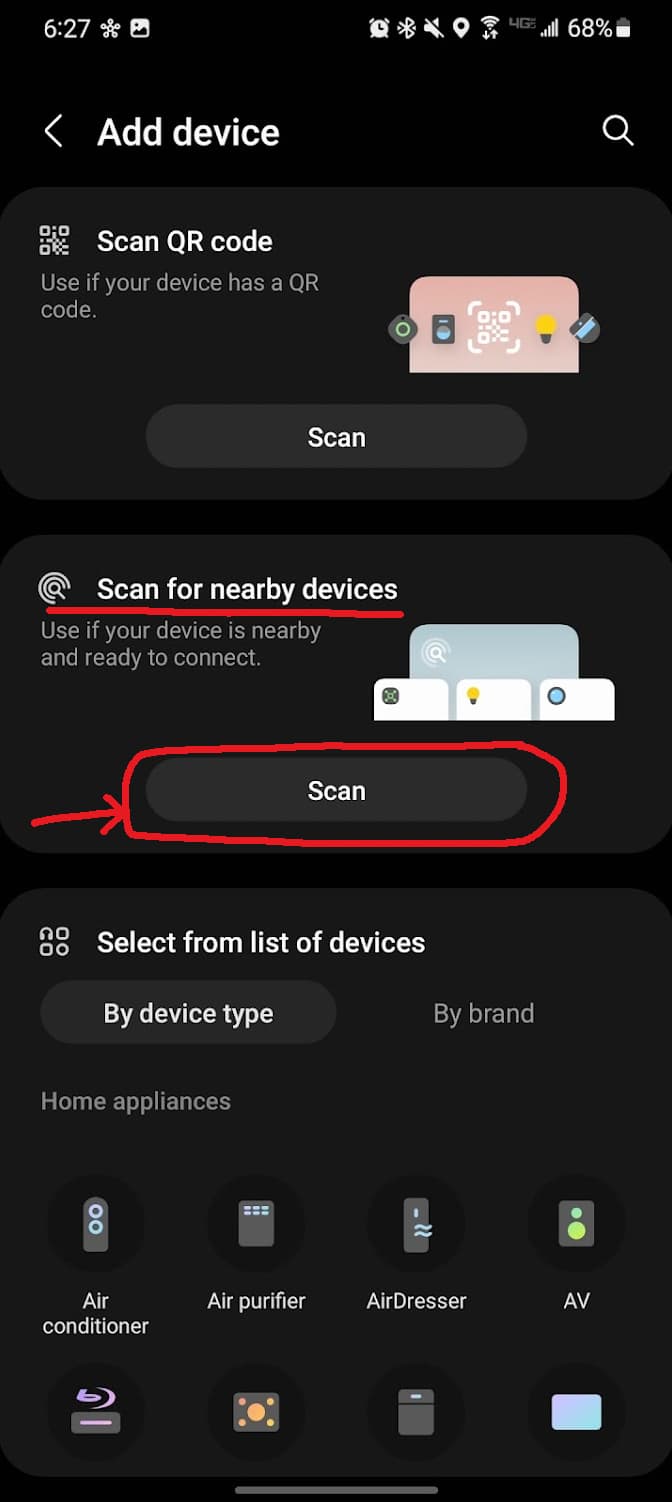
- Then under, “Scan for nearby devices” click, “Scan”
- SmartThings should then search for, find and initialize the switch
Prerequisites
The only prerequisite to pairing this switch is the following:
- Installation of the Device Edge Driver
While this switch will also pair without it, for full functionality, you’ll want to install the Edge Driver.
Device Handler Installation
As of October 15th, Device Handlers will no longer be allowed to be installed on the SmartThings platform. For more information please see the following community post in the ST forum: The End of Groovy Has Arrived - Announcements - SmartThings Community
Because of this, we are recommending you install the Edge Driver using the directions below.
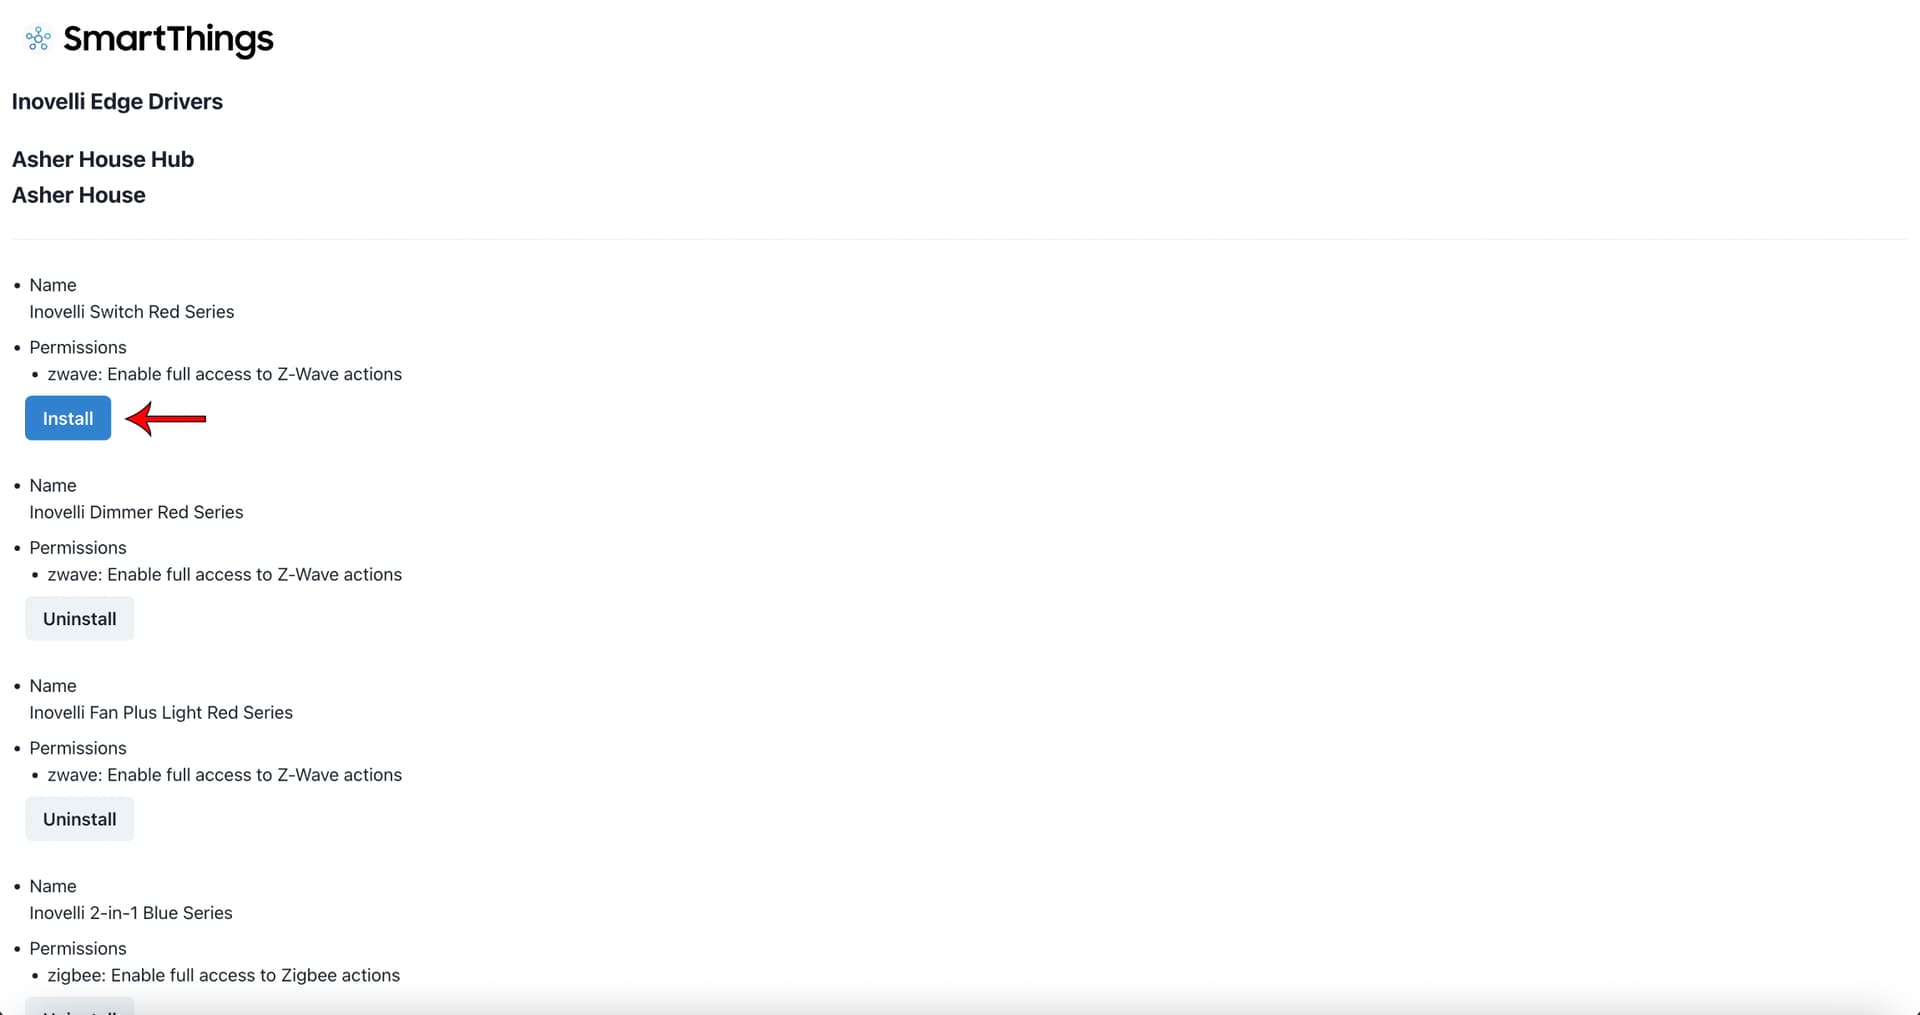
Device Edge Driver Installation
To install the Edge Driver, please follow the instructions below:
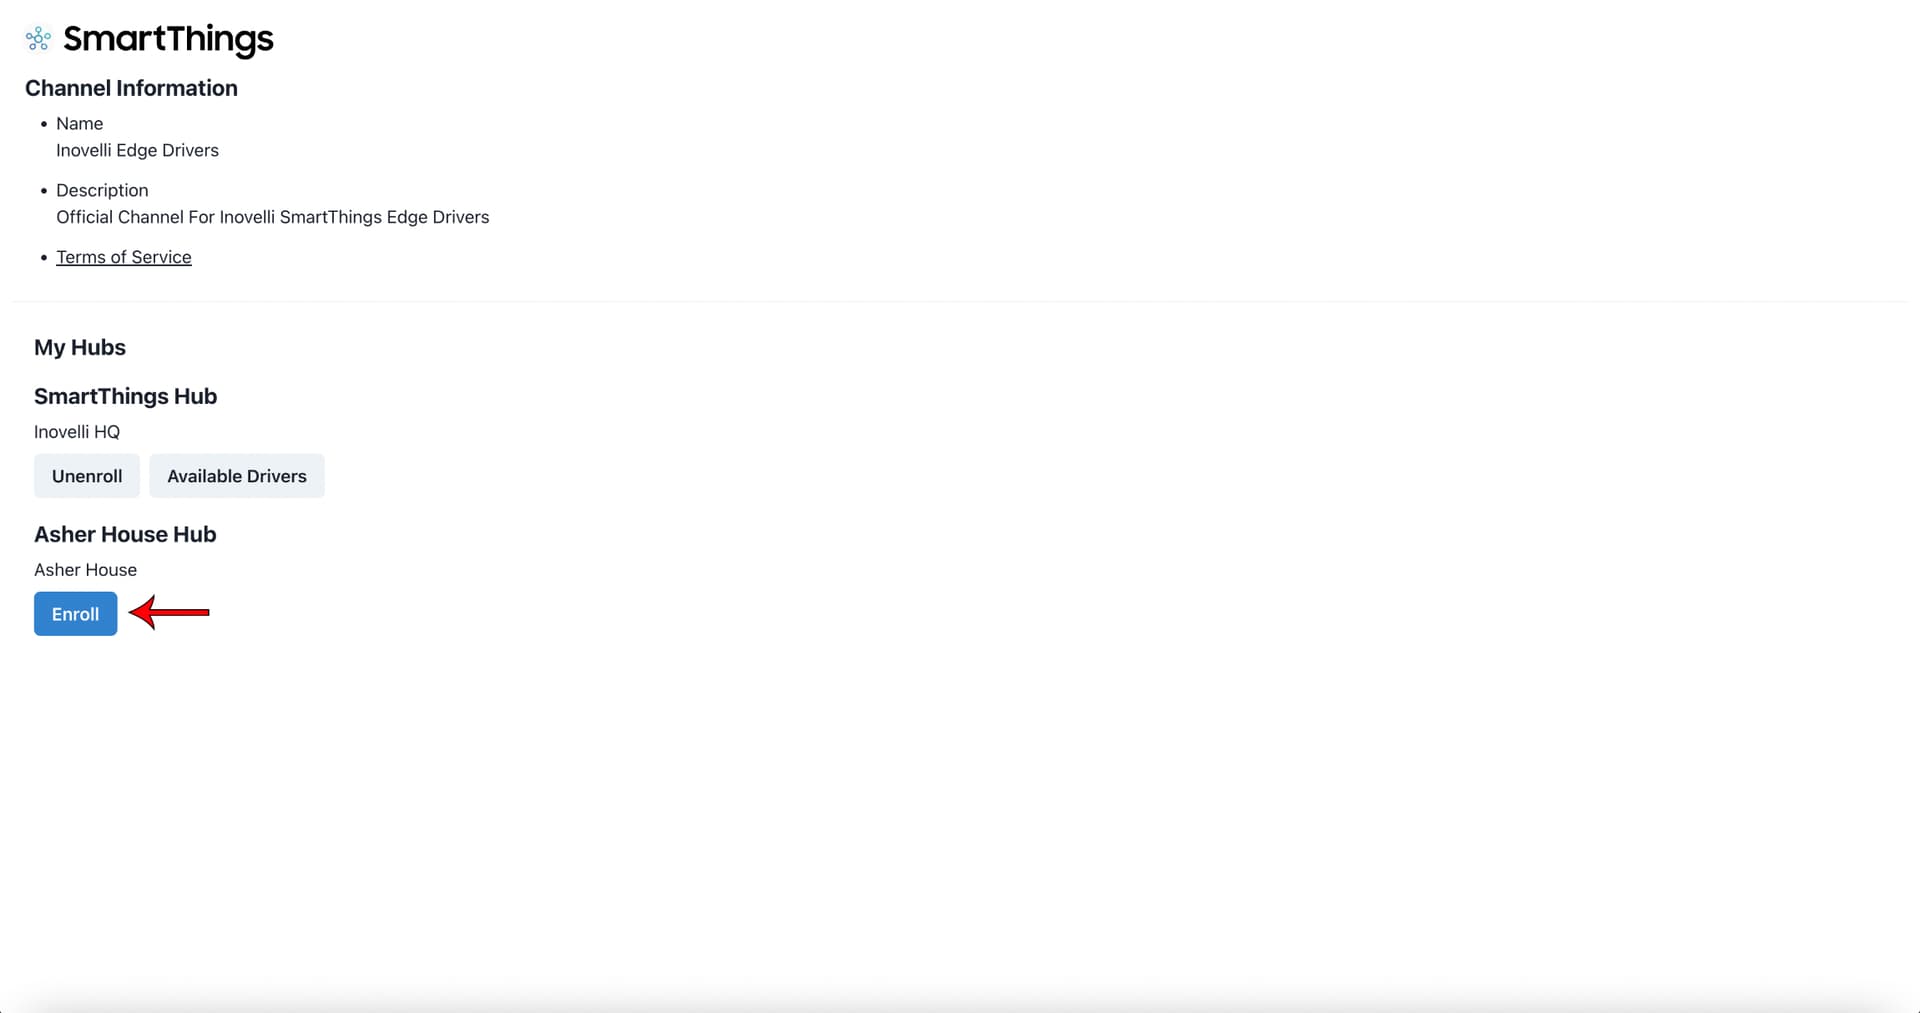
- Click on the following link Samsung Edge Driver Access and sign into your Samsung account (you may have 2-Factor Authentication on – if so, please follow the directions Samsung gives you to attain a code)
- Next, click, “Enroll” by the hub your devices are paired to
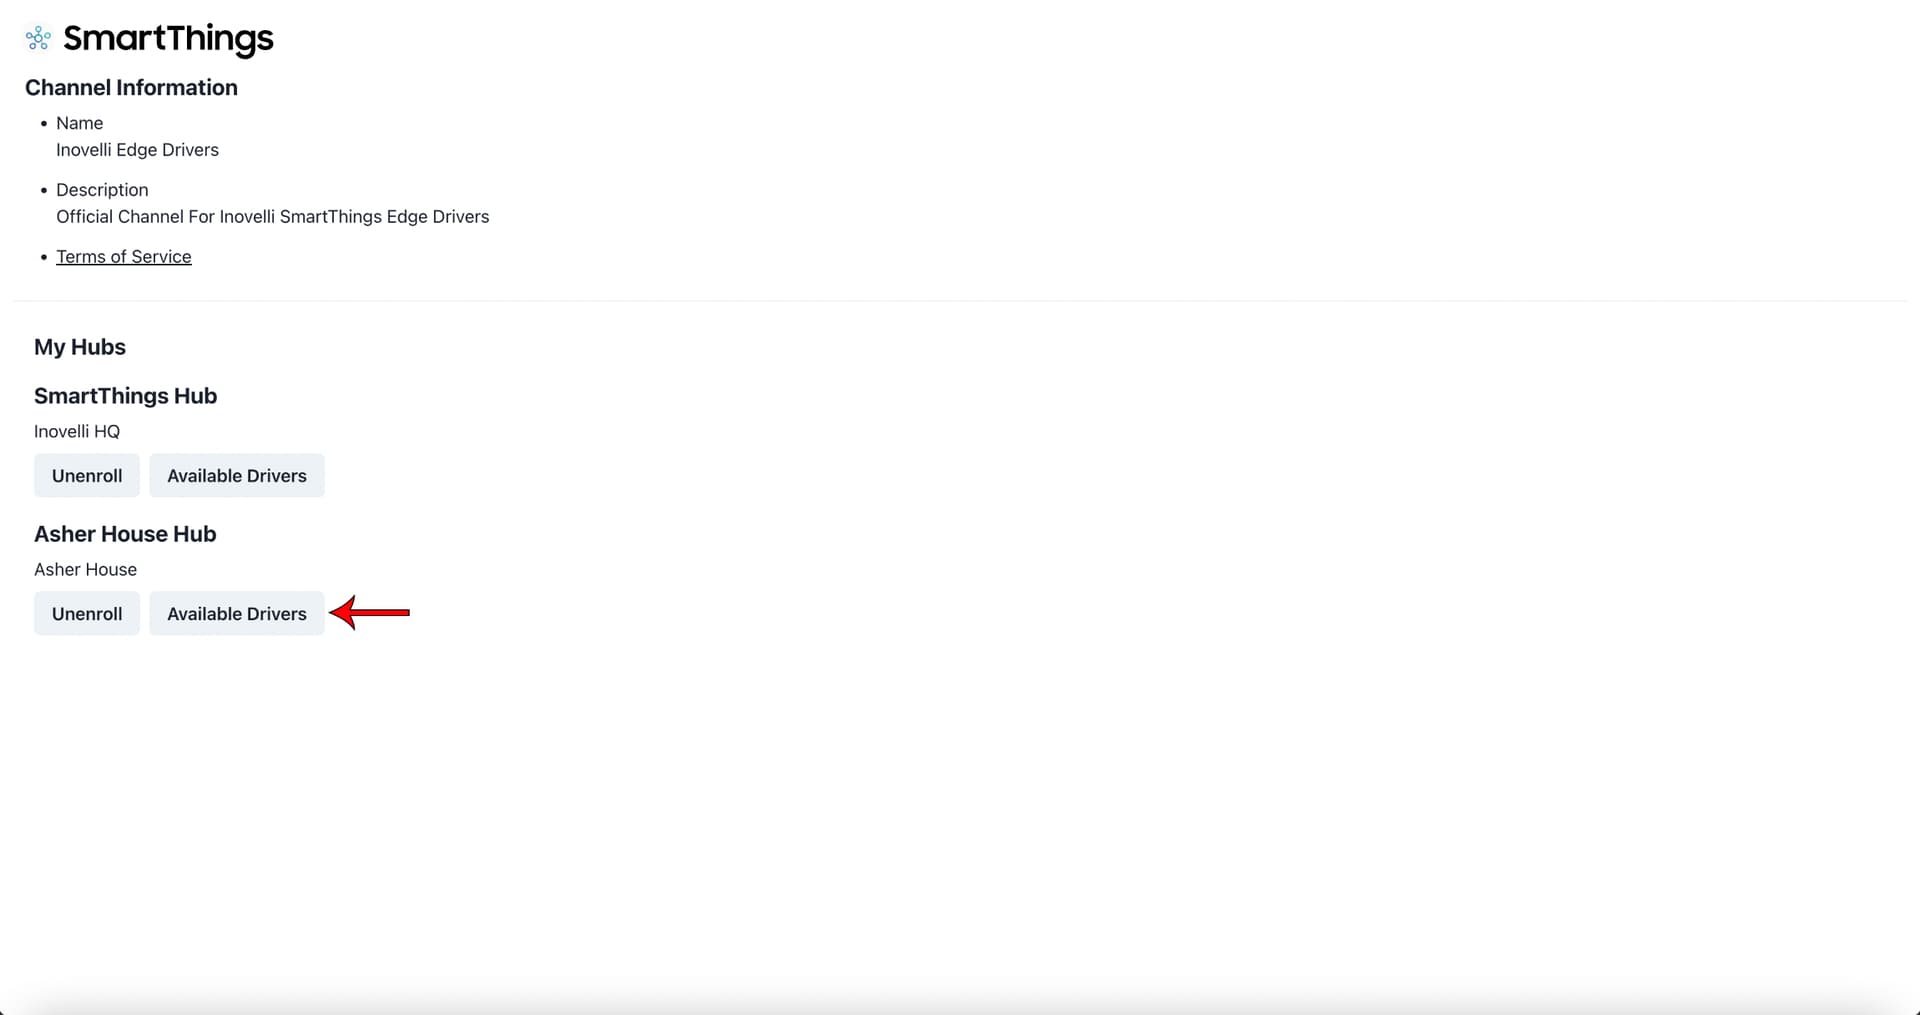
- Next, click, “Available Drivers”
- Finally, click on the driver you’d like installed by clicking, “Install” (NOTE: In this case, please install, “Inovelli 2-in-1 Blue Series”
Now when you pair your switch, it should automatically pick up the Edge Driver. Feel free to move onto the next section of the Setup Instructions below.
Installation Instructions
Various steps of the installation instructions can be found by clicking the links below. The reason they are not listed here is to save space and to only have one area that requires updating (rather than multiple locations with the same data).
IMPORTANT: Please follow both steps below (Wiring & Pre-Programming) before making your way to the Pairing Instructions
- Wiring Your Switch
- Full Instructions (Recommended if not familiar with schematics and/or this is your first time setting up this switch)
- Schematics (skip directly to reading the schematics)
- Pre-Programming
- Full Instructions (Recommended if this is the first time installing this switch – NOTE: This is only needed if using the switch as a dimmer and/or multi-way setup)
- Quick Reference Chart (skip directly to the pre-programming sequence chart)
Pairing Instructions
NOTE: The below instructions assume you have installed the Edge Driver prior to pairing.
1. Initiate Pairing on the Switch
There are four methods to pairing your switch to your hub/gateway: Auto-Pairing (default) and Manual-Pairing (Air-Gap or Config Button press/hold method). For simplicity sake, we’ve bolded the first two as they’re what we recommend.
Please select from one of the drop-downs below:
Auto-Pairing (Default) - Recommended
When power is restored to the switch, it will automatically start the pairing process (LED Bar (C) should start pulsing blue).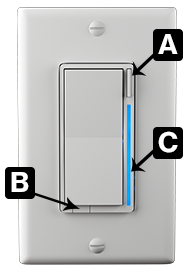
NOTE: If you've already restored power and the LED bar is not pulsing or has timed out, please use the method below, "Manual-Pairing (Config Button - Hold)".
Video Visual
Manual-Pairing (Config Button - Hold) - Recommended
If your LED Bar (C) is solid blue (not pulsing), hold the config button (A) followed by the top of the paddle for 20 seconds (or until the LED bar flashes red) -- then release the config button followed by the top of the paddle to initiate the pairing process (LED Bar (C) should start pulsing blue). This will factory reset your switch.
Video Visual
Other Pairing Methods
Manual-Pairing (Config Button - Press 3x)
If your LED Bar (C) is solid blue (not pulsing), press the config button (A) 3x rapidly (1-2 seconds) to initiate the pairing process (LED Bar (C) should start pulsing blue)
Video Visual
Once your LED Bar is pulsing blue, move onto the next step. You will have 3 minutes to complete it before the switch times out.
2. Initiate Pairing on the Hub
After you’ve initiated pairing on your switch, the LED bar should be pulsing blue (reminder, you will have 3 minutes until it times out).
If it’s not pulsing, please hold down the config button followed by the top of the paddle for 20 seconds until the LED bar turns/flashes red (click below for a visual) – then let go of the config button followed by the top of the paddle.
Visual
Feel free to follow the written instructions below by clicking the drop down or follow along with the video below:
Written Instructions
- Open your SmartThings App and go to the, “Devices” tab
 —
— - Press the (+) button at the top right of the screen—
- Click on, “Add Device”—
- Under the, “Scan for nearby devices” section, click, “Scan” and your hub will search for devices—
- If successful, the LED bar will turn green (if unsuccessful, the LED bar will turn red)—
GIF Visual
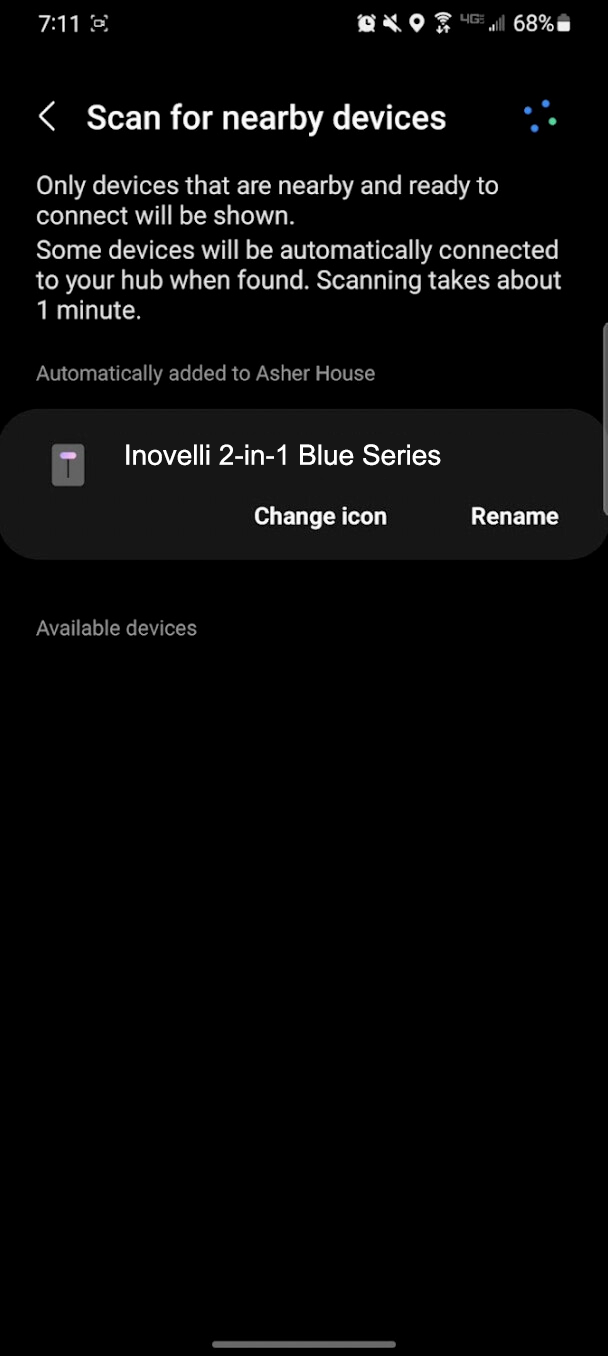
- In addition, your app will show your switch (likely called, “Inovelli 2-in-1 Blue Series” or something similar)—
- Press the back arrow at the top of the screen to go back to the main menu—
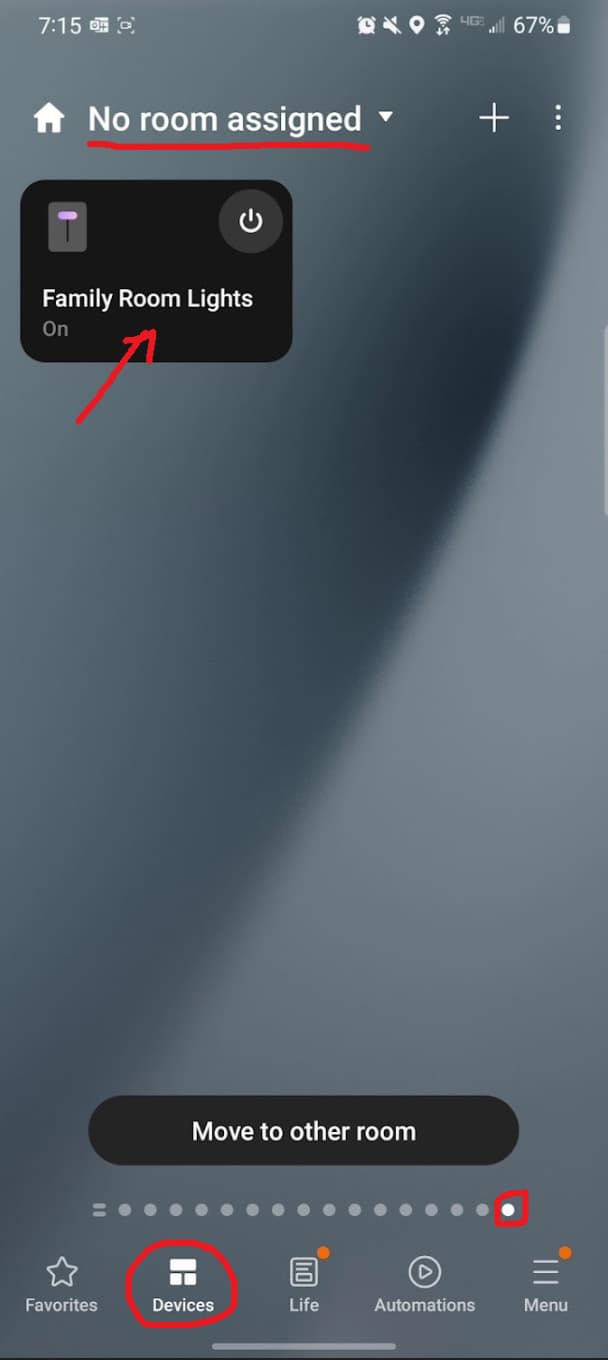
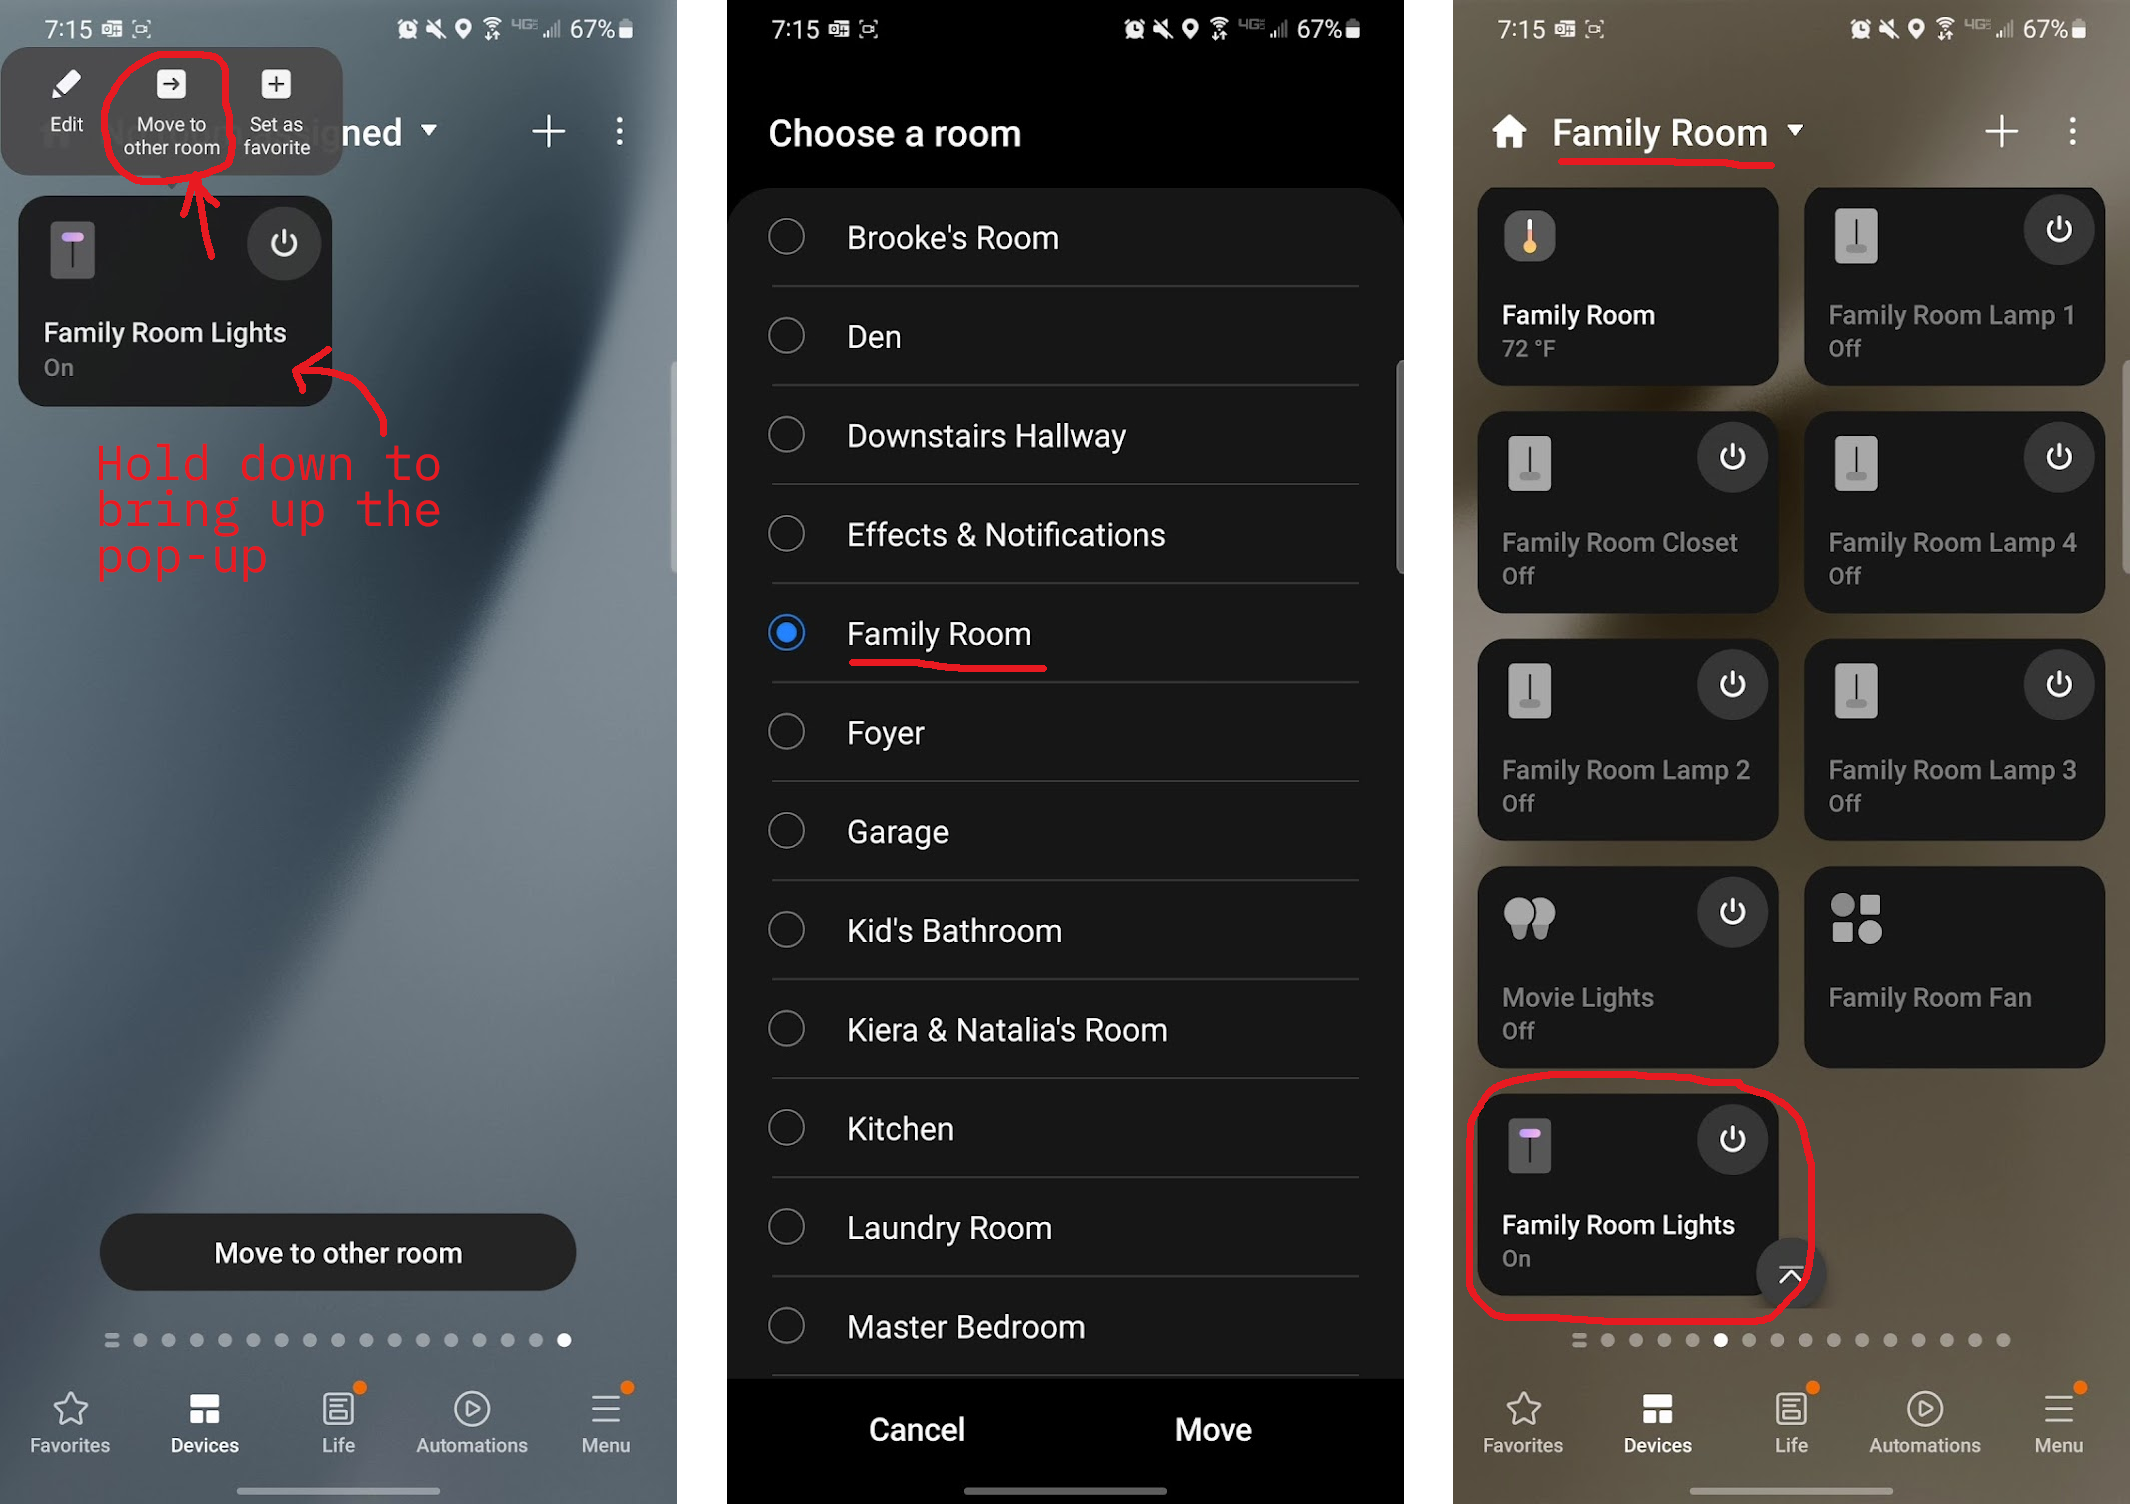
- Next, click on the, “Devices” tab and look for your switch – it should show up under, “No room assigned”—
- Feel free to rename it and assign it to the proper room (to do this click on the switch, then click on the three dots and select, “Edit”)—


Once your switch is successfully paired, check to make sure you have basic functionality of your switch by turning it on/off (and if you have it as a dimmer, test the dimming) in the app.
If successful, we can move onto customizing your switch and setting up some advanced features (animations, scene control, etc) in the next section.
Advanced Feature Setup
This switch is packed with features and most of them come directly from this community. They’ve been debated back and forth, added to wishlists, and talked about over the course of 3+ years (as this switch builds on our Red Series lineup). Below we will explain all the parameters and show you how to change them from within SmartThings and then we’ll go into some of the advanced features and explain how to set them up in SmartThings. If you have any questions along the way, feel free to create a post as there are many SmartThings users here who are excited to help.
Parameter Explanations
NOTE: You will need to install an Edge Driver prior to accessing any of these features from within the app. Instructions can be found here: Edge Driver Installation
__
A parameter is a setting within the switch firmware that allows you to change how the switch operates. For example, you want to change how fast your lights dim on and off, the color of the LED bar, minimum dimming level and much more – all with a few clicks within the app.
The video below will show you how to access the parameters once the device handler is installed.
")
Some parameters are only available if using the switch as a dimmer. For that reason, we’ve divided them into On/Off and Dimmer parameters. Feel free to navigate to the proper section depending on how you’ve programmed your switch.
On/Off Mode Parameters
Below you will see the list of parameters that are available in On/Off Mode. Feel free to click on the drop downs to learn more about each parameter and how to change them from within the SmartThings App.
Firmware v01020200 (2.0) (Present)
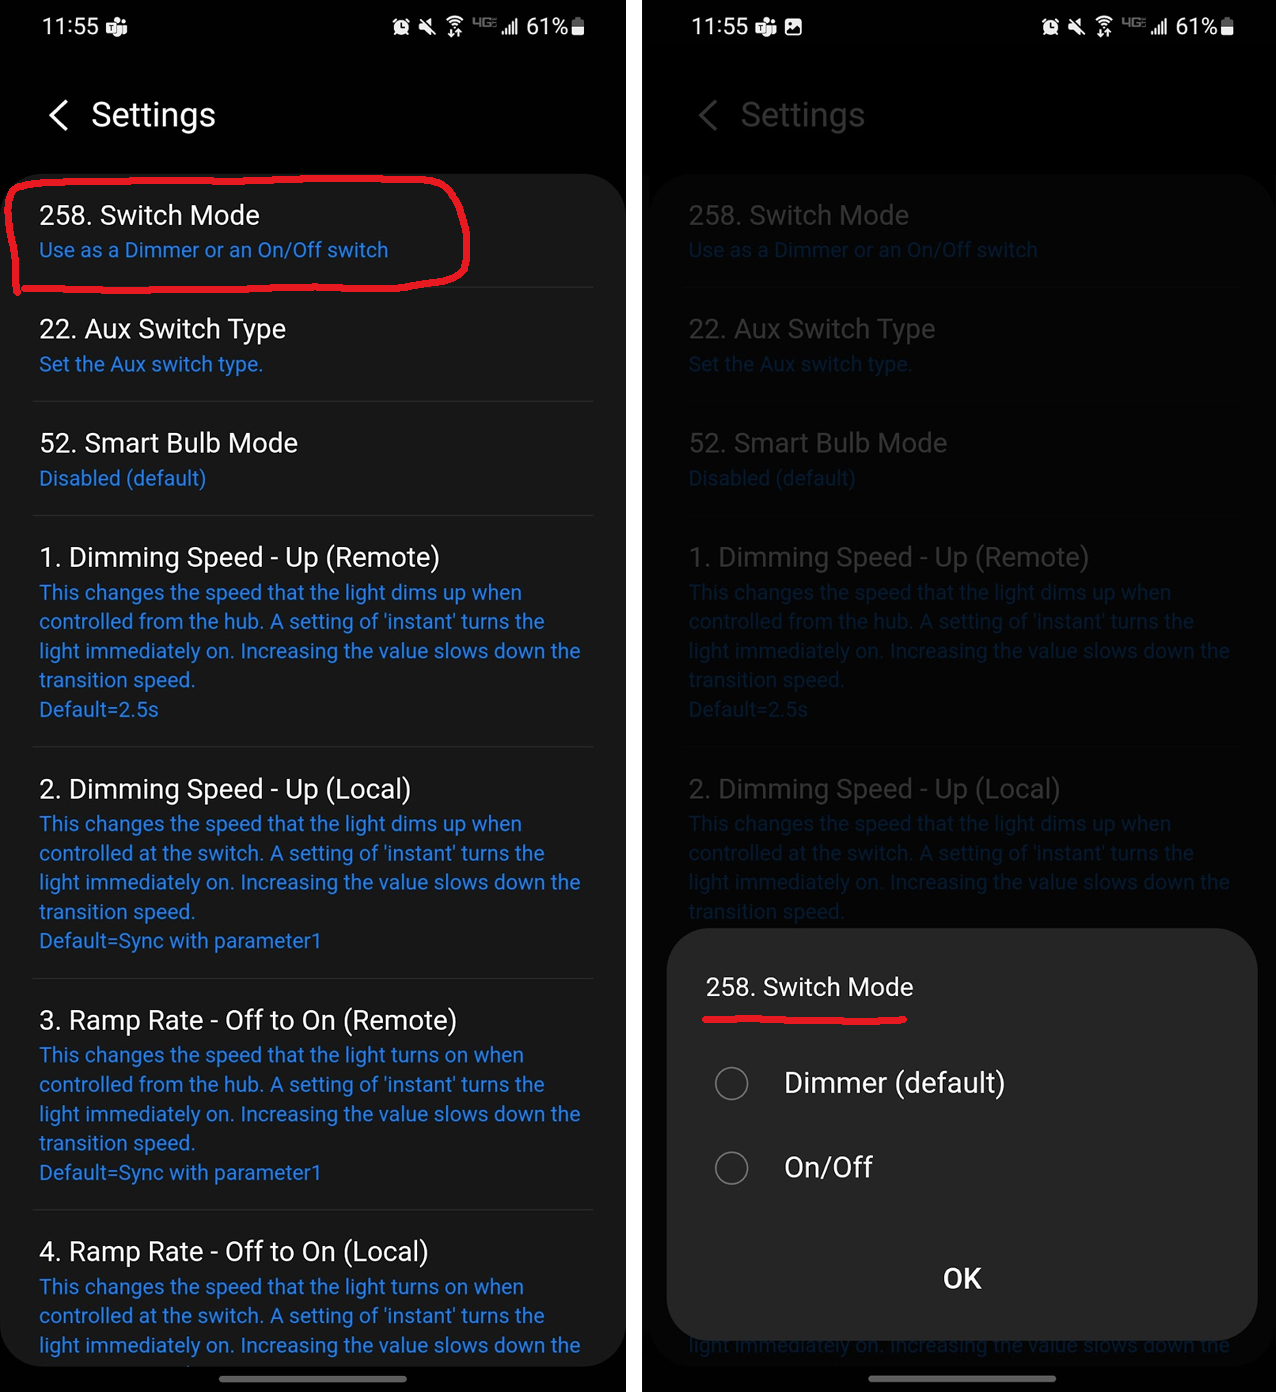
Switch Mode & Type
Switch mode allows you to switch between on/off and dimmer. By default the switch is in on/off mode to protect installations that are not able to be dimmed.Switch type refers to the type of installation you have – either a single-pole (one switch controls one load) or a multi-way (multiple switches control one load) setup. If a multi-way setup, this parameter selects whether or not you are using a dumb switch or an add-on/aux switch.
Parameter 261 allows you to disable the audible, “click” of the switch. By default, in a neutral setting, the switch has a hard, “on/off” that results in a clicking sound. This was put in by a request from the community to ensure power is cut to the load. The sound you hear is the relay opening and closing (NOTE: You will not hear this click in a non-neutral setting as the relay cannot fully close due to the switch still needing power to operate its Zigbee antenna). If you’d like to have a simulated on/off (like the non-neutral setup has), you can disable this click. The switch will then only be able to be set to 0 or 100.
| # | About | Description |
|---|---|---|
| 258 | Switch Mode (Dimmer or On/Off) | Determines the mode of the switch (On/Off or Dimmer)More DetailsYou may choose from a range of 0-1, with 0 = On/Off, and 1 = Dimmer 0 = On/Off (Default) 1 = Dimmer |
| 22 | Switch Type | Select what type of installation you haveMore DetailsYou may choose from a range of 0-2, with 0 = Single-Pole, 1 = Multi-Way (Dumb Switch) and 2 = Multi-Way (Aux Switch) 0 = Single-Pole (Default) 1 = Multi-Way (Dumb Switch) 2 = Multi-Way (Add-On/Aux Switch) |
| 261 | Disable Audible Relay Click | Disables the audible click from the relay and puts the switch into a simulated on/off modeMore DetailsYou may choose from a range of 0-1, with 0 = Disabled (Audible Click is Active), and 1 = Enabled (Audible Click is Inactive 0 = Disabled (Audible Click is Active) 1 = Enabled (Audible Click is Inactive) How to AdjustTBD - Need to put in the Edge Driver as of 10/28/22 – if this is still here and you’re wanting this now, shoot me a PM and I’ll remind the team |
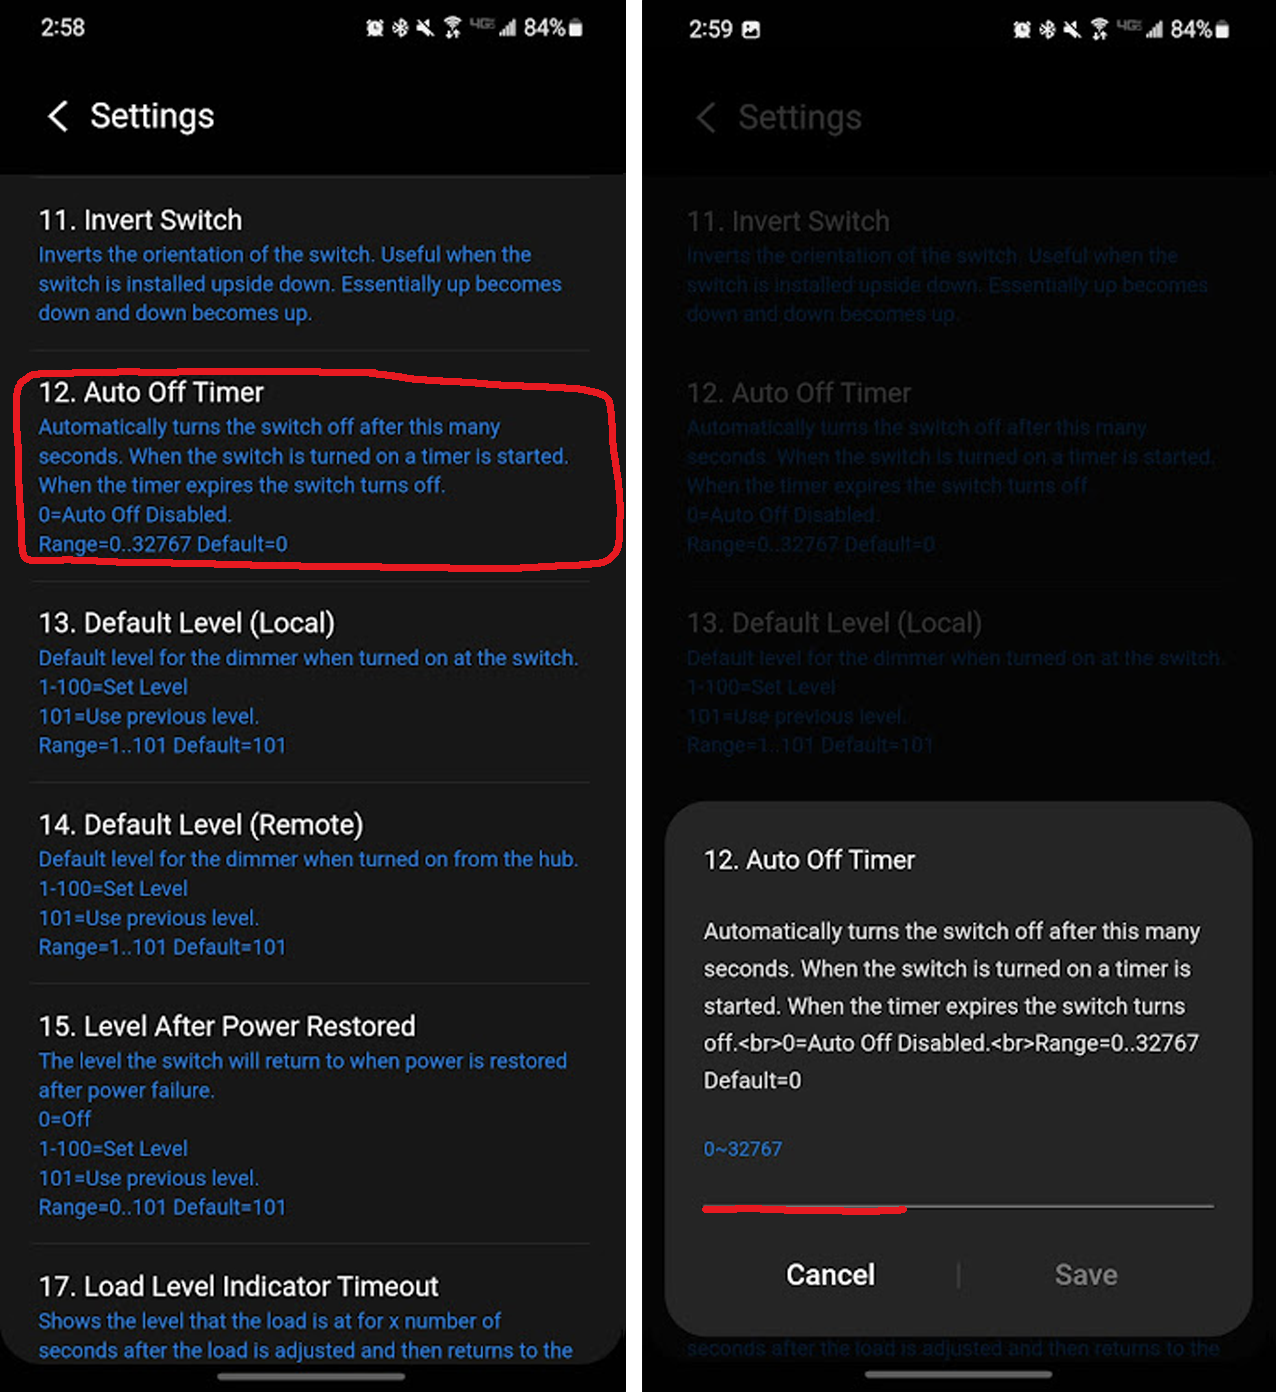
Auto Off Timer
The auto-off timer function is used to automatically turn off the light switch locally after a certain amount of time without setting up an automation.
Example: This is handy if you have the switch installed in an area that is infrequently used and you want to make sure the switch is off without setting an automation.
| # | About | Description |
|---|---|---|
| 12 | Auto-Off Timer | Automatically turns the switch off after x amount of secondsMore DetailsYou may choose from a range of 0-32767, in which 0 disables the auto-timer and 32767 being 32767 seconds (each number represents 1s) 0 = Disabled (Default) 1 = 1s 32767 = 32767s (9.1hrs) |
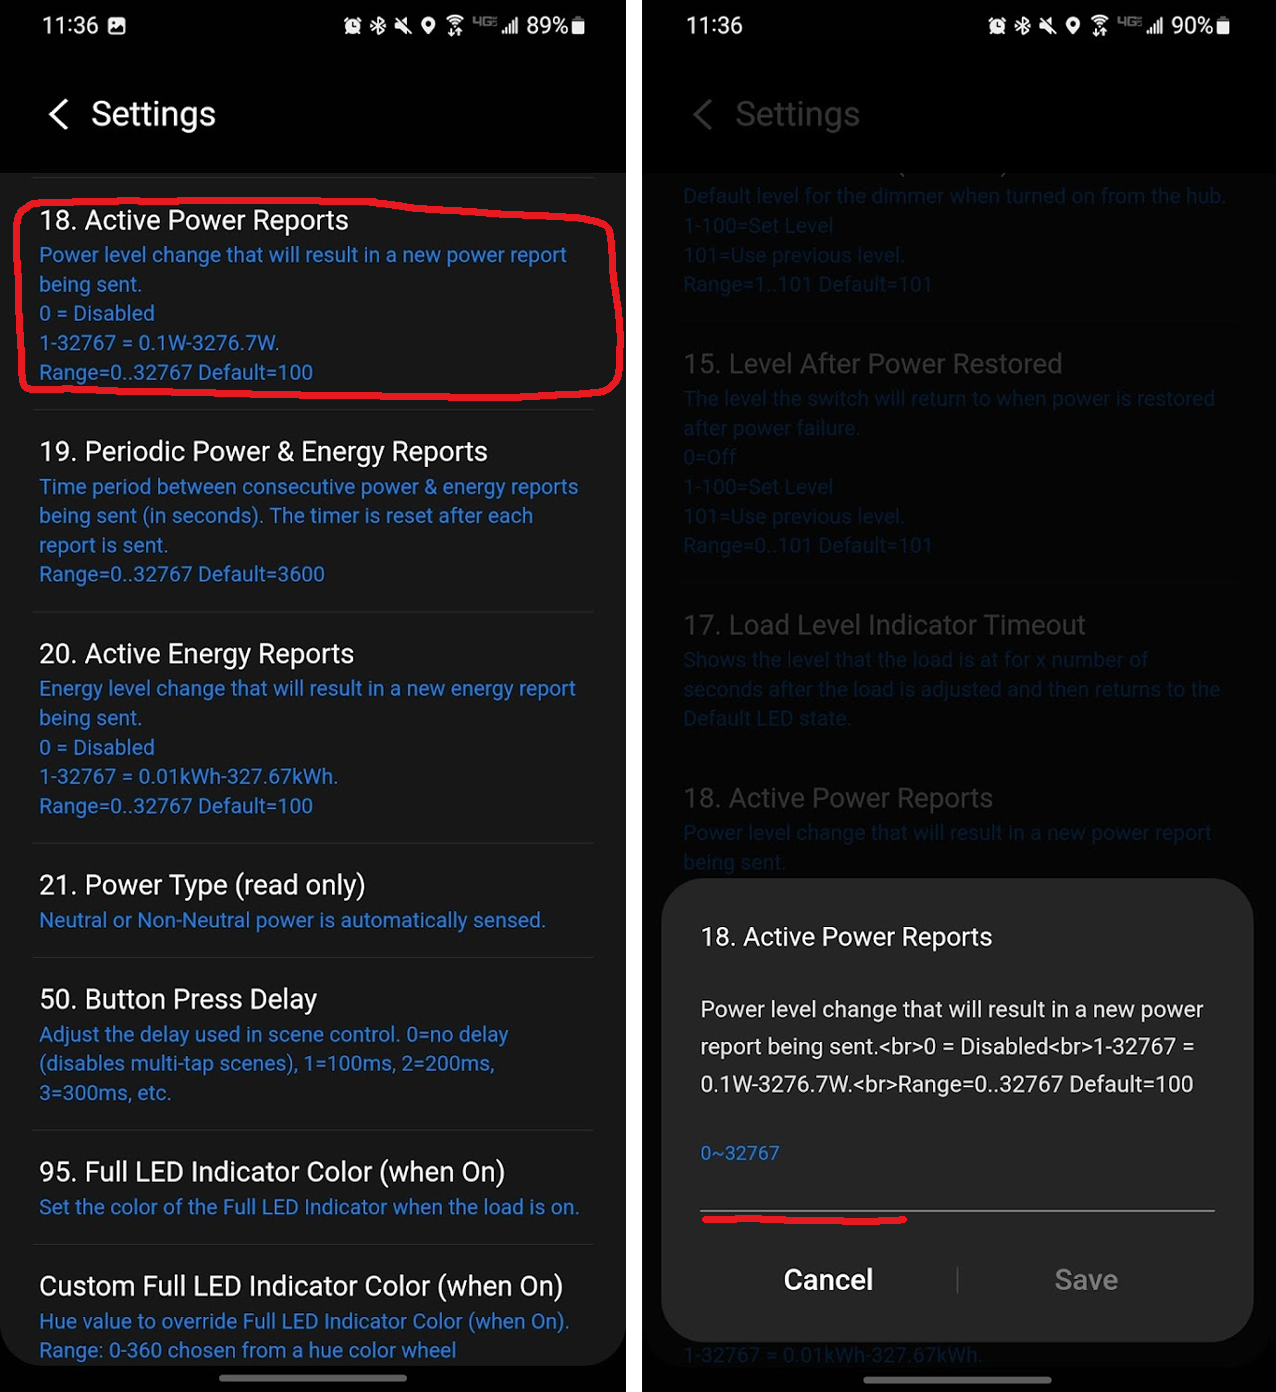
Energy & Power Monitoring
Energy monitoring refers to the active and periodic monitoring of kilowatt hours. Active energy monitoring gives you the ability to measure any fluctuations between kilowatt hours, whereas periodic monitoring will report actual kilowatt hours used regardless of change.
Example: Suppose you want to keep track of the kilowatt hours in a chart to see how much energy is expended. You would set the periodic energy monitoring to whatever interval you want to make your graph accurate (ie: 1 minute, 5 minutes, etc). Whereas, if you wanted to set automations based off of fluctuations (ie: if there is a sudden change in kilowatt hours, send a notification) you would use the active energy reports.
Power monitoring refers to the active and periodic monitoring of wattage. Active power monitoring gives you the ability to measure any fluctuations between wattage, whereas periodic monitoring will report wattage used regardless of change.
Example: Suppose you want to keep track of wattage in a chart to see how much power is consumed. You would set the periodic power monitoring to whatever interval you want to make your graph accurate (ie: 1 minute, 5 minutes, etc). Whereas, if you wanted to set automations based off of fluctuations (ie: if there is a sudden change in wattage, send a notification) you would use the active power reports.
| # | About | Description |
|---|---|---|
| 18 | Active Power Reports | The power level change that will result in a new power report being sent in wattage (W)More DetailsYou may choose from a range of 0-100, in which 0 disables power reports, and 100 being a 10W change (each number represents 0.1W) 0 = Disabled 1 = 0.1W 10 = 1W (Default) 100 = 10W How to AdjustClick on the parameter and input a number. Each number represents the wattage change you want a report sent at (ie: If you want reports sent with every 5W fluctuation, input the number 50). WARNING: The lower the number that is set, the more traffic your network may endure and the more your hub/gateway has to process. This can cause congestion and slow down automations. |
| 19 | Periodic Power & Energy Reports | Time period between consecutive power and energy reports being sent (in seconds)More DetailsYou may choose from a range of 0-32767, with 0 being disabled, and 32767 being 32767 seconds (each number represents 1s) 0 = Disabled 1 = 1s 3600 = 3600s/1hr (Default) 32767 = 32767s/9.1hr NOTE: Timer resets after every report is sent How to AdjustClick on the parameter and input a number. Each number represents the number of seconds between power/energy reporting. WARNING: The faster the reporting interval (ie: lower the number of seconds between reporting), the more traffic your network will endure and the more your hub/gateway has to process. This can cause congestion and slow down automations. |
| 20 | Energy Reports | The energy level change that will result in a new energy report being sent in kilowatt hours (kWh)More DetailsYou may choose from a range of 0-100, with 0 being disabled, and 100 being 1kWh (each number represents 0.01kWh) 0 = Disabled 1 = 0.01kWh 10 = 0.1kWh (Default) 100 = 1kWh How to AdjustClick on the parameter and input a number. Each number represents the kilowatt hour change you want a report sent at (ie: If you want reports sent with every 0.5kWh fluctuation, input the number 50). WARNING: The lower the number that is set, the more traffic your network may endure and the more your hub/gateway has to process. This can cause congestion and slow down automations. |


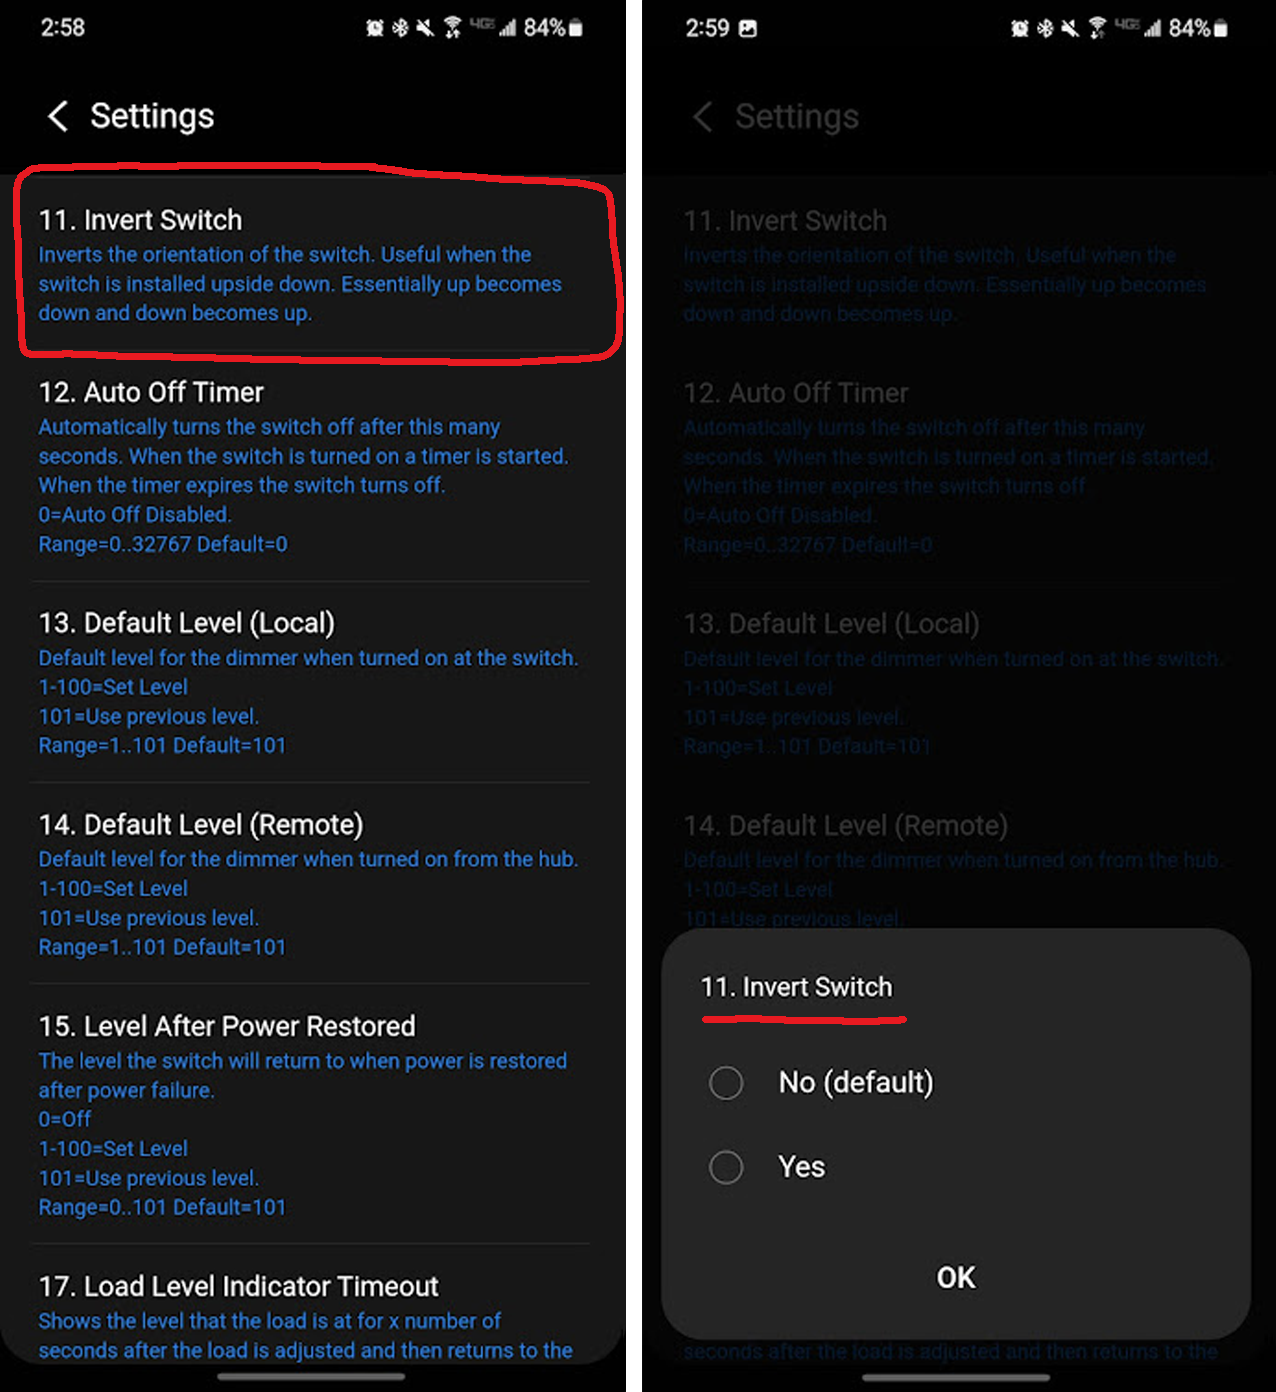
Invert Switch
Inverting the switch refers to swapping the way the paddles typically work (ie: push up on the paddle = light turns on or dims up, push down on paddle = light turns off or dims down) and making it so that when you push up on the paddle, you would be turning the lights off, whereas if you pushed down on the paddle, it would turn the lights on.
Example: This is more used for areas where switches are installed horizontally or if you prefer to have the configuration/favorites button at the bottom of the switch instead of the top.
| # | About | Description |
|---|---|---|
| 11 | Invert Switch | Inverts the switch (Tapping ↓ = On, Tapping ↑ = Off)More DetailsYou may choose from a range of 0-1, in which 0 disables inverting and 1 enables inverting 0 = Disabled (Default) 1 = Enabled |
LED Bar Customization
LED Bar Color
These parameters allow you to change the LED bar color (either the entire LED bar or each of the seven (7) individual LED’s individually) for when the switch is on and when the switch is off (ie: colors can be separate values when the switch is on vs when it is off).
Example: Match your home aesthetics by selecting various solid colors or by creating your own design by stylizing each individual LED.
| # | About | Description |
|---|---|---|
| 95 | LED Indicator Color (When On) - Full Bar | This will set the default color of the LED Bar (all 7 LED’s) when the switch is onMore DetailsYou may choose from a range of 0-255, in which each number represents a certain color. To play around with the colors to determine what value it is, please click here to be taken to the LED Color Calculator 0 = Red 170 = Blue (Default) 255 = White How to AdjustGo to the LED Color Calculator and follow these instructions to attain your color value: (NOTE: The 2-1 Switch may not be available in the drop-down, feel free to use the Dimmer switch – you will get the same results) Once you find the color and value that you like from the calculator, click on the parameter and input the number. |
| 96 | LED Indicator Color (When Off) - Full Bar | This will set the default color of the LED Bar (all 7 LED’s) when the switch is offMore DetailsYou may choose from a range of 0-255, in which each number represents a certain color. To play around with the colors to determine what value it is, please click here to be taken to the LED Color Calculator 0 = Red 170 = Blue (Default) 255 = White How to AdjustGo to the LED Color Calculator and follow these instructions to attain your color value: (NOTE: The 2-1 Switch may not be available in the drop-down, feel free to use the Dimmer switch – you will get the same results) Once you find the color and value that you like from the calculator, click on the parameter and input the number. |
| 60 | LED Indicator Color (When On) - LED #1 | This will set the default color of the LED Bar (only LED #1 - bottom LED) when the switch is onMore DetailsYou may choose from a range of 0-255, in which each number represents a certain color. To play around with the colors to determine what value it is, please click here to be taken to the LED Color Calculator 0 = Red 170 = Blue (Default) 255 = White How to AdjustGo to the LED Color Calculator and follow these instructions to attain your color value: (NOTE: The 2-1 Switch may not be available in the drop-down, feel free to use the Dimmer switch – you will get the same results) Once you find the color and value that you like from the calculator, click on the parameter and input the number. |
| 61 | LED Indicator Color (When Off) - LED #1 | This will set the default color of the LED Bar (only LED #1 - bottom LED) when the switch is offMore DetailsYou may choose from a range of 0-255, in which each number represents a certain color. To play around with the colors to determine what value it is, please click here to be taken to the LED Color Calculator 0 = Red 170 = Blue (Default) 255 = White How to AdjustGo to the LED Color Calculator and follow these instructions to attain your color value: (NOTE: The 2-1 Switch may not be available in the drop-down, feel free to use the Dimmer switch – you will get the same results) Once you find the color and value that you like from the calculator, click on the parameter and input the number. |
| 65 | LED Indicator Color (When On) - LED #2 | This will set the default color of the LED Bar (only LED #2 - second from the bottom LED) when the switch is onMore DetailsYou may choose from a range of 0-255, in which each number represents a certain color. To play around with the colors to determine what value it is, please click here to be taken to the LED Color Calculator 0 = Red 170 = Blue (Default) 255 = White How to AdjustGo to the LED Color Calculator and follow these instructions to attain your color value: (NOTE: The 2-1 Switch may not be available in the drop-down, feel free to use the Dimmer switch – you will get the same results) Once you find the color and value that you like from the calculator, click on the parameter and input the number. |
| 66 | LED Indicator Color (When Off) - LED #2 | This will set the default color of the LED Bar (only LED #2 - second from the bottom LED) when the switch is offMore DetailsYou may choose from a range of 0-255, in which each number represents a certain color. To play around with the colors to determine what value it is, please click here to be taken to the LED Color Calculator 0 = Red 170 = Blue (Default) 255 = White How to AdjustGo to the LED Color Calculator and follow these instructions to attain your color value: (NOTE: The 2-1 Switch may not be available in the drop-down, feel free to use the Dimmer switch – you will get the same results) Once you find the color and value that you like from the calculator, click on the parameter and input the number. |
| 70 | LED Indicator Color (When On) - LED #3 | This will set the default color of the LED Bar (only LED #3 - third from the bottom LED) when the switch is onMore DetailsYou may choose from a range of 0-255, in which each number represents a certain color. To play around with the colors to determine what value it is, please click here to be taken to the LED Color Calculator 0 = Red 170 = Blue (Default) 255 = White How to AdjustGo to the LED Color Calculator and follow these instructions to attain your color value: (NOTE: The 2-1 Switch may not be available in the drop-down, feel free to use the Dimmer switch – you will get the same results) Once you find the color and value that you like from the calculator, click on the parameter and input the number. |
| 71 | LED Indicator Color (When Off) - LED #3 | This will set the default color of the LED Bar (only LED #3 - third from the bottom LED) when the switch is offMore DetailsYou may choose from a range of 0-255, in which each number represents a certain color. To play around with the colors to determine what value it is, please click here to be taken to the LED Color Calculator 0 = Red 170 = Blue (Default) 255 = White How to AdjustGo to the LED Color Calculator and follow these instructions to attain your color value: (NOTE: The 2-1 Switch may not be available in the drop-down, feel free to use the Dimmer switch – you will get the same results) Once you find the color and value that you like from the calculator, click on the parameter and input the number. |
| 75 | LED Indicator Color (When On) - LED #4 | This will set the default color of the LED Bar (only LED #4 - middle LED) when the switch is onMore DetailsYou may choose from a range of 0-255, in which each number represents a certain color. To play around with the colors to determine what value it is, please click here to be taken to the LED Color Calculator 0 = Red 170 = Blue (Default) 255 = White How to AdjustGo to the LED Color Calculator and follow these instructions to attain your color value: (NOTE: The 2-1 Switch may not be available in the drop-down, feel free to use the Dimmer switch – you will get the same results) Once you find the color and value that you like from the calculator, click on the parameter and input the number. |
| 76 | LED Indicator Color (When Off) - LED #4 | This will set the default color of the LED Bar (only LED #4 - middle LED) when the switch is offMore DetailsYou may choose from a range of 0-255, in which each number represents a certain color. To play around with the colors to determine what value it is, please click here to be taken to the LED Color Calculator 0 = Red 170 = Blue (Default) 255 = White How to AdjustGo to the LED Color Calculator and follow these instructions to attain your color value: (NOTE: The 2-1 Switch may not be available in the drop-down, feel free to use the Dimmer switch – you will get the same results) Once you find the color and value that you like from the calculator, click on the parameter and input the number. |
| 80 | LED Indicator Color (When On) - LED #5 | This will set the default color of the LED Bar (only LED #5 - third from the top LED) when the switch is onMore DetailsYou may choose from a range of 0-255, in which each number represents a certain color. To play around with the colors to determine what value it is, please click here to be taken to the LED Color Calculator 0 = Red 170 = Blue (Default) 255 = White How to AdjustGo to the LED Color Calculator and follow these instructions to attain your color value: (NOTE: The 2-1 Switch may not be available in the drop-down, feel free to use the Dimmer switch – you will get the same results) Once you find the color and value that you like from the calculator, click on the parameter and input the number. |
| 81 | LED Indicator Color (When Off) - LED #5 | This will set the default color of the LED Bar (only LED #5 - third from the top LED) when the switch is offMore DetailsYou may choose from a range of 0-255, in which each number represents a certain color. To play around with the colors to determine what value it is, please click here to be taken to the LED Color Calculator 0 = Red 170 = Blue (Default) 255 = White How to AdjustGo to the LED Color Calculator and follow these instructions to attain your color value: (NOTE: The 2-1 Switch may not be available in the drop-down, feel free to use the Dimmer switch – you will get the same results) Once you find the color and value that you like from the calculator, click on the parameter and input the number. |
| 85 | LED Indicator Color (When On) - LED #6 | This will set the default color of the LED Bar (only LED #6 - second from the top LED) when the switch is onMore DetailsYou may choose from a range of 0-255, in which each number represents a certain color. To play around with the colors to determine what value it is, please click here to be taken to the LED Color Calculator 0 = Red 170 = Blue (Default) 255 = White How to AdjustGo to the LED Color Calculator and follow these instructions to attain your color value: (NOTE: The 2-1 Switch may not be available in the drop-down, feel free to use the Dimmer switch – you will get the same results) Once you find the color and value that you like from the calculator, click on the parameter and input the number. |
| 86 | LED Indicator Color (When Off) - LED #6 | This will set the default color of the LED Bar (only LED #6 - second from the top LED) when the switch is offMore DetailsYou may choose from a range of 0-255, in which each number represents a certain color. To play around with the colors to determine what value it is, please click here to be taken to the LED Color Calculator 0 = Red 170 = Blue (Default) 255 = White How to AdjustGo to the LED Color Calculator and follow these instructions to attain your color value: (NOTE: The 2-1 Switch may not be available in the drop-down, feel free to use the Dimmer switch – you will get the same results) Once you find the color and value that you like from the calculator, click on the parameter and input the number. |
| 90 | LED Indicator Color (When On) - LED #7 | This will set the default color of the LED Bar (only LED #7 - top LED) when the switch is onMore DetailsYou may choose from a range of 0-255, in which each number represents a certain color. To play around with the colors to determine what value it is, please click here to be taken to the LED Color Calculator 0 = Red 170 = Blue (Default) 255 = White How to AdjustGo to the LED Color Calculator and follow these instructions to attain your color value: (NOTE: The 2-1 Switch may not be available in the drop-down, feel free to use the Dimmer switch – you will get the same results) Once you find the color and value that you like from the calculator, click on the parameter and input the number. |
| 91 | LED Indicator Color (When Off) - LED #7 | This will set the default color of the LED Bar (only LED #7 - top LED) when the switch is offMore DetailsYou may choose from a range of 0-255, in which each number represents a certain color. To play around with the colors to determine what value it is, please click here to be taken to the LED Color Calculator 0 = Red 170 = Blue (Default) 255 = White How to AdjustGo to the LED Color Calculator and follow these instructions to attain your color value: (NOTE: The 2-1 Switch may not be available in the drop-down, feel free to use the Dimmer switch – you will get the same results) Once you find the color and value that you like from the calculator, click on the parameter and input the number. |

LED Bar Intensity
These parameters allow you to change the LED bar intensity/brightness (either the entire LED bar or each of the seven (7) individual LED's individually) for when the switch is on and when the switch is off (ie: intensity/brightness can be separate values when the switch is on vs when it is off).Example: Some people prefer to have the LED Bar light up when the light is on, whereas others prefer the LED to light up when the light is off, and some just don’t want it on at all! Another use for the brightness outside of aesthetics is to adjust the brightness based on the time of day (ie: if the switch is in your bedroom and you prefer not to have it be bright, you can change the brightness at night vs daytime).
| # | About | Description |
|---|---|---|
| 97 | LED Indicator Intensity (When On) - Full Bar | This will set the intensity (ie: how bright it is) of the LED Bar (all 7 LED’s) when the switch is onMore DetailsYou may choose from a range of 0-100, in which each 0 = Off and 100 = 100% (each number represents a percentage). 0 = Off 1 = 1% 33 = 33% (Default) 100 = 100% How to AdjustClick on the parameter and input a number. Each number represents the percentage you want the LED bar intensity (the higher the brighter). |
| 98 | LED Indicator Intensity (When Off) - Full Bar | This will set the intensity (ie: how bright it is) of the LED Bar (all 7 LED’s) when the switch is offMore DetailsYou may choose from a range of 0-101, in which each 0 = Off, 100 = 100% (each number represents a percentage) 0 = Off 1 = 1% 33 = 33% 100 = 100% How to AdjustClick on the parameter and input a number. Each number represents the percentage you want the LED bar intensity (the higher the brighter). |
| 62 | LED Indicator Intensity (When On) - LED #1 | This will set the intensity (ie: how bright it is) of the LED Bar (only LED #1 - bottom LED) when the switch is onMore DetailsYou may choose from a range of 0-101, in which each 0 = Off, 100 = 100% (each number represents a percentage) and 101 syncs with Parameter 97 (full LED bar intensity - on). 1 = 1% 33 = 33% 100 = 100% 101 = Sync to Parameter 97 How to AdjustClick on the parameter and input a number. Each number represents the percentage you want the LED bar intensity (the higher the brighter). |
| 63 | LED Indicator Intensity (When Off) - LED #1 | This will set the intensity (ie: how bright it is) of the LED Bar (only LED #1 - bottom LED) when the switch is offMore DetailsYou may choose from a range of 0-101, in which each 0 = Off, 100 = 100% (each number represents a percentage) and 101 syncs with Parameter 98 (full LED bar intensity - off). 1 = 1% 33 = 33% 100 = 100% 101 = Sync to Parameter 98 How to AdjustClick on the parameter and input a number. Each number represents the percentage you want the LED bar intensity (the higher the brighter). |
| 67 | LED Indicator Intensity (When On) - LED #2 | This will set the intensity (ie: how bright it is) of the LED Bar (only LED #2 - second from the bottom LED) when the switch is onMore DetailsYou may choose from a range of 0-101, in which each 0 = Off, 100 = 100% (each number represents a percentage) and 101 syncs with Parameter 97 (full LED bar intensity - on). 1 = 1% 33 = 33% 100 = 100% 101 = Sync to Parameter 97 How to AdjustClick on the parameter and input a number. Each number represents the percentage you want the LED bar intensity (the higher the brighter). |
| 68 | LED Indicator Intensity (When Off) - LED #2 | This will set the intensity (ie: how bright it is) of the LED Bar (only LED #2 - second from the bottom LED) when the switch is offMore DetailsYou may choose from a range of 0-101, in which each 0 = Off, 100 = 100% (each number represents a percentage) and 101 syncs with Parameter 98 (full LED bar intensity - off). 1 = 1% 33 = 33% 100 = 100% 101 = Sync to Parameter 98 How to AdjustClick on the parameter and input a number. Each number represents the percentage you want the LED bar intensity (the higher the brighter). |
| 72 | LED Indicator Intensity (When On) - LED #3 | This will set the intensity (ie: how bright it is) of the LED Bar (only LED #3 - third from the bottom LED) when the switch is onMore DetailsYou may choose from a range of 0-101, in which each 0 = Off, 100 = 100% (each number represents a percentage) and 101 syncs with Parameter 97 (full LED bar intensity - on). 1 = 1% 33 = 33% 100 = 100% 101 = Sync to Parameter 97 How to AdjustClick on the parameter and input a number. Each number represents the percentage you want the LED bar intensity (the higher the brighter). |
| 73 | LED Indicator Intensity (When Off) - LED #3 | This will set the intensity (ie: how bright it is) of the LED Bar (only LED #3 - third from the bottom LED) when the switch is offMore DetailsYou may choose from a range of 0-101, in which each 0 = Off, 100 = 100% (each number represents a percentage) and 101 syncs with Parameter 98 (full LED bar intensity - off). 1 = 1% 33 = 33% 100 = 100% 101 = Sync to Parameter 98 How to AdjustClick on the parameter and input a number. Each number represents the percentage you want the LED bar intensity (the higher the brighter). |
| 72 | LED Indicator Intensity (When On) - LED #4 | This will set the intensity (ie: how bright it is) of the LED Bar (only LED #4 - middle LED) when the switch is onMore DetailsYou may choose from a range of 0-101, in which each 0 = Off, 100 = 100% (each number represents a percentage) and 101 syncs with Parameter 97 (full LED bar intensity - on). 1 = 1% 33 = 33% 100 = 100% 101 = Sync to Parameter 97 How to AdjustClick on the parameter and input a number. Each number represents the percentage you want the LED bar intensity (the higher the brighter). |
| 73 | LED Indicator Intensity (When Off) - LED #4 | This will set the intensity (ie: how bright it is) of the LED Bar (only LED #4 - middle LED) when the switch is offMore DetailsYou may choose from a range of 0-101, in which each 0 = Off, 100 = 100% (each number represents a percentage) and 101 syncs with Parameter 98 (full LED bar intensity - off). 1 = 1% 33 = 33% 100 = 100% 101 = Sync to Parameter 98 How to AdjustClick on the parameter and input a number. Each number represents the percentage you want the LED bar intensity (the higher the brighter). |
| 77 | LED Indicator Intensity (When On) - LED #5 | This will set the intensity (ie: how bright it is) of the LED Bar (only LED #5 - third from the top LED) when the switch is onMore DetailsYou may choose from a range of 0-101, in which each 0 = Off, 100 = 100% (each number represents a percentage) and 101 syncs with Parameter 97 (full LED bar intensity - on). 1 = 1% 33 = 33% 100 = 100% 101 = Sync to Parameter 97 How to AdjustClick on the parameter and input a number. Each number represents the percentage you want the LED bar intensity (the higher the brighter). |
| 78 | LED Indicator Intensity (When Off) - LED #5 | This will set the intensity (ie: how bright it is) of the LED Bar (only LED #5 - third from the top LED) when the switch is offMore DetailsYou may choose from a range of 0-101, in which each 0 = Off, 100 = 100% (each number represents a percentage) and 101 syncs with Parameter 98 (full LED bar intensity - off). 1 = 1% 33 = 33% 100 = 100% 101 = Sync to Parameter 98 How to AdjustClick on the parameter and input a number. Each number represents the percentage you want the LED bar intensity (the higher the brighter). |
| 87 | LED Indicator Intensity (When On) - LED #6 | This will set the intensity (ie: how bright it is) of the LED Bar (only LED #6 - second from the top LED) when the switch is onMore DetailsYou may choose from a range of 0-101, in which each 0 = Off, 100 = 100% (each number represents a percentage) and 101 syncs with Parameter 97 (full LED bar intensity - on). 1 = 1% 33 = 33% 100 = 100% 101 = Sync to Parameter 97 How to AdjustClick on the parameter and input a number. Each number represents the percentage you want the LED bar intensity (the higher the brighter). |
| 88 | LED Indicator Intensity (When Off) - LED #6 | This will set the intensity (ie: how bright it is) of the LED Bar (only LED #6 - second from the top LED) when the switch is offMore DetailsYou may choose from a range of 0-101, in which each 0 = Off, 100 = 100% (each number represents a percentage) and 101 syncs with Parameter 98 (full LED bar intensity - off). 1 = 1% 33 = 33% 100 = 100% 101 = Sync to Parameter 98 How to AdjustClick on the parameter and input a number. Each number represents the percentage you want the LED bar intensity (the higher the brighter). |
| 87 | LED Indicator Intensity (When On) - LED #7 | This will set the intensity (ie: how bright it is) of the LED Bar (only LED #7 - top LED) when the switch is onMore DetailsYou may choose from a range of 0-101, in which each 0 = Off, 100 = 100% (each number represents a percentage) and 101 syncs with Parameter 97 (full LED bar intensity - on). 1 = 1% 33 = 33% 100 = 100% 101 = Sync to Parameter 97 How to AdjustClick on the parameter and input a number. Each number represents the percentage you want the LED bar intensity (the higher the brighter). |
| 88 | LED Indicator Intensity (When Off) - LED #7 | This will set the intensity (ie: how bright it is) of the LED Bar (only LED #7 - top LED) when the switch is offMore DetailsYou may choose from a range of 0-101, in which each 0 = Off, 100 = 100% (each number represents a percentage) and 101 syncs with Parameter 98 (full LED bar intensity - off). 1 = 1% 33 = 33% 100 = 100% 101 = Sync to Parameter 98 How to AdjustClick on the parameter and input a number. Each number represents the percentage you want the LED bar intensity (the higher the brighter). |
LED Bar Timeout
This parameter is where you set the number of seconds the dim level is shown on the LED bar.Example: When you change the dim level (locally or remotely), the LED bar will show you approximately what the dim level is (ie: if dimming to 75%, the LED bar will light up 3/4 of the way). This parameter adjusts the time the LED bar shows you the dim level on the switch. After it’s done showing you the level, it goes back to illuminating the entire LED bar (at the color and intensity level you’ve already set) – or you can have the LED bar always show you what level the load is at.
| # | About | Description |
|---|---|---|
| 17 | LED Indicator Timeout | Changes the amount of time (in seconds) the RGB Bar shows the Dim levelMore DetailsYou may choose from a range of 0-11, in which each 0 = Always off, 10 = 10 (each number represents 1 second) and 11 = Always on. 0 = Always off 1 = 1s (Default) 5 = 5s 10 = 10s 11 = Always on How to AdjustClick on the parameter and input a number. Each number represents the number of seconds before the LED bar indicator stops showing the dim level. |
One LED Mode
This parameter is used if you only ever want to use one LED (bottom one) and is primarily for if you have purchased the On/Off Red Series switch and want to match the aesthetics.Example: Let’s say you purchased the Red Series On/Off switch (that only has one LED) and want all your switches to match. You can set your switch to match this by turning on this mode.
| # | About | Description |
|---|---|---|
| 259 | One LED Mode | Switch only shows LED #1 and does not show LED #'s 2-6 – this mimics the Red Series On/Off switchMore DetailsYou may choose from a range of 0-1, in which each 0 = Disabled and 1 = Enabled 0 = Disabled (Default) 1 = Enabled How to AdjustClick on the parameter and select either enabled or disabled. |
Level After Power Restored
The level after power is restored parameter is used to set the way the switch behaves after the switch loses power (ie: power outage). You can set it to always turn on, have it always turn off, or have it return to where it was prior to the power outage.
Example: If you experience frequent power outages at night and do not want to wake up to being blinded by all your lights turning on when power is restored, you can set your switch to always be off when power comes back. Most of the time, this parameter is left as the default which is to have the switch return to whatever state it was prior to the power outage, but it’s up to you!
| # | About | Description |
|---|---|---|
| 15 | Level After Power Restored | When power is restored, the switch reverts to either On, Off, or Last LevelMore DetailsYou may choose from a range of 0-101, in which 0 is off, 100 = On, and 101 means that the switch will turn onto the last state it was in prior to the power outage 0 = Off 100 = On 101 = Returns to last state prior to outage (Default) NOTE: You will be presented with the option to input numbers between 1-99. These numbers are for if you have your switch in Dimmer mode as you can set the switch to turn on to a specific level. Please only choose 0, 100, or 101 if your switch is in On/Off mode) How to AdjustClick on the parameter and input a number. 0 means the switch will turn off, 100 represents the switch turning on and 101 means the switch will return to the state prior to it losing power. Again, please do not choose values between 1-99 as those are meant for if your switch is in Dimming Mode |

Local & Remote Protection ("Disable Relay")
This parameter locks the internal relay so that it cannot be changed either at the switch (locally) or via an app (remotely).
Example: This is typically used to prevent your switch from turning on or off if it’s connected to a load you do not want turned on or off. It’s also used during certain times of day to prevent children from messing with the light switch.
SMART BULB MODE: This parameter used to be the recommendation if using a smart bulb with your switch (as the load). We’ve created a different parameter for this that’s specifically designed for smart bulbs. Please see Parameter 52 (Smart Bulb Mode) or visit the instructions near the bottom of this page that outline how to setup smart bulbs using this mode.
| # | About | Description |
|---|---|---|
| 256 | Local Protection | Determines whether or not the load of the switch can be controlled via paddle presses (locally)More DetailsYou may choose from a range of 0-1, in which 0 = Disabled and 1 = Enabled 0 = Disabled (Default) 1 = Enabled |
| 257 | Remote Protection | Determines whether or not the load of the switch can be controlled via an app (remote)More DetailsYou may choose from a range of 0-1, in which 0 = Disabled and 1 = Enabled 0 = Disabled (Default) 1 = Enabled |
Smart Bulb Mode
This parameter is used to enable smart bulb mode and will allow your switch to be wired directly to smart bulbs.
Example: If you want to use smart bulbs with your smart switch, you would use this parameter. This was created because smart bulbs require constant power to them in order to report in to the hub. If power is cut to them, they can no longer report to the hub as they go offline (because of no power). With smart bulb mode, the switch locks full power to the bulb and sends digital signals to the hub (or bulb) to turn on/off/dim.
Switch Delay (Instant On / 700ms delay)
This parameter adjusts the amount of time between when the paddle is pressed and the light turns on. By default, there is a 700ms delay built in so that multi-tap scene control can be used (ie: double-tap to activate a scene). However, this can be adjusted down to, “no delay” (you will lose multi-tap capability) or up to 900ms depending on your preference.
Example: When you walk up to the switch and press up, most people are used to there being no delay at all between when you press up and the light turning on. However, many smart switches have a delay built into them because the switch may be looking for a second tap to activate a scene. You can adjust this delay with this parameter or completely turn it off to mimic a normal switch. If you decide to turn it off, you will lose multi-tap features (but you can still use the favorites button).
| # | About | Description |
|---|---|---|
| 50 | Switch Delay | Adjusts the delay between taps in 100ms incrementsMore DetailsYou may choose from a range of 0-9, in which 0 = Instant On (No Delay) and 9 = 900ms 0 = Instant On (Default) 1 = 100ms 7 = 700ms (Default) 9 = 900ms How to AdjustClick on the parameter and select the value you want from the list. The lower the time, the lower the delay between pressing the paddle and the light turning on/off – the higher the time, the slower the delay. Remember, if you set to 0, you will lose the ability to multi-tap for scene control (except for the favorites button). |
Dimmer Mode Parameters
Below you will see the list of parameters that are available in Dimmer Mode. Feel free to click on the drop downs to learn more about each parameter and how to change them from within the SmartThings App.
Firmware v01020200 (2.0) (Present)
Switch Mode & Type
Switch mode allows you to switch between on/off and dimmer. By default the switch is in on/off mode to protect installations that are not able to be dimmed. -- Switch type refers to the type of installation you have -- either a single-pole (one switch controls one load) or a multi-way (multiple switches control one load) setup. If a multi-way setup, this parameter selects whether or not you are using a dumb switch or an add-on/aux switch.| # | About | Description |
|---|---|---|
| 258 | Switch Mode (Dimmer or On/Off) | Determines the mode of the switch (On/Off or Dimmer)More DetailsYou may choose from a range of 0-1, with 0 = On/Off, and 1 = Dimmer 0 = On/Off (Default) 1 = Dimmer |
| 22 | Switch Type | Select what type of installation you haveMore DetailsYou may choose from a range of 0-2, with 0 = Single-Pole, 1 = Multi-Way (Dumb Switch) and 2 = Multi-Way (Aux Switch) 0 = Single-Pole (Default) 1 = Multi-Way (Dumb Switch) 2 = Multi-Way (Add-On/Aux Switch) |
Dimmer Calibration
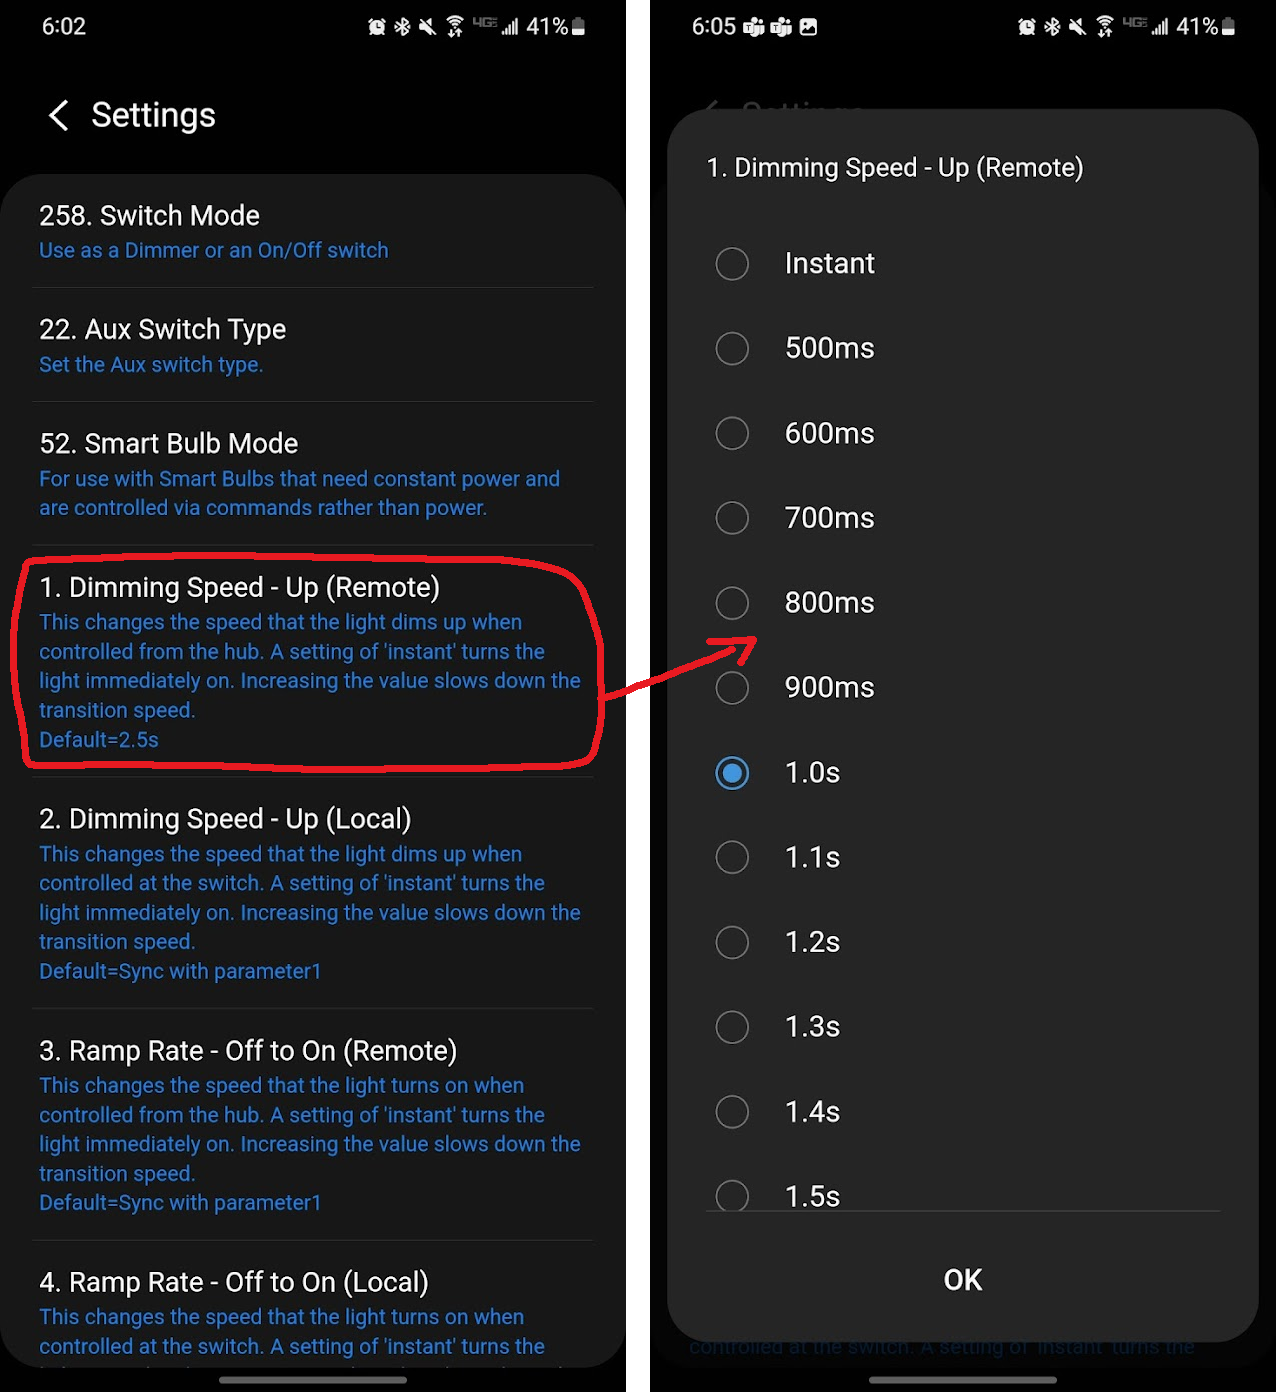
Dimming Speed
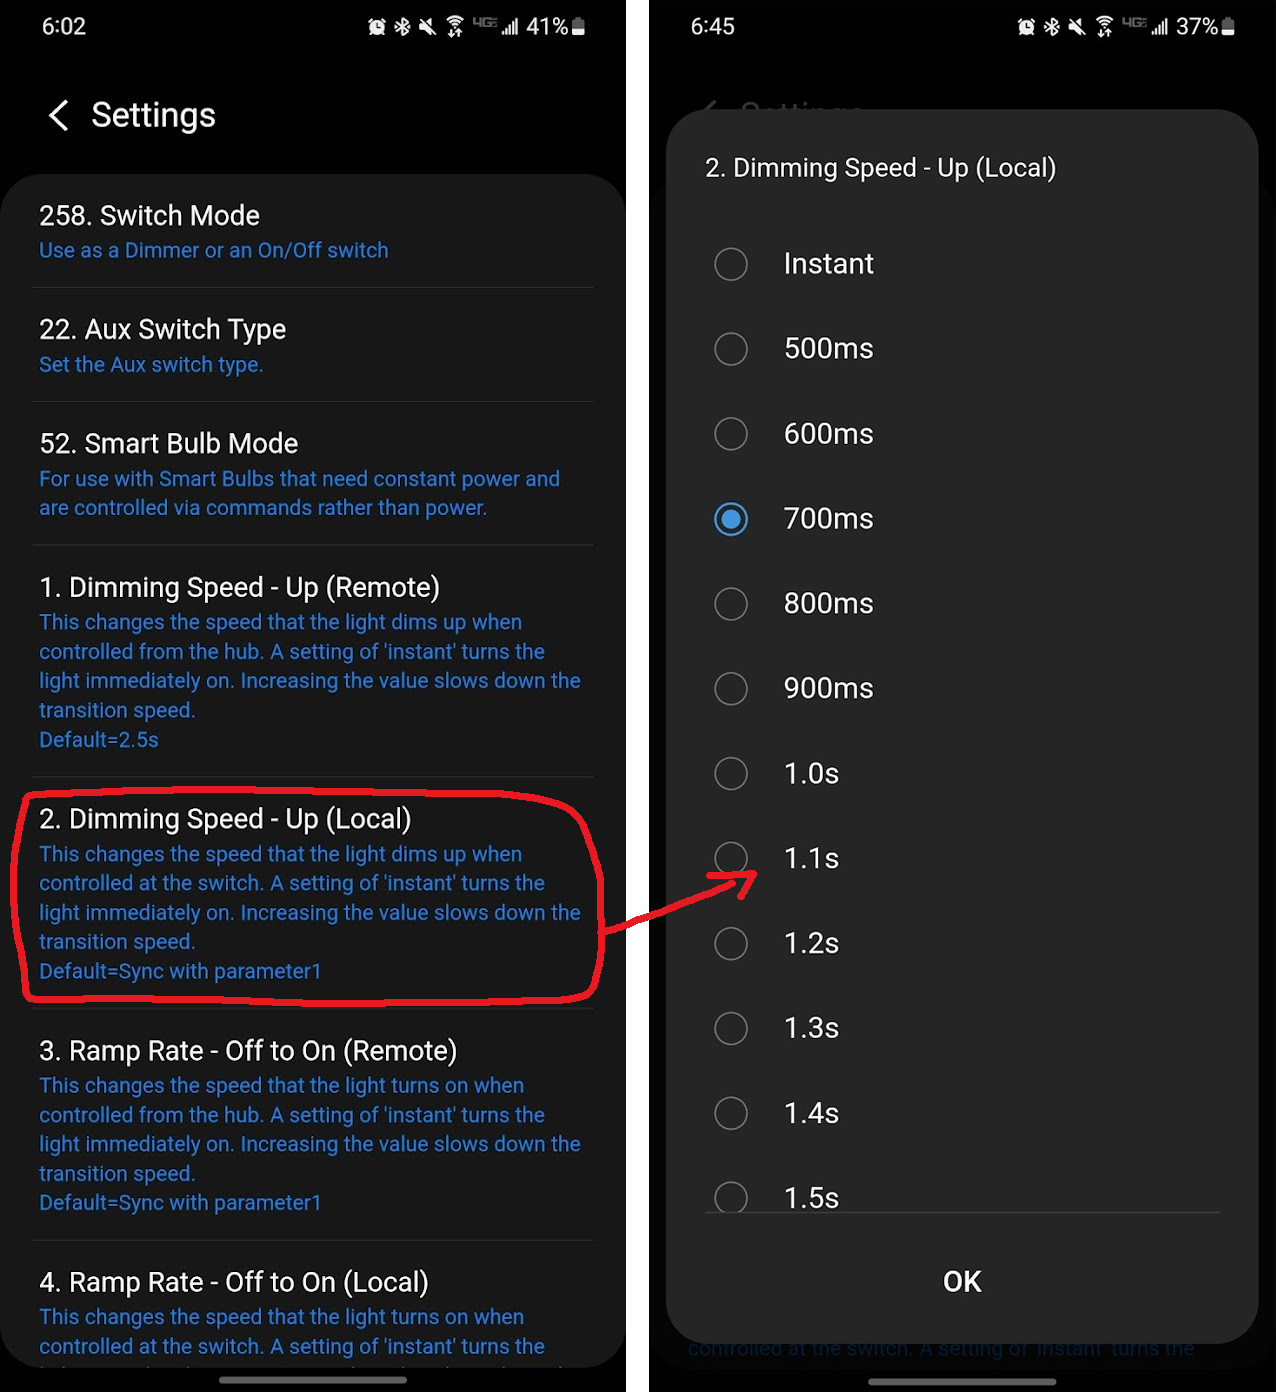
Dimming speed refers to the speed at which the light goes from x% to y% when holding down on the switch (locally) or sliding the dim scale (remotely). You can adjust the brightness (increasing light) and the darkness (decreasing light) values independently.
Example: You walk up to the switch and hold down on it to adjust the dim level from 20% to 60%. Using this example, this parameter will adjust the time it takes to go from 20% to 60% (faster or slower). Conversely, if you walk up to the switch and hold down on it to adjust the dim level from 60% to 20%, this will adjust that time as well. You can set them to be the same value or different.
| # | About | Description |
|---|---|---|
| 1 | Dimming Speed (↑) - Remote | How fast or slow the light turns on when you change the dim level remotely from the SmartThings app (ie: dimming from 10-20%, 60-80%, etc)More DetailsYou may choose from a range of 0-126, with 0 being instant on, and 126 being 12.6 seconds (each number represents 100ms) 0 = Instant On 5 = Fast (500ms) 25 = Default (2.5s) 126 = Slow (12.6s) IF USING A DUMB SWITCH: This parameter will not work when pressing the dumb switch manually. |
| 2 | Dimming Speed (↑) - Local | How fast or slow the light the light turns on when you hold up on the switch (ie: dimming from 10-20%, 60-80%, etc)More DetailsYou may choose from a range of 0-127, with 0 being instant on, and 126 being 12.6 seconds (each number represents 100ms) and 127 will sync this parameter to whatever the value is in Parameter 1 0 = Instant On 5 = Fast (500ms) 126 = Slow (12.6s) 127 = Sync to Parameter 1 IF USING A DUMB SWITCH: This parameter will not work when pressing the dumb switch manually. |
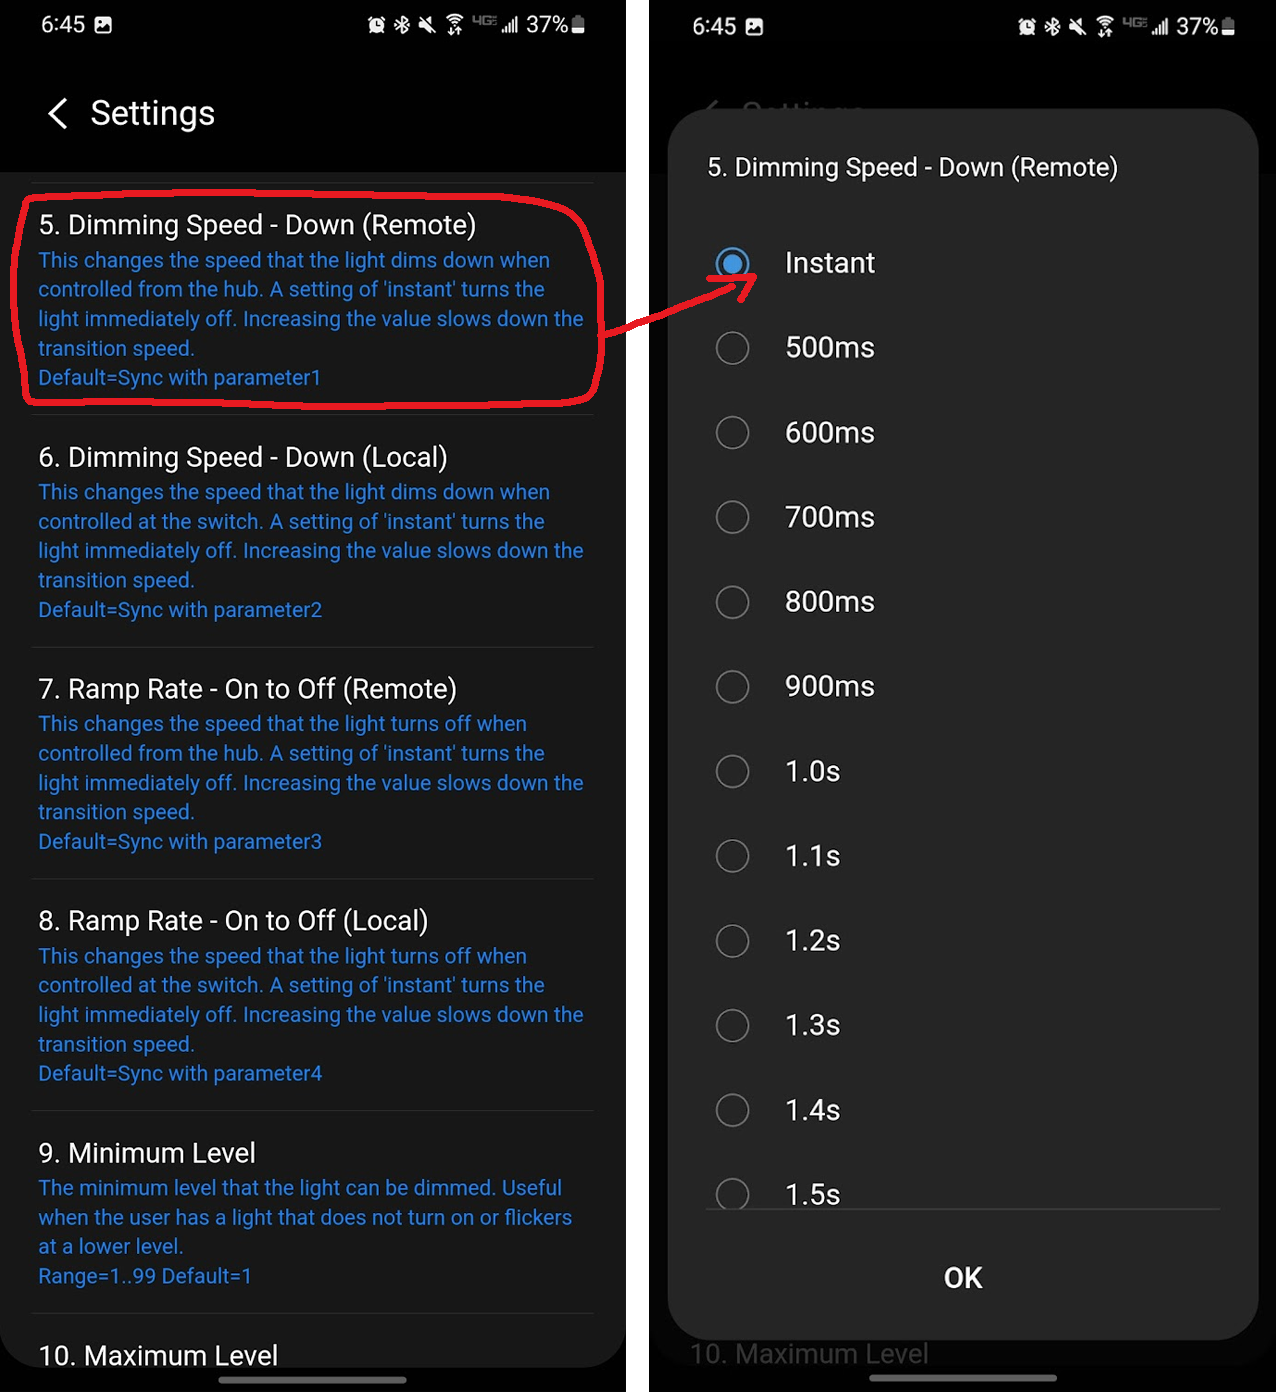
| 5 | Dimming Speed (↓) - Remote | How fast or slow the light turns off when you change the dim level remotely (ie: dimming from 80-60%, 20-10%, etc)More DetailsYou may choose from a range of 0-127, with 0 being instant on, and 126 being 12.6 seconds (each number represents 100ms) and 127 will sync this parameter to whatever the value is in Parameter 1 0 = Instant Off 5 = Fast (500ms) 126 = Slow (12.6s) 127 = Sync to Parameter 1 IF USING A DUMB SWITCH: This parameter will not work when pressing the dumb switch manually. |
| 6 | Dimming Speed (↓) - Local | How fast or slow the light the light turns off when you hold down on the switch (ie: dimming from 80-60%, 20-10%, etc)More DetailsYou may choose from a range of 0-127, with 0 being instant on, and 126 being 12.6 seconds (each number represents 100ms) and 127 will sync this parameter to whatever the value is in Parameter 2 0 = Instant Off 5 = Fast (500ms) 126 = Slow (12.6s) 127 = Sync to Parameter 2 IF USING A DUMB SWITCH: This parameter will not work when pressing the dumb switch manually. |

Min/Max/Default Dim Levels
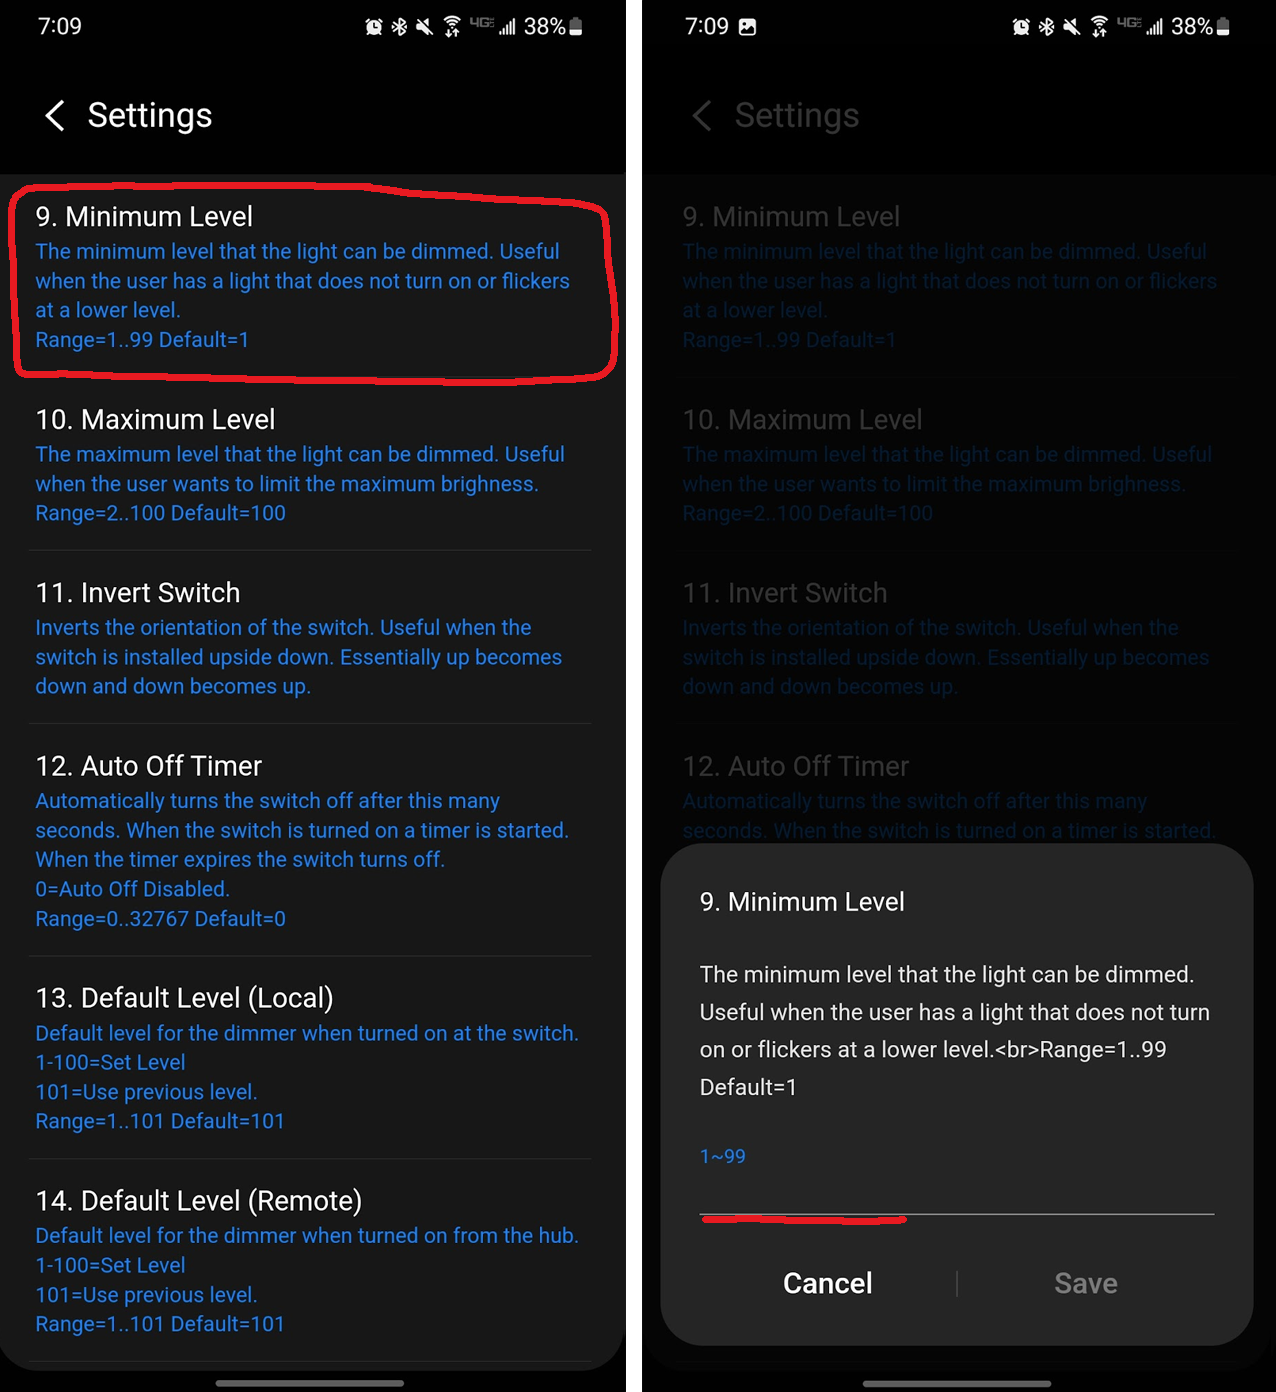
Minimum Dim Level refers to the minimum level your bulb can be dimmed to. This parameter is often used to calibrate your bulb to work better with your dimmer, especially if the bulb is flickering or turns off before your LED bar or app reflects a 0%. Setting a minimum level of x% will let the switch know that is the new 1% (see example below – it will make more sense).
Examples: Let’s say you notice your bulb starts to flicker when you dim it to 20%. You’ll want to set the minimum dim level to 21 so that the bulb will shut off before it starts to flicker. Or, in some cases you may notice your bulb has turned off, but the LED bar is a quarter of the way up and the SmartThings app is showing the bulb is at 25%. You’ll want to set the minimum dim level to whatever level the bulb turns on at (ie: 26%) – this will become your new 1%. In other words, your switch knows to turn off before 25% and therefore will reflect to the app that whatever the minimum dim level is set as is now 1% (so you don’t have to remember to slide the dim level in the app to the minimum dim setting every time).
__
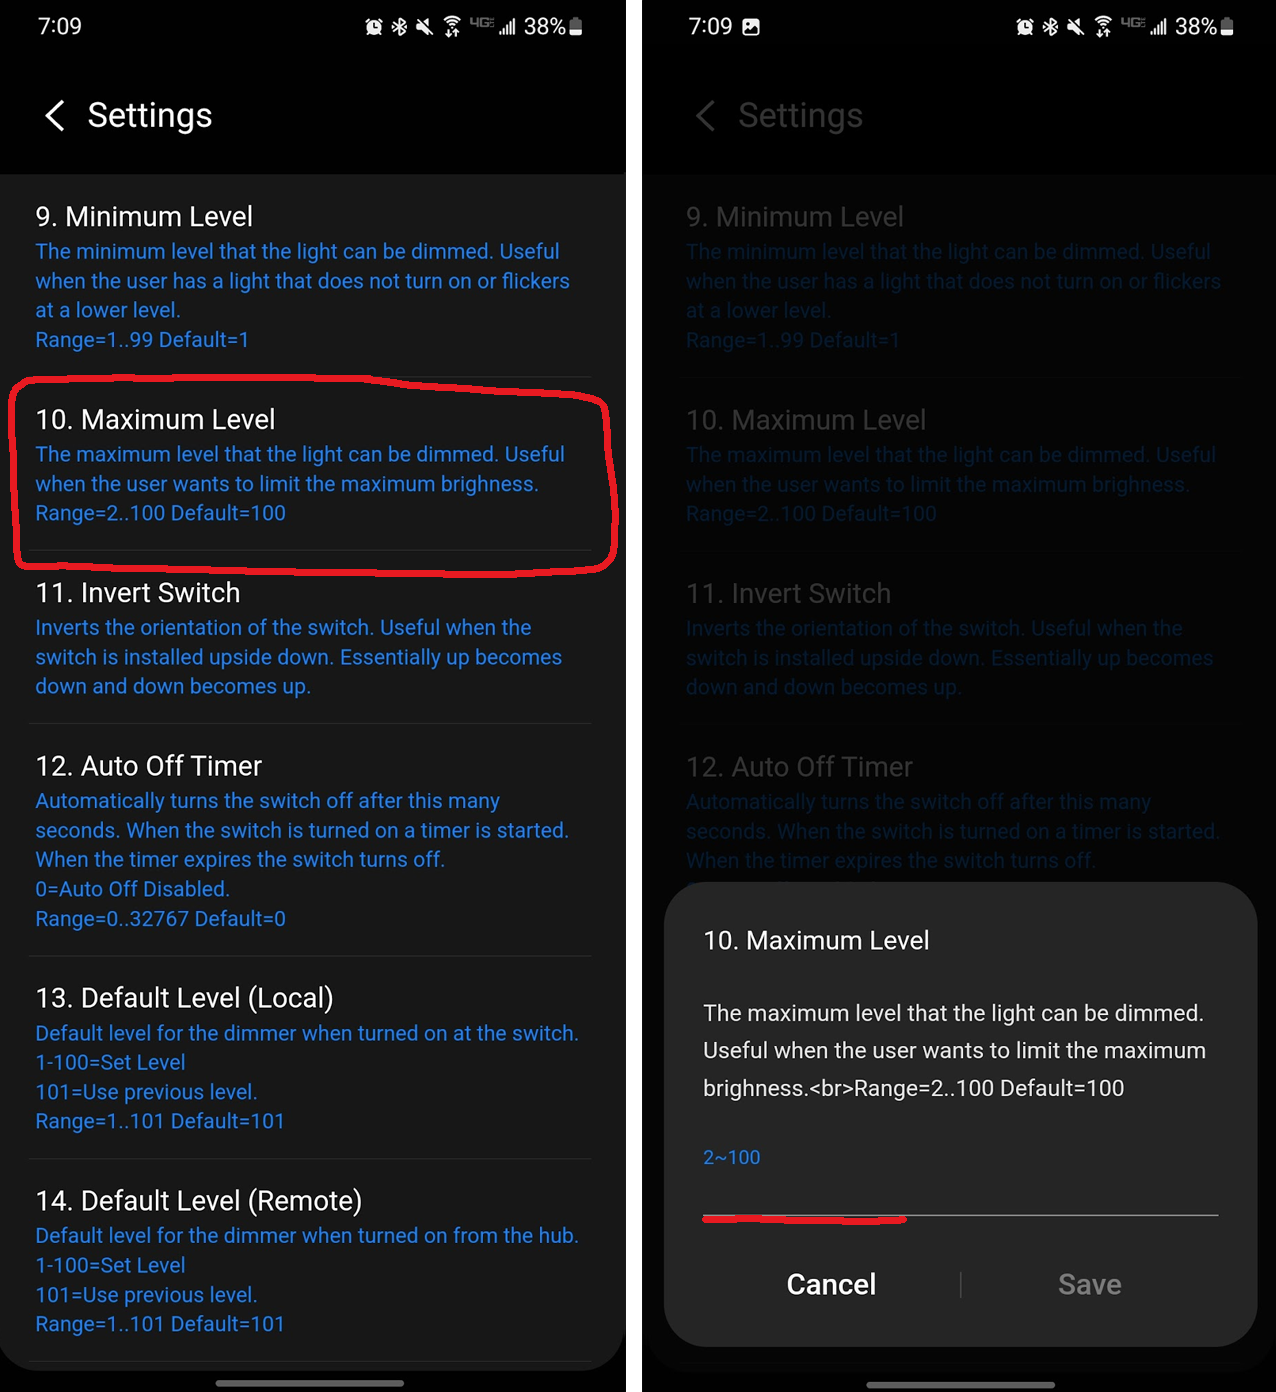
Maximum Dim Level refers to the maximum level your bulb can be dimmed to. This parameter is also often used to calibrate your bulb to work better with your dimmer, especially if the bulb starts flickering.
Example: Let’s say you notice your bulb starts to flicker around 93%. You’ll want to set the maximum dim level to 92 so that the bulb will max out prior to flickering.
__
Default Dim Level refers to the dim level your switch will default to when you turn your switch on.
Example: If you want your switch to always dim up to 100% when you turn it on, you would set the default level to 100. Or if you want the switch to always turn on to the same level it was prior to when it was turned off, you can set it to do that as well. In some cases, you can change the default level based on the time of day, which is good for those late night bathroom trips (ie: you can set it to come on to 10% between the hours of 10pm and 6am as to not blind yourself).
| # | About | Description |
|---|---|---|
| 9 | Minimum Dim Level | Minimum level the light switch will dim toMore DetailsYou may choose from a range of 1-99, with 1 being 1%, and 99 being 99% (each number represents 1 percentage) 1 = 1% (Default) 50 = 50% 99 = 99% NOTE: This is often used to fix flickering bulbs or to calibrate bulbs that shuts off prior to 1% |
| 10 | Maximum Dim Level | Maximum level the light switch will dim toMore DetailsYou may choose from a range of 2-100, with 2 being 2%, and 100 being 100% (each number represents 1 percentage) 2 = 2% 50 = 50% 100 = 100% (Default) NOTE: This is often used to fix flickering bulbs. |
| 13 | Default Level - Local | The default dim level the switch goes to when turned on locally (at the switch)More DetailsYou may choose from a range of 1-100 with 1 being 1% and 100 being 100% (each number represents 1 percentage) or you can choose 101 to have the switch go to the last level before being turned off. 1 = 1% 50 = 50% 100 = 100% 101 = Returns to prior state it was before being turned off (Default) |
| 14 | Default Level - Remote | The default dim level the switch goes to when powered on via a remote commandMore DetailsYou may choose from a range of 1-100 with 1 being 1% and 100 being 100% (each number represents 1 percentage) or you can choose 101 to have the switch go to the last level before being turned off. 1 = 1% 50 = 50% 100 = 100% 101 = Returns to prior state it was before being turned off (Default) |


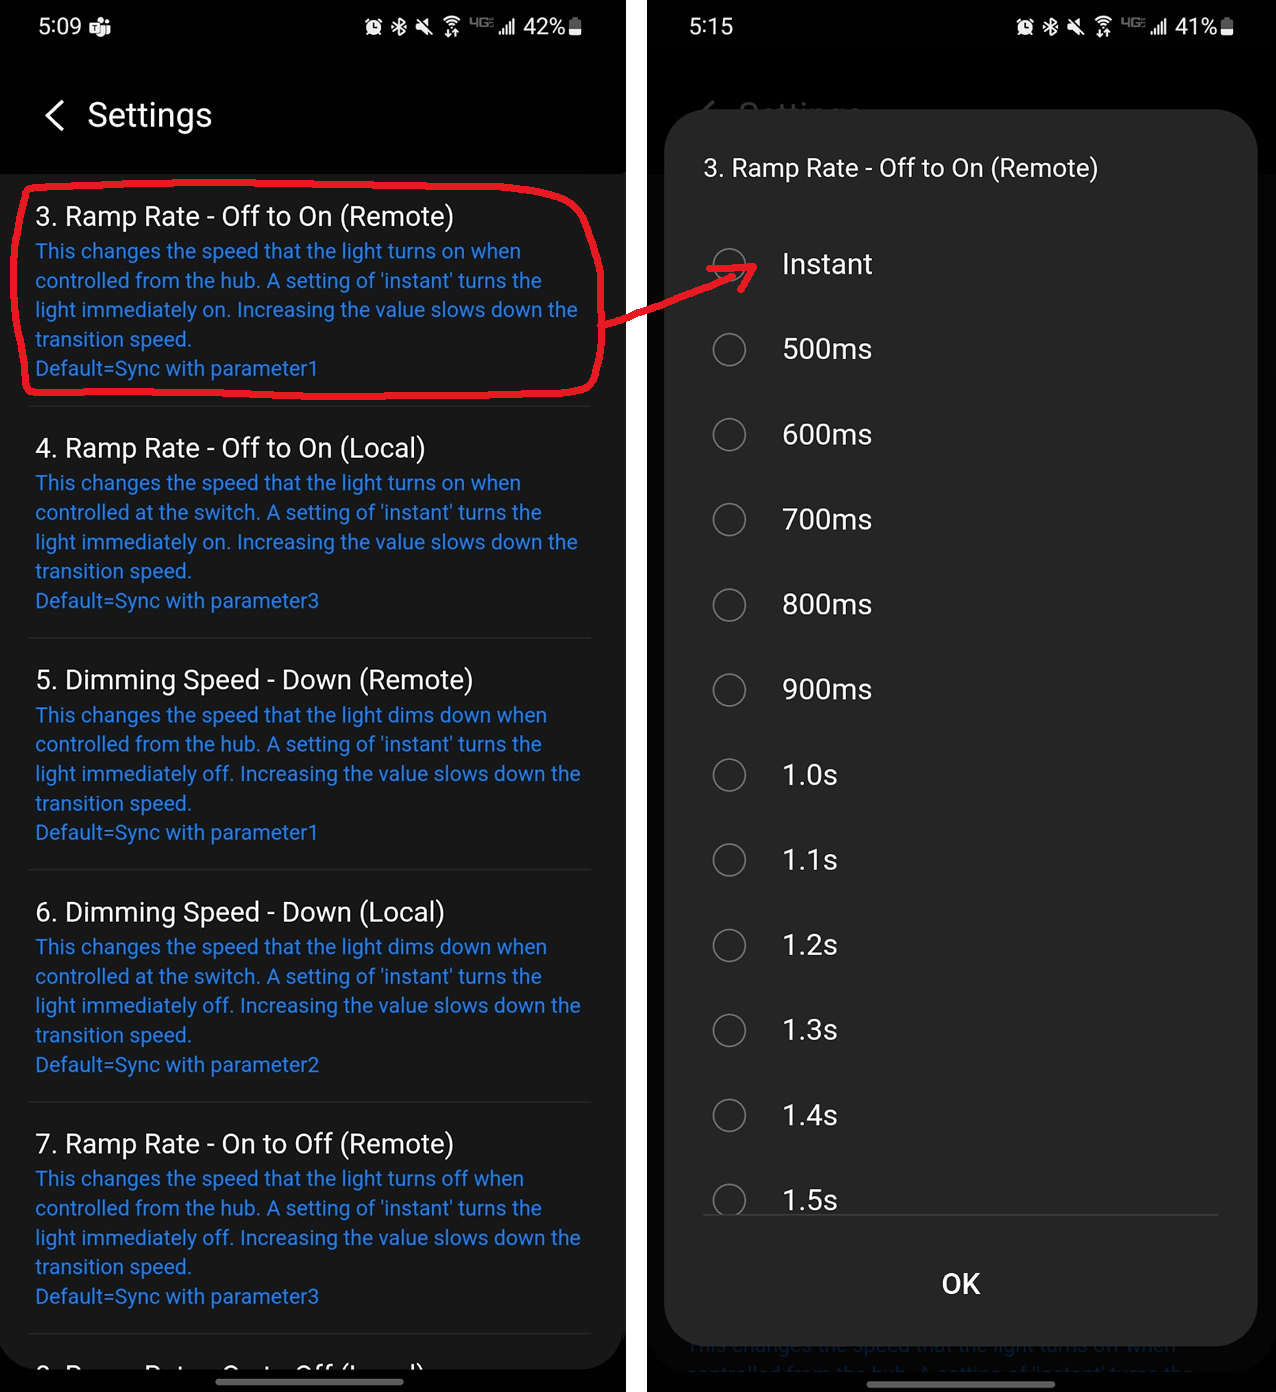
Ramp Rate
Ramp rate refers to the speed at which the light goes from off to on when tapping up or down on the switch (locally) or pressing the power button on or off (remotely). You can adjust how quickly the light turns on and off independently.
Example: You walk up to the switch and tap up on the paddle to turn the light on. Using this example, this parameter will adjust the time it takes to go from off to on (faster or slower). Conversely, if you walk up to the switch and tap down on the paddle to turn the light off, this will adjust that time as well. You can set them to be the same value or different.
| # | About | Description |
|---|---|---|
| 3 | Ramp Rate (Off → On) - Remote | How fast or slow the light turns on when you remotely bring the switch from Off to On via the SmartThings app (ie: tapping the power button in the app)More DetailsYou may choose from a range of 0-127, with 0 being instant on, and 126 being 12.6 seconds (each number represents 100ms) 0 = Instant On 5 = Fast (500ms) 25 = Default (2.5s)* 126 = Slow (12.6s) 127 = Sync to Parameter 1 NOTE: The default time is 2.5s since this parameter is initially synced to Parameter 1 (Dimming Speed ↑ - Remote). If you change the speed of Parameter 1, this one will remain synced unless you manually change it to a new value (other than 127). |
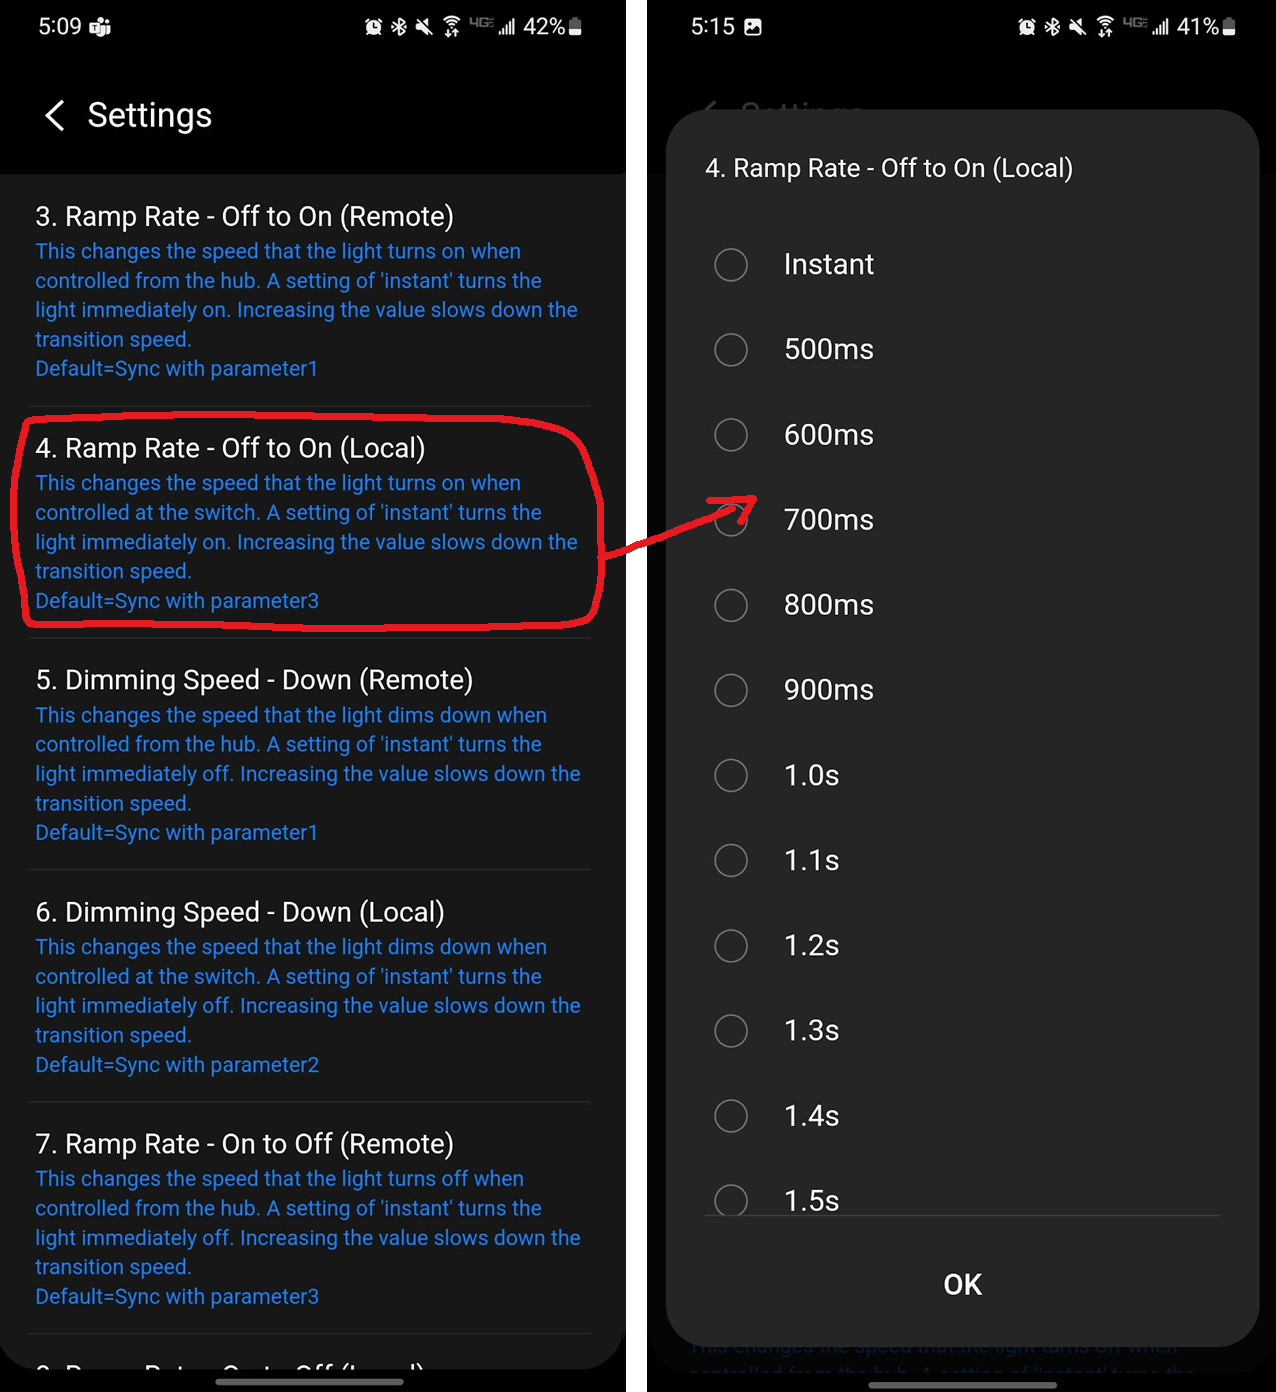
| 4 | Ramp Rate (Off → On) - Local | How fast or slow the light turns on when you turn the switch from Off to On via the switch itself (ie: tapping the paddle on the switch)More DetailsYou may choose from a range of 0-127, with 0 being instant on, and 126 being 12.6 seconds (each number represents 100ms) 0 = Instant On 5 = Fast (500ms) 25 = Default (2.5s)* 126 = Slow (12.6s) 127 = Sync to Parameter 3 NOTE: The default time is 2.5s since this parameter is initially synced to Parameter 3 (Ramp Rate Off → On - Remote). If you change the speed of Parameter 3, this one will remain synced unless you manually change it to a new value (other than 127). |
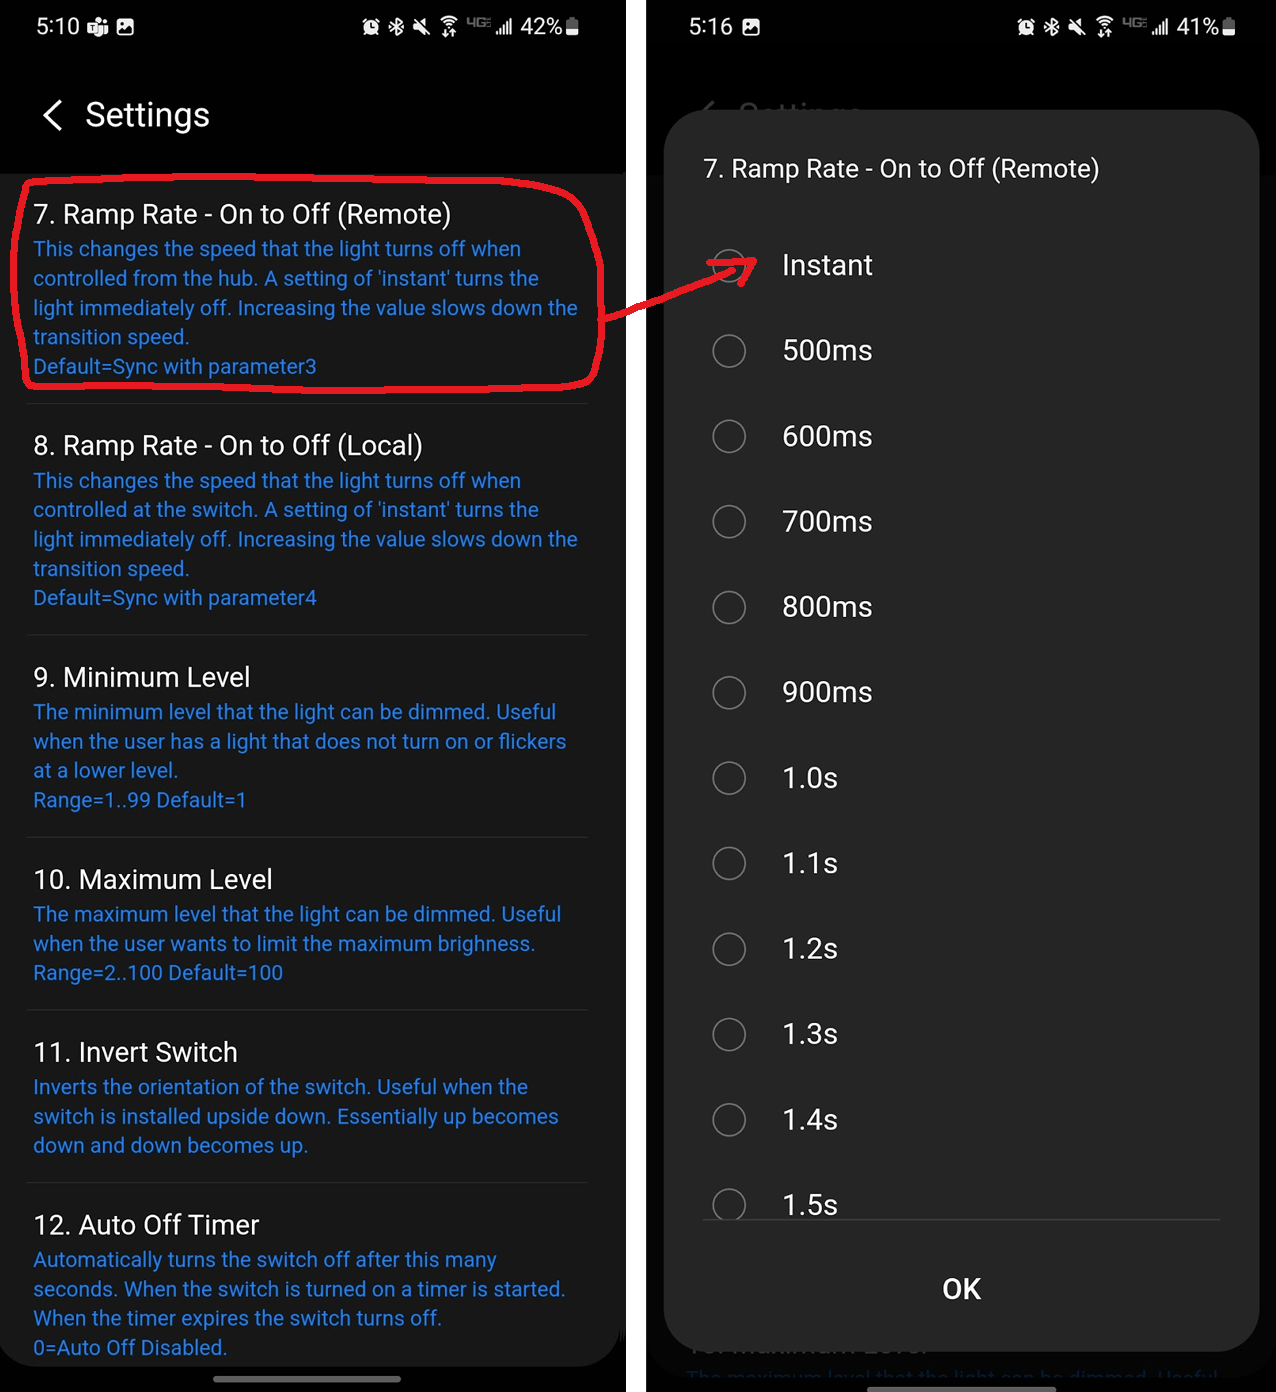
| 7 | Ramp Rate (On → Off) - Remote | How fast or slow the light turns off when you remotely bring the switch from On to Off via the SmartThings app (ie: tapping the power button in the app)More DetailsYou may choose from a range of 0-127, with 0 being instant off, and 126 being 12.6 seconds (each number represents 100ms) 0 = Instant Off 5 = Fast (500ms) 25 = Default (2.5s)* 126 = Slow (12.6s) 127 = Sync to Parameter 3 NOTE: The default time is 2.5s since this parameter is initially synced to Parameter 3 (Ramp Rate Off → On - Remote). If you change the speed of Parameter 3, this one will remain synced unless you manually change it to a new value (other than 127). |
| 8 | Ramp Rate (On → Off) - Local | How fast or slow the light turns on when you turn the switch from On to Off via the switch itself (ie: tapping the paddle on the switch)More DetailsYou may choose from a range of 0-127, with 0 being instant on, and 126 being 12.6 seconds (each number represents 100ms) 0 = Instant Off 5 = Fast (500ms) 25 = Default (2.5s)* 126 = Slow (12.6s) 127 = Sync to Parameter 3 NOTE: The default time is 2.5s since this parameter is initially synced to Parameter 4 (Ramp Rate Off → On - Local). If you change the speed of Parameter 4, this one will remain synced unless you manually change it to a new value (other than 127). |

Auto Off Timer
The auto-off timer function is used to automatically turn off the light switch locally after a certain amount of time without setting up an automation.
Example: This is handy if you have the switch installed in an area that is infrequently used and you want to make sure the switch is off without setting an automation.
| # | About | Description |
|---|---|---|
| 12 | Auto-Off Timer | Automatically turns the switch off after x amount of secondsMore DetailsYou may choose from a range of 0-32767, in which 0 disables the auto-timer and 32767 being 32767 seconds (each number represents 1s) 0 = Disabled (Default) 1 = 1s 32767 = 32767s (9.1hrs) |
Energy & Power Monitoring
Energy monitoring refers to the active and periodic monitoring of kilowatt hours. Active energy monitoring gives you the ability to measure any fluctuations between kilowatt hours, whereas periodic monitoring will report actual kilowatt hours used regardless of change.
Example: Suppose you want to keep track of the kilowatt hours in a chart to see how much energy is expended. You would set the periodic energy monitoring to whatever interval you want to make your graph accurate (ie: 1 minute, 5 minutes, etc). Whereas, if you wanted to set automations based off of fluctuations (ie: if there is a sudden change in kilowatt hours, send a notification) you would use the active energy reports.
Power monitoring refers to the active and periodic monitoring of wattage. Active power monitoring gives you the ability to measure any fluctuations between wattage, whereas periodic monitoring will report wattage used regardless of change.
Example: Suppose you want to keep track of wattage in a chart to see how much power is consumed. You would set the periodic power monitoring to whatever interval you want to make your graph accurate (ie: 1 minute, 5 minutes, etc). Whereas, if you wanted to set automations based off of fluctuations (ie: if there is a sudden change in wattage, send a notification) you would use the active power reports.
| # | About | Description |
|---|---|---|
| 18 | Active Power Reports | The power level change that will result in a new power report being sent in wattage (W)More DetailsYou may choose from a range of 0-100, in which 0 disables power reports, and 100 being a 10W change (each number represents 0.1W) 0 = Disabled 1 = 0.1W 10 = 1W (Default) 100 = 10W How to AdjustClick on the parameter and input a number. Each number represents the wattage change you want a report sent at (ie: If you want reports sent with every 5W fluctuation, input the number 50). WARNING: The lower the number that is set, the more traffic your network may endure and the more your hub/gateway has to process. This can cause congestion and slow down automations. |
| 19 | Periodic Power & Energy Reports | Time period between consecutive power and energy reports being sent (in seconds)More DetailsYou may choose from a range of 0-32767, with 0 being disabled, and 32767 being 32767 seconds (each number represents 1s) 0 = Disabled 1 = 1s 3600 = 3600s/1hr (Default) 32767 = 32767s/9.1hr NOTE: Timer resets after every report is sent How to AdjustClick on the parameter and input a number. Each number represents the number of seconds between power/energy reporting. WARNING: The faster the reporting interval (ie: lower the number of seconds between reporting), the more traffic your network will endure and the more your hub/gateway has to process. This can cause congestion and slow down automations. |
| 20 | Energy Reports | The energy level change that will result in a new energy report being sent in kilowatt hours (kWh)More DetailsYou may choose from a range of 0-100, with 0 being disabled, and 100 being 1kWh (each number represents 0.01kWh) 0 = Disabled 1 = 0.01kWh 10 = 0.1kWh (Default) 100 = 1kWh How to AdjustClick on the parameter and input a number. Each number represents the kilowatt hour change you want a report sent at (ie: If you want reports sent with every 0.5kWh fluctuation, input the number 50). WARNING: The lower the number that is set, the more traffic your network may endure and the more your hub/gateway has to process. This can cause congestion and slow down automations. |
Invert Switch
Inverting the switch refers to swapping the way the paddles typically work (ie: push up on the paddle = light turns on or dims up, push down on paddle = light turns off or dims down) and making it so that when you push up on the paddle, you would be turning the lights off, whereas if you pushed down on the paddle, it would turn the lights on.
Example: This is more used for areas where switches are installed horizontally or if you prefer to have the configuration/favorites button at the bottom of the switch instead of the top.
| # | About | Description |
|---|---|---|
| 11 | Invert Switch | Inverts the switch (Tapping ↓ = On, Tapping ↑ = Off)More DetailsYou may choose from a range of 0-1, in which 0 disables inverting and 1 enables inverting 0 = Disabled (Default) 1 = Enabled |
LED Bar Customization
LED Bar Color
These parameters allow you to change the LED bar color (either the entire LED bar or each of the seven (7) individual LED’s individually) for when the switch is on and when the switch is off (ie: colors can be separate values when the switch is on vs when it is off).
Example: Match your home aesthetics by selecting various solid colors or by creating your own design by stylizing each individual LED.
| # | About | Description |
|---|---|---|
| 95 | LED Indicator Color (When On) - Full Bar | This will set the default color of the LED Bar (all 7 LED’s) when the switch is onMore DetailsYou may choose from a range of 0-255, in which each number represents a certain color. To play around with the colors to determine what value it is, please click here to be taken to the LED Color Calculator 0 = Red 170 = Blue (Default) 255 = White How to AdjustGo to the LED Color Calculator and follow these instructions to attain your color value: (NOTE: The 2-1 Switch may not be available in the drop-down, feel free to use the Dimmer switch – you will get the same results) Once you find the color and value that you like from the calculator, click on the parameter and input the number. |
| 96 | LED Indicator Color (When Off) - Full Bar | This will set the default color of the LED Bar (all 7 LED’s) when the switch is offMore DetailsYou may choose from a range of 0-255, in which each number represents a certain color. To play around with the colors to determine what value it is, please click here to be taken to the LED Color Calculator 0 = Red 170 = Blue (Default) 255 = White How to AdjustGo to the LED Color Calculator and follow these instructions to attain your color value: (NOTE: The 2-1 Switch may not be available in the drop-down, feel free to use the Dimmer switch – you will get the same results) Once you find the color and value that you like from the calculator, click on the parameter and input the number. |
| 60 | LED Indicator Color (When On) - LED #1 | This will set the default color of the LED Bar (only LED #1 - bottom LED) when the switch is onMore DetailsYou may choose from a range of 0-255, in which each number represents a certain color. To play around with the colors to determine what value it is, please click here to be taken to the LED Color Calculator 0 = Red 170 = Blue (Default) 255 = White How to AdjustGo to the LED Color Calculator and follow these instructions to attain your color value: (NOTE: The 2-1 Switch may not be available in the drop-down, feel free to use the Dimmer switch – you will get the same results) Once you find the color and value that you like from the calculator, click on the parameter and input the number. |
| 61 | LED Indicator Color (When Off) - LED #1 | This will set the default color of the LED Bar (only LED #1 - bottom LED) when the switch is offMore DetailsYou may choose from a range of 0-255, in which each number represents a certain color. To play around with the colors to determine what value it is, please click here to be taken to the LED Color Calculator 0 = Red 170 = Blue (Default) 255 = White How to AdjustGo to the LED Color Calculator and follow these instructions to attain your color value: (NOTE: The 2-1 Switch may not be available in the drop-down, feel free to use the Dimmer switch – you will get the same results) Once you find the color and value that you like from the calculator, click on the parameter and input the number. |
| 65 | LED Indicator Color (When On) - LED #2 | This will set the default color of the LED Bar (only LED #2 - second from the bottom LED) when the switch is onMore DetailsYou may choose from a range of 0-255, in which each number represents a certain color. To play around with the colors to determine what value it is, please click here to be taken to the LED Color Calculator 0 = Red 170 = Blue (Default) 255 = White How to AdjustGo to the LED Color Calculator and follow these instructions to attain your color value: (NOTE: The 2-1 Switch may not be available in the drop-down, feel free to use the Dimmer switch – you will get the same results) Once you find the color and value that you like from the calculator, click on the parameter and input the number. |
| 66 | LED Indicator Color (When Off) - LED #2 | This will set the default color of the LED Bar (only LED #2 - second from the bottom LED) when the switch is offMore DetailsYou may choose from a range of 0-255, in which each number represents a certain color. To play around with the colors to determine what value it is, please click here to be taken to the LED Color Calculator 0 = Red 170 = Blue (Default) 255 = White How to AdjustGo to the LED Color Calculator and follow these instructions to attain your color value: (NOTE: The 2-1 Switch may not be available in the drop-down, feel free to use the Dimmer switch – you will get the same results) Once you find the color and value that you like from the calculator, click on the parameter and input the number. |
| 70 | LED Indicator Color (When On) - LED #3 | This will set the default color of the LED Bar (only LED #3 - third from the bottom LED) when the switch is onMore DetailsYou may choose from a range of 0-255, in which each number represents a certain color. To play around with the colors to determine what value it is, please click here to be taken to the LED Color Calculator 0 = Red 170 = Blue (Default) 255 = White How to AdjustGo to the LED Color Calculator and follow these instructions to attain your color value: (NOTE: The 2-1 Switch may not be available in the drop-down, feel free to use the Dimmer switch – you will get the same results) Once you find the color and value that you like from the calculator, click on the parameter and input the number. |
| 71 | LED Indicator Color (When Off) - LED #3 | This will set the default color of the LED Bar (only LED #3 - third from the bottom LED) when the switch is offMore DetailsYou may choose from a range of 0-255, in which each number represents a certain color. To play around with the colors to determine what value it is, please click here to be taken to the LED Color Calculator 0 = Red 170 = Blue (Default) 255 = White How to AdjustGo to the LED Color Calculator and follow these instructions to attain your color value: (NOTE: The 2-1 Switch may not be available in the drop-down, feel free to use the Dimmer switch – you will get the same results) Once you find the color and value that you like from the calculator, click on the parameter and input the number. |
| 75 | LED Indicator Color (When On) - LED #4 | This will set the default color of the LED Bar (only LED #4 - middle LED) when the switch is onMore DetailsYou may choose from a range of 0-255, in which each number represents a certain color. To play around with the colors to determine what value it is, please click here to be taken to the LED Color Calculator 0 = Red 170 = Blue (Default) 255 = White How to AdjustGo to the LED Color Calculator and follow these instructions to attain your color value: (NOTE: The 2-1 Switch may not be available in the drop-down, feel free to use the Dimmer switch – you will get the same results) Once you find the color and value that you like from the calculator, click on the parameter and input the number. |
| 76 | LED Indicator Color (When Off) - LED #4 | This will set the default color of the LED Bar (only LED #4 - middle LED) when the switch is offMore DetailsYou may choose from a range of 0-255, in which each number represents a certain color. To play around with the colors to determine what value it is, please click here to be taken to the LED Color Calculator 0 = Red 170 = Blue (Default) 255 = White How to AdjustGo to the LED Color Calculator and follow these instructions to attain your color value: (NOTE: The 2-1 Switch may not be available in the drop-down, feel free to use the Dimmer switch – you will get the same results) Once you find the color and value that you like from the calculator, click on the parameter and input the number. |
| 80 | LED Indicator Color (When On) - LED #5 | This will set the default color of the LED Bar (only LED #5 - third from the top LED) when the switch is onMore DetailsYou may choose from a range of 0-255, in which each number represents a certain color. To play around with the colors to determine what value it is, please click here to be taken to the LED Color Calculator 0 = Red 170 = Blue (Default) 255 = White How to AdjustGo to the LED Color Calculator and follow these instructions to attain your color value: (NOTE: The 2-1 Switch may not be available in the drop-down, feel free to use the Dimmer switch – you will get the same results) Once you find the color and value that you like from the calculator, click on the parameter and input the number. |
| 81 | LED Indicator Color (When Off) - LED #5 | This will set the default color of the LED Bar (only LED #5 - third from the top LED) when the switch is offMore DetailsYou may choose from a range of 0-255, in which each number represents a certain color. To play around with the colors to determine what value it is, please click here to be taken to the LED Color Calculator 0 = Red 170 = Blue (Default) 255 = White How to AdjustGo to the LED Color Calculator and follow these instructions to attain your color value: (NOTE: The 2-1 Switch may not be available in the drop-down, feel free to use the Dimmer switch – you will get the same results) Once you find the color and value that you like from the calculator, click on the parameter and input the number. |
| 85 | LED Indicator Color (When On) - LED #6 | This will set the default color of the LED Bar (only LED #6 - second from the top LED) when the switch is onMore DetailsYou may choose from a range of 0-255, in which each number represents a certain color. To play around with the colors to determine what value it is, please click here to be taken to the LED Color Calculator 0 = Red 170 = Blue (Default) 255 = White How to AdjustGo to the LED Color Calculator and follow these instructions to attain your color value: (NOTE: The 2-1 Switch may not be available in the drop-down, feel free to use the Dimmer switch – you will get the same results) Once you find the color and value that you like from the calculator, click on the parameter and input the number. |
| 86 | LED Indicator Color (When Off) - LED #6 | This will set the default color of the LED Bar (only LED #6 - second from the top LED) when the switch is offMore DetailsYou may choose from a range of 0-255, in which each number represents a certain color. To play around with the colors to determine what value it is, please click here to be taken to the LED Color Calculator 0 = Red 170 = Blue (Default) 255 = White How to AdjustGo to the LED Color Calculator and follow these instructions to attain your color value: (NOTE: The 2-1 Switch may not be available in the drop-down, feel free to use the Dimmer switch – you will get the same results) Once you find the color and value that you like from the calculator, click on the parameter and input the number. |
| 90 | LED Indicator Color (When On) - LED #7 | This will set the default color of the LED Bar (only LED #7 - top LED) when the switch is onMore DetailsYou may choose from a range of 0-255, in which each number represents a certain color. To play around with the colors to determine what value it is, please click here to be taken to the LED Color Calculator 0 = Red 170 = Blue (Default) 255 = White How to AdjustGo to the LED Color Calculator and follow these instructions to attain your color value: (NOTE: The 2-1 Switch may not be available in the drop-down, feel free to use the Dimmer switch – you will get the same results) Once you find the color and value that you like from the calculator, click on the parameter and input the number. |
| 91 | LED Indicator Color (When Off) - LED #7 | This will set the default color of the LED Bar (only LED #7 - top LED) when the switch is offMore DetailsYou may choose from a range of 0-255, in which each number represents a certain color. To play around with the colors to determine what value it is, please click here to be taken to the LED Color Calculator 0 = Red 170 = Blue (Default) 255 = White How to AdjustGo to the LED Color Calculator and follow these instructions to attain your color value: (NOTE: The 2-1 Switch may not be available in the drop-down, feel free to use the Dimmer switch – you will get the same results) Once you find the color and value that you like from the calculator, click on the parameter and input the number. |
LED Bar Intensity
These parameters allow you to change the LED bar intensity/brightness (either the entire LED bar or each of the seven (7) individual LED's individually) for when the switch is on and when the switch is off (ie: intensity/brightness can be separate values when the switch is on vs when it is off).Example: Some people prefer to have the LED Bar light up when the light is on, whereas others prefer the LED to light up when the light is off, and some just don’t want it on at all! Another use for the brightness outside of aesthetics is to adjust the brightness based on the time of day (ie: if the switch is in your bedroom and you prefer not to have it be bright, you can change the brightness at night vs daytime).
| # | About | Description |
|---|---|---|
| 97 | LED Indicator Intensity (When On) - Full Bar | This will set the intensity (ie: how bright it is) of the LED Bar (all 7 LED’s) when the switch is onMore DetailsYou may choose from a range of 0-100, in which each 0 = Off and 100 = 100% (each number represents a percentage). 0 = Off 1 = 1% 33 = 33% (Default) 100 = 100% How to AdjustClick on the parameter and input a number. Each number represents the percentage you want the LED bar intensity (the higher the brighter). |
| 98 | LED Indicator Intensity (When Off) - Full Bar | This will set the intensity (ie: how bright it is) of the LED Bar (all 7 LED’s) when the switch is offMore DetailsYou may choose from a range of 0-101, in which each 0 = Off, 100 = 100% (each number represents a percentage) 0 = Off 1 = 1% 33 = 33% 100 = 100% How to AdjustClick on the parameter and input a number. Each number represents the percentage you want the LED bar intensity (the higher the brighter). |
| 62 | LED Indicator Intensity (When On) - LED #1 | This will set the intensity (ie: how bright it is) of the LED Bar (only LED #1 - bottom LED) when the switch is onMore DetailsYou may choose from a range of 0-101, in which each 0 = Off, 100 = 100% (each number represents a percentage) and 101 syncs with Parameter 97 (full LED bar intensity - on). 1 = 1% 33 = 33% 100 = 100% 101 = Sync to Parameter 97 How to AdjustClick on the parameter and input a number. Each number represents the percentage you want the LED bar intensity (the higher the brighter). |
| 63 | LED Indicator Intensity (When Off) - LED #1 | This will set the intensity (ie: how bright it is) of the LED Bar (only LED #1 - bottom LED) when the switch is offMore DetailsYou may choose from a range of 0-101, in which each 0 = Off, 100 = 100% (each number represents a percentage) and 101 syncs with Parameter 98 (full LED bar intensity - off). 1 = 1% 33 = 33% 100 = 100% 101 = Sync to Parameter 98 How to AdjustClick on the parameter and input a number. Each number represents the percentage you want the LED bar intensity (the higher the brighter). |
| 67 | LED Indicator Intensity (When On) - LED #2 | This will set the intensity (ie: how bright it is) of the LED Bar (only LED #2 - second from the bottom LED) when the switch is onMore DetailsYou may choose from a range of 0-101, in which each 0 = Off, 100 = 100% (each number represents a percentage) and 101 syncs with Parameter 97 (full LED bar intensity - on). 1 = 1% 33 = 33% 100 = 100% 101 = Sync to Parameter 97 How to AdjustClick on the parameter and input a number. Each number represents the percentage you want the LED bar intensity (the higher the brighter). |
| 68 | LED Indicator Intensity (When Off) - LED #2 | This will set the intensity (ie: how bright it is) of the LED Bar (only LED #2 - second from the bottom LED) when the switch is offMore DetailsYou may choose from a range of 0-101, in which each 0 = Off, 100 = 100% (each number represents a percentage) and 101 syncs with Parameter 98 (full LED bar intensity - off). 1 = 1% 33 = 33% 100 = 100% 101 = Sync to Parameter 98 How to AdjustClick on the parameter and input a number. Each number represents the percentage you want the LED bar intensity (the higher the brighter). |
| 72 | LED Indicator Intensity (When On) - LED #3 | This will set the intensity (ie: how bright it is) of the LED Bar (only LED #3 - third from the bottom LED) when the switch is onMore DetailsYou may choose from a range of 0-101, in which each 0 = Off, 100 = 100% (each number represents a percentage) and 101 syncs with Parameter 97 (full LED bar intensity - on). 1 = 1% 33 = 33% 100 = 100% 101 = Sync to Parameter 97 How to AdjustClick on the parameter and input a number. Each number represents the percentage you want the LED bar intensity (the higher the brighter). |
| 73 | LED Indicator Intensity (When Off) - LED #3 | This will set the intensity (ie: how bright it is) of the LED Bar (only LED #3 - third from the bottom LED) when the switch is offMore DetailsYou may choose from a range of 0-101, in which each 0 = Off, 100 = 100% (each number represents a percentage) and 101 syncs with Parameter 98 (full LED bar intensity - off). 1 = 1% 33 = 33% 100 = 100% 101 = Sync to Parameter 98 How to AdjustClick on the parameter and input a number. Each number represents the percentage you want the LED bar intensity (the higher the brighter). |
| 72 | LED Indicator Intensity (When On) - LED #4 | This will set the intensity (ie: how bright it is) of the LED Bar (only LED #4 - middle LED) when the switch is onMore DetailsYou may choose from a range of 0-101, in which each 0 = Off, 100 = 100% (each number represents a percentage) and 101 syncs with Parameter 97 (full LED bar intensity - on). 1 = 1% 33 = 33% 100 = 100% 101 = Sync to Parameter 97 How to AdjustClick on the parameter and input a number. Each number represents the percentage you want the LED bar intensity (the higher the brighter). |
| 73 | LED Indicator Intensity (When Off) - LED #4 | This will set the intensity (ie: how bright it is) of the LED Bar (only LED #4 - middle LED) when the switch is offMore DetailsYou may choose from a range of 0-101, in which each 0 = Off, 100 = 100% (each number represents a percentage) and 101 syncs with Parameter 98 (full LED bar intensity - off). 1 = 1% 33 = 33% 100 = 100% 101 = Sync to Parameter 98 How to AdjustClick on the parameter and input a number. Each number represents the percentage you want the LED bar intensity (the higher the brighter). |
| 77 | LED Indicator Intensity (When On) - LED #5 | This will set the intensity (ie: how bright it is) of the LED Bar (only LED #5 - third from the top LED) when the switch is onMore DetailsYou may choose from a range of 0-101, in which each 0 = Off, 100 = 100% (each number represents a percentage) and 101 syncs with Parameter 97 (full LED bar intensity - on). 1 = 1% 33 = 33% 100 = 100% 101 = Sync to Parameter 97 How to AdjustClick on the parameter and input a number. Each number represents the percentage you want the LED bar intensity (the higher the brighter). |
| 78 | LED Indicator Intensity (When Off) - LED #5 | This will set the intensity (ie: how bright it is) of the LED Bar (only LED #5 - third from the top LED) when the switch is offMore DetailsYou may choose from a range of 0-101, in which each 0 = Off, 100 = 100% (each number represents a percentage) and 101 syncs with Parameter 98 (full LED bar intensity - off). 1 = 1% 33 = 33% 100 = 100% 101 = Sync to Parameter 98 How to AdjustClick on the parameter and input a number. Each number represents the percentage you want the LED bar intensity (the higher the brighter). |
| 87 | LED Indicator Intensity (When On) - LED #6 | This will set the intensity (ie: how bright it is) of the LED Bar (only LED #6 - second from the top LED) when the switch is onMore DetailsYou may choose from a range of 0-101, in which each 0 = Off, 100 = 100% (each number represents a percentage) and 101 syncs with Parameter 97 (full LED bar intensity - on). 1 = 1% 33 = 33% 100 = 100% 101 = Sync to Parameter 97 How to AdjustClick on the parameter and input a number. Each number represents the percentage you want the LED bar intensity (the higher the brighter). |
| 88 | LED Indicator Intensity (When Off) - LED #6 | This will set the intensity (ie: how bright it is) of the LED Bar (only LED #6 - second from the top LED) when the switch is offMore DetailsYou may choose from a range of 0-101, in which each 0 = Off, 100 = 100% (each number represents a percentage) and 101 syncs with Parameter 98 (full LED bar intensity - off). 1 = 1% 33 = 33% 100 = 100% 101 = Sync to Parameter 98 How to AdjustClick on the parameter and input a number. Each number represents the percentage you want the LED bar intensity (the higher the brighter). |
| 87 | LED Indicator Intensity (When On) - LED #7 | This will set the intensity (ie: how bright it is) of the LED Bar (only LED #7 - top LED) when the switch is onMore DetailsYou may choose from a range of 0-101, in which each 0 = Off, 100 = 100% (each number represents a percentage) and 101 syncs with Parameter 97 (full LED bar intensity - on). 1 = 1% 33 = 33% 100 = 100% 101 = Sync to Parameter 97 How to AdjustClick on the parameter and input a number. Each number represents the percentage you want the LED bar intensity (the higher the brighter). |
| 88 | LED Indicator Intensity (When Off) - LED #7 | This will set the intensity (ie: how bright it is) of the LED Bar (only LED #7 - top LED) when the switch is offMore DetailsYou may choose from a range of 0-101, in which each 0 = Off, 100 = 100% (each number represents a percentage) and 101 syncs with Parameter 98 (full LED bar intensity - off). 1 = 1% 33 = 33% 100 = 100% 101 = Sync to Parameter 98 How to AdjustClick on the parameter and input a number. Each number represents the percentage you want the LED bar intensity (the higher the brighter). |
LED Bar Timeout
This parameter is where you set the number of seconds the dim level is shown on the LED bar.Example: When you change the dim level (locally or remotely), the LED bar will show you approximately what the dim level is (ie: if dimming to 75%, the LED bar will light up 3/4 of the way). This parameter adjusts the time the LED bar shows you the dim level on the switch. After it’s done showing you the level, it goes back to illuminating the entire LED bar (at the color and intensity level you’ve already set) – or you can have the LED bar always show you what level the load is at.
| # | About | Description |
|---|---|---|
| 17 | LED Indicator Timeout | Changes the amount of time (in seconds) the RGB Bar shows the Dim levelMore DetailsYou may choose from a range of 0-11, in which each 0 = Always off, 10 = 10 (each number represents 1 second) and 11 = Always on. 0 = Always off 1 = 1s (Default) 5 = 5s 10 = 10s 11 = Always on How to AdjustClick on the parameter and input a number. Each number represents the number of seconds before the LED bar indicator stops showing the dim level. |
One LED Mode
This parameter is used if you only ever want to use one LED (bottom one) and is primarily for if you have purchased the On/Off Red Series switch and want to match the aesthetics.Example: Let’s say you purchased the Red Series On/Off switch (that only has one LED) and want all your switches to match. You can set your switch to match this by turning on this mode.
| # | About | Description |
|---|---|---|
| 259 | One LED Mode | Switch only shows LED #1 and does not show LED #'s 2-6 – this mimics the Red Series On/Off switchMore DetailsYou may choose from a range of 0-1, in which each 0 = Disabled and 1 = Enabled 0 = Disabled (Default) 1 = Enabled How to AdjustClick on the parameter and select either enabled or disabled. |
Level After Power Restored
The level after power is restored parameter is used to set the way the switch behaves after the switch loses power (ie: power outage). You can set it to always turn on to a certain level, have it always turn off, or have it return to where it was prior to the power outage.
Example: If you experience frequent power outages at night and do not want to wake up to being blinded by all your lights turning on when power is restored, you can set your switch to always be off when power comes back. Most of the time, this parameter is left as the default which is to have the switch return to whatever state it was prior to the power outage, but it’s up to you!
| # | About | Description |
|---|---|---|
| 15 | Level After Power Restored | When power is restored, the switch reverts to either On, Off, or Last LevelMore DetailsYou may choose from a range of 0-101, in which 0 is off, 1-100 represents the switch will turn on to a specific percentage value, and 101 means that the switch will turn onto the last state it was in prior to the power outage 0 = Off 1 = On to 1% 100 = On to 100% 101 = Returns to last state prior to outage (Default) |
Local & Remote Protection ("Disable Relay")
This parameter locks the internal relay so that it cannot be changed either at the switch (locally) or via an app (remotely).
Example: This is typically used to prevent your switch from turning on or off if it’s connected to a load you do not want turned on or off. It’s also used during certain times of day to prevent children from messing with the light switch.
SMART BULB MODE: This parameter used to be the recommendation if using a smart bulb with your switch (as the load). We’ve created a different parameter for this that’s specifically designed for smart bulbs. Please see Parameter 52 (Smart Bulb Mode) or visit the instructions near the bottom of this page that outline how to setup smart bulbs using this mode.
| # | About | Description |
|---|---|---|
| 256 | Local Protection | Determines whether or not the load of the switch can be controlled via paddle presses (locally)More DetailsYou may choose from a range of 0-1, in which 0 = Disabled and 1 = Enabled 0 = Disabled (Default) 1 = Enabled |
| 257 | Remote Protection | Determines whether or not the load of the switch can be controlled via an app (remote)More DetailsYou may choose from a range of 0-1, in which 0 = Disabled and 1 = Enabled 0 = Disabled (Default) 1 = Enabled |
Smart Bulb Mode
This parameter is used to enable smart bulb mode and will allow your switch to be wired directly to smart bulbs.
Example: If you want to use smart bulbs with your smart switch, you would use this parameter. This was created because smart bulbs require constant power to them in order to report in to the hub. If power is cut to them, they can no longer report to the hub as they go offline (because of no power). With smart bulb mode, the switch locks full power to the bulb and sends digital signals to the hub (or bulb) to turn on/off/dim.
Switch Delay (Instant On / 700ms delay)
This parameter adjusts the amount of time between when the paddle is pressed and the light turns on. By default, there is a 700ms delay built in so that multi-tap scene control can be used (ie: double-tap to activate a scene). However, this can be adjusted down to, “no delay” (you will lose multi-tap capability) or up to 900ms depending on your preference.
Example: When you walk up to the switch and press up, most people are used to there being no delay at all between when you press up and the light turning on. However, many smart switches have a delay built into them because the switch may be looking for a second tap to activate a scene. You can adjust this delay with this parameter or completely turn it off to mimic a normal switch. If you decide to turn it off, you will lose multi-tap features (but you can still use the favorites button).
| # | About | Description |
|---|---|---|
| 50 | Switch Delay | Adjusts the delay between taps in 100ms incrementsMore DetailsYou may choose from a range of 0-9, in which 0 = Instant On (No Delay) and 9 = 900ms 0 = Instant On (Default) 1 = 100ms 7 = 700ms (Default) 9 = 900ms How to AdjustClick on the parameter and select the value you want from the list. The lower the time, the lower the delay between pressing the paddle and the light turning on/off – the higher the time, the slower the delay. Remember, if you set to 0, you will lose the ability to multi-tap for scene control (except for the favorites button). |
Animated Notifications
Animated notifications are used when you want to have a visual cue on your LED bar notify you of a certain event. A few examples would be:
- LED Bar pulses purple if your garage door is left open past 9pm
- LED Bar chases red if your front door is unlocked
- LED Bar fast blinks orange if a door is opened at night time
These notifications are accomplished by using, “Routines” within the SmartThings App. In this example, we’ll setup a simple notification that alerts you if a door is opened between the hours of 9pm and 7am.
Written Instructions
- Open your SmartThings App and click on the, “Automations” icon at the bottom—
- Click on the, “+” button at the top of the screen and select, “Create routine”—
- Under the, “If” section, click on the, “+ Add what will trigger this routine” button—
- Click on, “Device status” and find your contact sensor to click on—
- This part may vary depending on your contact sensor, but the important thing is to select, “Contact sensor” and then, “Open” – then click, “Done”—
- Now, we’ll add another condition to set a time value (ie: we only want this notification to run between the hours of 9pm and 7am) – Click on, “+ Add Condition”—
- Click on, “Time”—
- Select, “Period of time” and then adjust where it says, “Start time” and “End time” and set those values to 9pm and 7am (then select the days you want this to be applicable and select, “Done”)—
- Under the, “Then” section, click on the, “+ Add what this routine will do” button—
- Click on, “Control devices”—
- Find your Inovelli Blue Series 2-1 Switch and click on it, then select, “Next”—
- If, “Turn on” or “Turn off” is selected, click on it again to unselect it—
- Select the Notification Effect, Notification Color, Notification Level and Notification Duration by pressing each button (in this case, we selected: Fast Blink, Orange, 100 (%), and Indefinitely) – click, “Done”—
- Ensure the correct notification values are selected, click, “Save” and name your routine—
- Test your routine (to manually clear the notification, double-tap the config/favorites button)
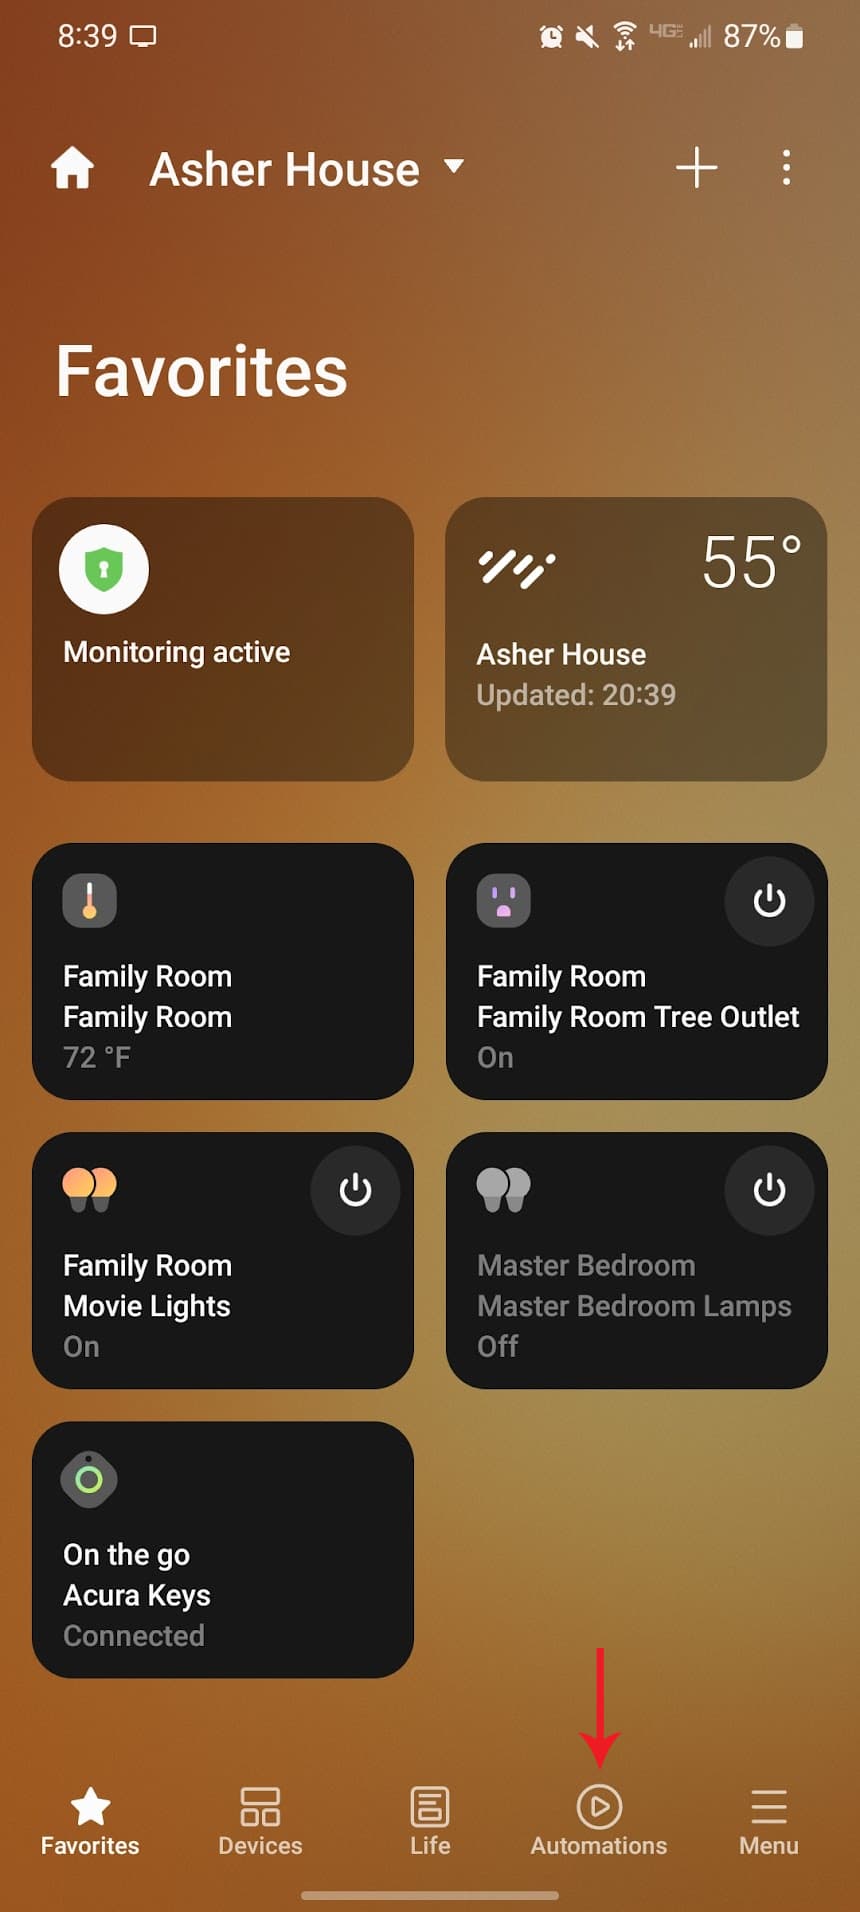

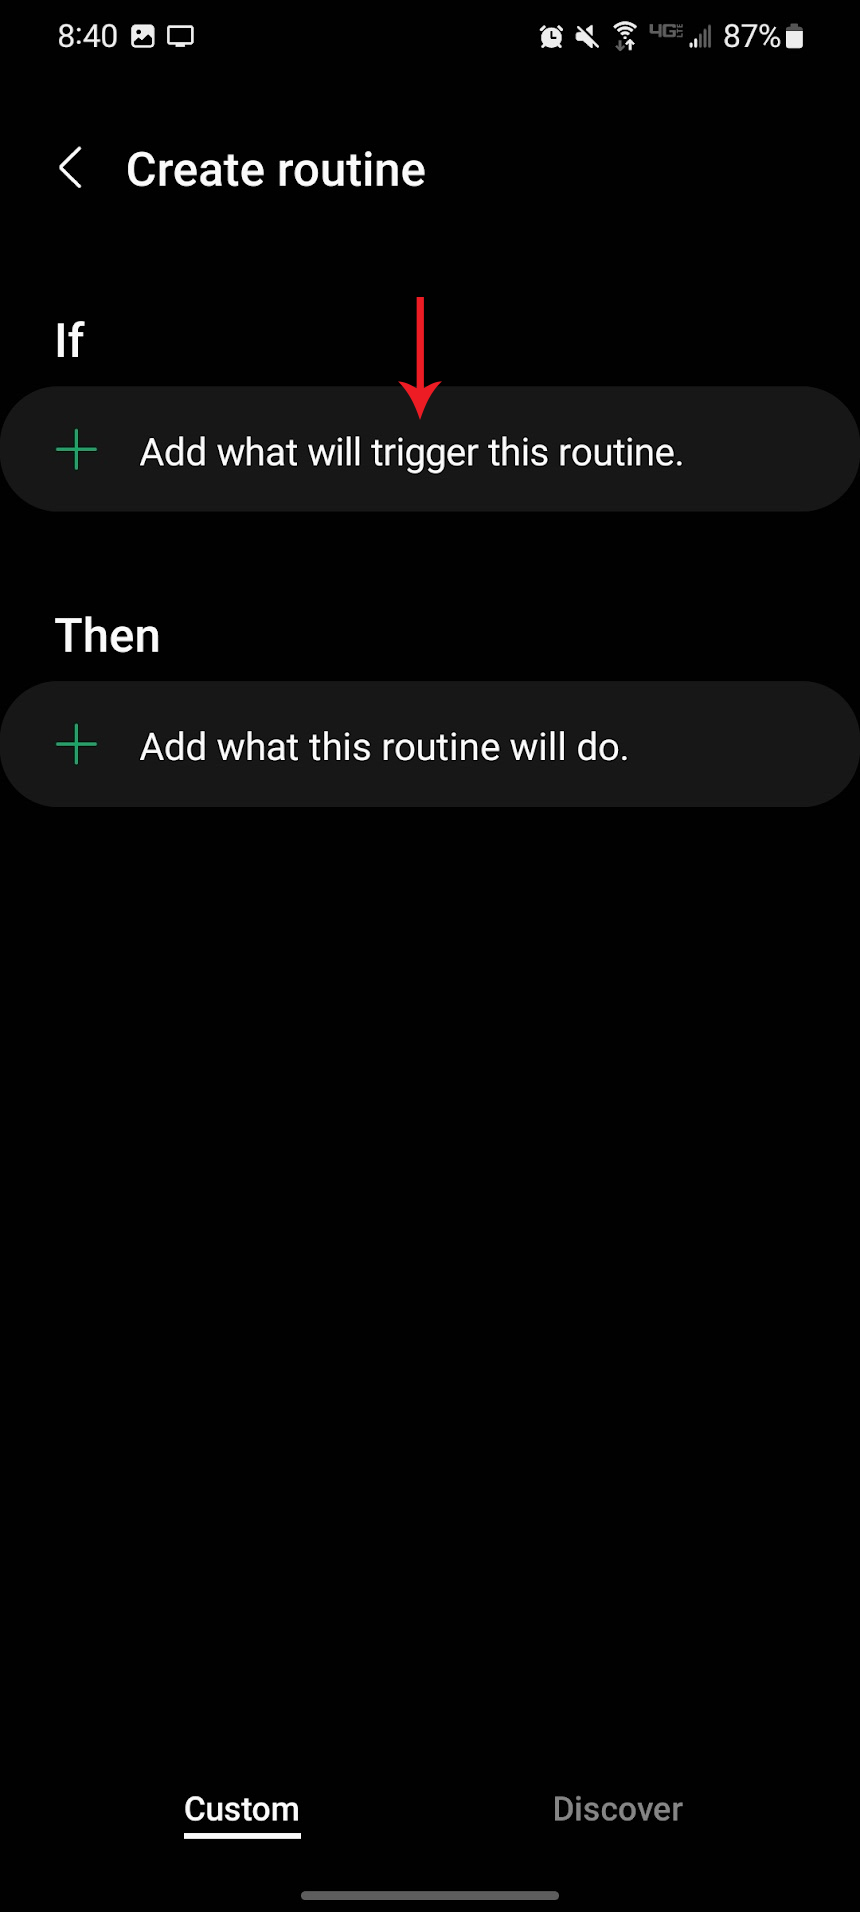
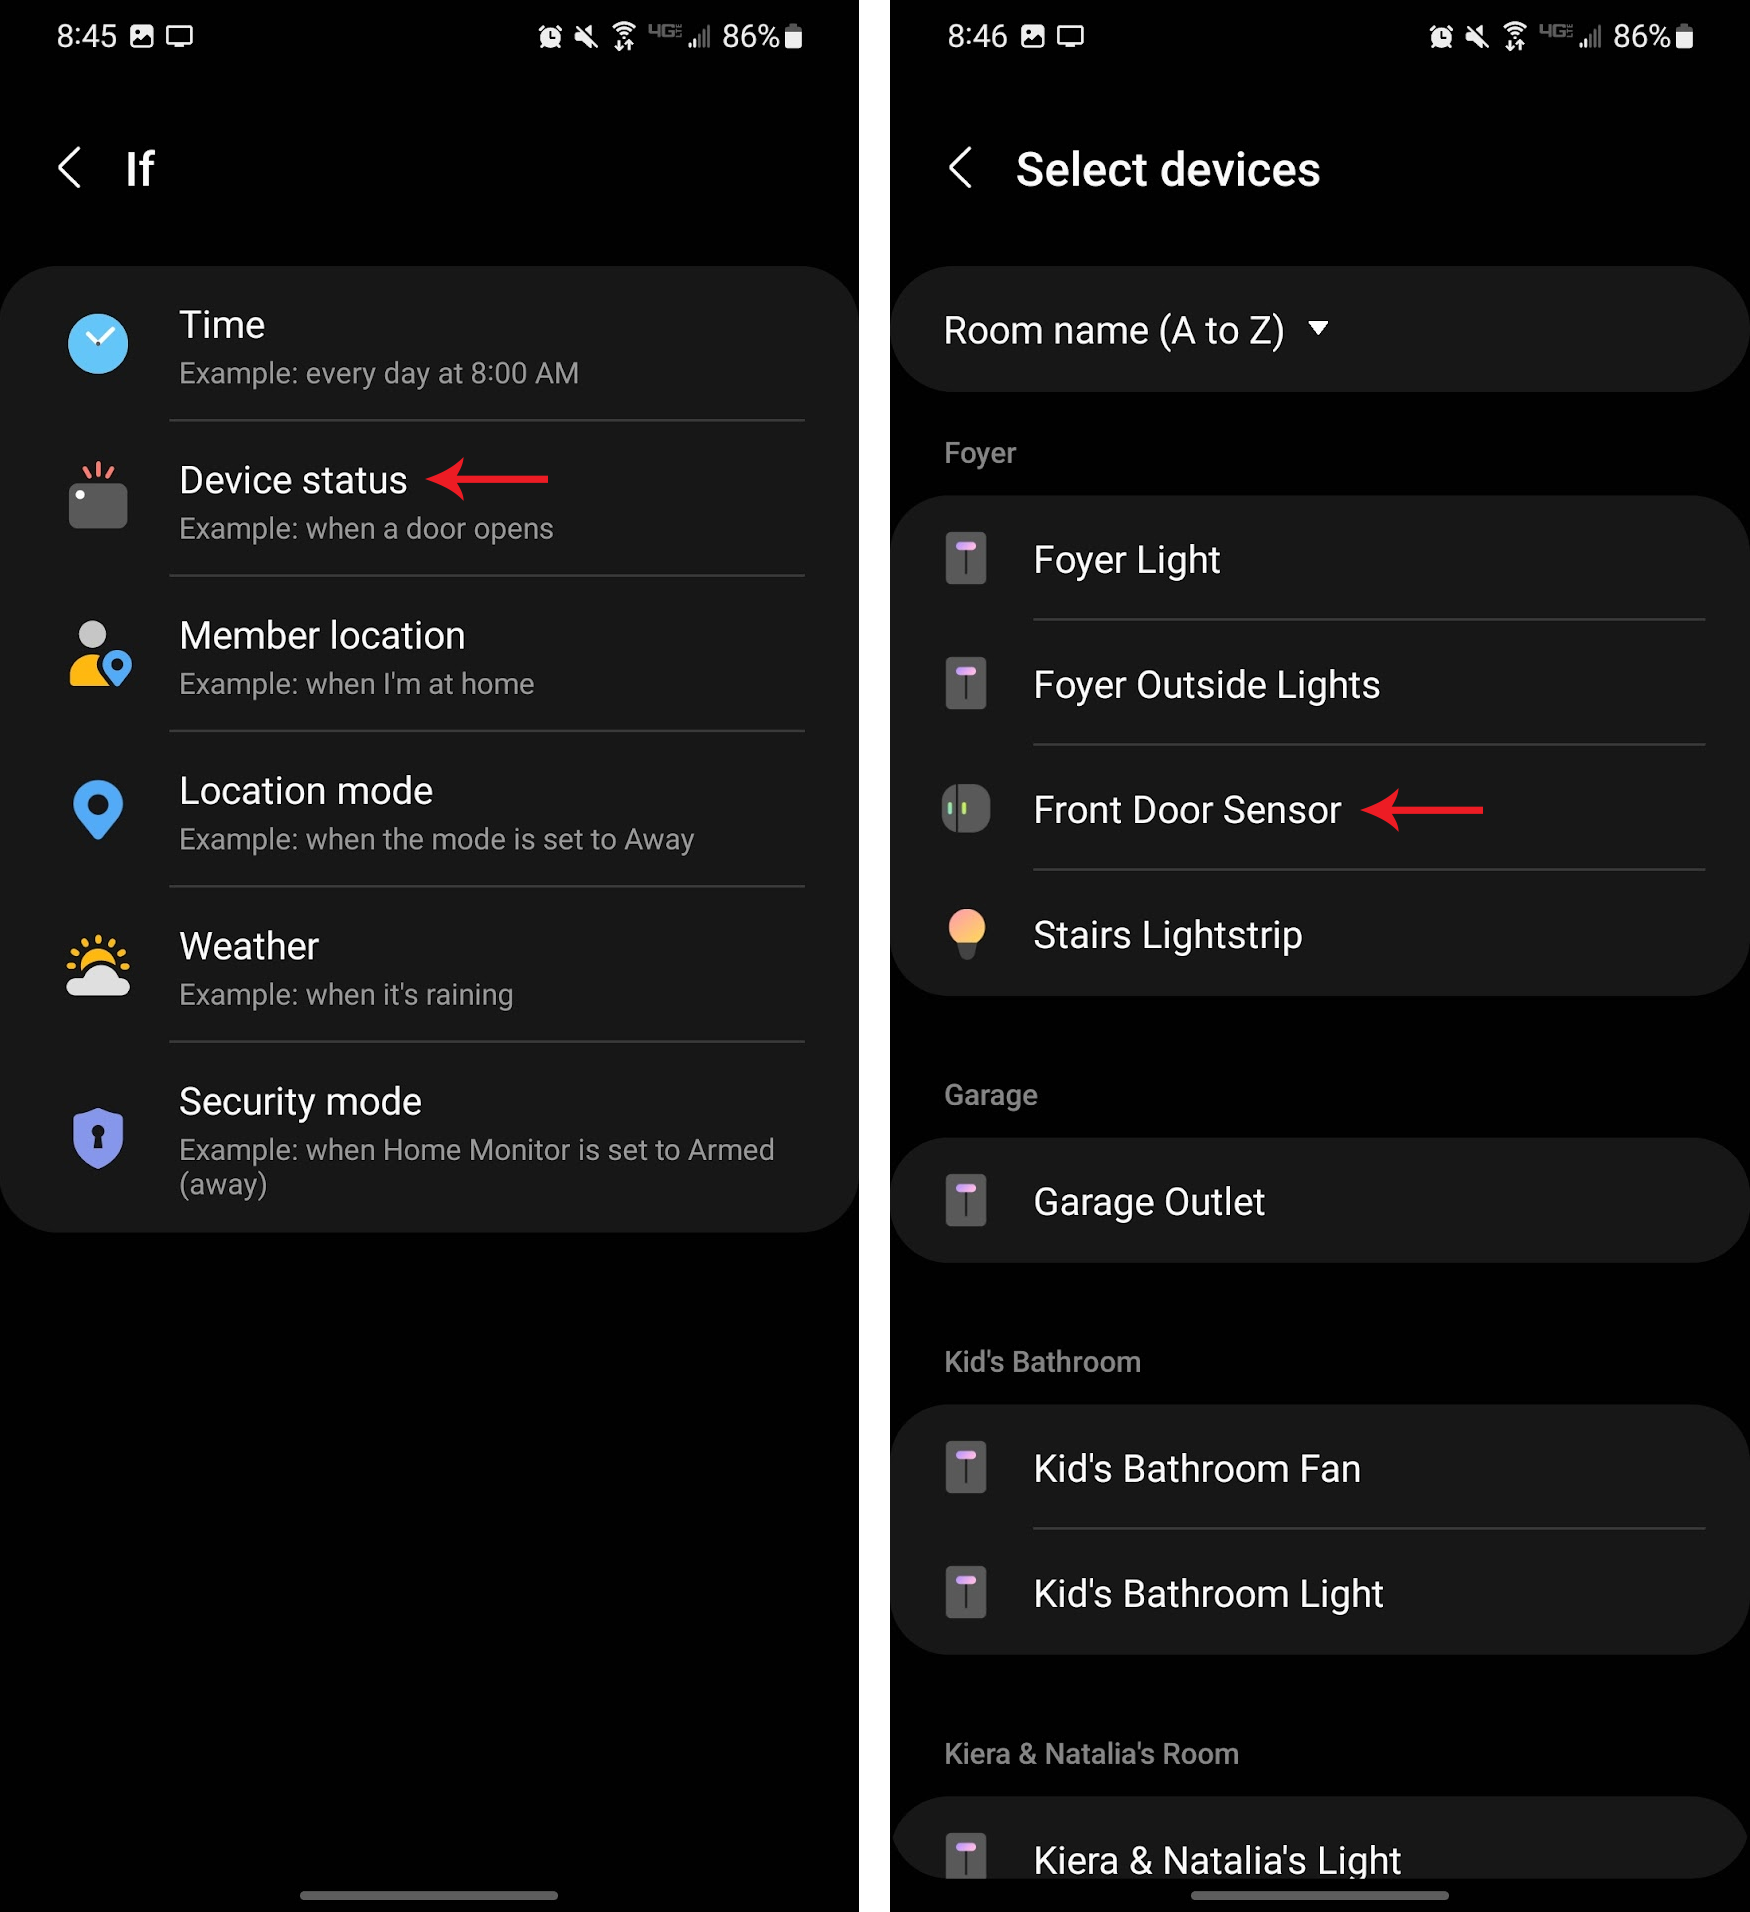
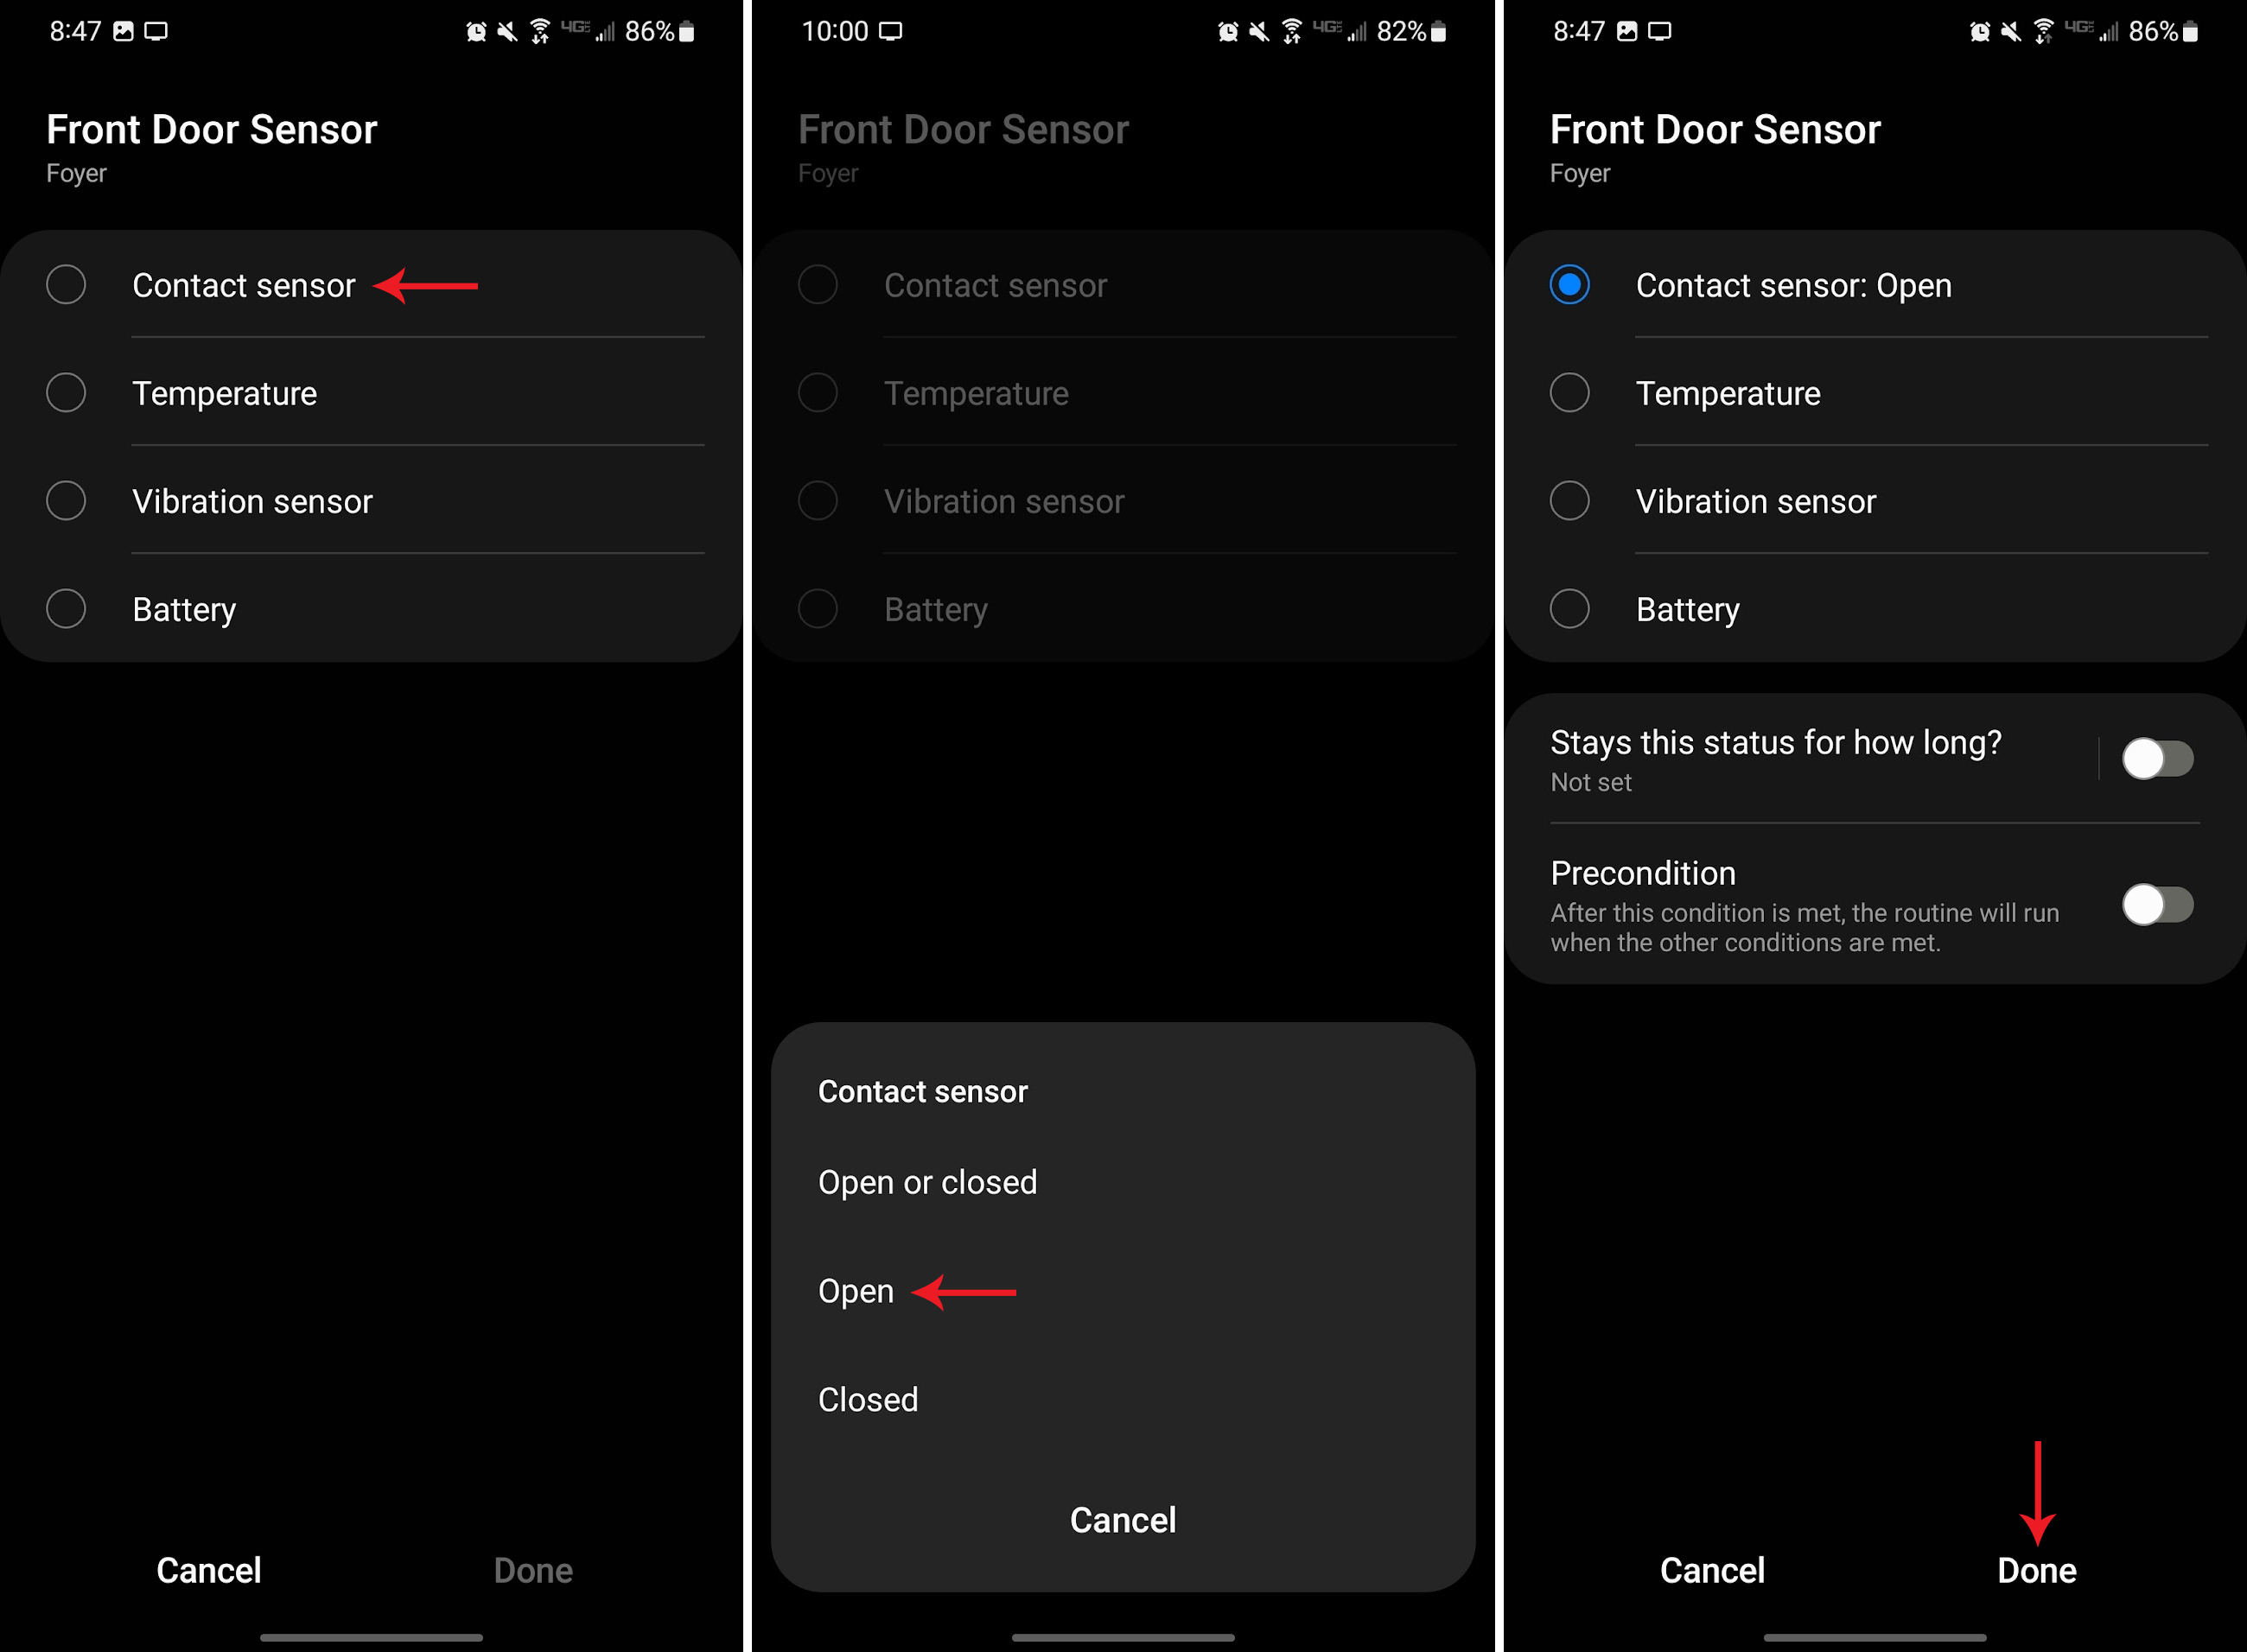
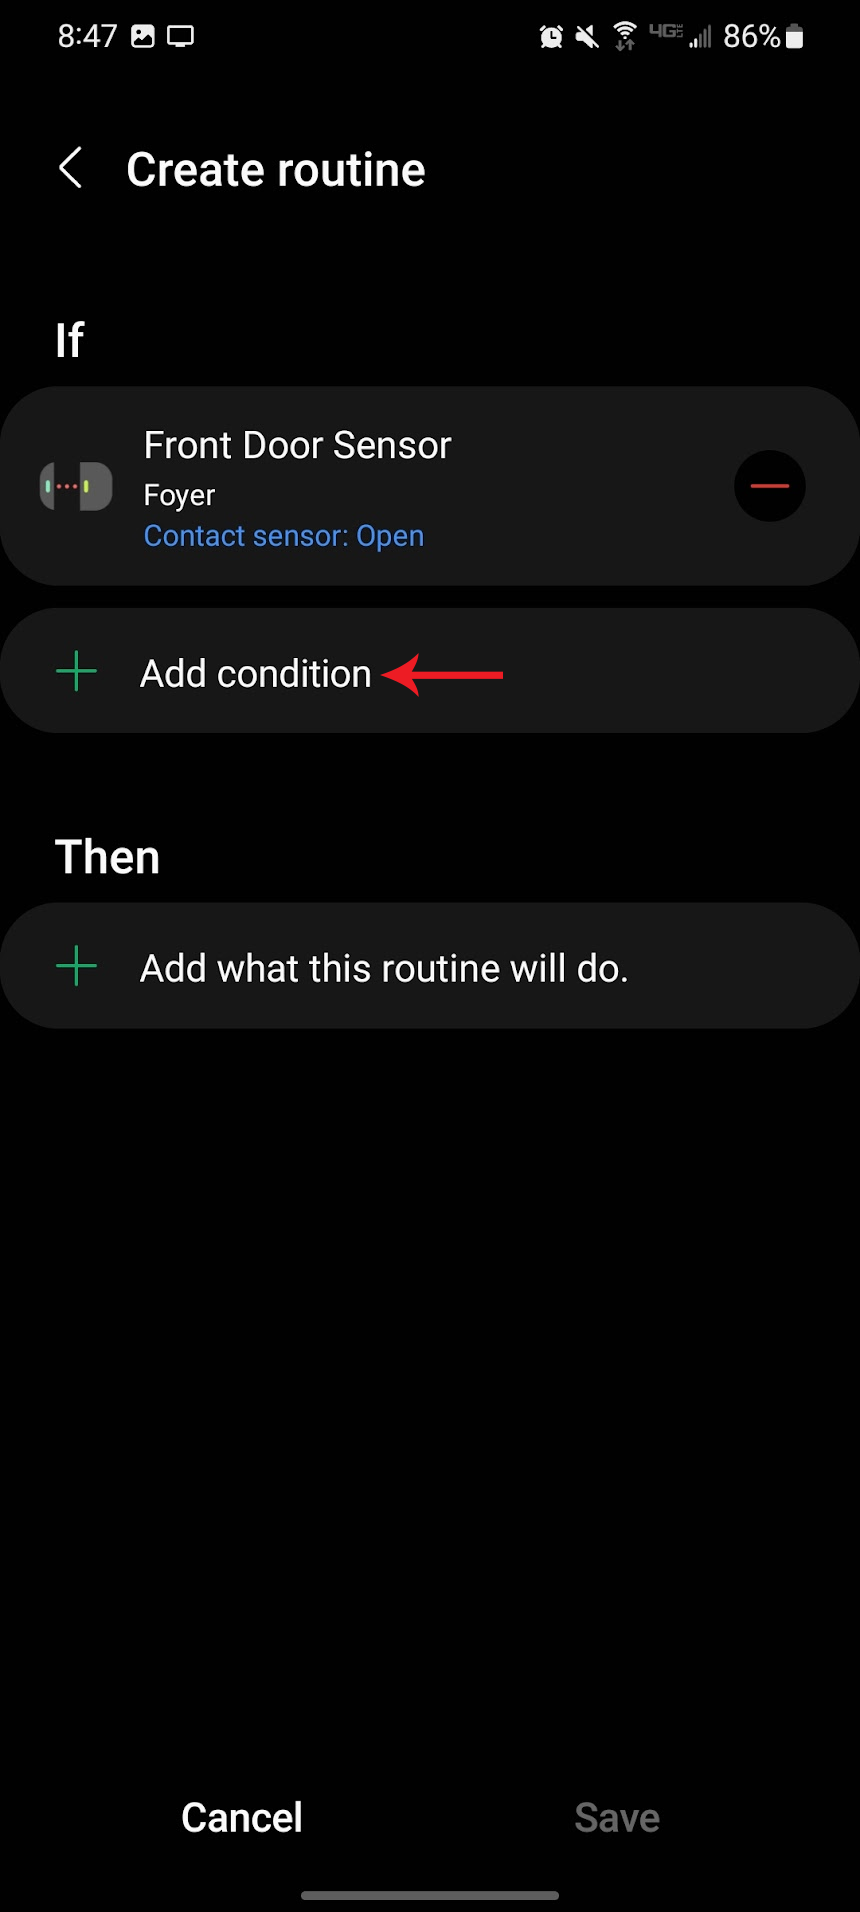
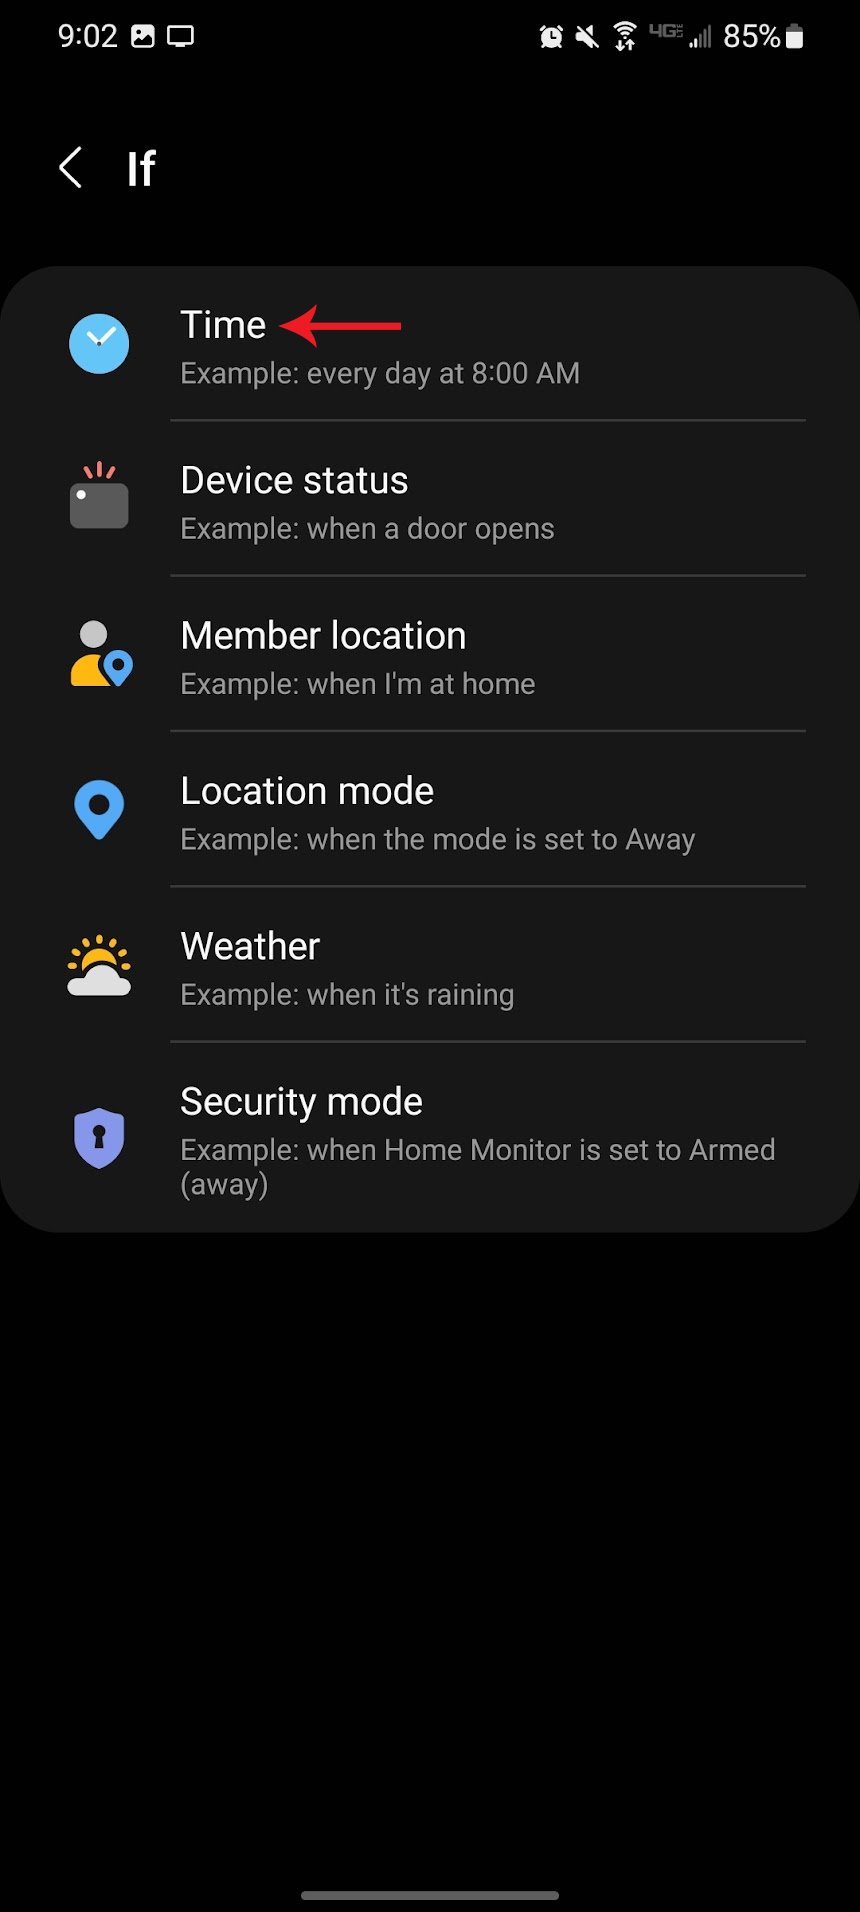
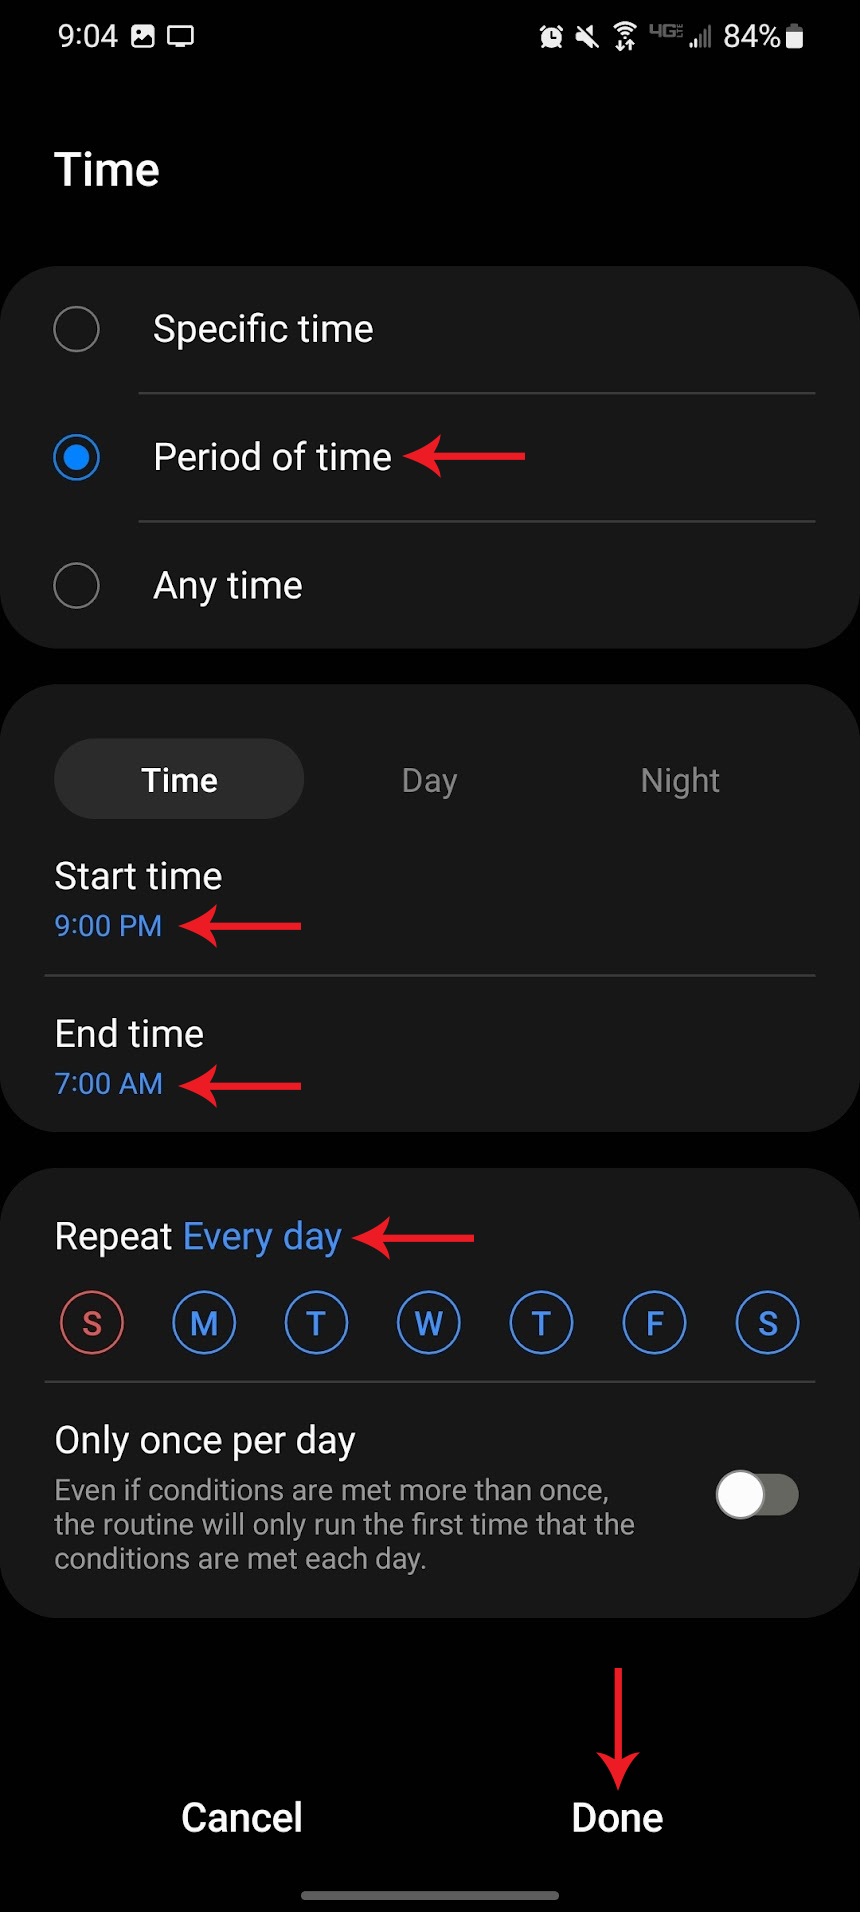
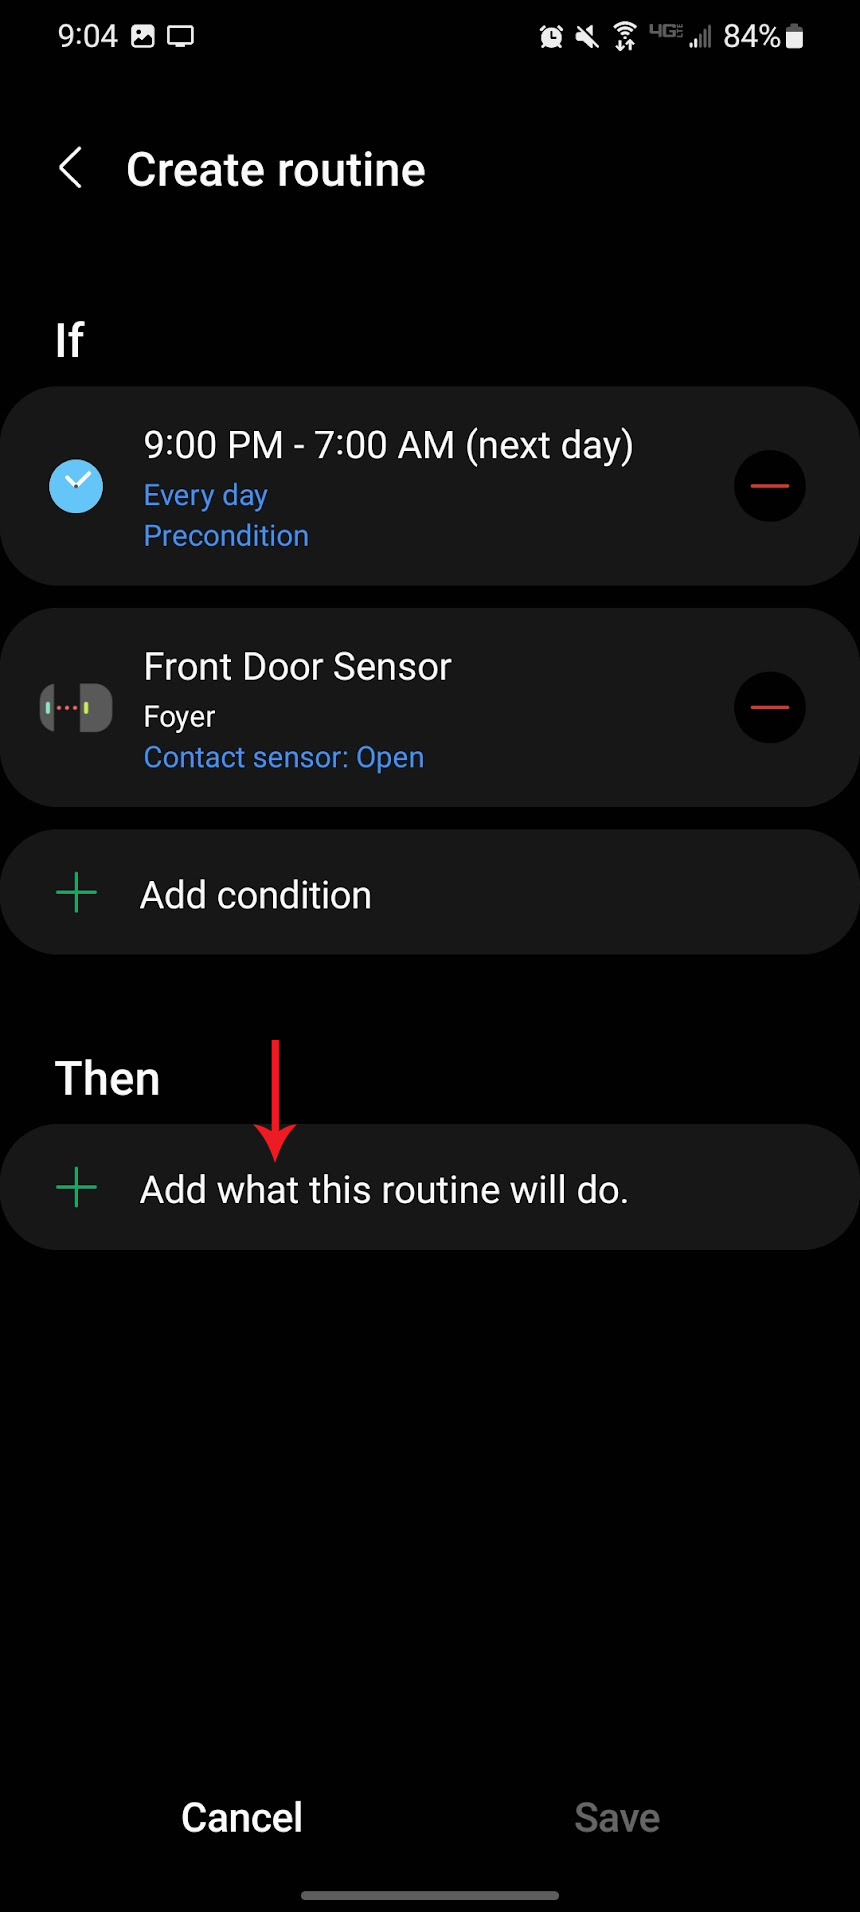

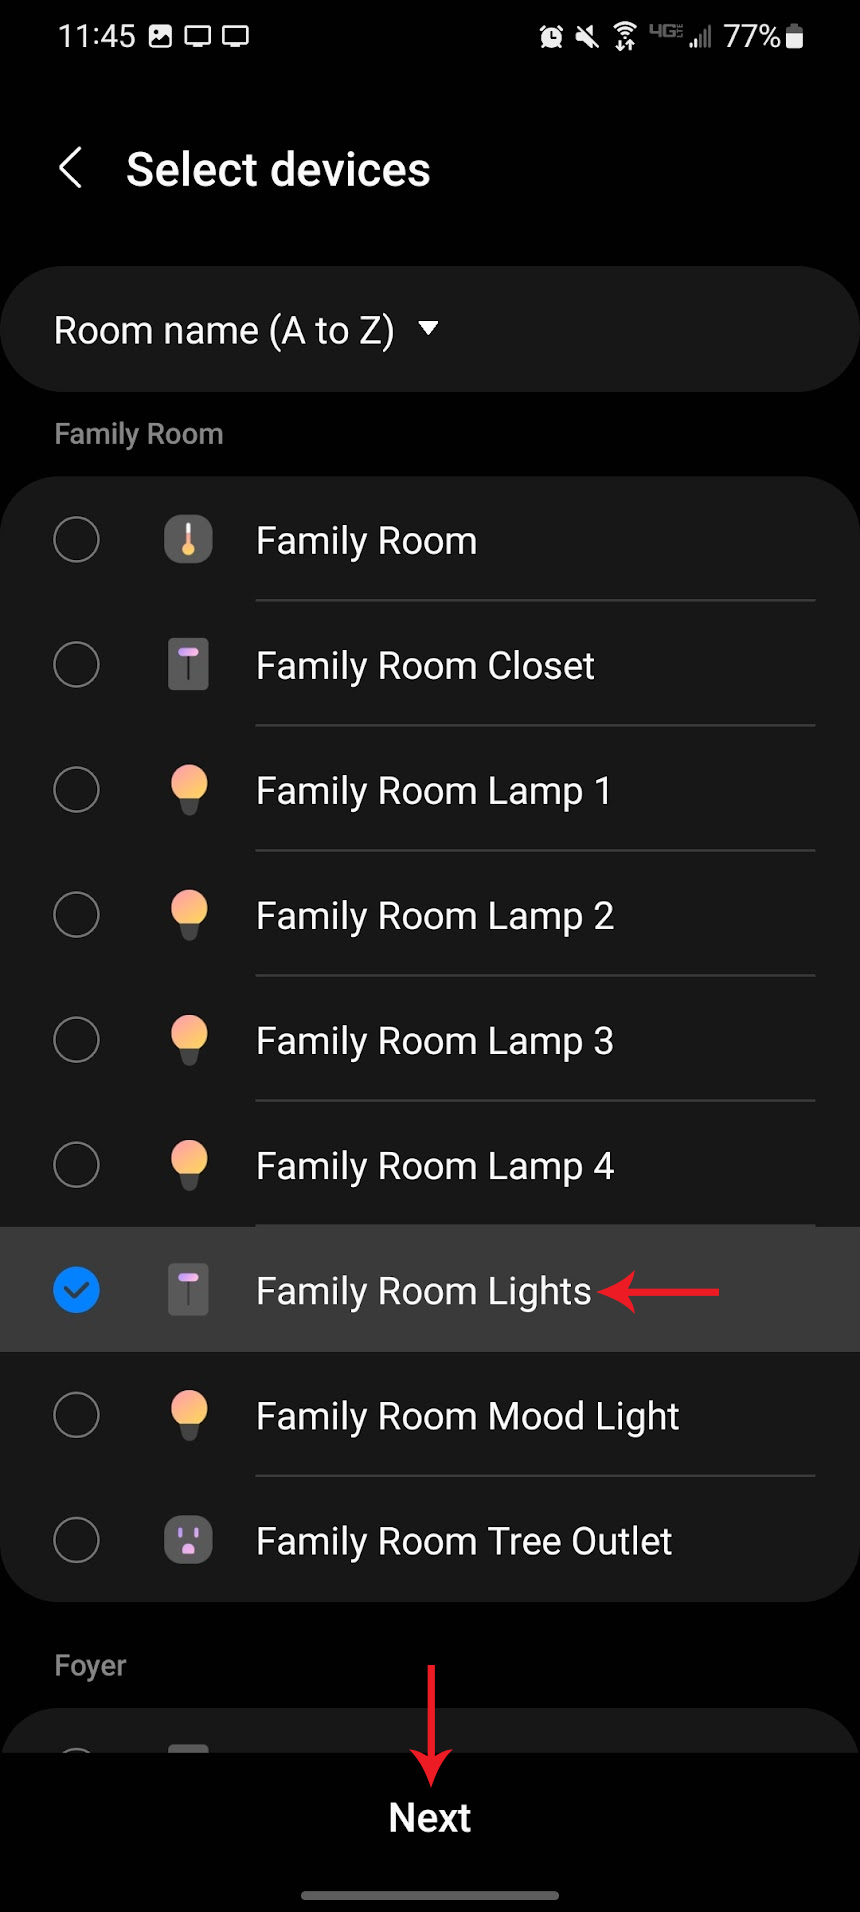
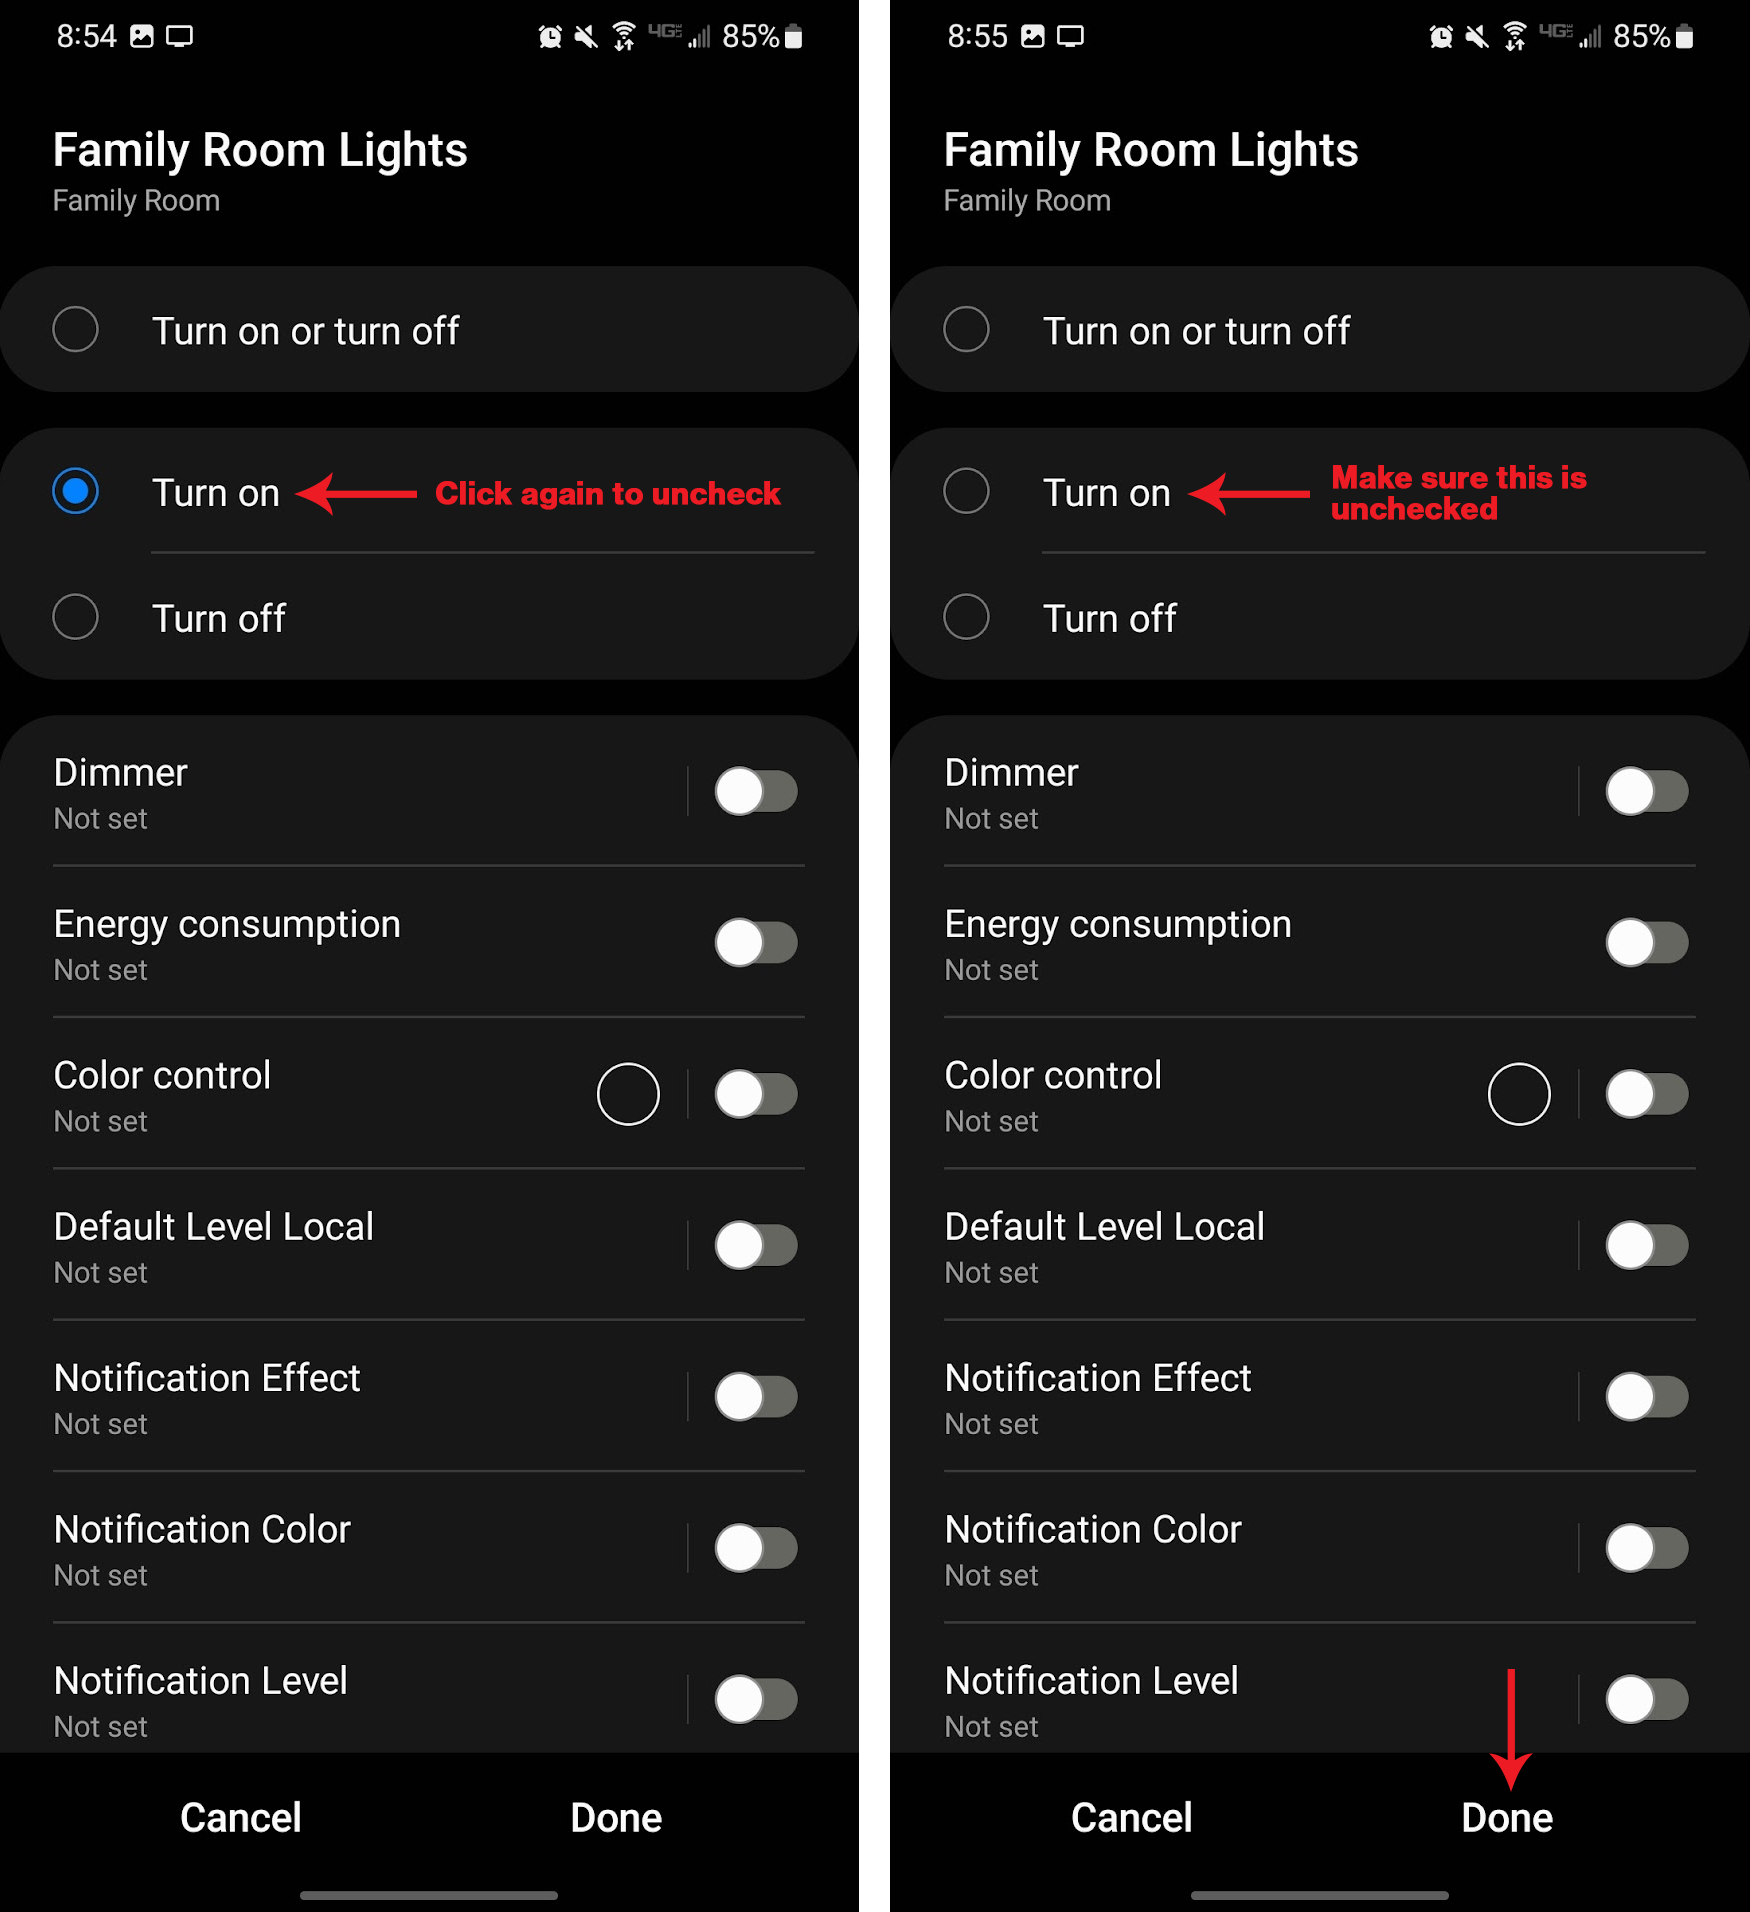
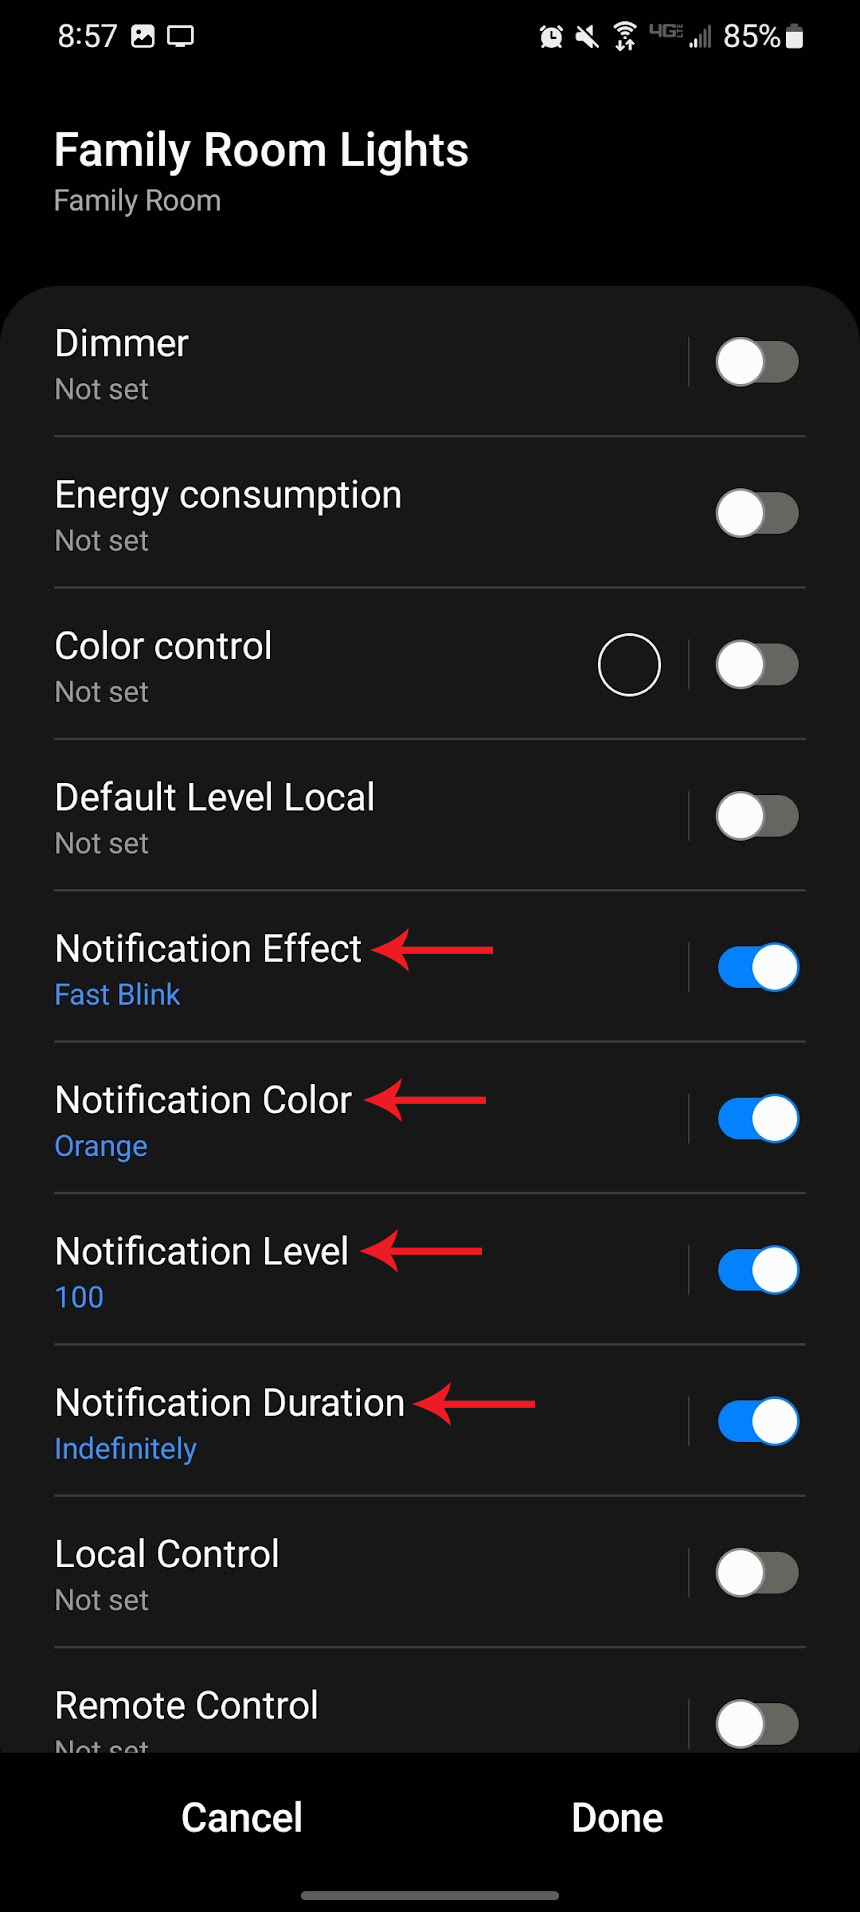
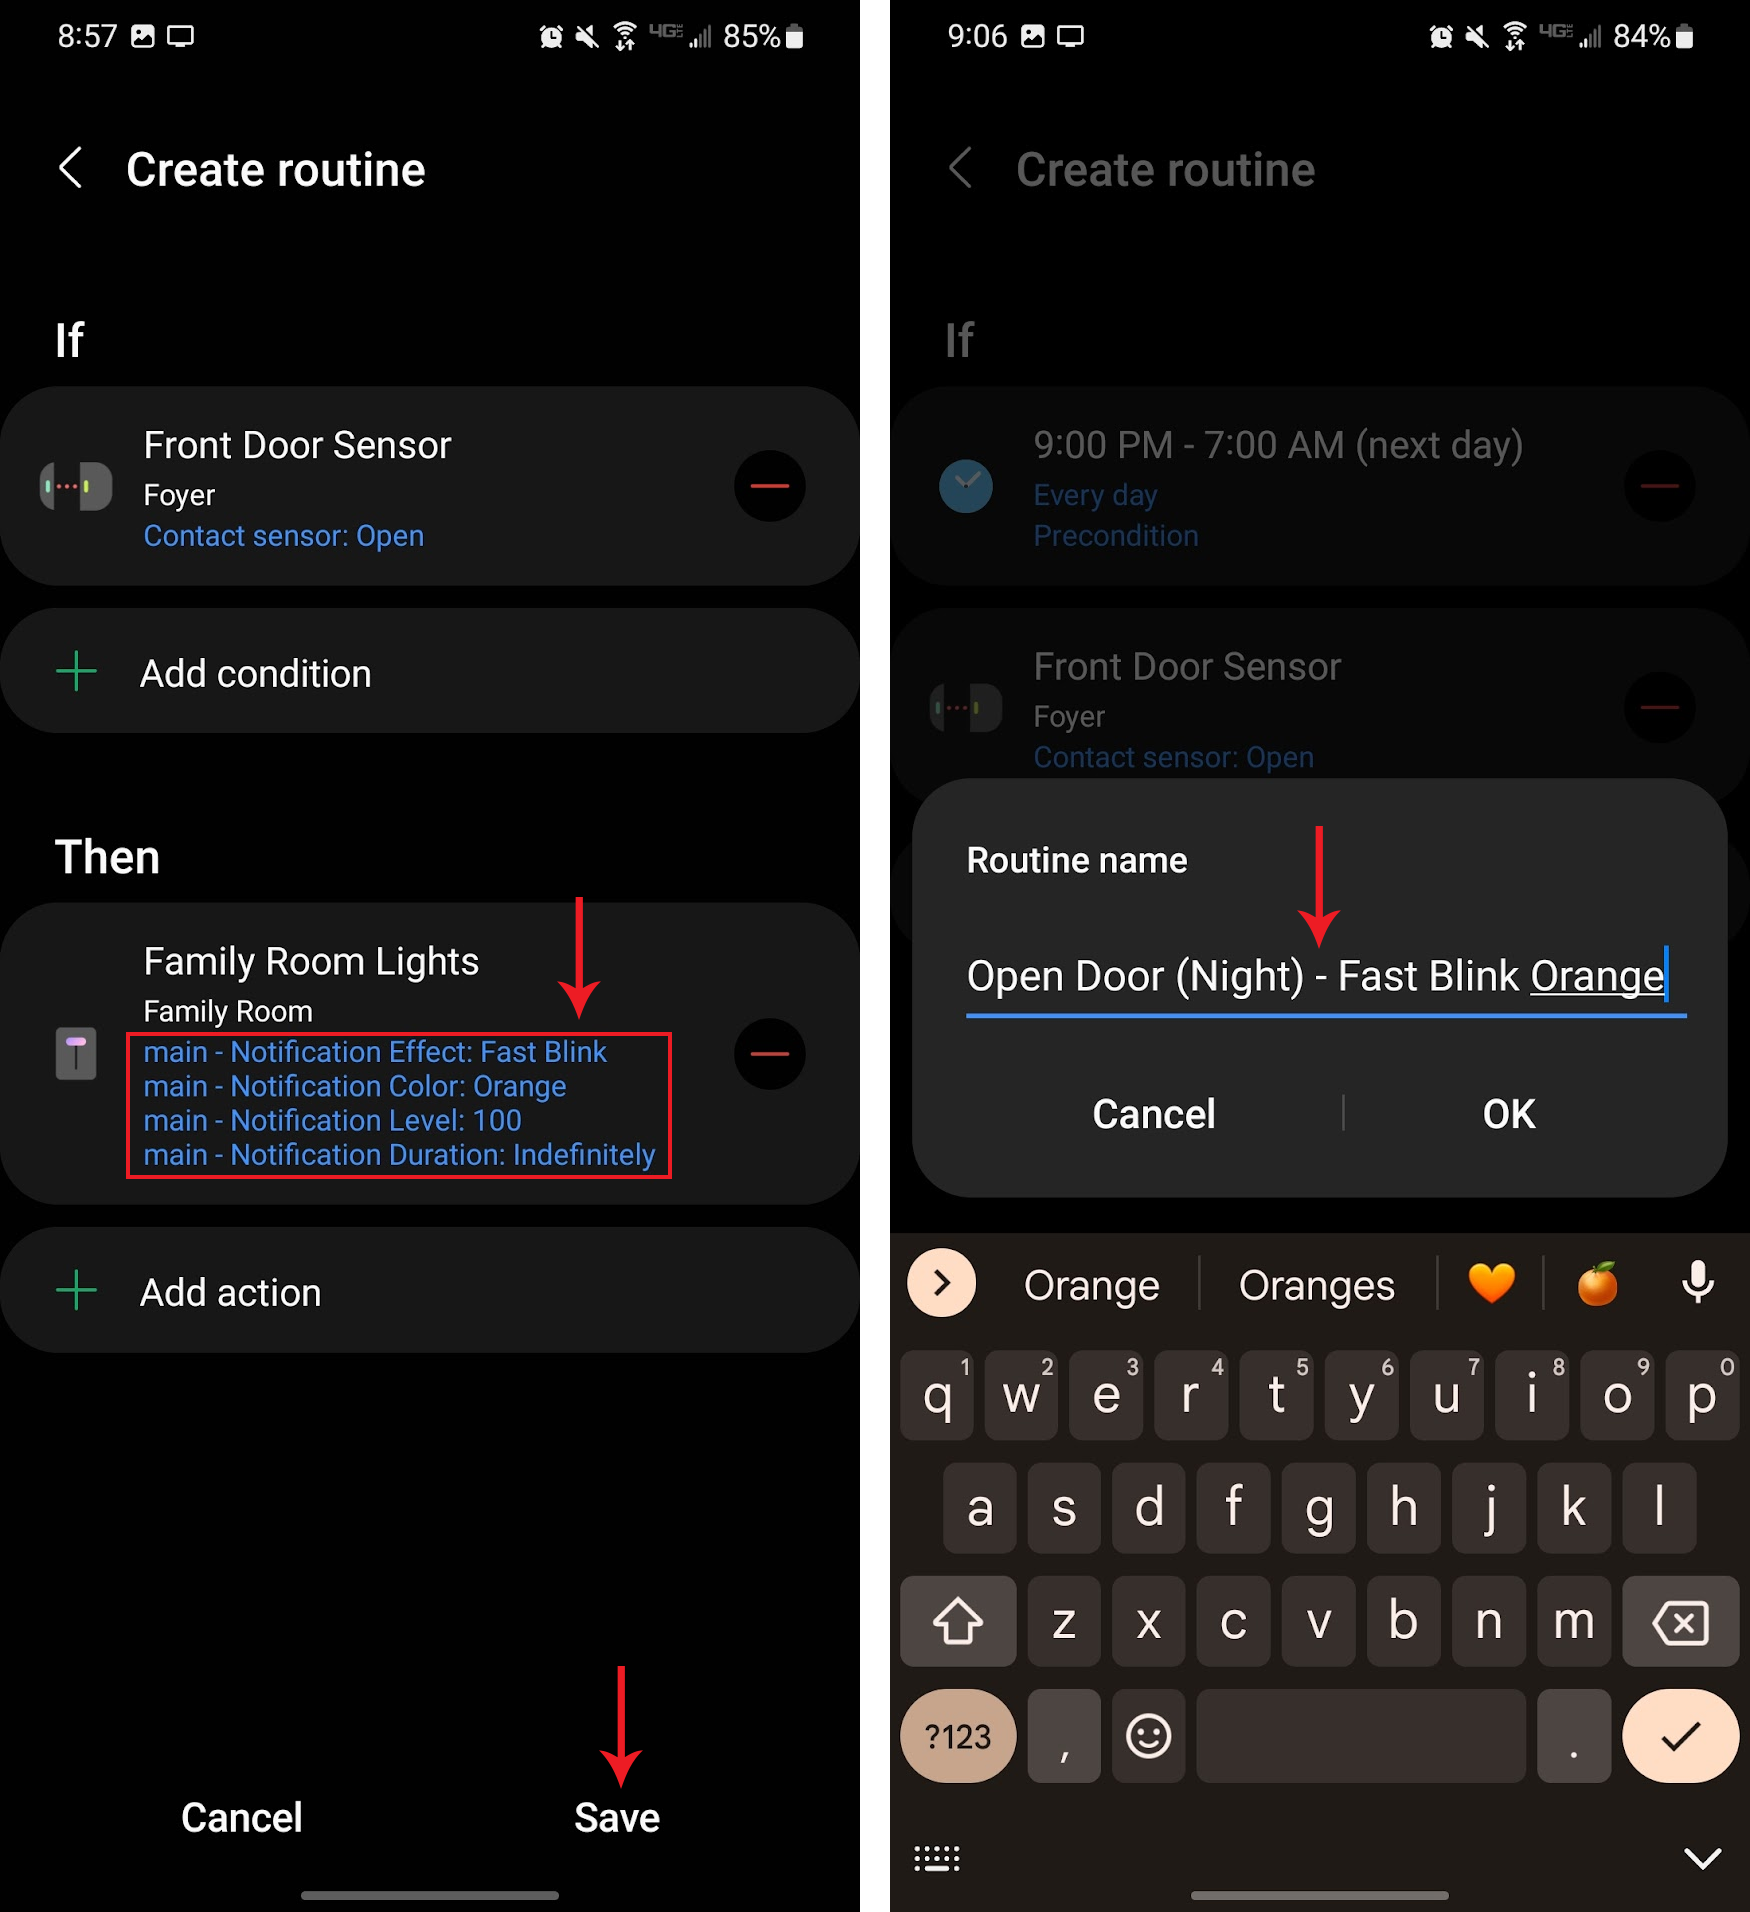
Scene Control
Scene control, in this context, refers to activating a scene from your light switch via a tap sequence (ie: double-tap, triple-tap, favorites button, etc). This is not to be confused with setting up scenes in your SmartThings app, which is different.
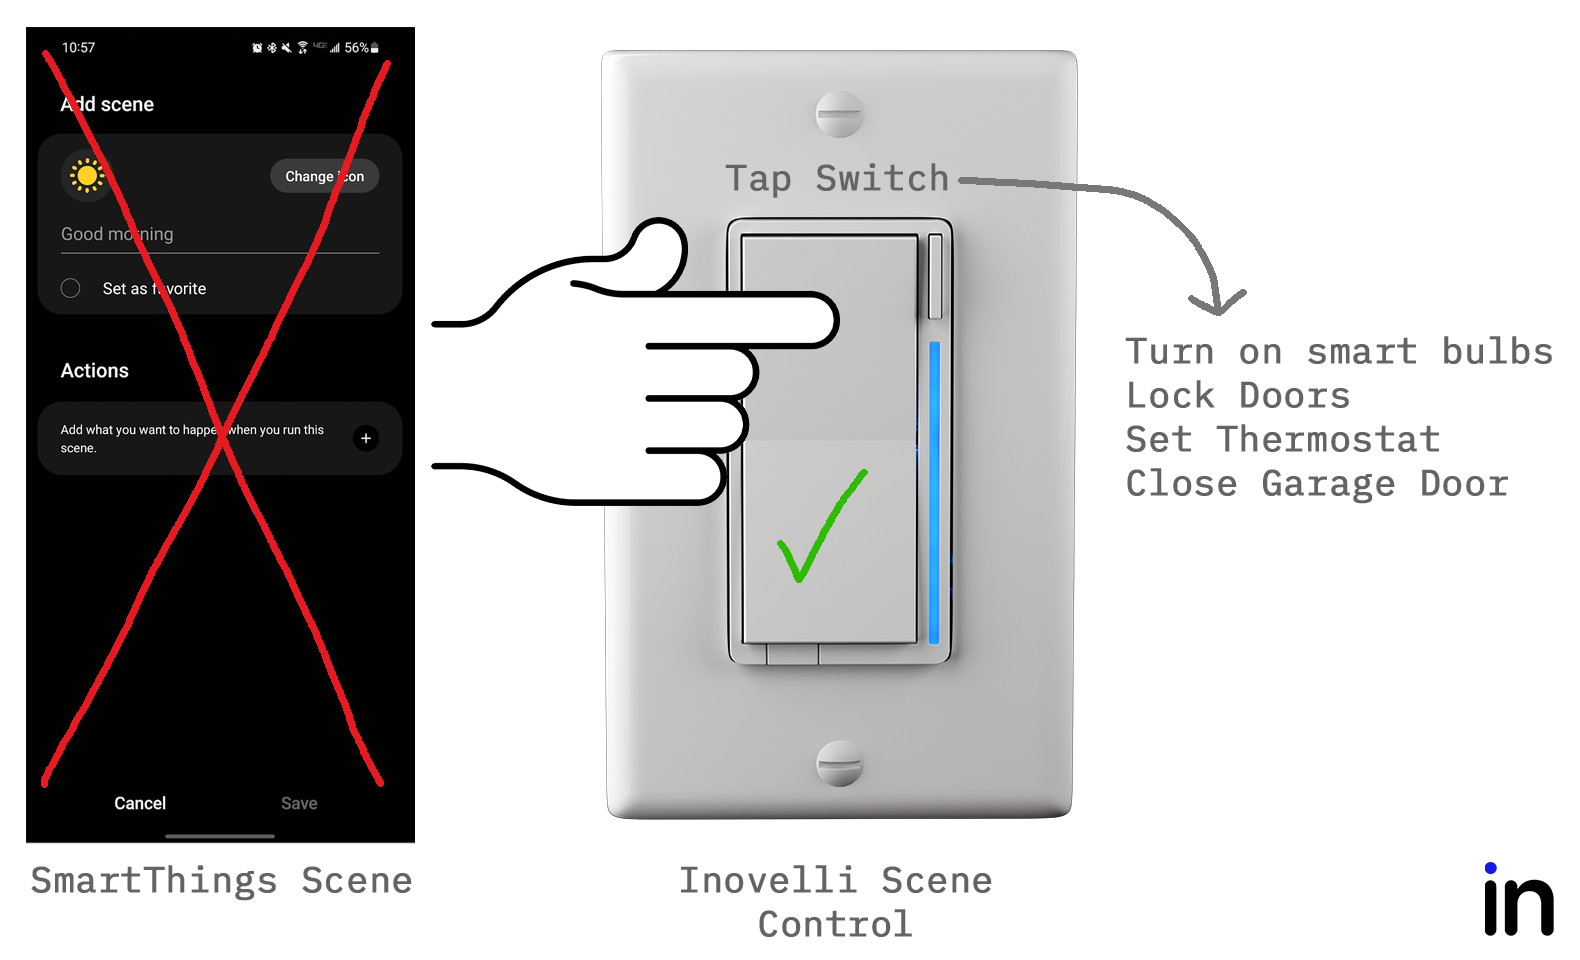
In the below example, we will create a simple scene of turning on movie lights and setting them to blue at 80% with a double-tap up of the light switch. Feel free to follow the written instructions below by clicking the drop down or follow along with the video below:
Written Instructions
- Open your SmartThings App and go to the, “Automations” tab
 —
— - Click on the, “+” button at the top of the screen and select, “Create routine”—
- Under the, “If” section, click on the, “+ Add what will trigger this routine” button—
- Click on, “Device status” and find your Inovelli Blue Series 2-1 Switch to click on—
- Scroll to the section that says, “Up Button” and click on, “Pressed 2 times” followed by, “Done” (NOTE: If you want something other than double-tap up, please select a different sequence)—
- Under the, “Then” section, click on the, “+ Add what this routine will do” button—
- Click on, “Control devices”—
- Select the movie lights you want to turn on and click, “Next”—
- Then go through each light and click on, “Choose what you want this device to do”—
- Click on, “Turn On”, followed by, “Dimmer” (set it to 80%), and, “Color control” (select blue) – then click, “Done”—
- Ensure the correct status, color and level values are selected, click, “Save” and name your routine—
- Test your routine by double tapping up on your Inovelli Blue Series 2-1 Switch and see if your movie lights turn on
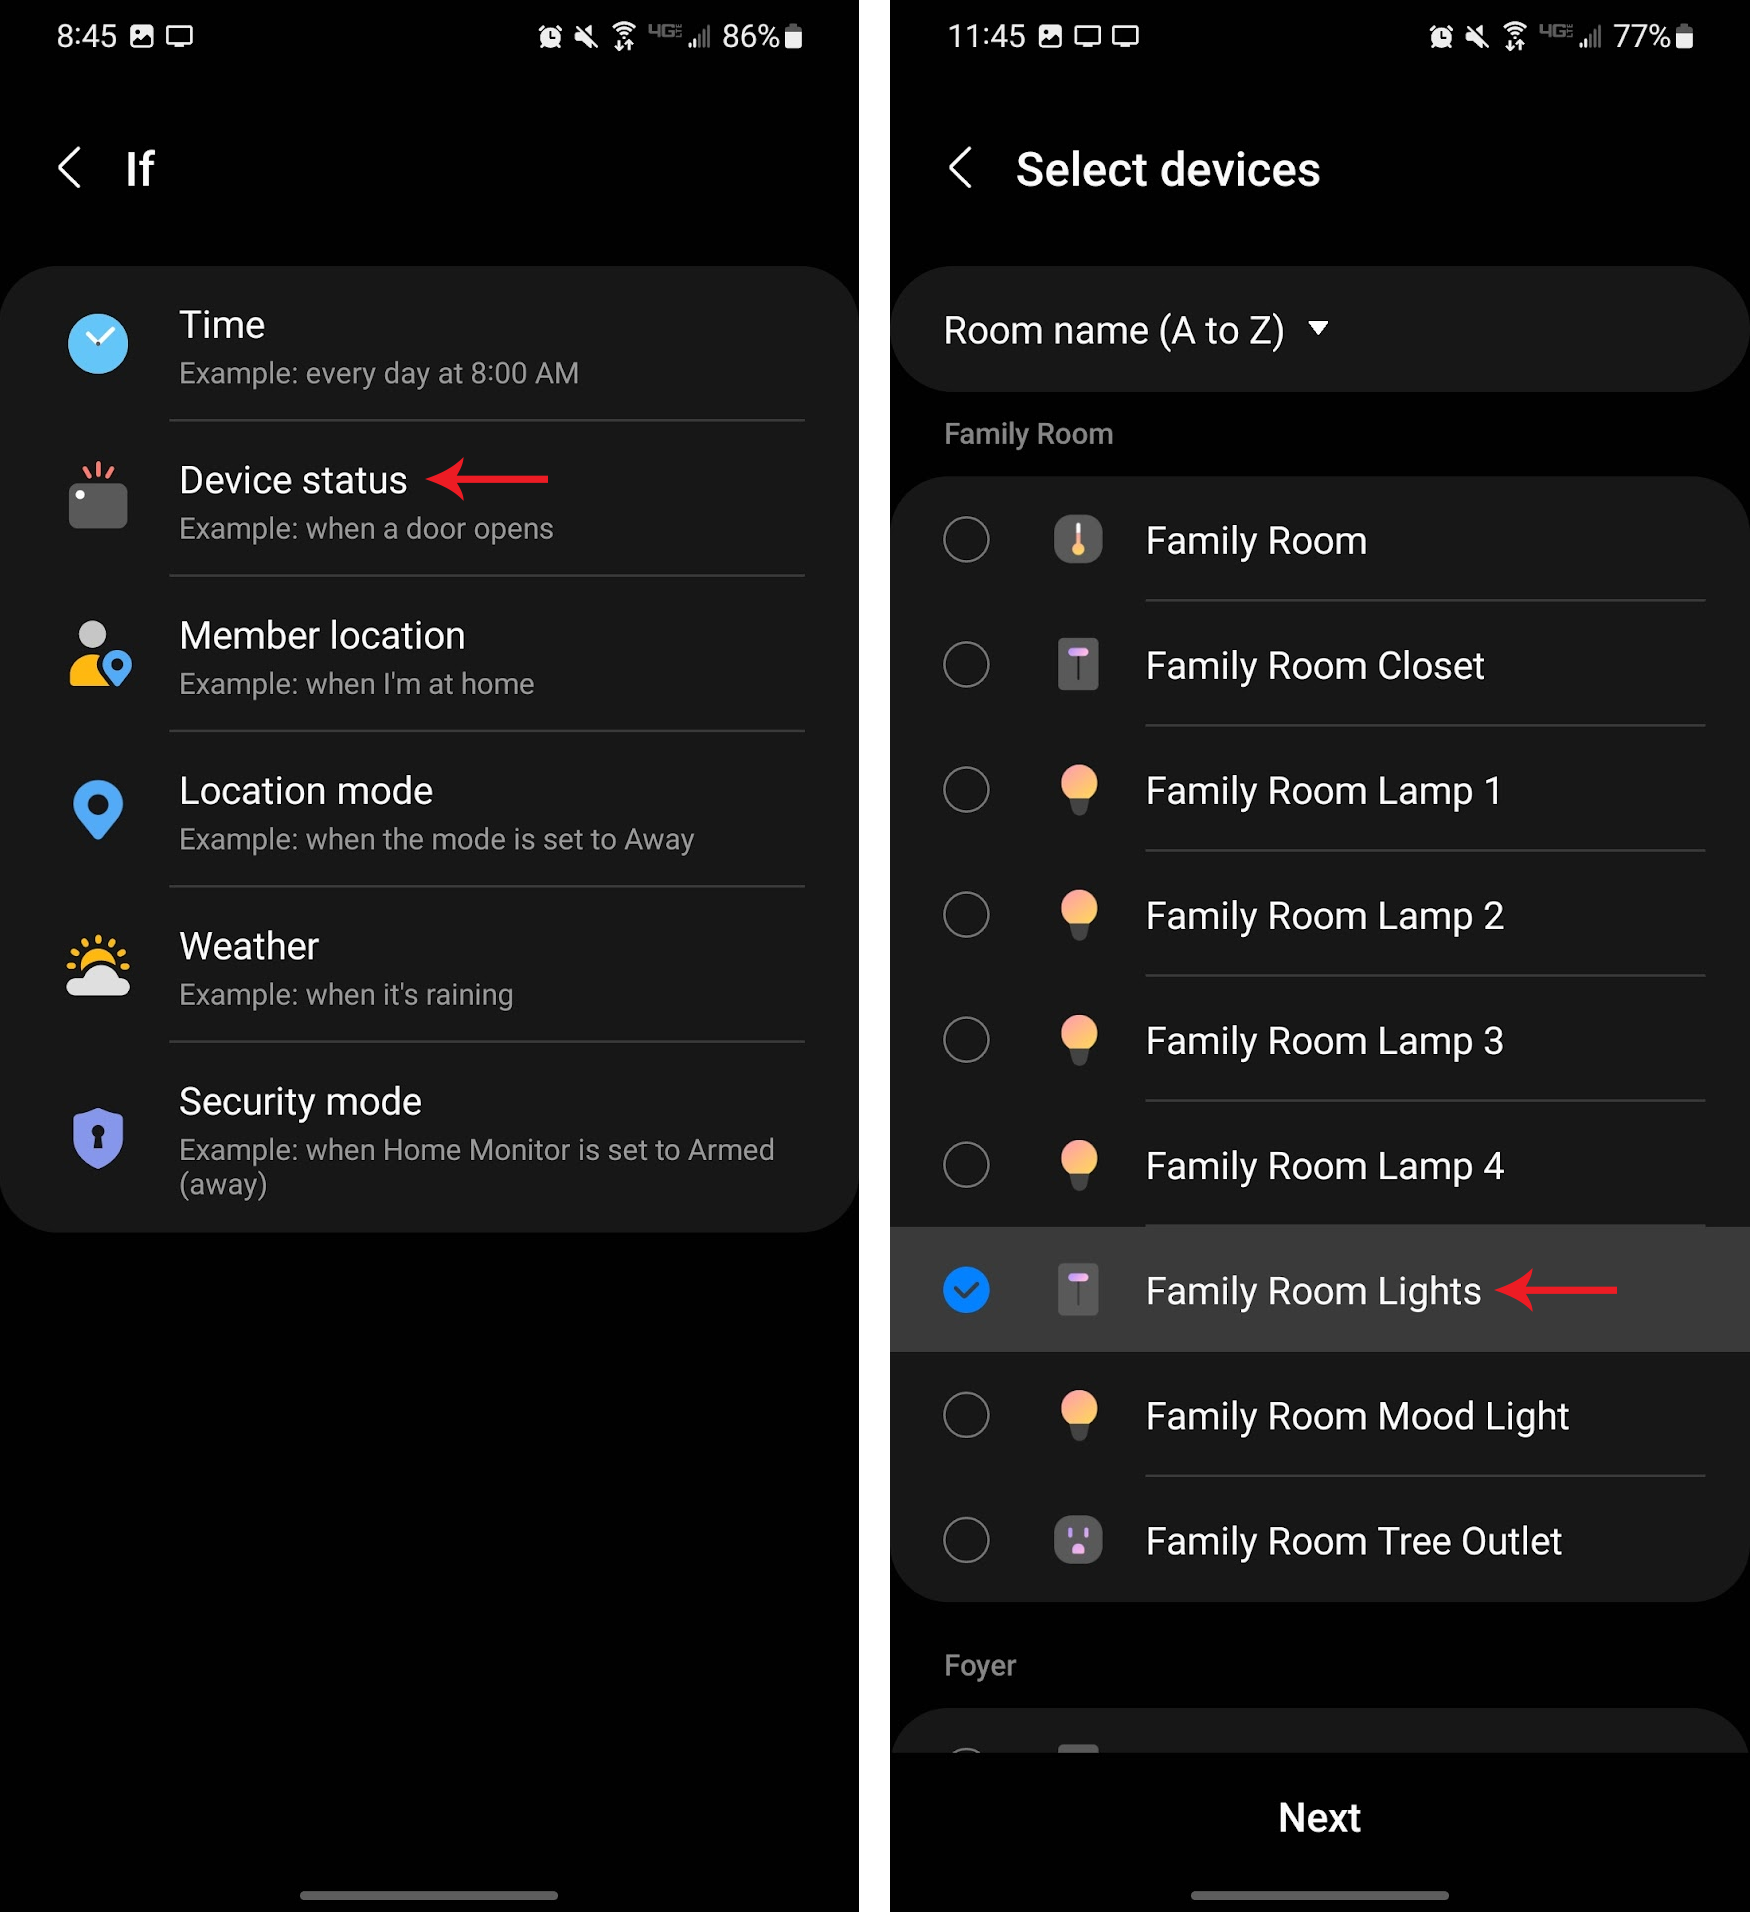
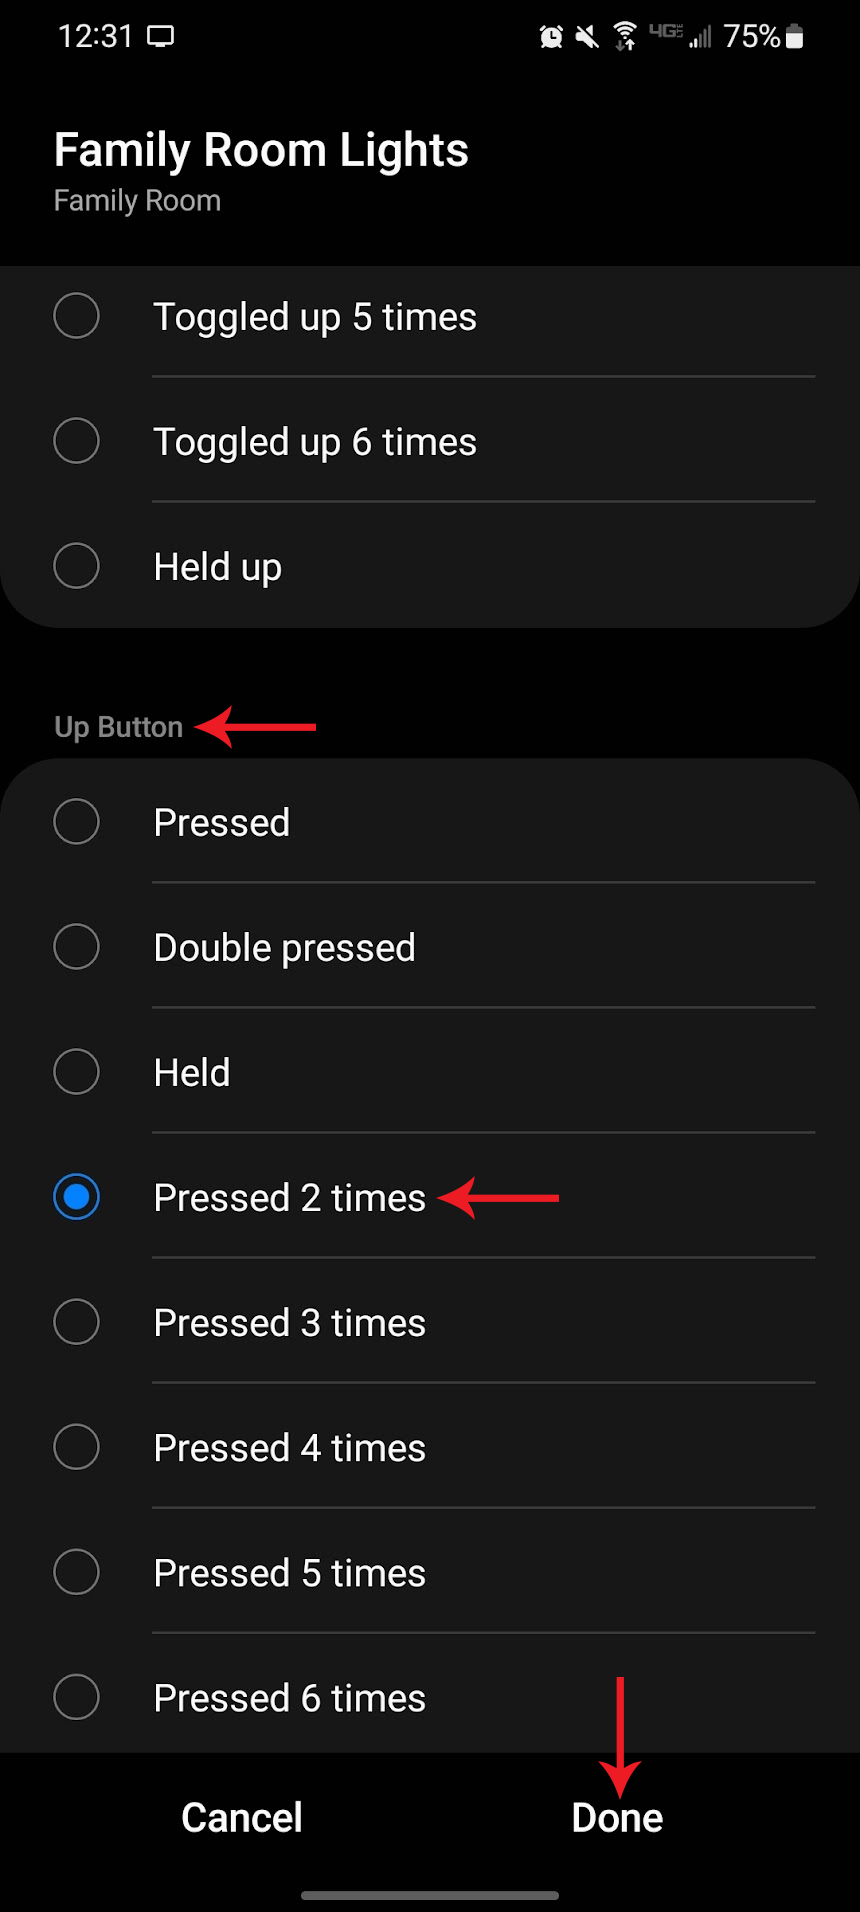
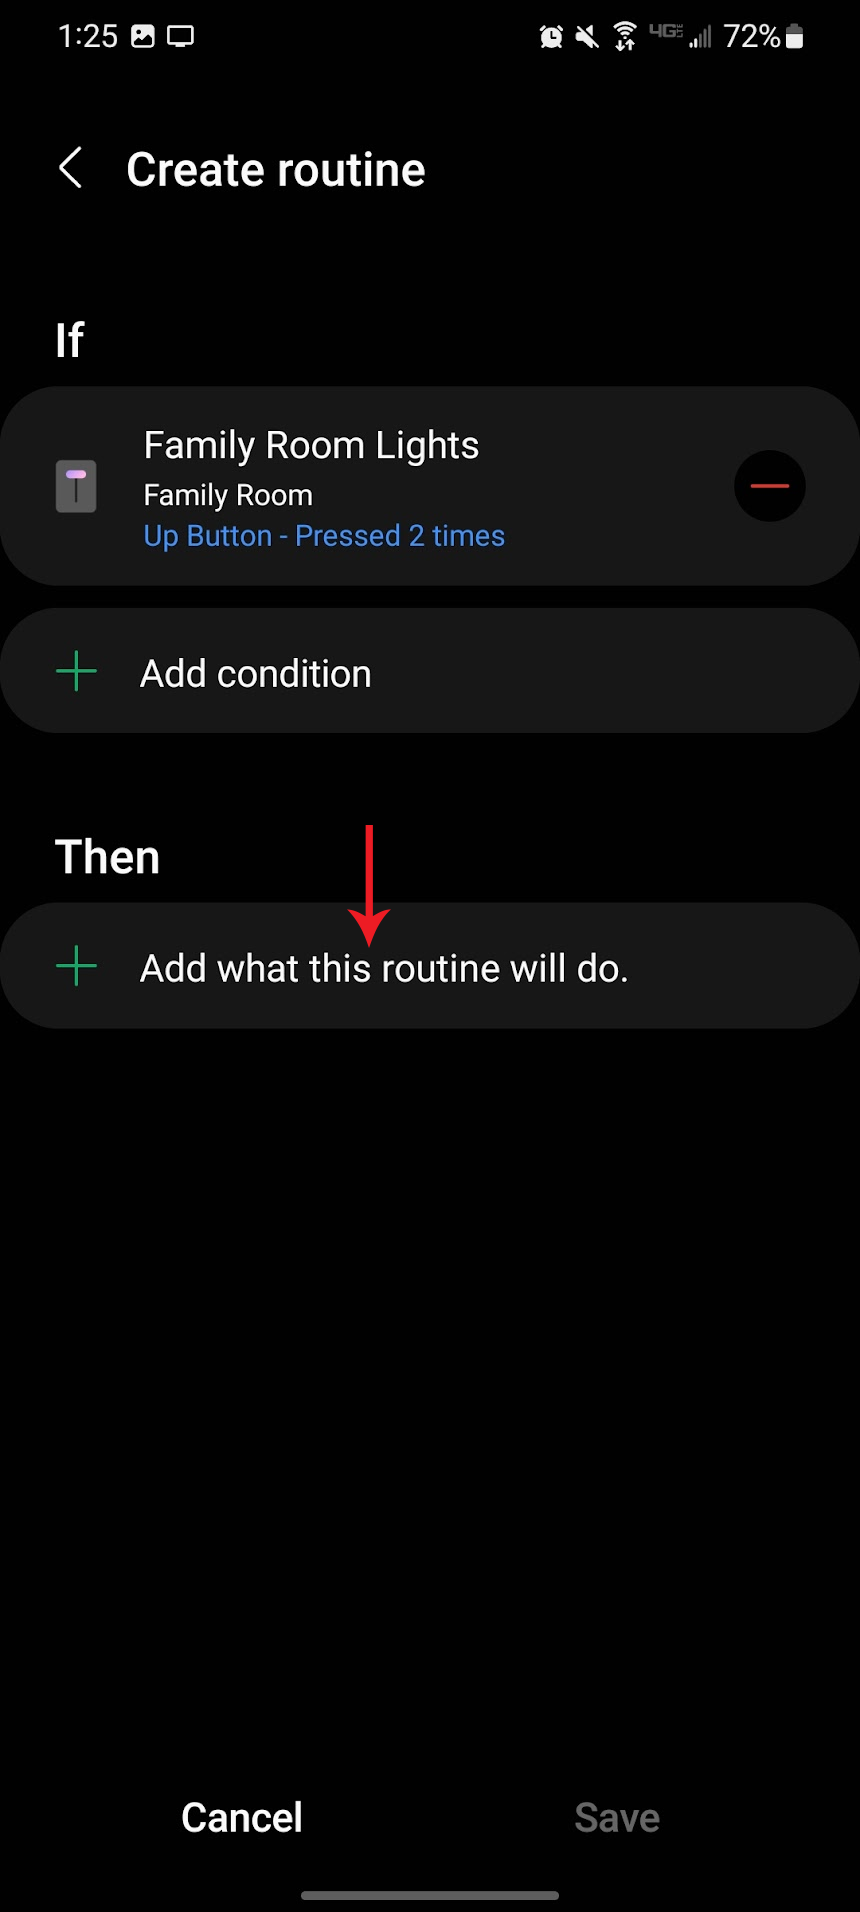
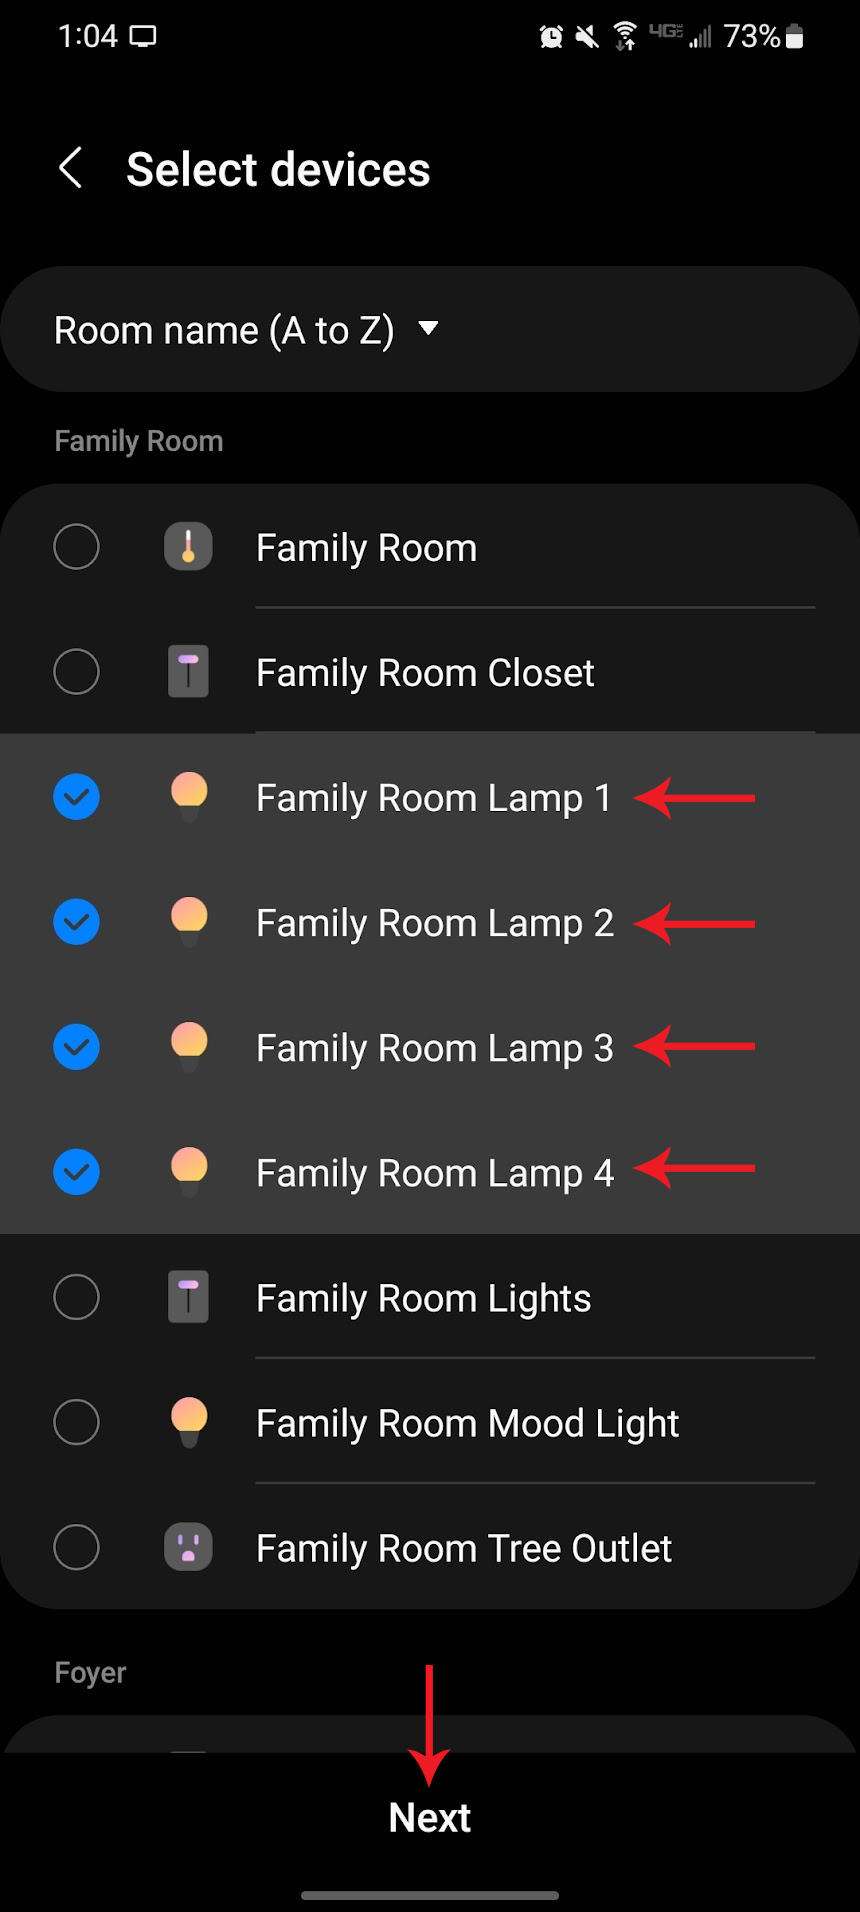
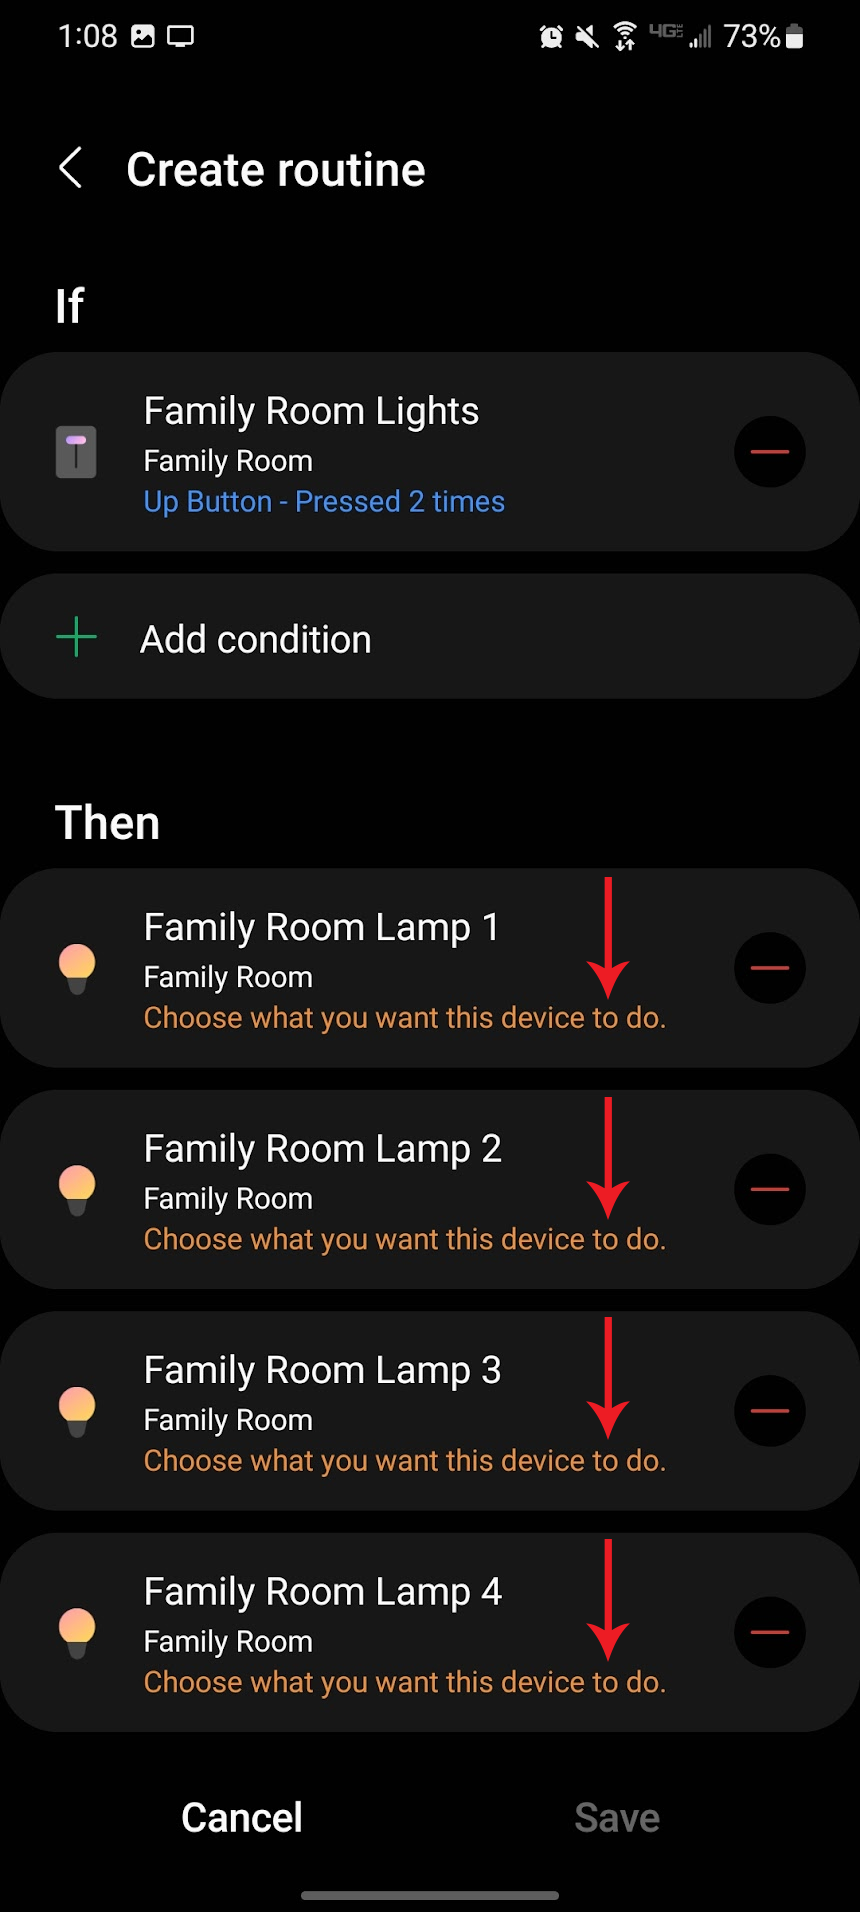

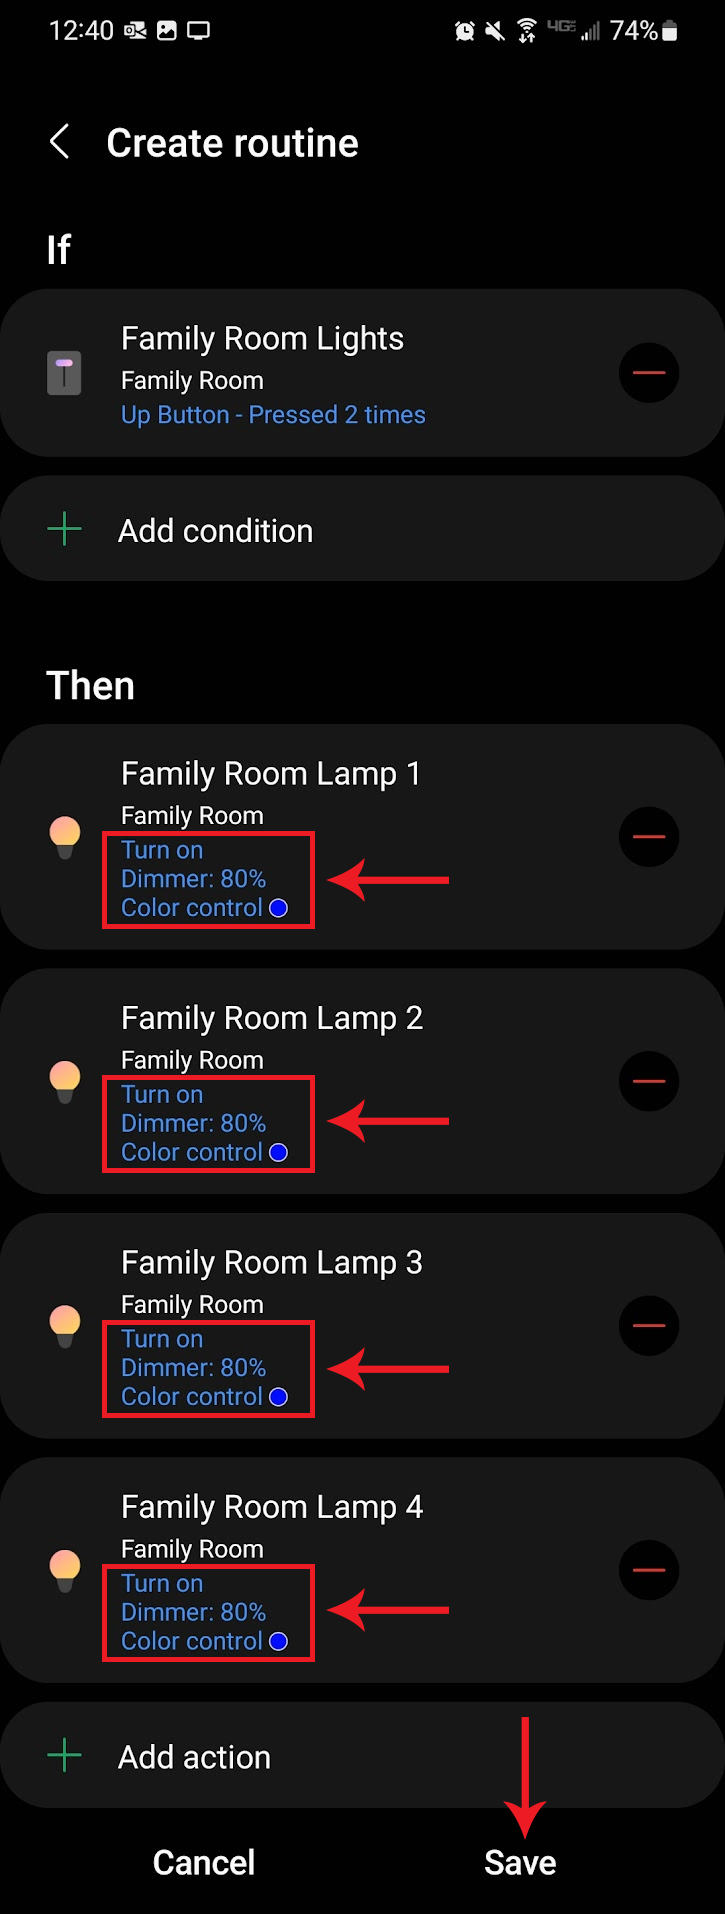
Smart Bulb Mode
Using Zigbee Bulbs
The best method to have your smart switch work with Zigbee smart bulbs is to use Zigbee binding. If your Zigbee bulb does not support Zigbee binding (or your bulb isn’t Zigbee), please follow the instructions in the Using Non-Zigbee Bulbs section.
For instructions for Zigbee binding to bulbs, please click here: How-To: Setup Zigbee Bindings in SmartThings
Bulbs that we’ve tested to be compatible are shown below:
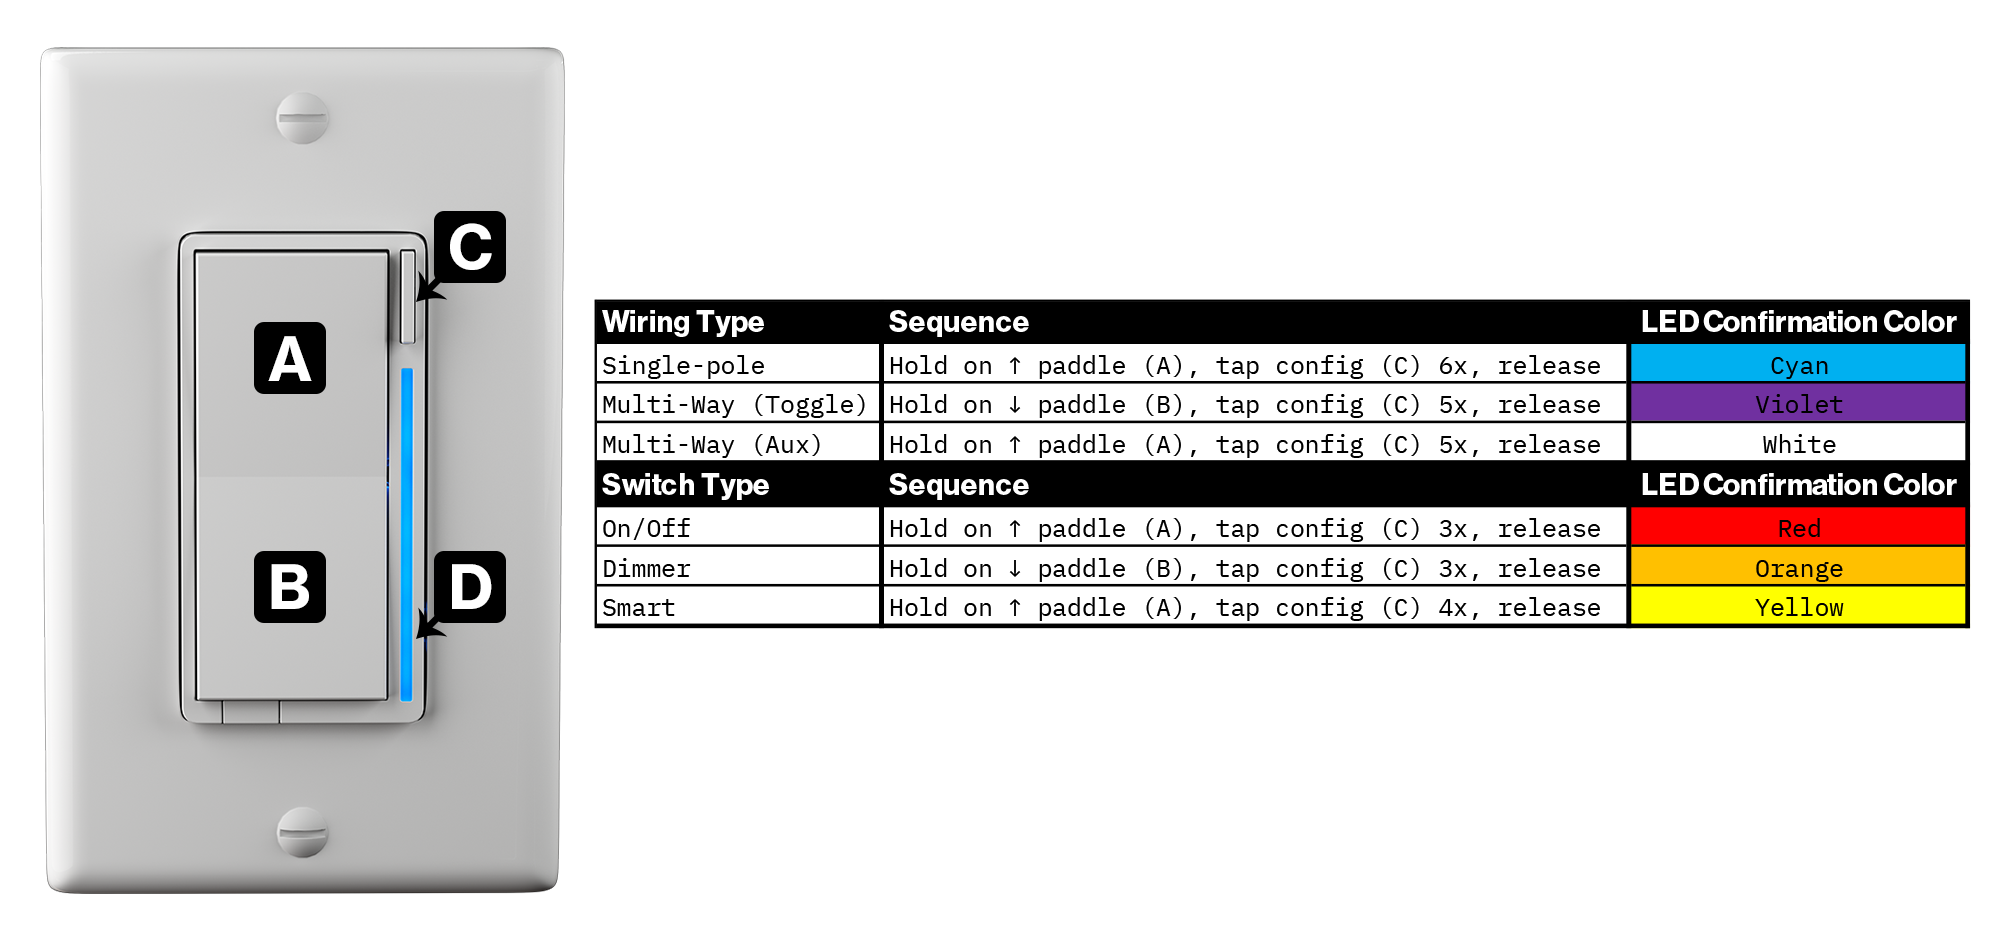
DISCLAIMER: As an Amazon Associate Inovelli, LLC earns from qualifying purchases.
Using Non-Zigbee Bulbs
To setup Smart Bulb Mode using Non-Zigbee bulbs (or Zigbee bulbs), please use the combination of putting your device in Smart Bulb Mode and utilizing scene control. In this example, we will setup a smart switch to control a smart bulb that is directly wired to it.
Zigbee Binding
For Zigbee binding instructions, please click here: How-To: Setup Zigbee Binding - SmartThings
Troubleshooting
Placeholder - Bulb Flickers, Turns off too soon, etc (bulb calibration)
Additional Resources
Community Contributions
See a Mistake?
If you see a mistake and would like to report it, please comment on the feedback thread or send a message to our support team.
Hub instructions can quickly become outdated and we rely on the community to let us know if something is wrong so we can quickly update it. Thanks so much for your support!