NOTE: I will finish this later this week (week of Nov 29th).
While we try to keep this article up to date, it’s often hard due to the many updates to our firmware. If any updates/edits need to be made to this article, please comment on this thread: https://community.inovelli.com/t/wiki-general-feedback-suggestions-thread/7399
Overview
Z-Wave Associations allow your Z-Wave products to communicate directly with one another without having to communicate with the hub. In other words, a normal communication process would be: Product A sends a signal to a hub, which in turn sends a signal to Product B, whereas with a Z-Wave Association, Product A can send a signal directly to Product B allowing for quicker communication.
In this how-to, we will discuss how to set up associations using Inovelli’s Z-Wave Association Tool. More specifically, we will give an example of associating an Inovelli switch with Inovelli smart bulbs.
Prerequisites
Before diving into how to associate your bulb(s), switch(es) and/or lightstrip(s), we need to go over the prerequisites.
There are three (3):
- All devices must be Inovelli Z-Wave devices (see notes below)
- All devices must have the appropriate device handler installed
- All devices must be on the same security level
Prerequisite Notes
Inovelli Z-Wave Devices
While all Z-Wave devices can technically be associated to one another despite the manufacturer, version, etc., there is special code installed in our device handlers which makes the association possible. This code can be used to write your own device handler for other products outside of Inovelli and if you’d like to know the code, please reach out to us, we’re happy to share it.
Device Handler Installation
Please install the proper device handler. Instructions for installation and location can be found here: https://community.inovelli.com/t/resources-device-handlers-smartthings/2722
Recommended Security Levels
Below is what we recommend for security levels between products:
- Switch to Bulb = Non-Secure to Non-Secure
- Switch to Switch = Non-Secure to Non-Secure OR S2 to S2
Details on how to check security levels in Step 2A.
Steps Prior to Association Setup
Step 1: Installing the Z-Wave Tool
The first step is to download and install the Z-Wave Association Tool developed by Inovelli.
The Z-Wave Association Tool is a SmartApp that was created to allow our customers to easily create device-to-device “associations” with Inovelli devices and other compatible Z-Wave devices. The tool requires special code to be present in the device handler so it will only work with Inovelli devices. Anyone is free to add the code to other device handlers though if they would like.
To install the Z-Wave Association Tool, please follow the steps below (NOTE: there are two parts):
Part 1 - Z-Wave Association Tool (Parent App)
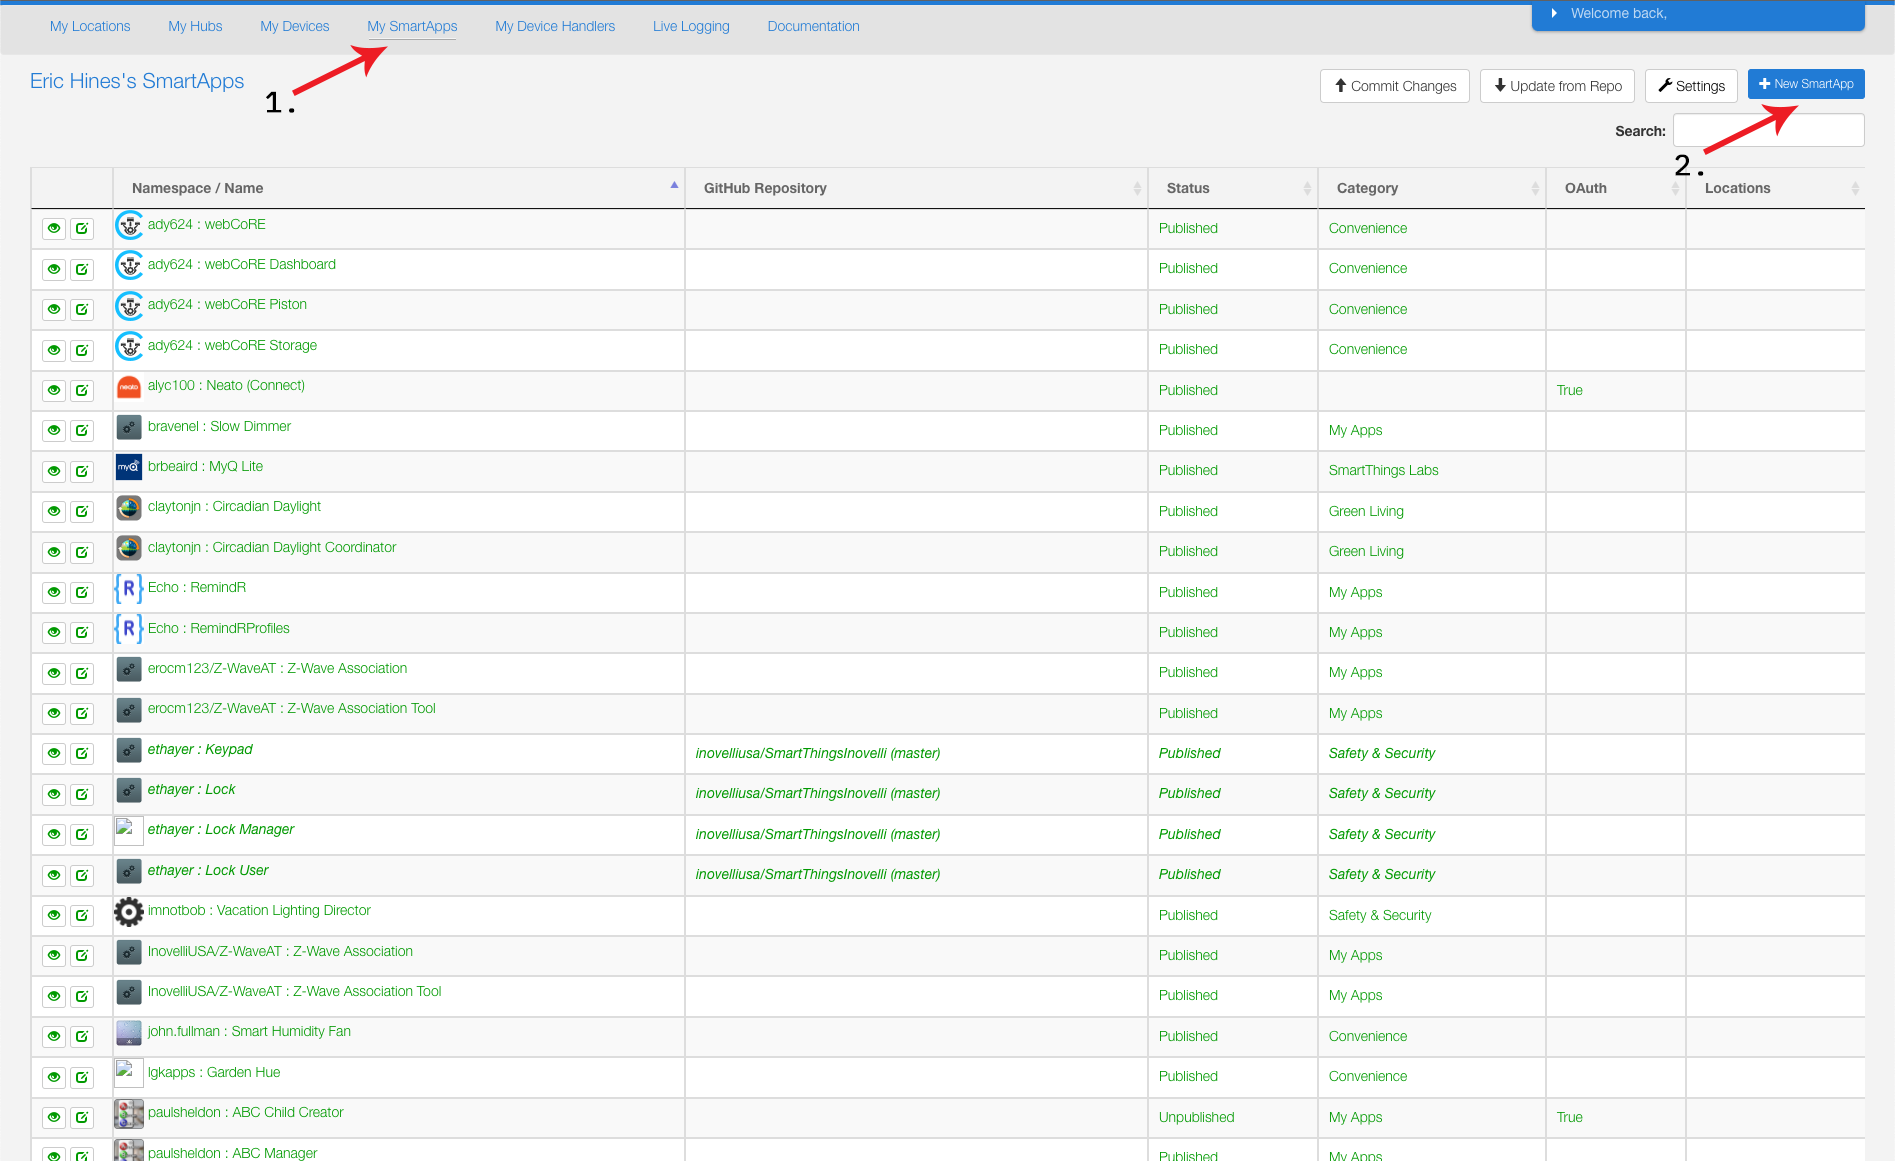
- Login to SmartThings IDE: https://account.smartthings.com/ (same login info as your app)
- Click on, “My SmartApps” and then, “+ New SmartApp”
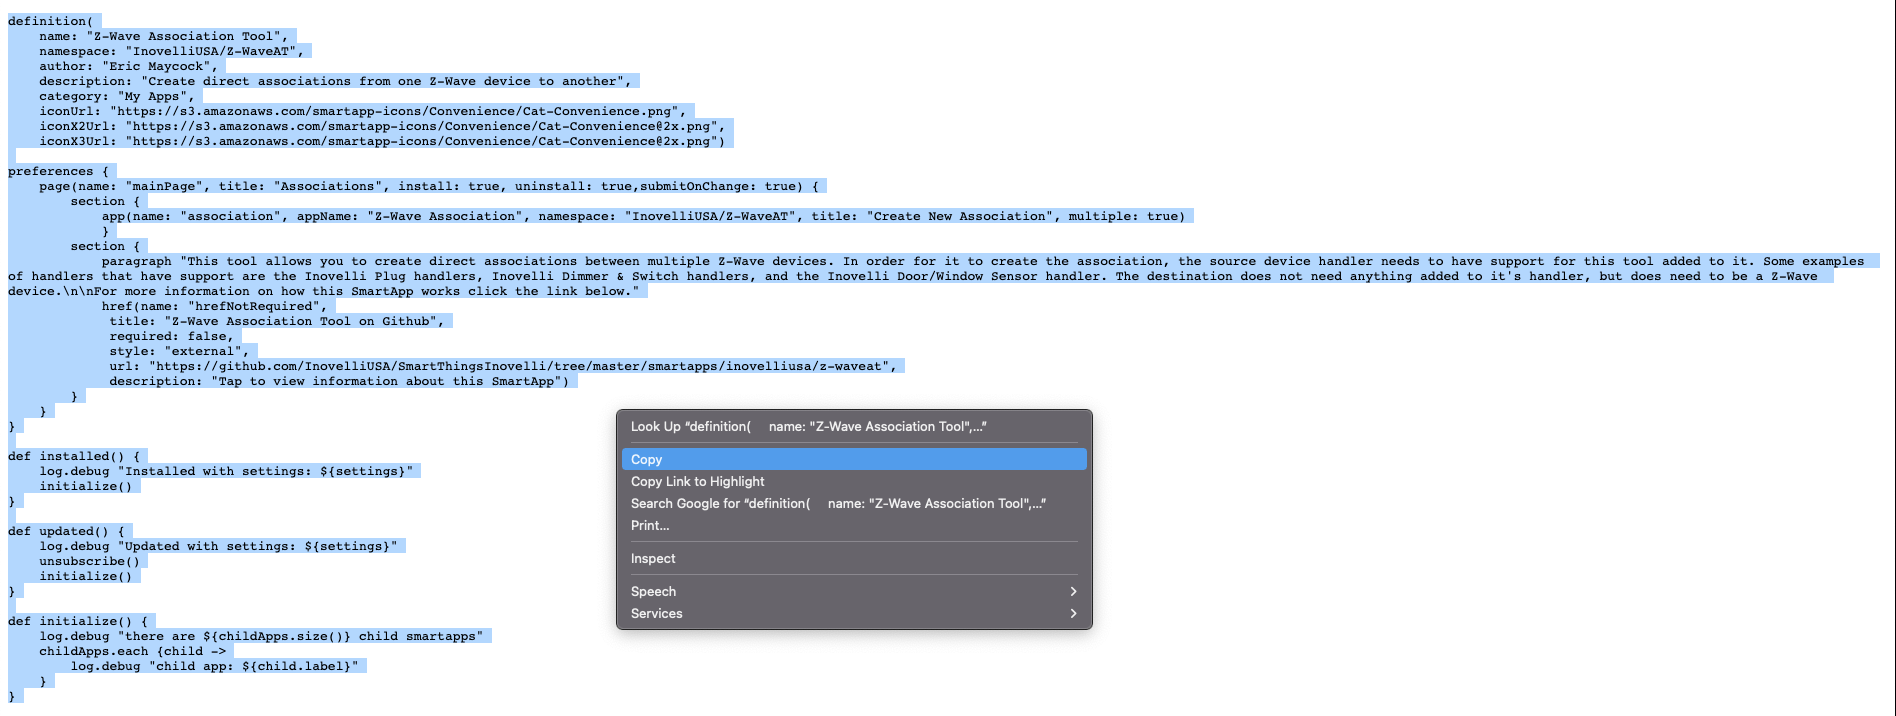
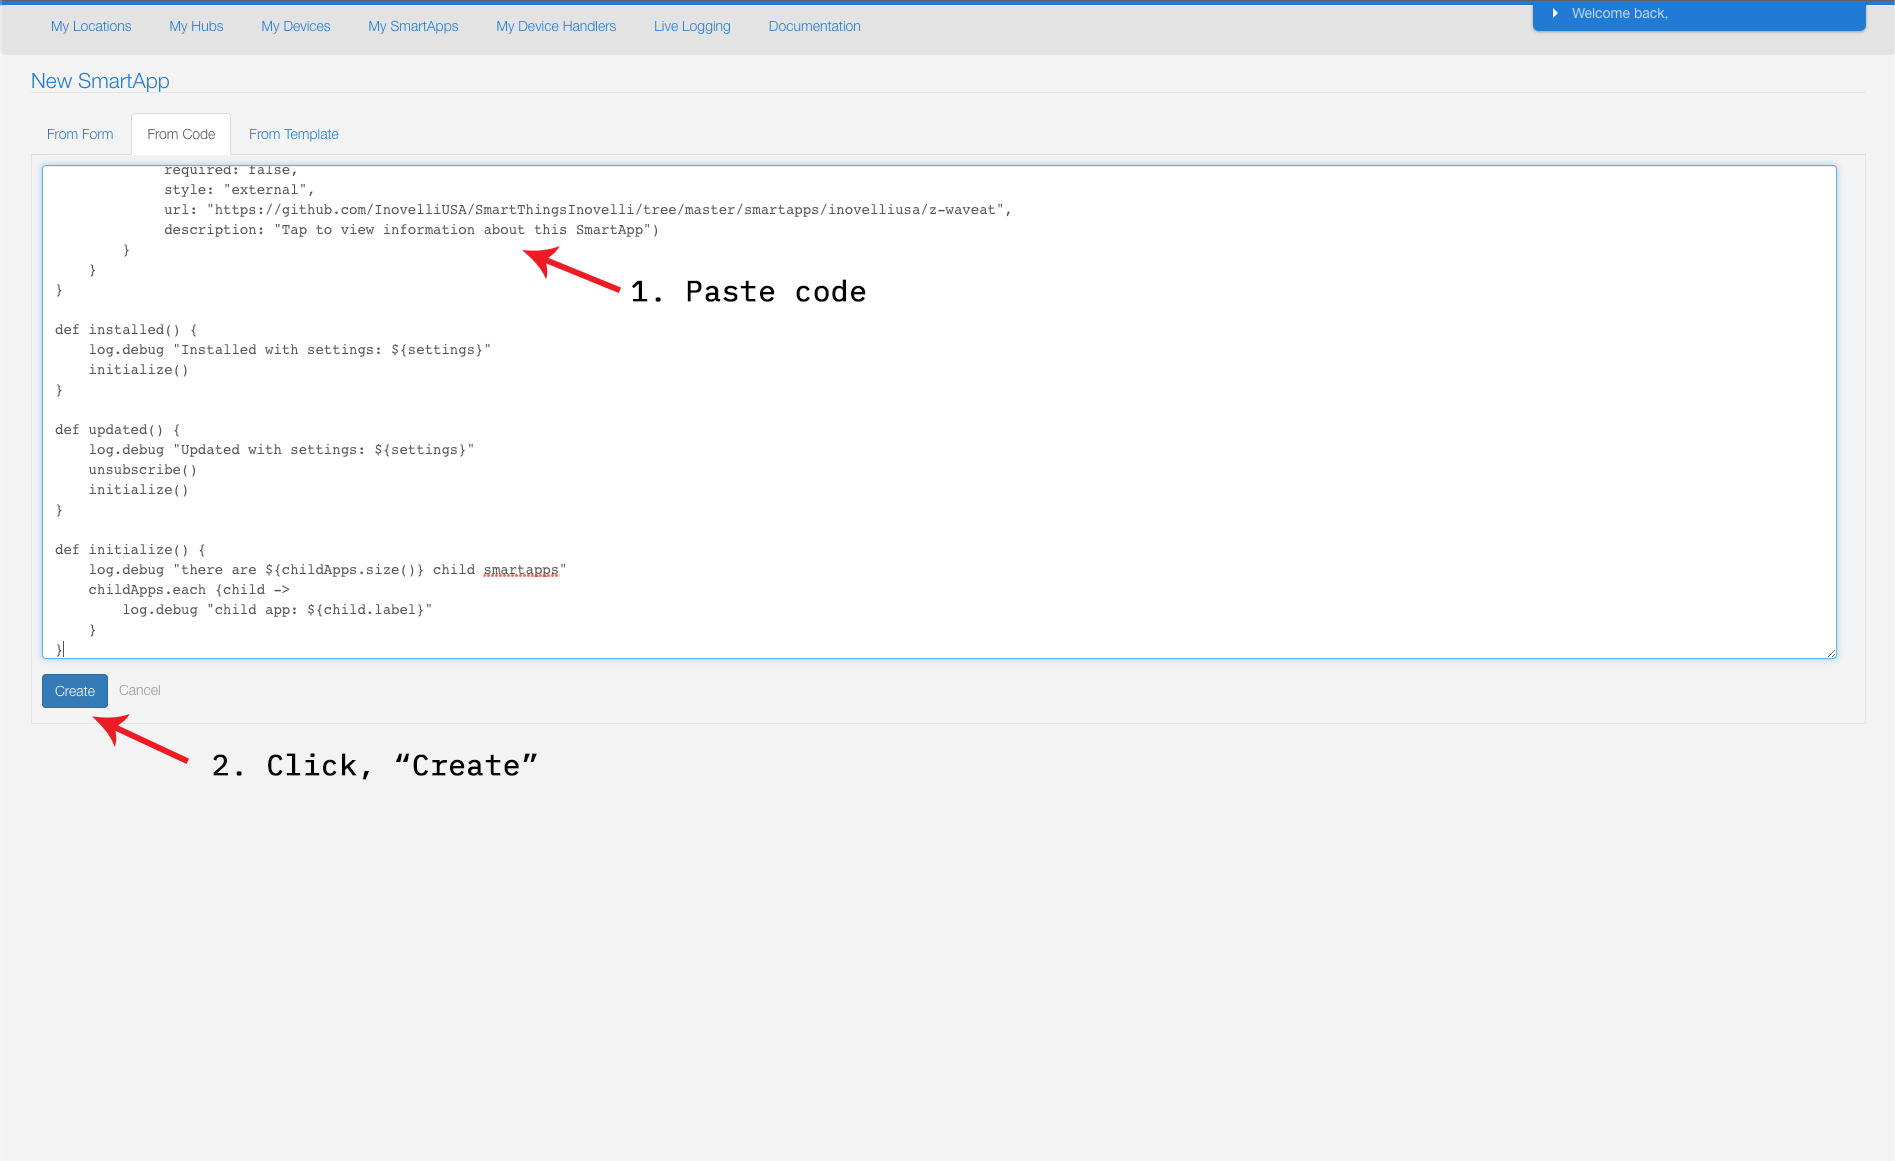
- Click on the tab that says, “From Code”, paste the code found here: Z-Wave Association Tool and click, “Create”
- Click, “Save”, then, “Publish”, and then, “For Me”


Part 2 - Z-Wave Association (Child App)
- Click on, “My SmartApps” and then, “+ New SmartApp”
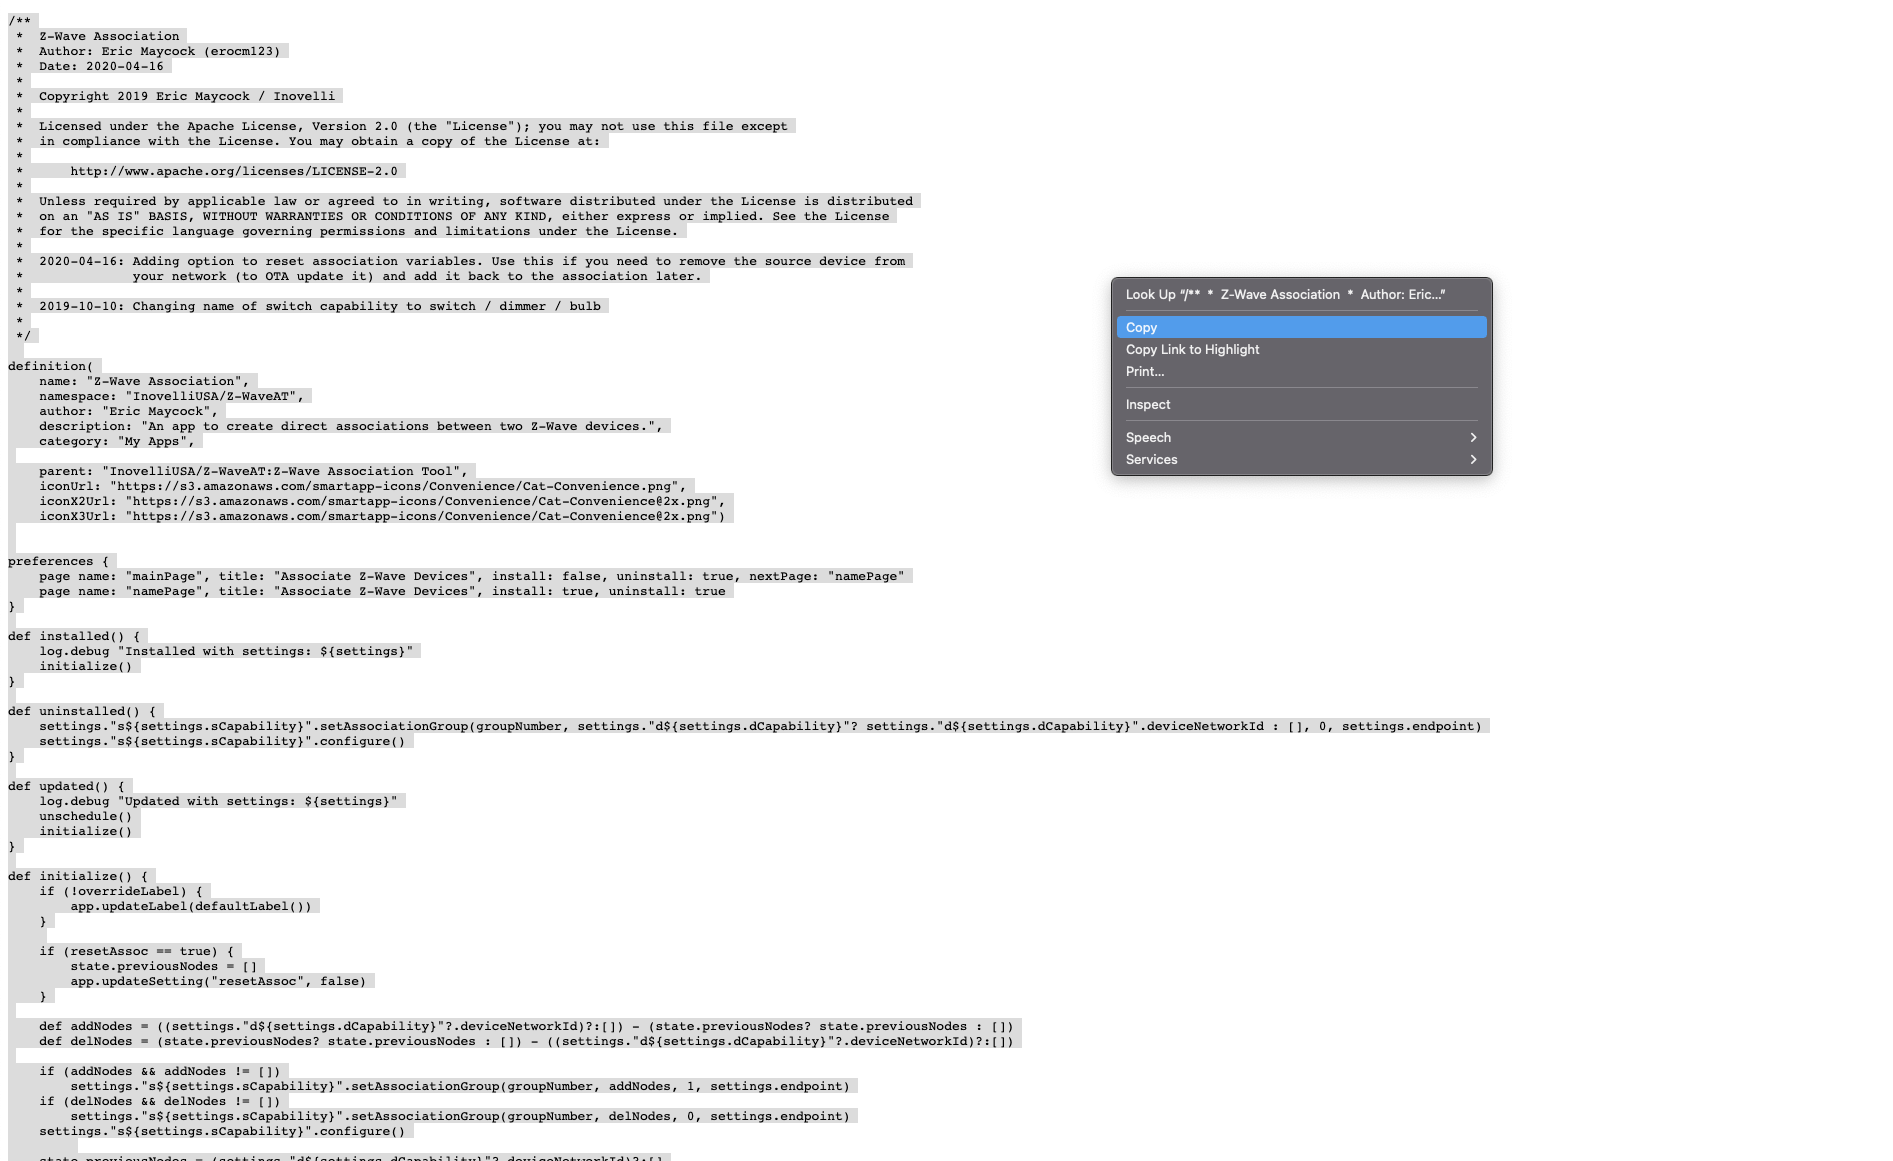
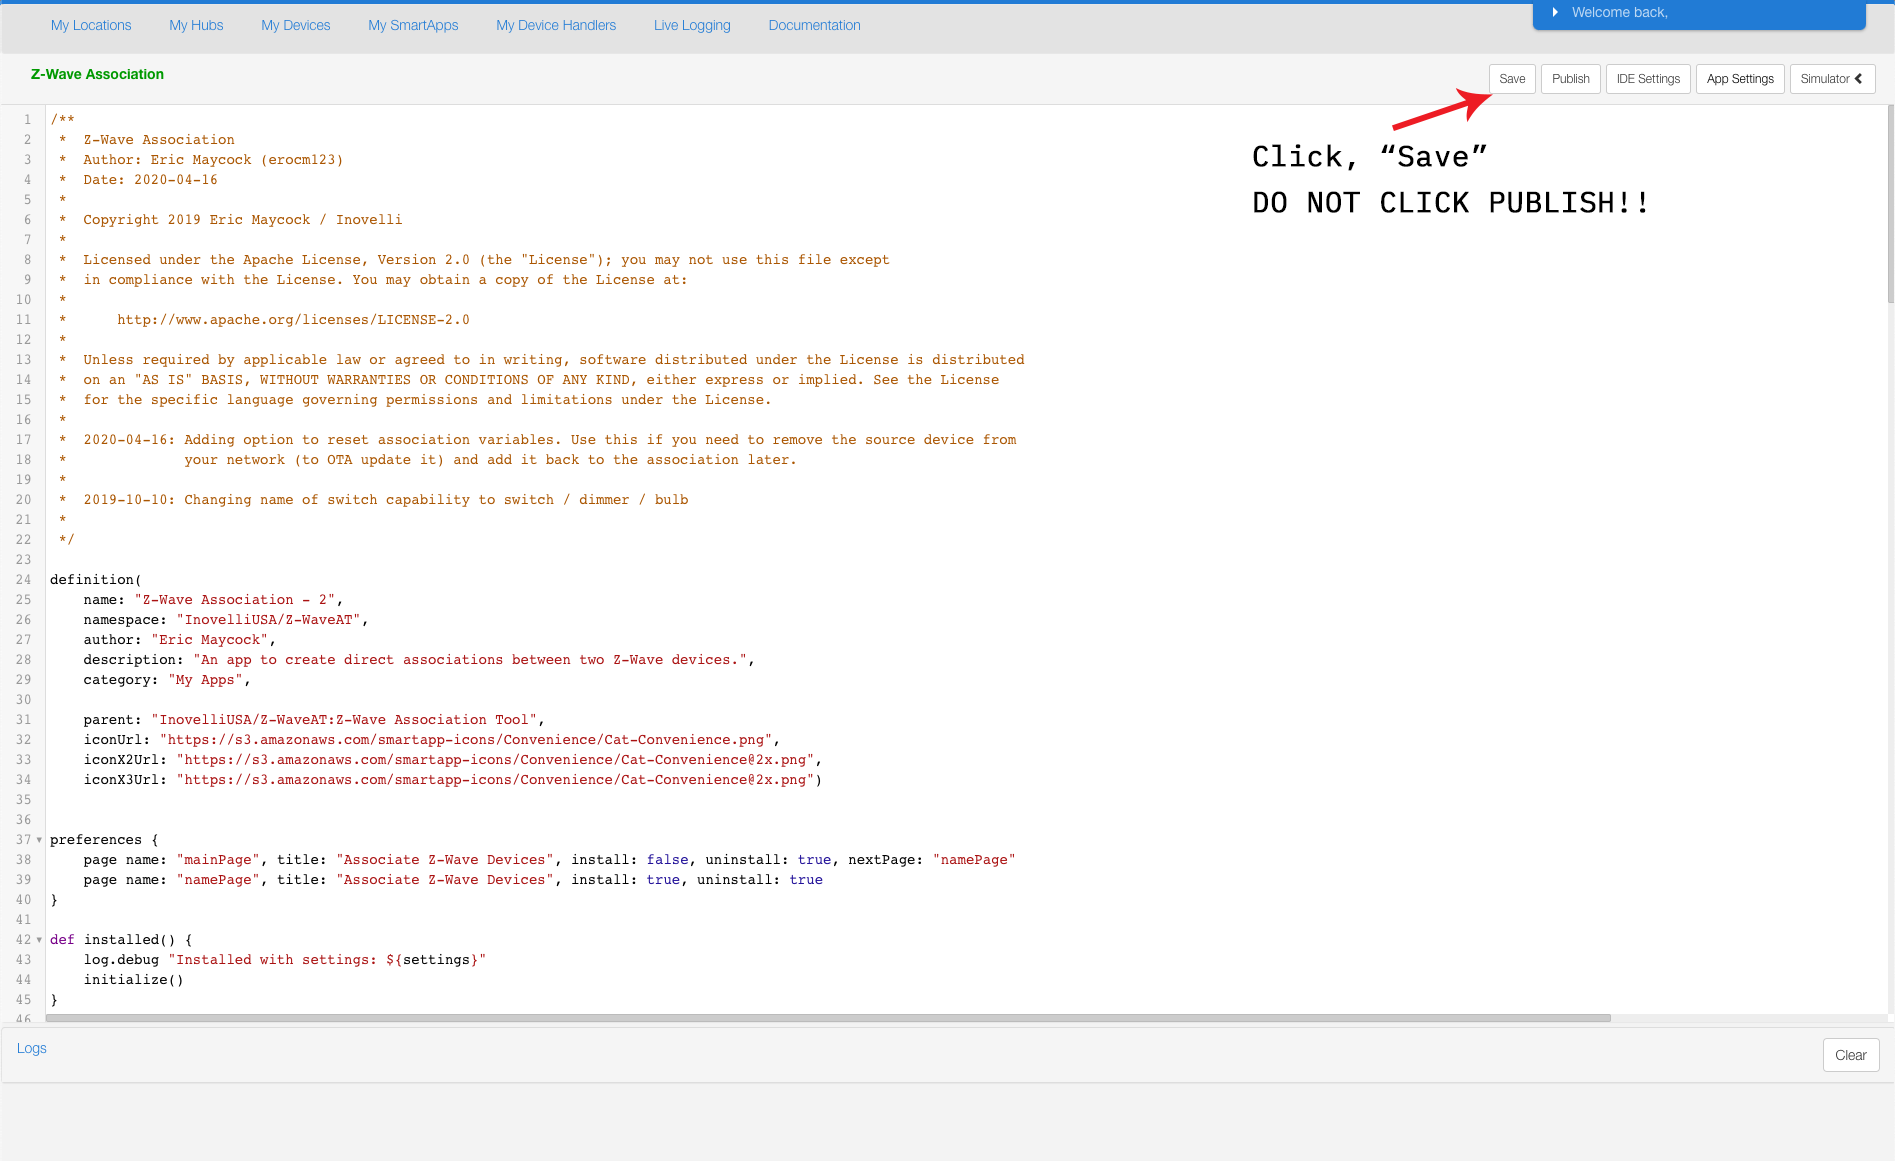
- Click on the tab that says, “From Code”, paste the code found here: Z-Wave Association and click, “Create”
- Click, “Save” – DO NOT CLICK, “PUBLISH” ON THIS ONE

Step 2A: Checking Security Levels (Devices Already Installed)
If you already have your devices installed, please use this step to ensure they are the same security level.
If you have not installed your devices yet, please see, “Step 2B: Installing Devices With Same Security”
Switch to Bulb Association
If you want to associate your smart switch to smart bulb, the only way to do this is by having both the switch(es) and bulb(s) paired with no security (ie: non-secure).
To check the security level, please follow the directions below:
- Login to SmartThings IDE: https://account.smartthings.com/ (same login info as your app)
- Click on, “My Devices” and then find your device (NOTE: sometimes there is a bug in IDE where your devices do not show up. If this is the case, click on, “My Locations” and then select your location – then select, “My Devices”)
- Click on your device and scroll to the middle where it shows the, “Raw Description” and check whether it says, “L” or “Ls” by, “zw:”:
NOTE: The above is an example of a switch paired non-securely because there’s an, “L” next to, “zw:” (if it was paired with a security level, it would say, “Ls”)
NOTE: The above is an example of a bulb paired non-securely because there’s an, “L” next to, “zw:” (if it was paired with a security level, it would say, “Ls”)
NOTE: The above is an example of a bulb paired securely because there’s an, “Ls” next to, “zw:” (if it was paired without a security level, it would say, “L”)
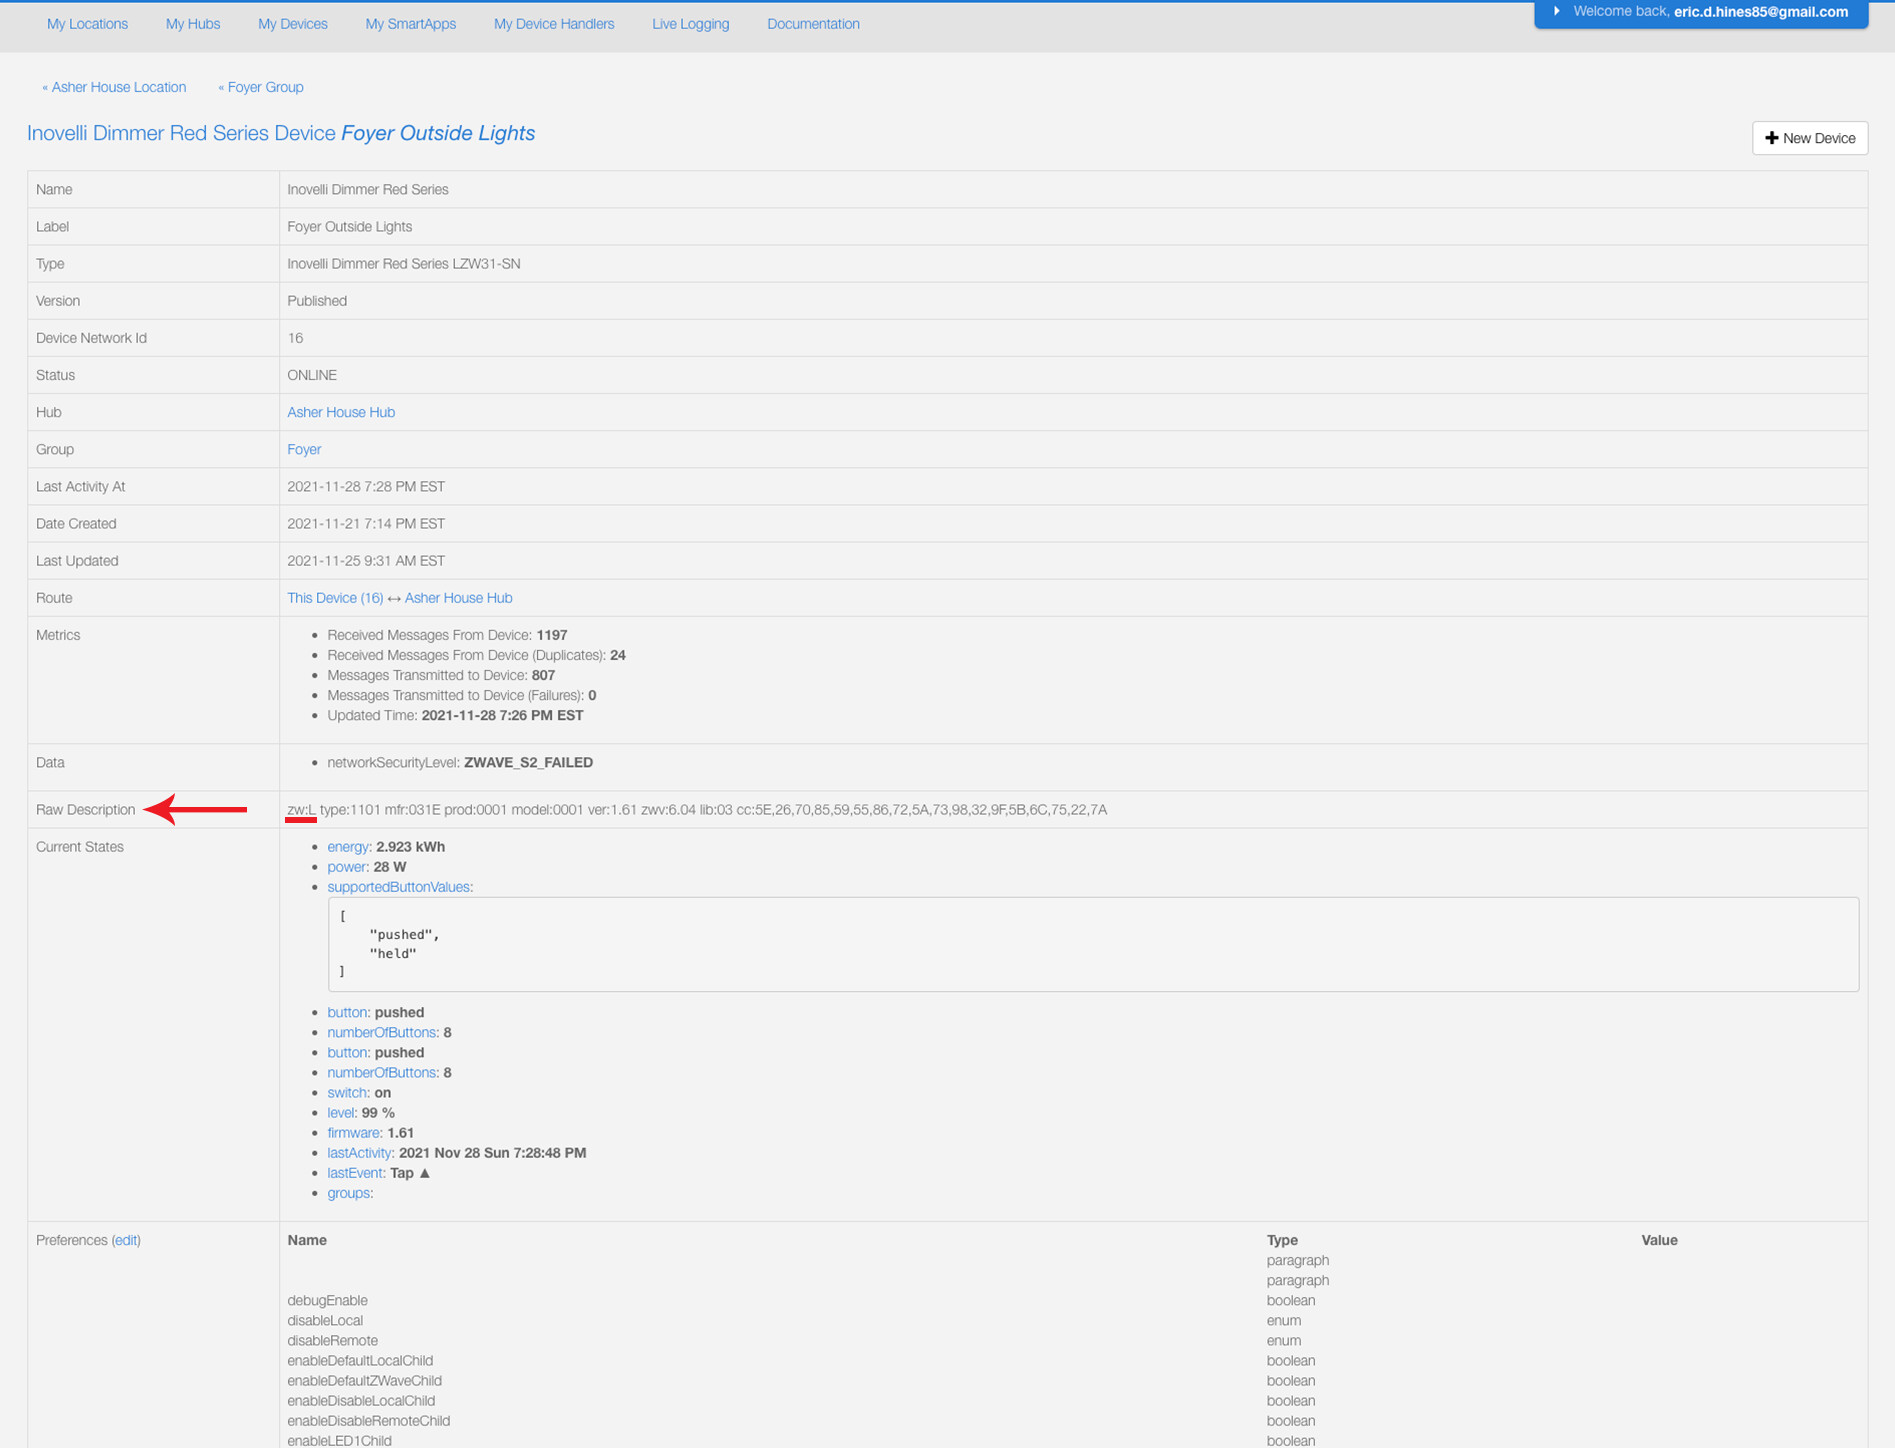
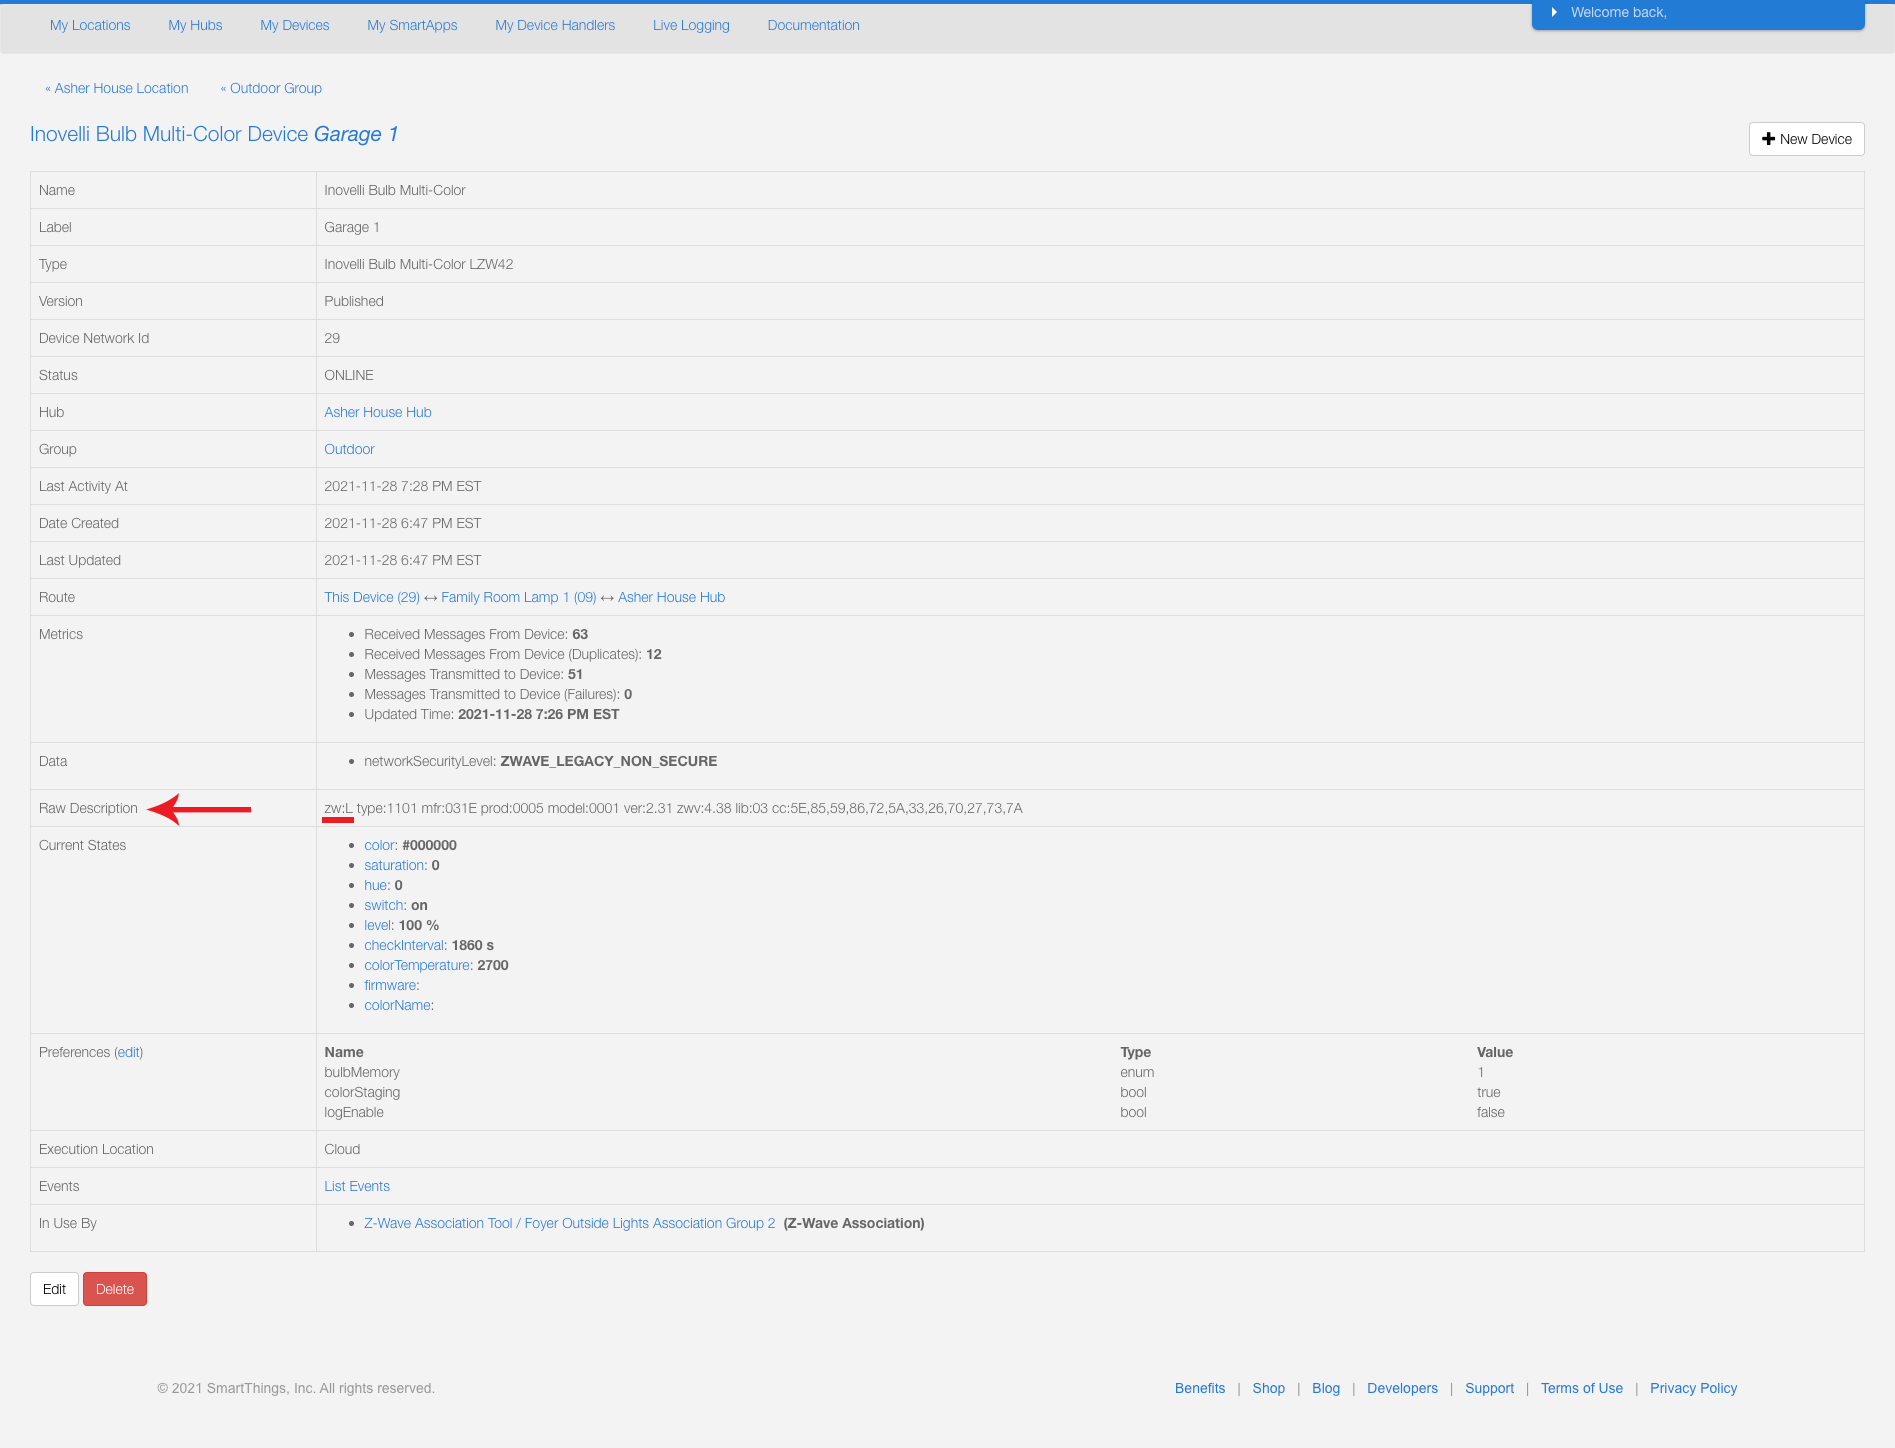

In this example, the switch (Foyer Outside Lights) matches security levels with one of the bulbs (Garage 1), but not the other (Garage 2). Therefore, the association would only work between, “Foyer Outside Lights” and “Garage 1”.
To remedy this situation, you must exclude (remove), “Garage 2” and include (pair) it back into SmartThings using the non-secure method.
Switch to Switch Association
If you want to associate your smart switch to another smart switch, there are a couple of ways you can do this. We recommend non-secure to non-secure as it cuts down on network traffic, but if you prefer to have security, you can associate using S2 to S2.
To check the security level, please follow the directions below:
- Login to SmartThings IDE: https://account.smartthings.com/ (same login info as your app)
- Click on, “My Devices” and then find your device (NOTE: sometimes there is a bug in IDE where your devices do not show up. If this is the case, click on, “My Locations” and then select your location – then select, “My Devices”)
- Click on your device and scroll to the middle where it shows the, “Raw Description” and check whether it says, “L” or “Ls” by, “zw:”:
NOTE: The above is an example of a switch paired non-securely because there’s an, “L” next to, “zw:” (if it was paired with a security level, it would say, “Ls”)
NOTE: The above is an example of a switch paired securely because there’s an, “Ls” next to, “zw:” (if it was paired without a security level, it would say, “L”)
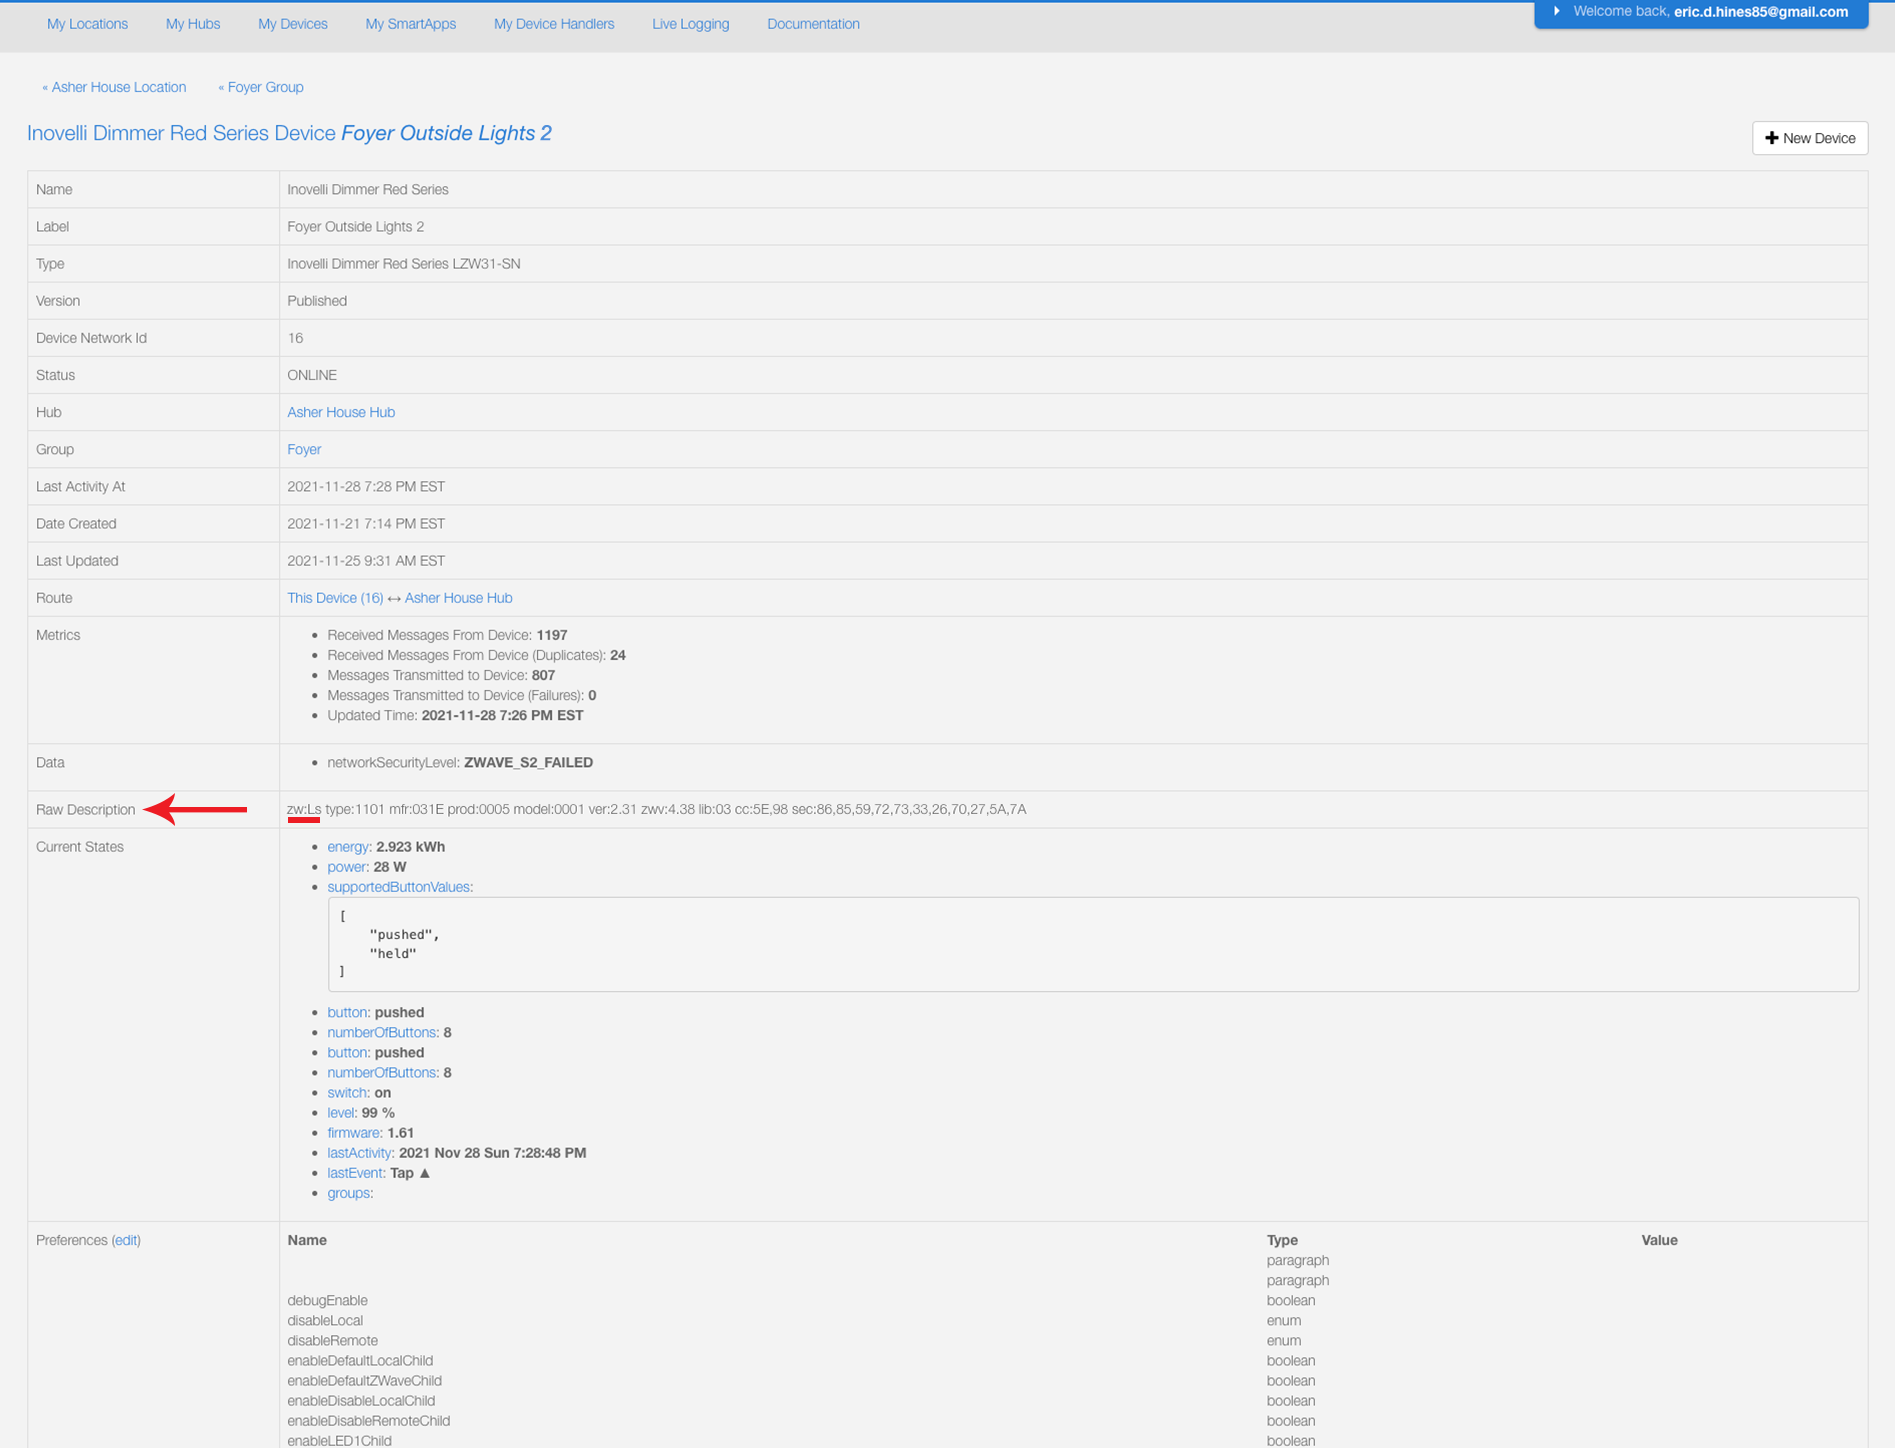
In this example, the switch (Foyer Outside Lights) does not match security levels with the other switch (Foyer Outside Lights 2). Therefore, the association would not work.
To remedy this situation, you must exclude (remove) one of them and include (pair) it in the proper security level (either non-secure or S2).
Step 2B: Installing Devices With the Same Security
If you haven’t installed your devices yet or you’ve determined that you have mismatched security levels on your already installed devices, please follow the instructions below to get each device on the same level.
Pairing Bulbs (Non-Securely)
In order to pair the bulbs non-securely, you must be on the latest firmware (v2.31), which allows the bulb to be paired non-securely.
To check what firmware you are on, please follow these directions:
- Login to SmartThings IDE: https://account.smartthings.com/ (same login info as your app)
- Click on, “My Devices” and then find your device (NOTE: sometimes there is a bug in IDE where your devices do not show up. If this is the case, click on, “My Locations” and then select your location – then select, “My Devices”)
- Click on your device and scroll to the middle where it shows the, “Raw Description” and check where it says, “ver:” – it should say, “ver: 2.31”:

If you are on a version below 2.31, unfortunately you will need to upgrade the firmware. To do this, please reach out to us for your options. SmartThings is supposed to be allowing OTA (Over-the-Air) updates soon, but at this time, it’s not available.
If you are on version 2.31, please follow the instructions located at the following URL to pair your bulb in non-secure mode: Setup Instructions | Red Series RGBW Smart Bulb - SmartThings
Setting Up Associations
After the prerequisites are completed, it’s time to set up the associations using the, “Z-Wave Association Tool”. Please see below for the appropriate association scenarios.
Dimmer Switch to Bulb Association
In this scenario, we will be associating an Inovelli Dimmer Switch to three Inovelli (or Ilumin) Smart Bulbs. NOTE: You can associate up to five (5) bulbs.
IMPORTANT: If your smart bulb is physically connected to your smart switch, you must put your smart switch in, “Smart Bulb Mode” otherwise you may cause damage to the smart bulb.
REMEMBER: Your bulb AND switch must be paired non-securely in order for this to work.
Video Instructions (Dimmer)
")
Written Instructions (Dimmer)
Prerequisites
Please remember the prerequisites, which are as follows:
- You are using Inovelli products
- The proper device handlers are installed
- The Z-Wave Association Tool SmartApps (both of them) are installed
- All devices need to be included as non-secure (ie: not S0 or S2)
Group Numbers
It’s important to understand the various group numbers when creating associations. During the association process you will be asked to select a group number.
- Group 2 = On/Off
- Group 4 = Dimming
If you would only prefer to have on/off capabilities, you will only select, “Group 2”. However, if you want dimming capabilities (switch needs to support this), you would select, “Group 2” and then create a separate association and select, “Group 4”.
Step By Step Instructions
Please follow the below instructions to setup your switch to bulb association. Remember, in this example, we will be associating one (1) Inovelli Dimmer Switch to three (3) Inovelli (or Ilumin) Smart Bulbs. In addition, we will be adding the ability to turn the bulbs on/off and dim (Group 2 and Group 4).
Group 2 - On/Off
We’ll start by adding Group 2 (which gives the switch the capability to turn the bulb on and off).
- Open up your SmartThings App and click on the, “Automations” tab
- Click on the, “+” sign at the top and select, “Add routine”
- Scroll to the bottom and select, “Z-Wave Association Tool”
- Click, “Create New Association”
- Under the, “Source Device”, click on, “Which capability”, select, “Switch / Dimmer / Bulb” and click, “Done”
- Click on, “Switch / Dimmer / Bulb”, select your switch (in this case, “Foyer Outside Lights”) and click, “Done”
- Under the, “Destination Device”, click on, “Which capability”, select, “Switch / Dimmer / Bulb” and click, “Done”
- Click on, “Switch / Dimmer / Bulb”, select your switch(es) (in this case, “Front Door”, “Garage 1”, and “Garage 2”) and click, “Done”
- Under the, “Options”, click on, “Which group number?”, select, “2” and click, “Done”
- Click, “Next” and then, “Done”
If you want dimming functionality, move on to the steps below.
Group 4 - Dimming
Group 4 adds the dimming functionality. If you just added Group 2 and are now adding Group 4, feel free to skip to #4 below.
- Open up your SmartThings App and click on the, “Automations” tab
- Click on the, “+” sign at the top and select, “Add routine”
- Scroll to the bottom and select, “Z-Wave Association Tool”
- Click, “Create New Association”
- Under the, “Source Device”, click on, “Which capability”, select, “Switch / Dimmer / Bulb” and click, “Done”
- Click on, “Switch / Dimmer / Bulb”, select your switch (in this case, “Foyer Outside Lights”) and click, “Done”
- Under the, “Destination Device”, click on, “Which capability”, select, “Switch / Dimmer / Bulb” and click, “Done”
- Click on, “Switch / Dimmer / Bulb”, select your switch(es) (in this case, “Front Door”, “Garage 1”, and “Garage 2”) and click, “Done”
- Under the, “Options”, click on, “Which group number?”, select, “4” and click, “Done”
- Click, “Next” and then, “Done”
Feel free to test the association.
NOTE: If you have associated a smart bulb to your smart switch and the bulb is on the load of the switch, you must set your switch to Smart Bulb Mode otherwise you may cause damage to your smart bulb.
_______
On/Off Switch to Bulb Association
In this scenario, we will be associating an Inovelli On/Off Switch to three Inovelli (or Ilumin) Smart Bulbs. NOTE: You can associate up to five (5) bulbs.
IMPORTANT: If your smart bulb is physically connected to your smart switch, you must put your smart switch in, “Smart Bulb Mode” otherwise you may cause damage to the smart bulb.
REMEMBER: Your bulb AND switch must be paired non-securely in order for this to work.
Video Instructions (On/Off)
")
Written Instructions (On/Off)
Prerequisites
Please remember the prerequisites, which are as follows:
- You are using Inovelli products
- The proper device handlers are installed
- The Z-Wave Association Tool SmartApps (both of them) are installed
- All devices need to be included as non-secure (ie: not S0 or S2)
Group Numbers
It’s important to understand the various group numbers when creating associations. During the association process you will be asked to select a group number.
- Group 2 = On/Off
Since we are using an on/off switch, there will be no dimming capabilities, so we can only use Group 2 (which allows for on/off communication).
Step By Step Instructions
Please follow the below instructions to setup your switch to bulb association. Remember, in this example, we will be associating one (1) Inovelli On/Off Switch to three (3) Inovelli (or Ilumin) Smart Bulbs. In addition, we will be adding the ability to turn the bulbs on/off via Group 2.
Group 2 - On/Off
We’ll start by adding Group 2 (which gives the switch the capability to turn the bulb on and off).
- Open up your SmartThings App and click on the, “Automations” tab
- Click on the, “+” sign at the top and select, “Add routine”
- Scroll to the bottom and select, “Z-Wave Association Tool”
- Click, “Create New Association”
- Under the, “Source Device”, click on, “Which capability”, select, “Switch / Dimmer / Bulb” and click, “Done”
- Click on, “Switch / Dimmer / Bulb”, select your switch (in this case, “Foyer Outside Lights”) and click, “Done”
- Under the, “Destination Device”, click on, “Which capability”, select, “Switch / Dimmer / Bulb” and click, “Done”
- Click on, “Switch / Dimmer / Bulb”, select your switch(es) (in this case, “Front Door”, “Garage 1”, and “Garage 2”) and click, “Done”
- Under the, “Options”, click on, “Which group number?”, select, “2” and click, “Done”
- Click, “Next” and then, “Done”
Feel free to test the association.
NOTE: If you have associated a smart bulb to your smart switch and the bulb is on the load of the switch, you must set your switch to Smart Bulb Mode otherwise you may cause damage to your smart bulb.