Pre-Orders Are Open Now: Blue Series Smart Fan/Light Canopy Module | Inovelli
I want to dedicate this project to my mom (Cheryl), who was an amazing mother to me and my brother and sister, grandmother to my four girls, role model, and someone who always was there to encourage me and brag about Inovelli to my aunts and uncles! Most importantly, she taught me to work hard, never quit if you believe in something, and always keep a positive attitude as it will inevitably rub off on others. I will miss you and hope that your spirit can live on through this product!

Yeah that’s me circa 2001 - Eagle Scout celebration!
Project Team
Feel free to tag any of us with questions. I’ll (Eric H) be the go-to’s for overall project management, timeline and anything other than firmware related questions, whereas Eric M is the go-to for any firmware related questions. Either way, we’re all here to help!
- Project Manager (Inovelli): @Eric_Inovelli
- Project Manager (Manufacturer): Rachel
- Innovation Lead: @Eric_Inovelli
- Technical Lead: @EricM_Inovelli
Introduction
As per our tradition of working with you amazing people, here’s what this thread allows us to do as a community.
- Allows us to keep everyone updated on the project status (either good or bad)
- Allows you to participate and help us develop amazing products together
- Enjoy each other’s company and have fun talking home automation
How this initial post will be laid out is in five sections:
- Project Overview
- Initial Hardware & Software Requirements (edited to remain up-to-date)
- Timeline (edited to remain up-to-date)
- Pinned Ideas & Shout-outs (edited to remain up-to-date)
- Weekly Recap
Housekeeping
- DATES & FUNCTIONS ARE NOT SET IN STONE: Just a reminder that all dates and functions are sometimes fluid. We have to make choices based on feasibility, opportunity costs, and overall timeline. I will be as transparent as possible on these decisions, but just a heads up, they may not always be exciting.
- NO IDEA IS A BAD IDEA: Ok, some are, but honestly throw out anything that you can think of. If we use your idea, we’ll credit you and send you a free device, so take that shot!
- VERSION 1 VS VERSION 2: Some ideas may be fantastic, but may not make the cut for the first version of the product. Once the product is locked in from a function standpoint, we’ll keep a tally of V2 ideas and then once the product is produced, we’ll move the ideas over to a suggestions/wishlist section.
Ok, let’s get this party started!
Project Overview
The purpose of this project is to bring back our second most popular switch which was the fan/light switch. To this day, it’s our #2 most searched for product on our site.
We will give it the ability to pair directly to an existing 2-1 switch or an upcoming button switch, giving you separate control over your fan and lights.
Project Name - Cheryl
I chose the name Cheryl to dedicate this to my mom, who passed away in 2019 of cancer. She was an incredible person who instilled in me a solid work ethic and a stubbornness to never give up (I wish she gave me her grammar skills, but unfortunately she didn’t – I got my dad’s math and science brain).
I wanted to name this project Cheryl because the goal is to have this pair directly to our button controller, which is named project Walt (my dad).
Cheryl - Hardware Requirements
The hardware for the canopy module can be found below.
Hardware
NOTE: Subject to change as R&D has not kicked off.
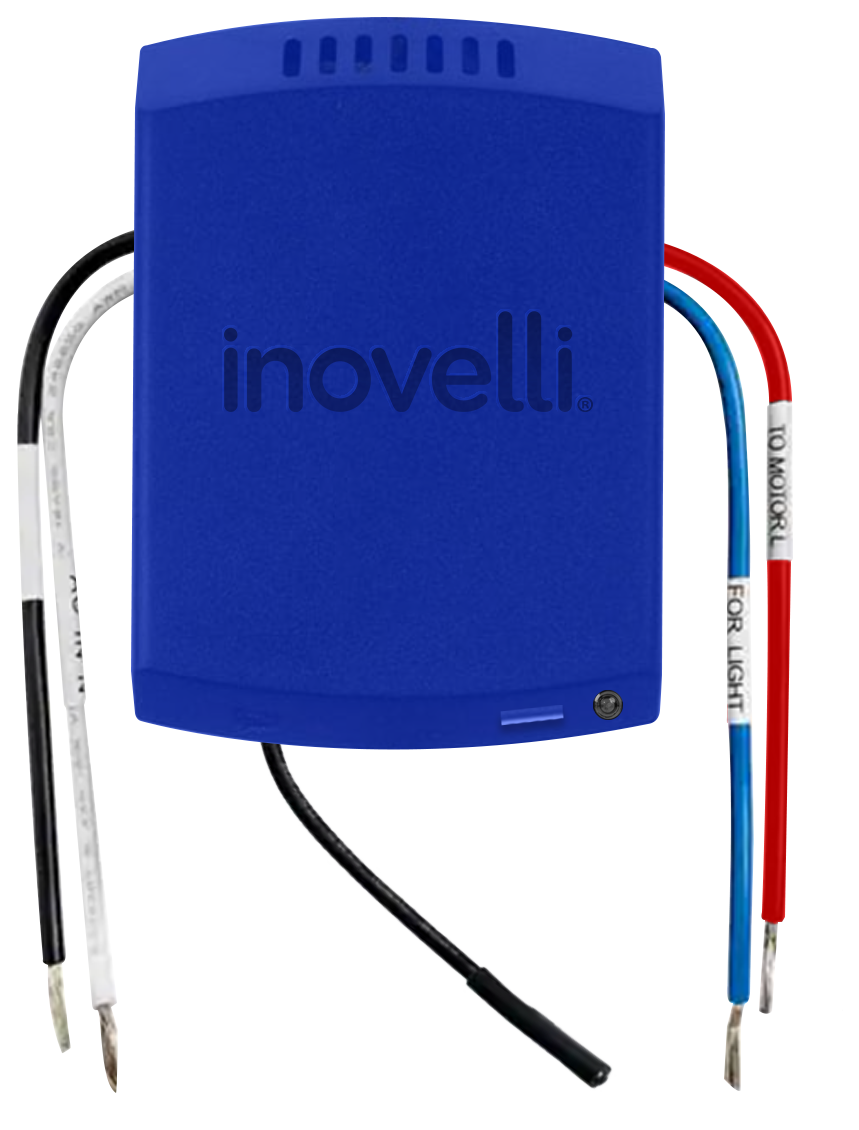
Hardware - Controller (Look / Feel)
- Heat Dissipating Cutouts: There should be multiple cutouts allowing for heat dissipation
- 5 Wires: In order to control both the fan and light, the module will need five wires that are labeled
- Hot/Line x1 (Black): Connect to 120V to power the module
- White x2 (Neutral): Connect to neutral wires
- Blue x1 (Light): Connect to the Light on the fan
- Red x 1 (Fan Motor) Connect to the Fan motor
- Slim Design: Should be smaller than our last version as there were space constraints within some canopies (target = Width = 2.1”, Height = 3.0”, Depth = 1.0”)
- Zigbee Antenna: This antenna needs to be strong enough (and long enough) to reach the switch through metal fan canopies
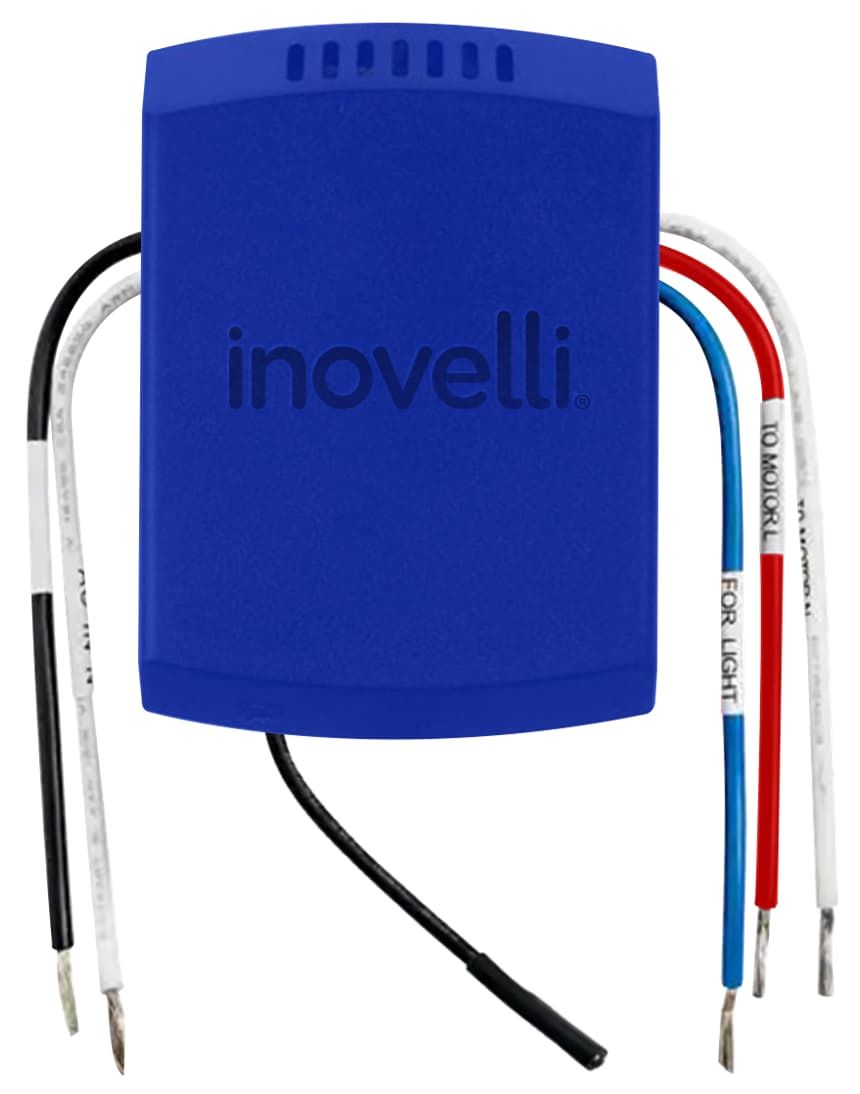
Hardware - Features & Capabilities
The look and feel will be different than previous canopy module in that it will be smaller, but the concept will be the same for installation.
- Heat dissipating cutouts: There should be multiple cutouts allowing for heat dissipations
- 5 Wire’s: In order to control both the fan and light, the module will need five wires that are labeled
- Hot/Line x1 (Black): Connect to 120V to power the module
- White x2 (Neutral): Connect to neutral wires
- Blue x1 (Light): Connect to the Light on the fan
- Red x 1 (Fan Motor): Connect to the Fan motor
- Slim Design: See appendix (Section A) – should be smaller than our last version as there were space constraints within some canopies (target = Width = 2.1”, Height = 3.0”, Depth = 1.0”)
- Zigbee Antenna: This antenna needs to be strong enough (and long enough) to reach the switch through metal fan canopies
These features allow us to be versatile in any installation setting and experience level and should take the intimidation away from installing a canopy module.
- Power Monitoring: switch should measure the power consumption
- Leading/Trailing Edge Dimming: the controller should be able to switch between leading and trailing edge for better compatibility with bulbs
Cheryl - Software Requirements
- Zigbee Binding (Multi-Channel & Endpoints): There should be a separate endpoint for each channel (Fan and Light) so that the button switch can be bound to each channel
- OTA Ready: Ability to update firmware via OTA
- Smart Bulb & Fan Mode: Ability to control smart bulbs and fans by locking power to the bulb/fan(s)
Timeline
Ah, everyone’s favorite part. When is this flippin thing going to be released? Great question – here’s the high-level of what happens leading up to the first release of the timeline:
- We present a PRD (Project Request Document) that has all of the above info in it (see above section for the pdf)
- R&D (manufacturer) analyzes the PRD and we go back and forth until we can align on 90% of the product
- Initial Timeline is released and remaining 10% of product features are added/cut along the way
Again, just want to throw this out there – I don’t have a crystal ball so I can’t predict things that come up along the way. Trust me when I say we’re trying our best to get things launched on time.
Pre-Initial Timeline Milestones:
- Present PRD: Completed
- R&D Analyzation: In-Progress
- Initial Timeline Released: Completed
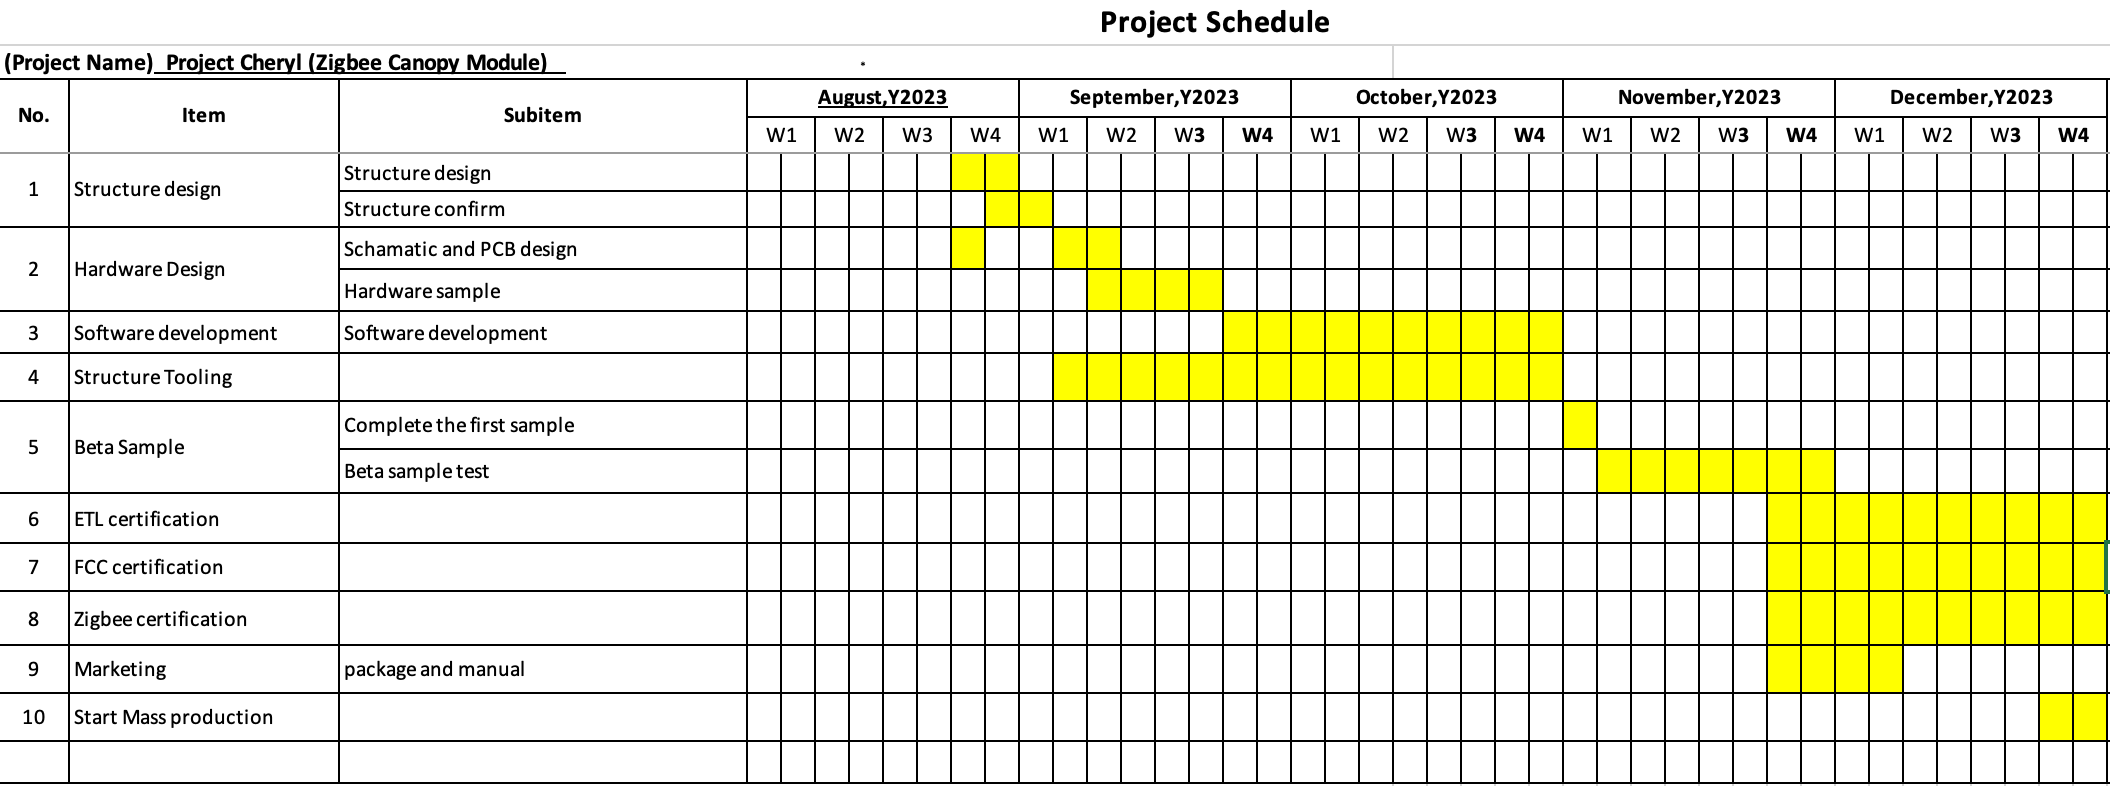
Timeline (Estimated)
The initial timeline will be shown below once released and will be updated monthly.
- Structure Design & Confirmation
- Estimated Completion: Sept 9, 2023
- Status: COMPLETED
- Schematic & PCB Design
- Estimated Completion: Sept 16, 2023
- Status: COMPLETED
- Hardware Sample
- Estimated Completion: Sept 23, 2023
- Status: COMPLETED
- Software Development
- Estimated Completion - Oct 28, 2023
- Status: COMPLETED
- Beta Sample Creation
- Estimated Completion - Nov 4, 2023
- Status: COMPLETED
- Beta Testing
- Estimated Completion - Dec 25, 2023
- Status: IN PROGRESS
- ETL Certification
- Estimated Completion - Jan 30, 2024
- Status: COMPLETED
- FCC Certification
- Estimated Completion - Jan 30, 2024
- Status: COMPLETED
- Zigbee Certification
- Estimated Completion - Jan 30, 2024
- Status: COMPLETED
- Marketing Materials (Box, Insert, Manual)
- Estimated Completion: Jan 9, 2024
- Status: COMPLETED
- Mass Production
- Estimated Completion: Feb 12, 2024
- Status: NOT STARTED
Pinned Ideas & Shout-Outs
Here are the ideas from the community. We sincerely appreciate them, we love them, and we couldn’t create the products we do without them. So, thank you for your input and let’s continue to innovate together and change the home automation category for the better (NOTE: if an idea is crossed out, it’s not because it wasn’t valid, nor was it something we didn’t consider – we’ve discussed it internally or with the manufacturer and unfortunately it was not feasible).
Hardware
Software
Monthly Recap
Every month I’ll provide a recap as well as edit the sections above so we can all keep track. If you have any specific questions you’d like me to ask, feel free to tag me and let me know so I can ask the manufacturer as well.
August 17th, 2023: We’ve officially kicked off this project with the manufacturer and will provide an official timeline once they give it to us.
August 18th, 2023: Official timeline has been released w/a target of mid-February 2024 for Mass Production to finish.
August 29th, 2023: Project update posted here: Zigbee Fan Canopy Module | Project Cheryl - #86 by Eric_Inovelli
November 30, 2023: I forgot to keep updating up here in the project description and only updated in the threads, so my fault. Quick update is that we’ve received the beta units last week and everyone has them in hand. I’ve tested two of them in my daughter’s rooms and they work amazing. Look/feel is solid and the firmware seems to be well ahead of what we projected. We’re looking to wrap up beta testing in December. Here’s a quick video of my testing:
January 6, 2024: Well, look at this… there’s a first in Inovelli history. We are a month ahead of schedule and have production scheduled for January 18th. Beta testing is wrapping up and all certifications are completed.
February 2, 2024 - Modules enroute for a March 2024 delivery: Zigbee Fan Canopy Module | Project Cheryl - #289 by Eric_Inovelli
March 8, 2024: They’re here: Zigbee Fan Canopy Module | Project Cheryl - #327 by Eric_Inovelli