DISCLAIMER
While we (and our community) try to keep these instructions up to date, it’s often hard due to the many updates to our firmware, Hubitat app & platform changes, as well as many other factors outside of our control. If any updates/edits need to be made to these instructions, please comment on this thread so we can keep it up-to-date:Wiki - General Feedback/Suggestions Thread
COMMUNITY DRIVEN
Our entire Knowledge Base (which includes manuals) is community driven. This means that we at Inovelli work together with our amazing community to keep articles up-to-date. We’d love it if you’d contribute in any way you can, be it making edits, submitting how-to’s so others can learn, participating in our innovation projects, or simply commenting on threads. Thank you so much for your support and dedication to really making an impact in the smart home market.Community Knowledge Base
NOTE: All of the pictures can be clicked on to be made larger. Also, if you’re on mobile, you can either click on the pictures or turn your phone side-ways and the pictures will become larger.
NOTE: THIS IS A WORK-IN-PROGRESS
Zigbee Binding Overview
Zigbee binding is when two or more Zigbee products communicate directly with one another without the need to communicate with a hub. There are two main benefits of utilizing Zigbee binding: speed & local control.
From a speed standpoint, cutting out the middle-man (hub) can save precious milliseconds or even seconds depending on your cloud and/or processing power off your hub. Whereas from a local control standpoint, if your hub goes does down and cannot communicate, your products can still talk to each other.
Below is a quick video that shows the speed of Zigbee Bindings:

NOTE: The above video is using Home Assistant via ZHA (however, the speed is identical using Hubitat).
For an official explanation, please see this link: Zigbee Bindings
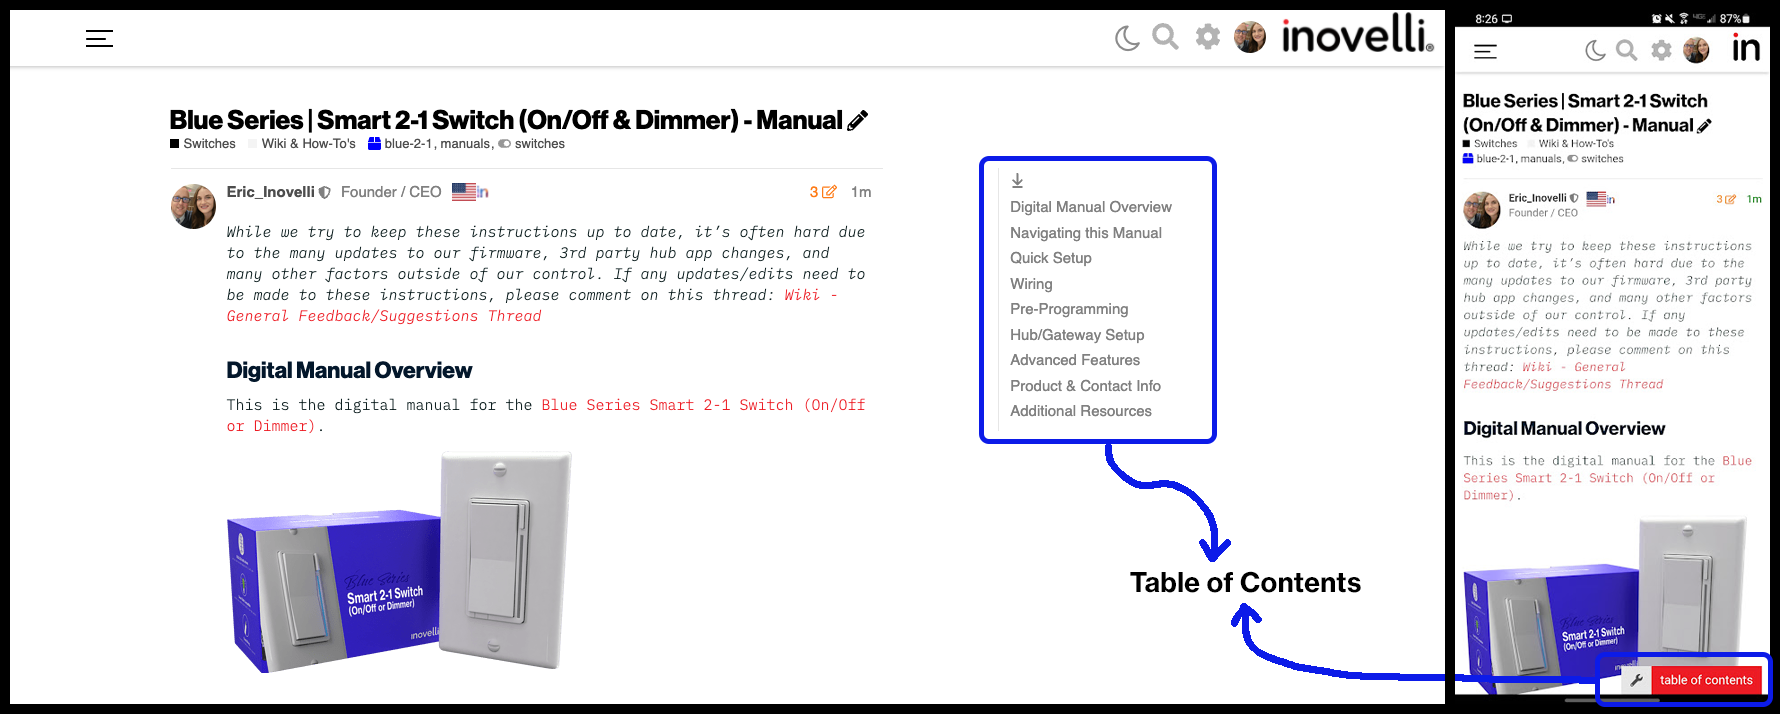
Navigating these Instructions
For desktop users, the, “Table of Contents” is located to the right of the screen, whereas for mobile users, it can be found at the bottom of the screen.
NOTE: If you do not see the table of contents, click here: How To's | Setup Zigbee Binding - Hubitat
Please click on any of the sections to get started. We recommend working your way down as it follows an intentional flow that is user friendly and hub/gateway specific.
Prerequisites
There are three prerequisites to setting up Zigbee bindings with your Inovelli Switch in Hubitat and they are:
- Ensure what you’re binding to your switch is Zigbee and supports Zigbee binding
- Install the Inovelli Device Driver (Instructions | Raw Code)
- Install the Zigbee Bindings App (Instructions | Raw Code)
NOTE: If you are binding a Blue Series Switch to a Philips Hue bulb, you will need the Hue bulb to be paired directly to the Hubitat hub (ie: it cannot be paired to the Philips Hue bridge). Zigbee bindings only work if each Zigbee device is on the same hub.
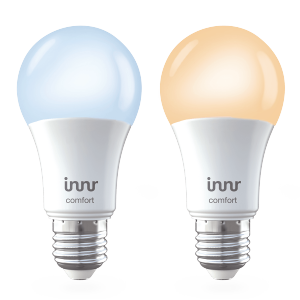
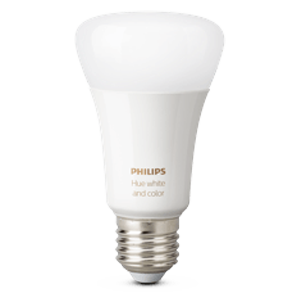
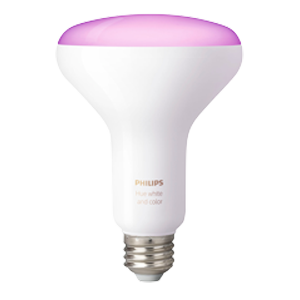
Compatible Products
We’ve tested Zigbee binding with the following Zigbee products on our switches:
DISCLAIMER: As an Amazon Associate Inovelli, LLC earns from qualifying purchases.
Installing the Driver and App
Before we get into setting up the bindings, we need to install the Inovelli Device Driver and the Zigbee Bindings App. If you’ve already done this, you can proceed to the, “Setup Instructions” section below.
Device Driver Installation
In an effort to keep directions consolidated into one area, please see the, “Hubitat Device Driver Installation” page for instructions. Make sure to select the driver called, “Blue Series - 2-1 Switch - VZM31-SN”
Zigbee Bindings App Installation
The Zigbee bindings app is required to bind your Zigbee devices together. Special shoutout to @adamkempenich for his hard work in bringing this app to life and allowing us and our community to use it. Please follow the instructions below to install the app.
Written Instructions
- Login to your Hubitat Portal and click on, “Apps Code”
- Click on, “New App”
- Right click and copy this URL: https://gist.githubusercontent.com/adamkempenich/1c102cc360c76fe783a88a899cdb54e6/raw/17b1764775f87e8240940680d835496feb33bb66/ZigbeeBindings.groovy
- Click on, “Import”, paste the URL into the pop-up and click, “Import” again (click, “OK” on any pop-ups)
- Click, “Save”
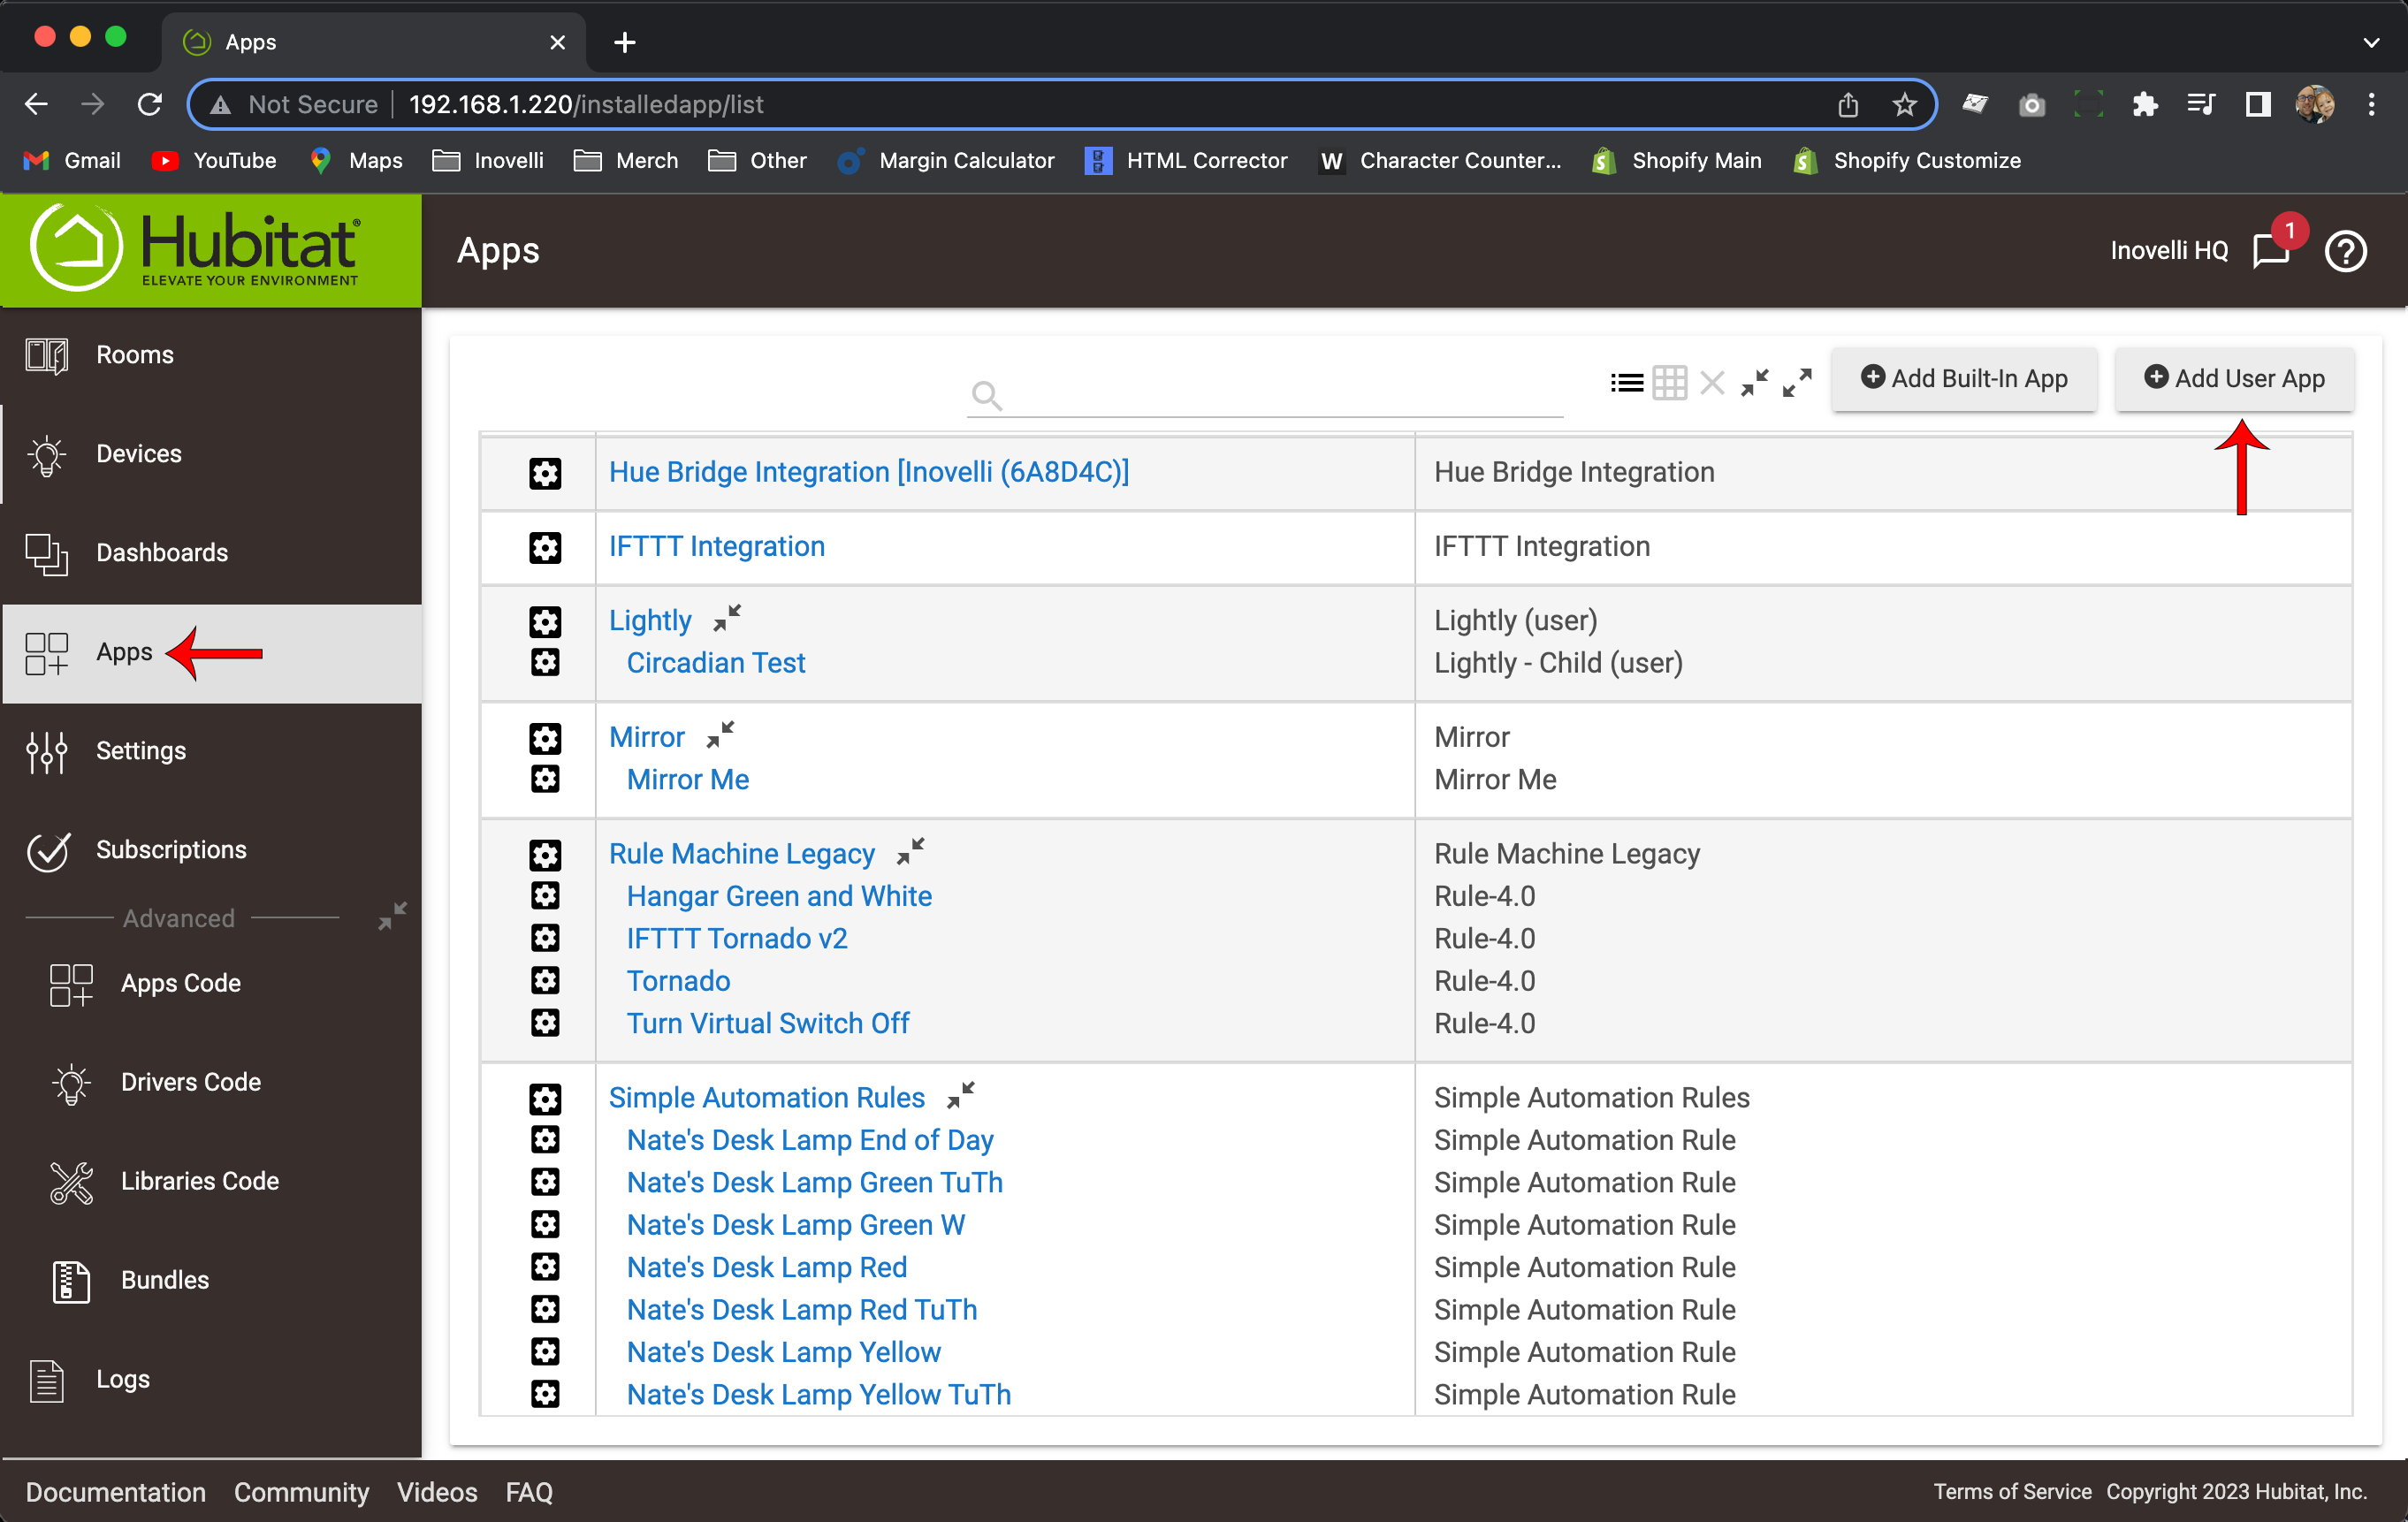
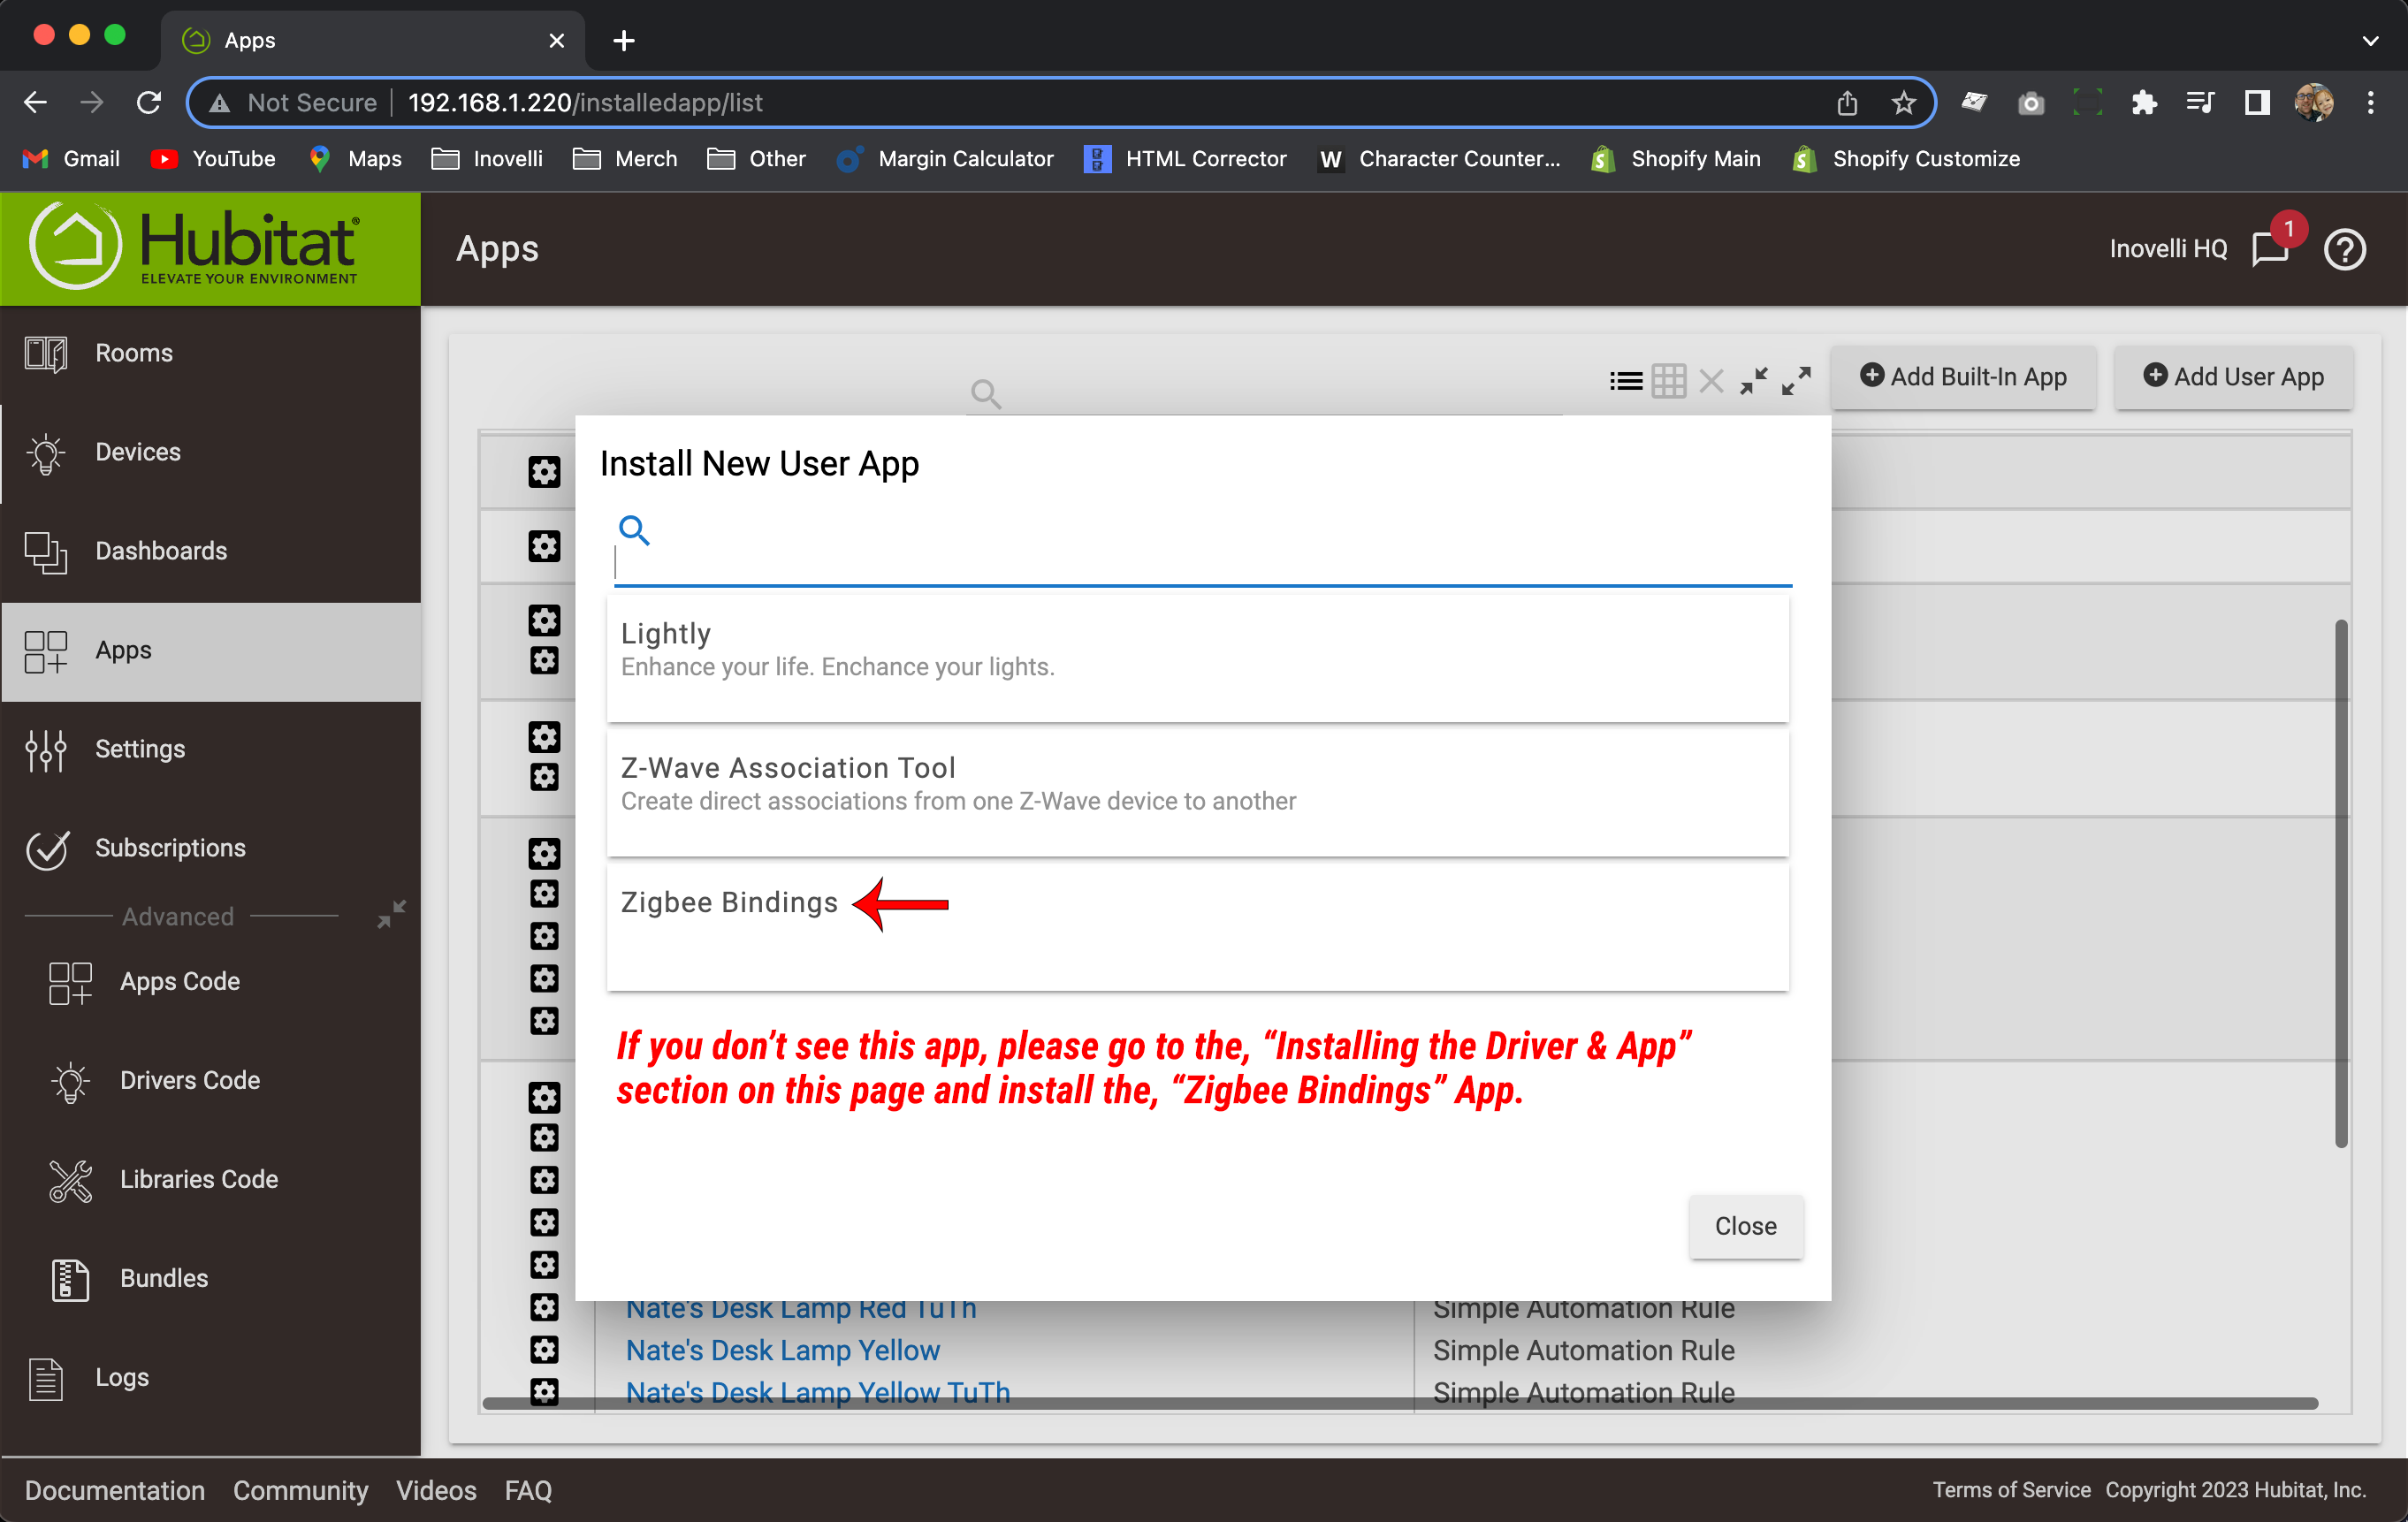
To ensure it was installed correctly, click on the menu and select, “Apps”. Then click on, “Add User App” and you should see, “Zigbee Bindings”.
Setup Instructions
Below we will walk through a few different scenarios where you’d want to use Zigbee binding: Switch to Bulb, Switch to Switch and Switch to Switch & Bulb.
Switch to Bulb(s)
In this scenario, you will be binding your Inovelli switch to Zigbee bulb(s). Please click on the drop-downs to select the option that best suits your setup.
Smart Bulb(s) Wired to Smart Switch
Please select from the following drop-downs based on the number of smart bulbs you have:
Smart Switch to 1x Smart Bulb
In this example, we will use the combination of Smart Bulb Mode (to keep full power to your smart bulbs) plus Zigbee Binding. As a reminder, if you do not have the Zigbee Bindings App or the Device Driver installed, please follow the instructions here before proceeding below: Installing the Zigbee Bindings App / Installing the Inovelli Device Driver
Feel free to follow the written instructions below by clicking the drop downs:
Written Instructions
- Open your Hubitat App (web or mobile) and click on the hamburger menu at the top left
- In the hamburger menu, click on, “Devices”, locate your Inovelli Blue Series 2-1 Switch and click on it—
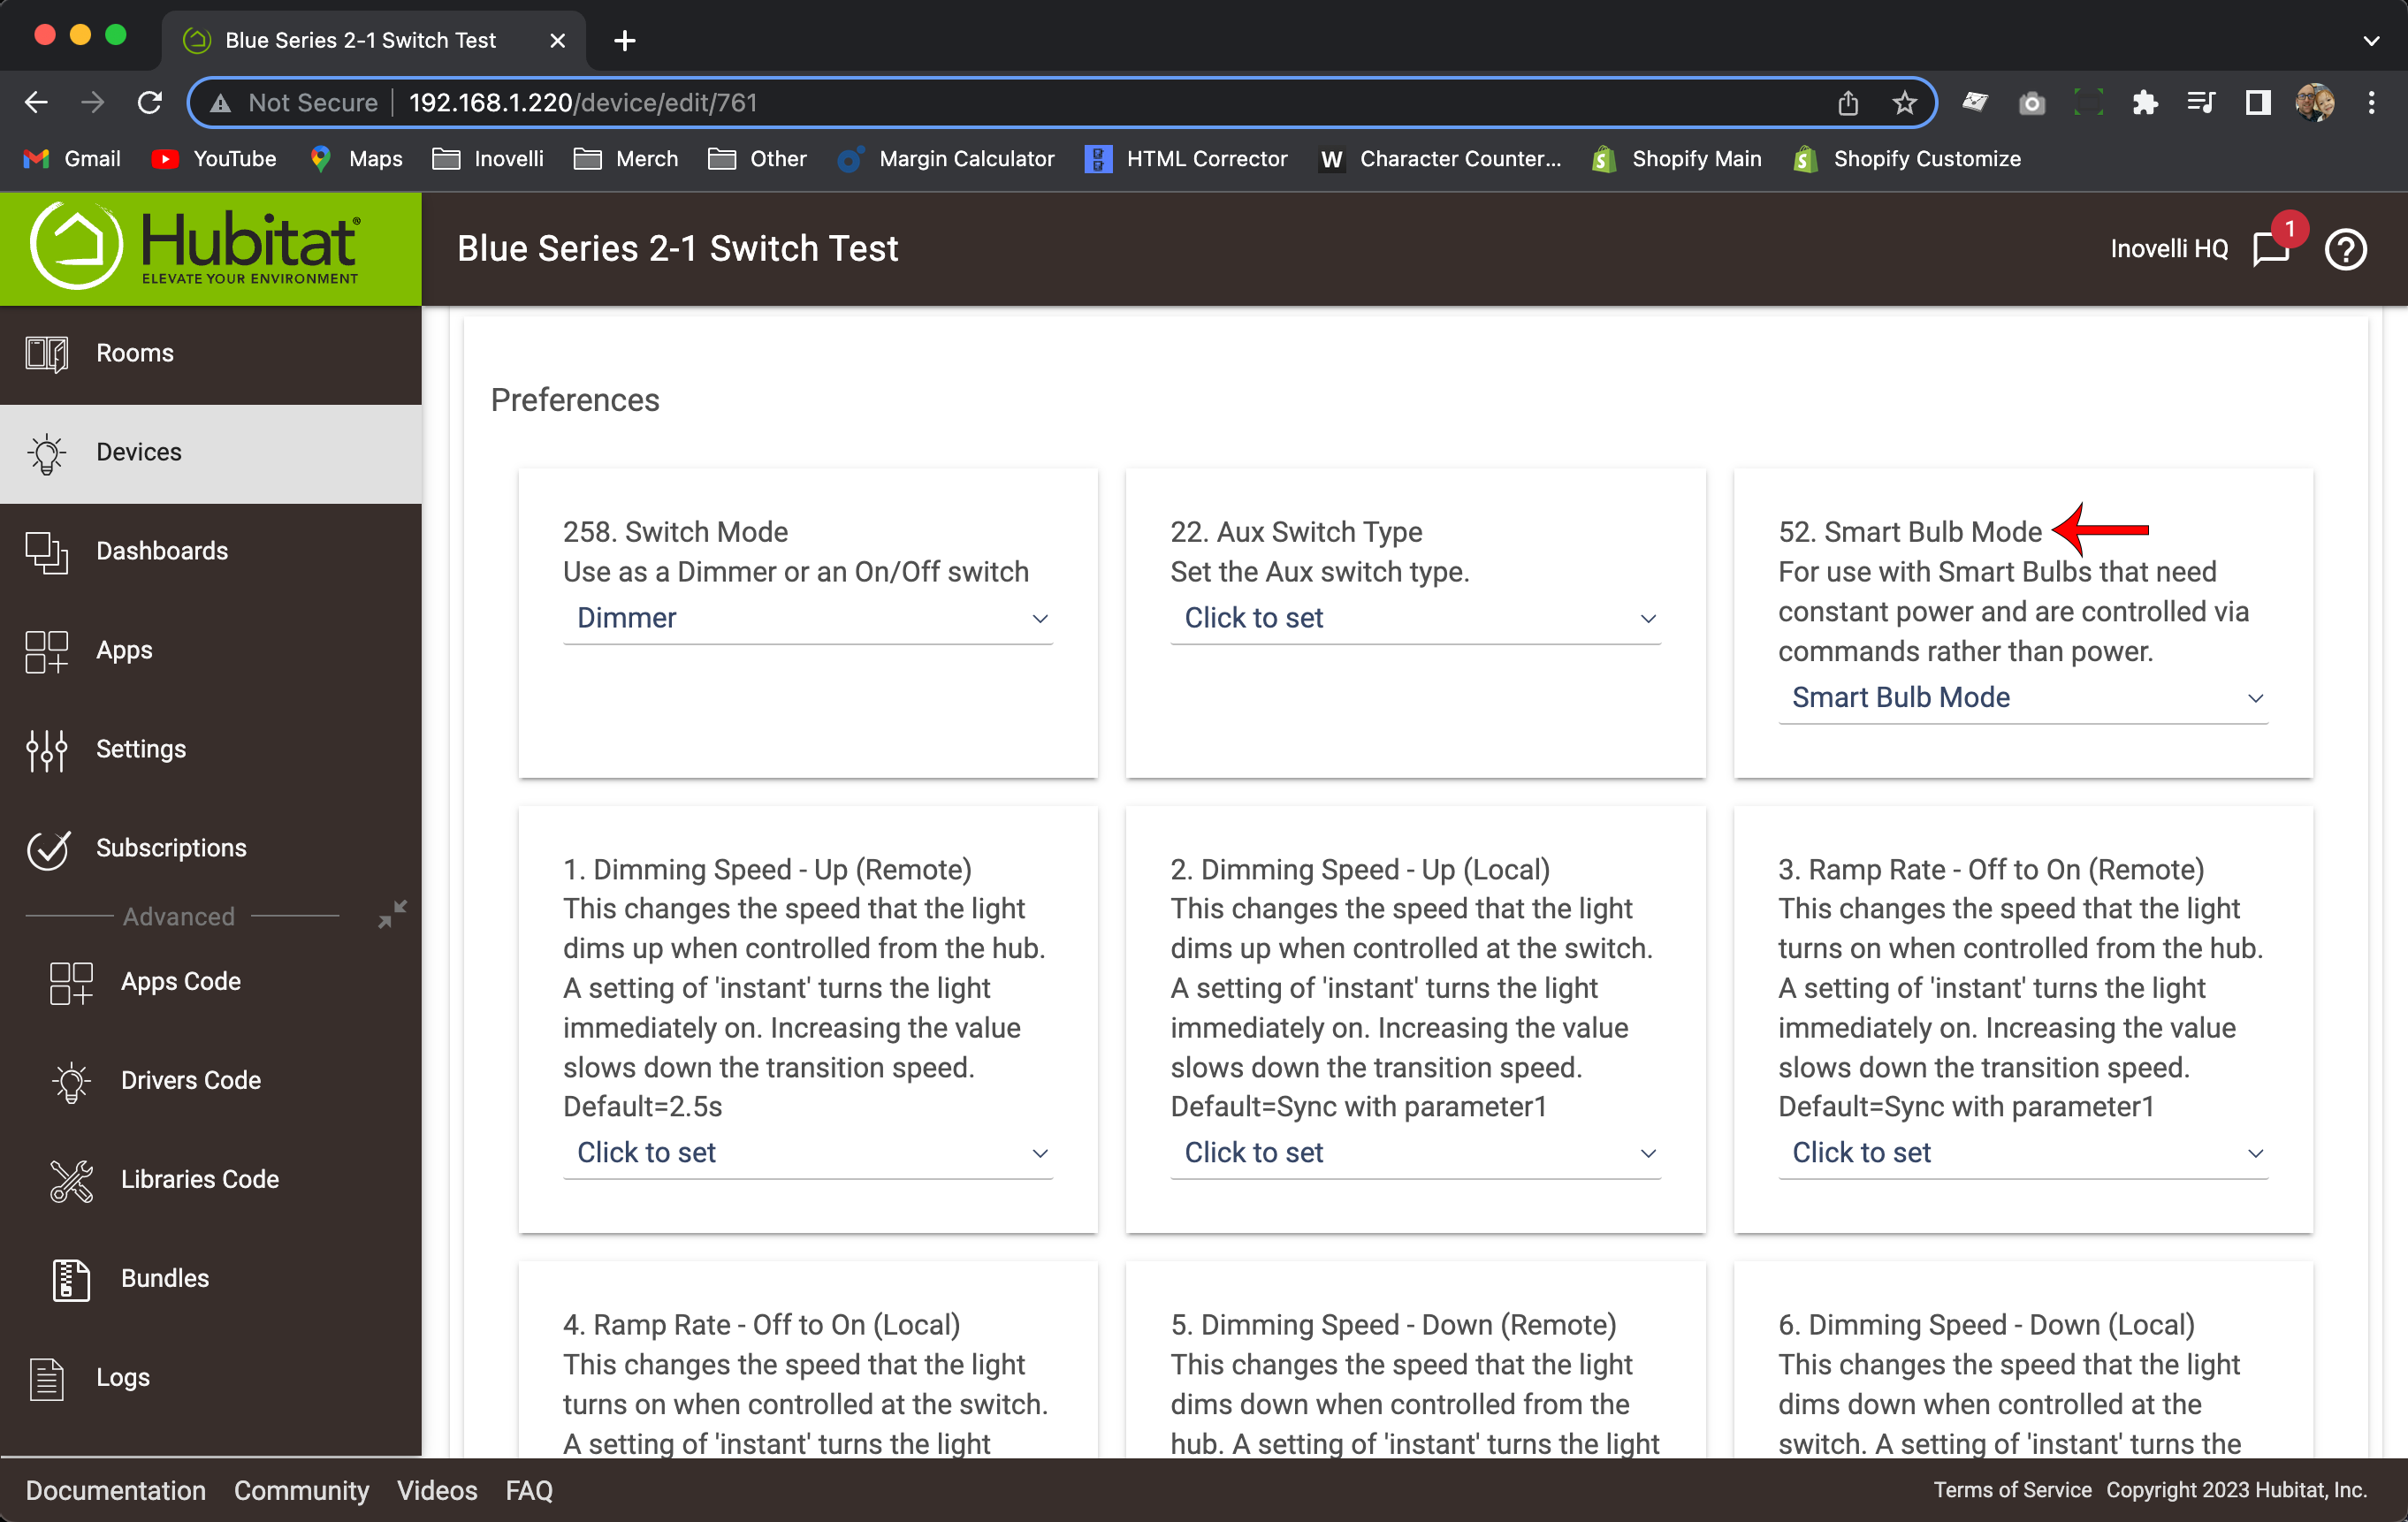
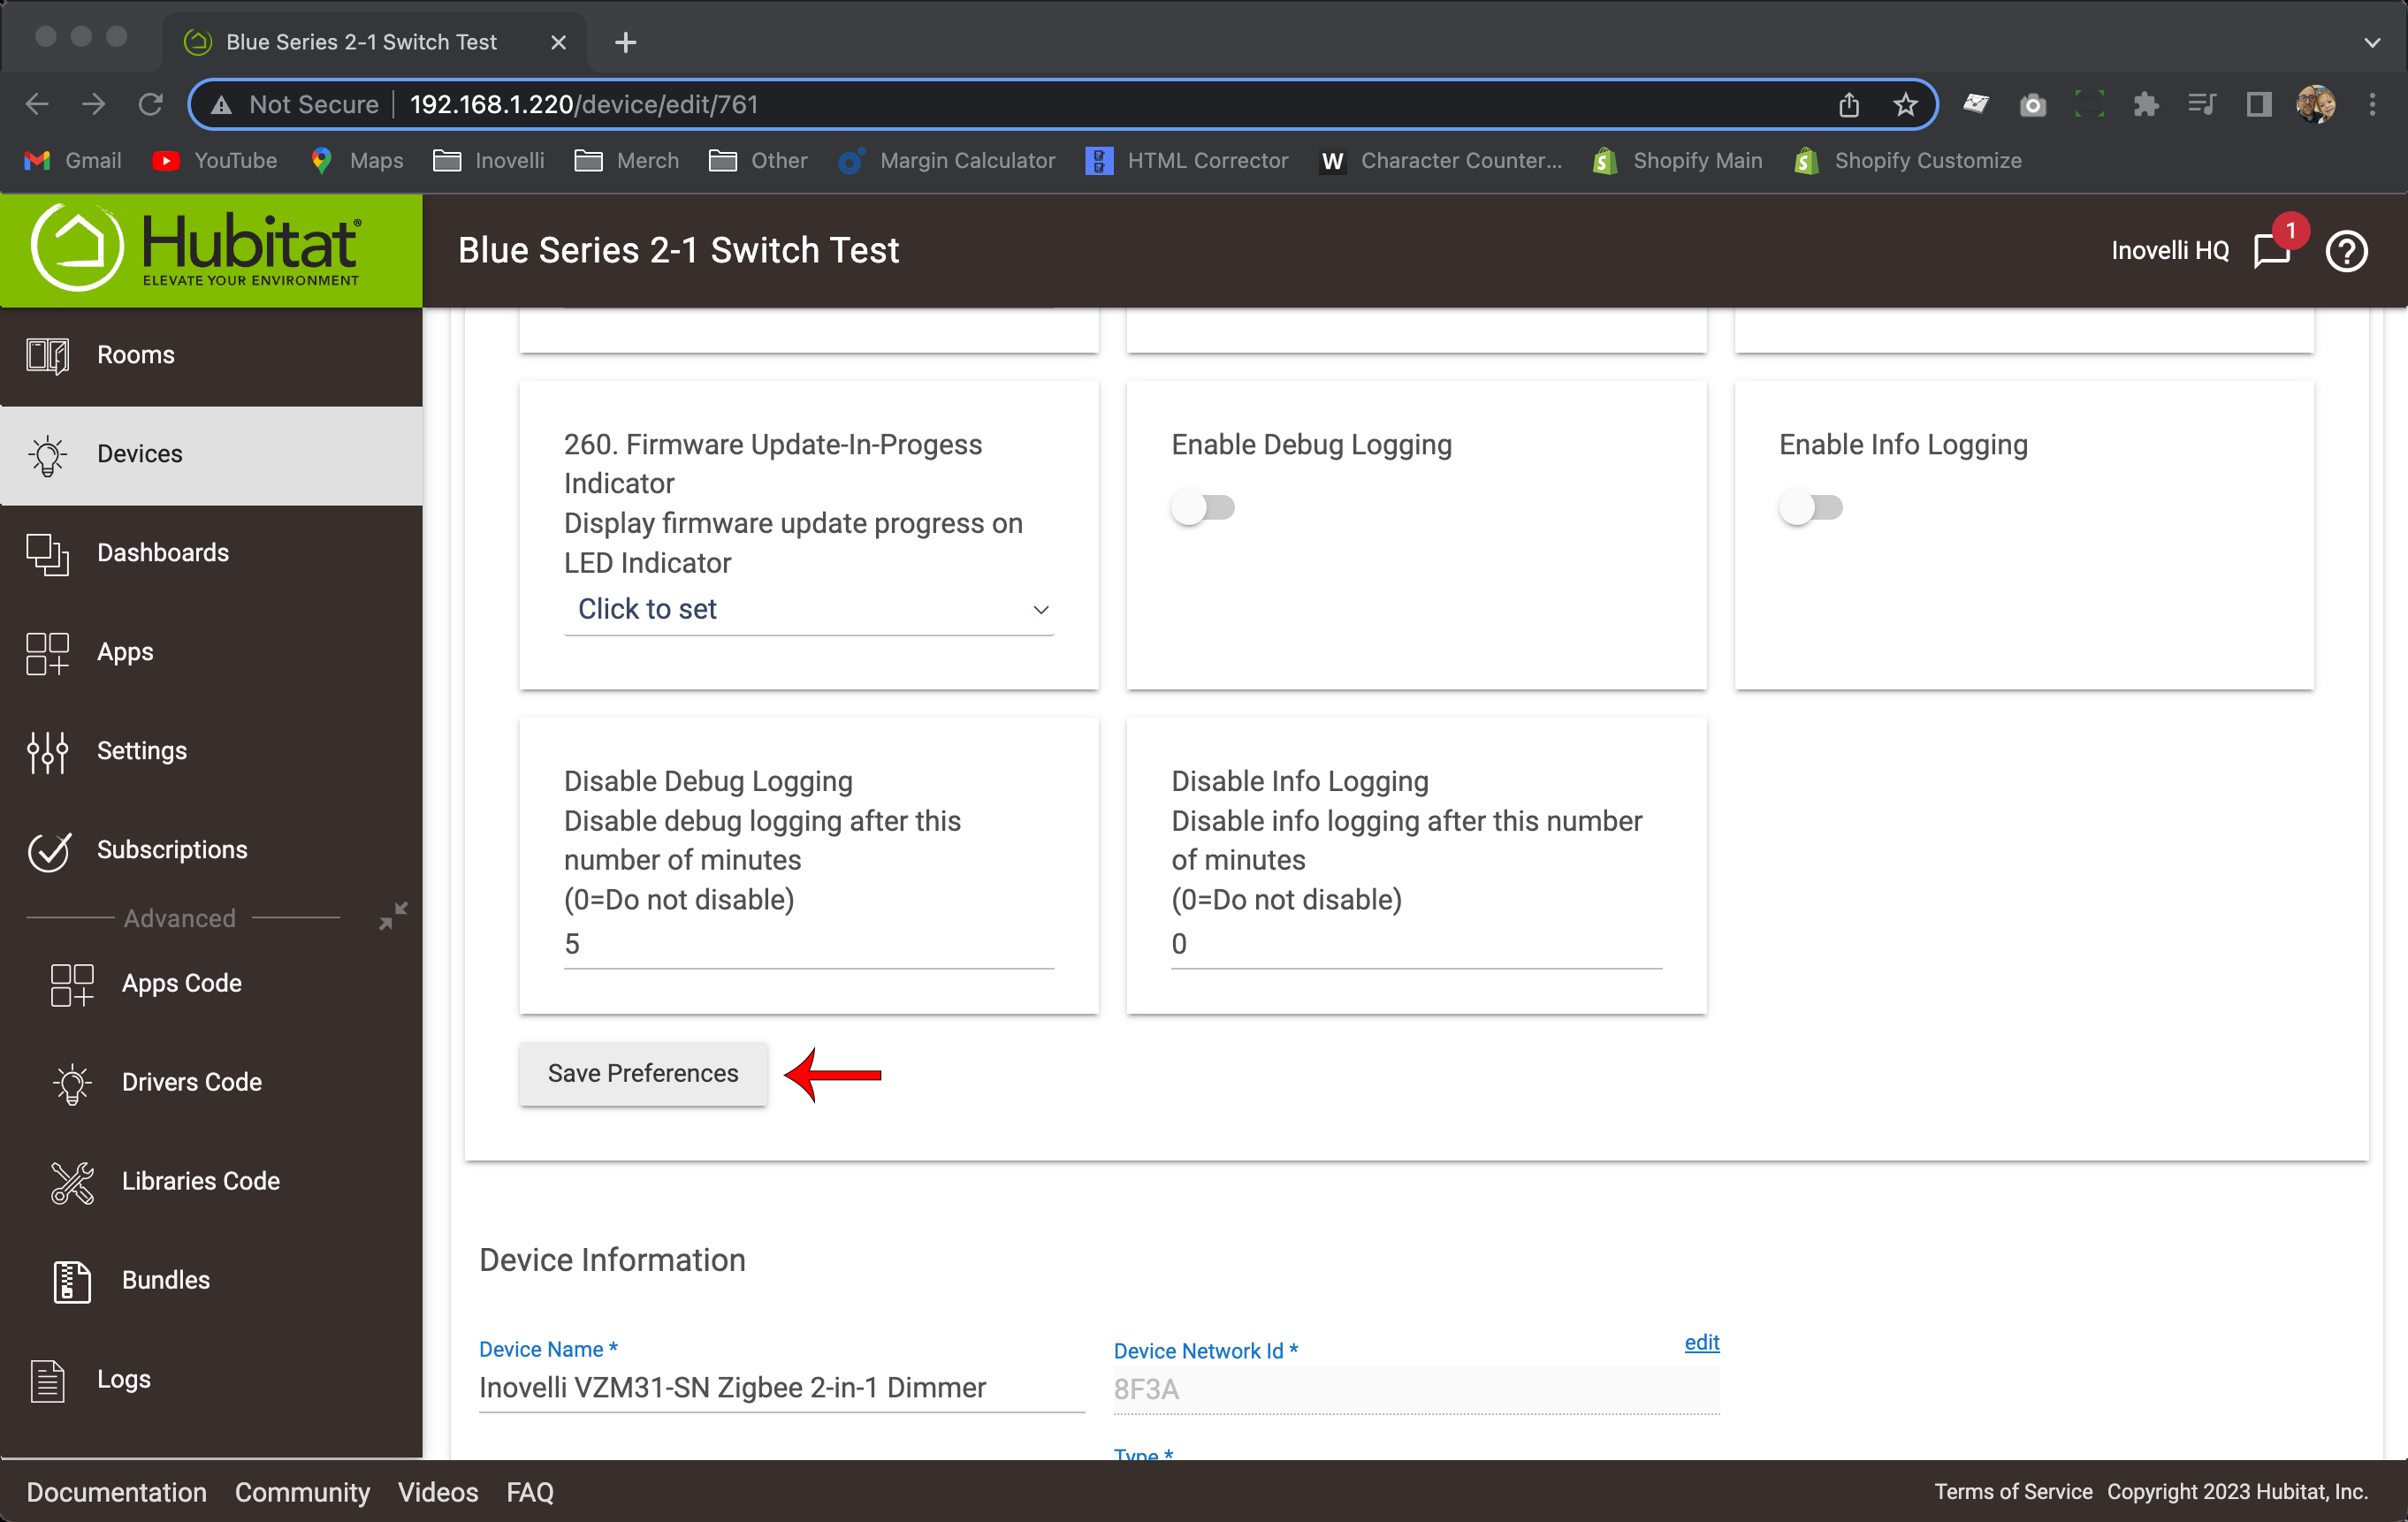
- Scroll down to the, “Preferences” section, look for, “52. Smart Bulb Mode” and select, “Smart Bulb Mode” – then click, “Save Preferences”—
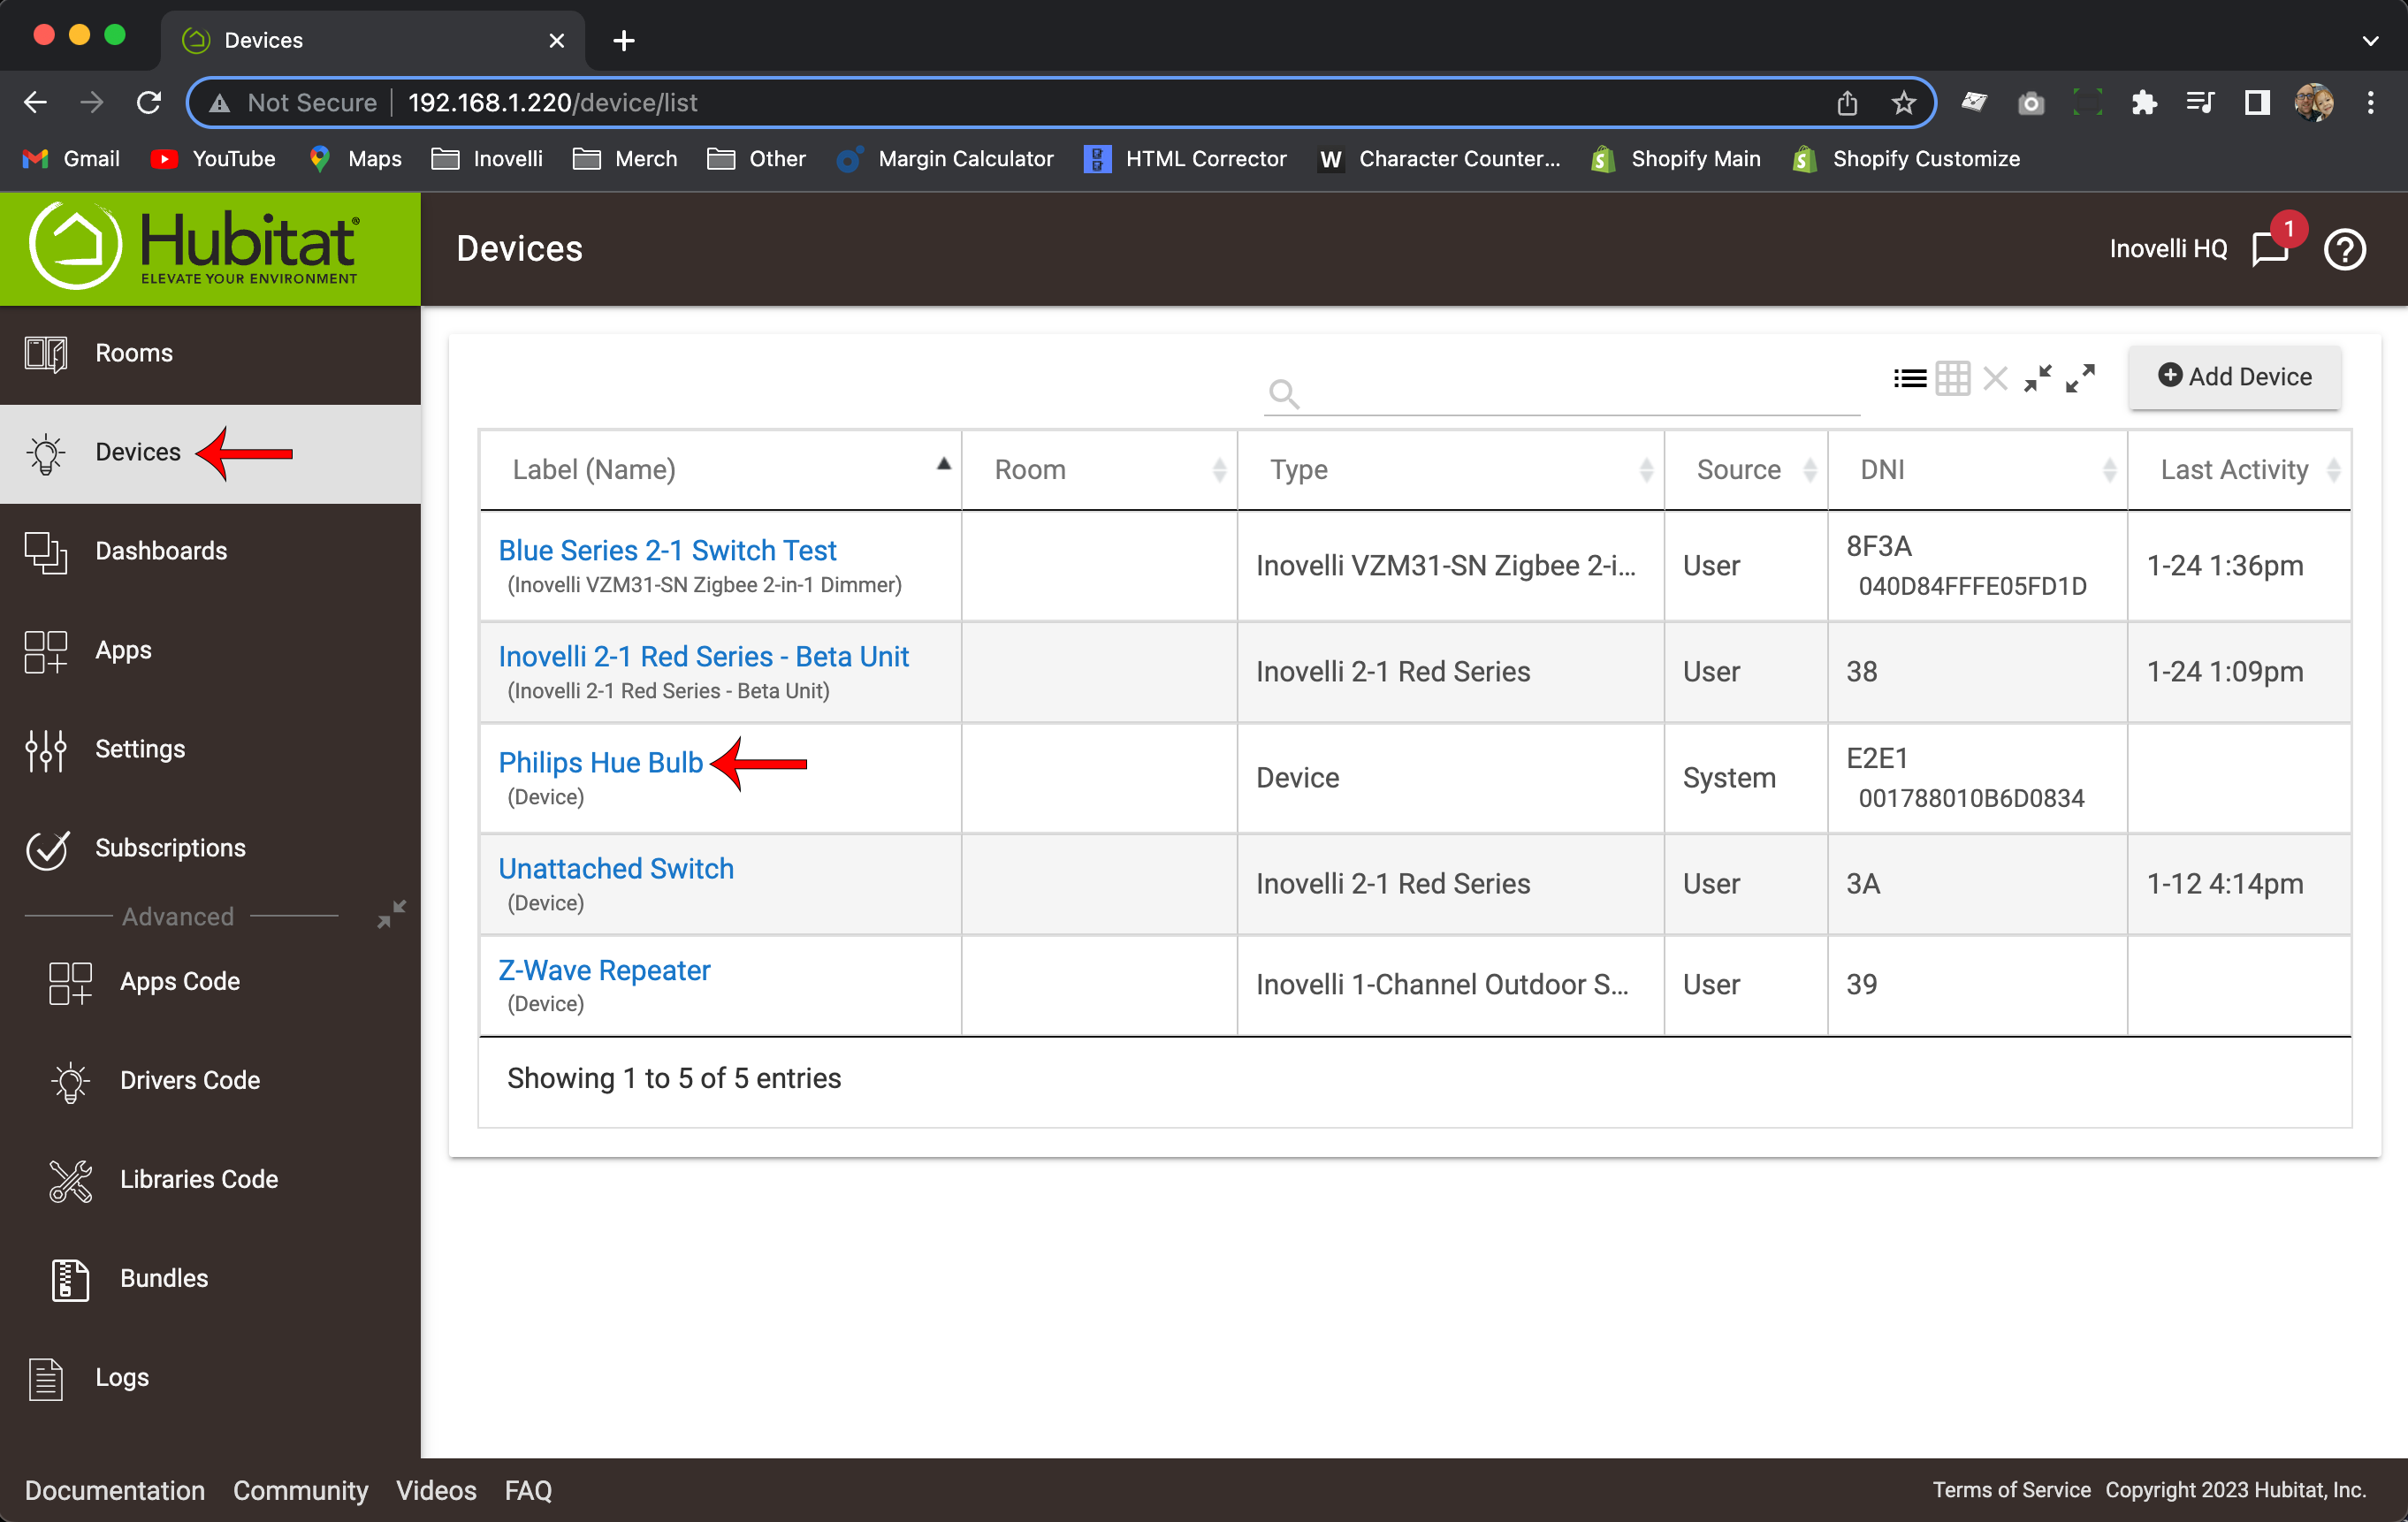
- Next, click on, “Devices” again and find the bulb you want to bind your switch to—
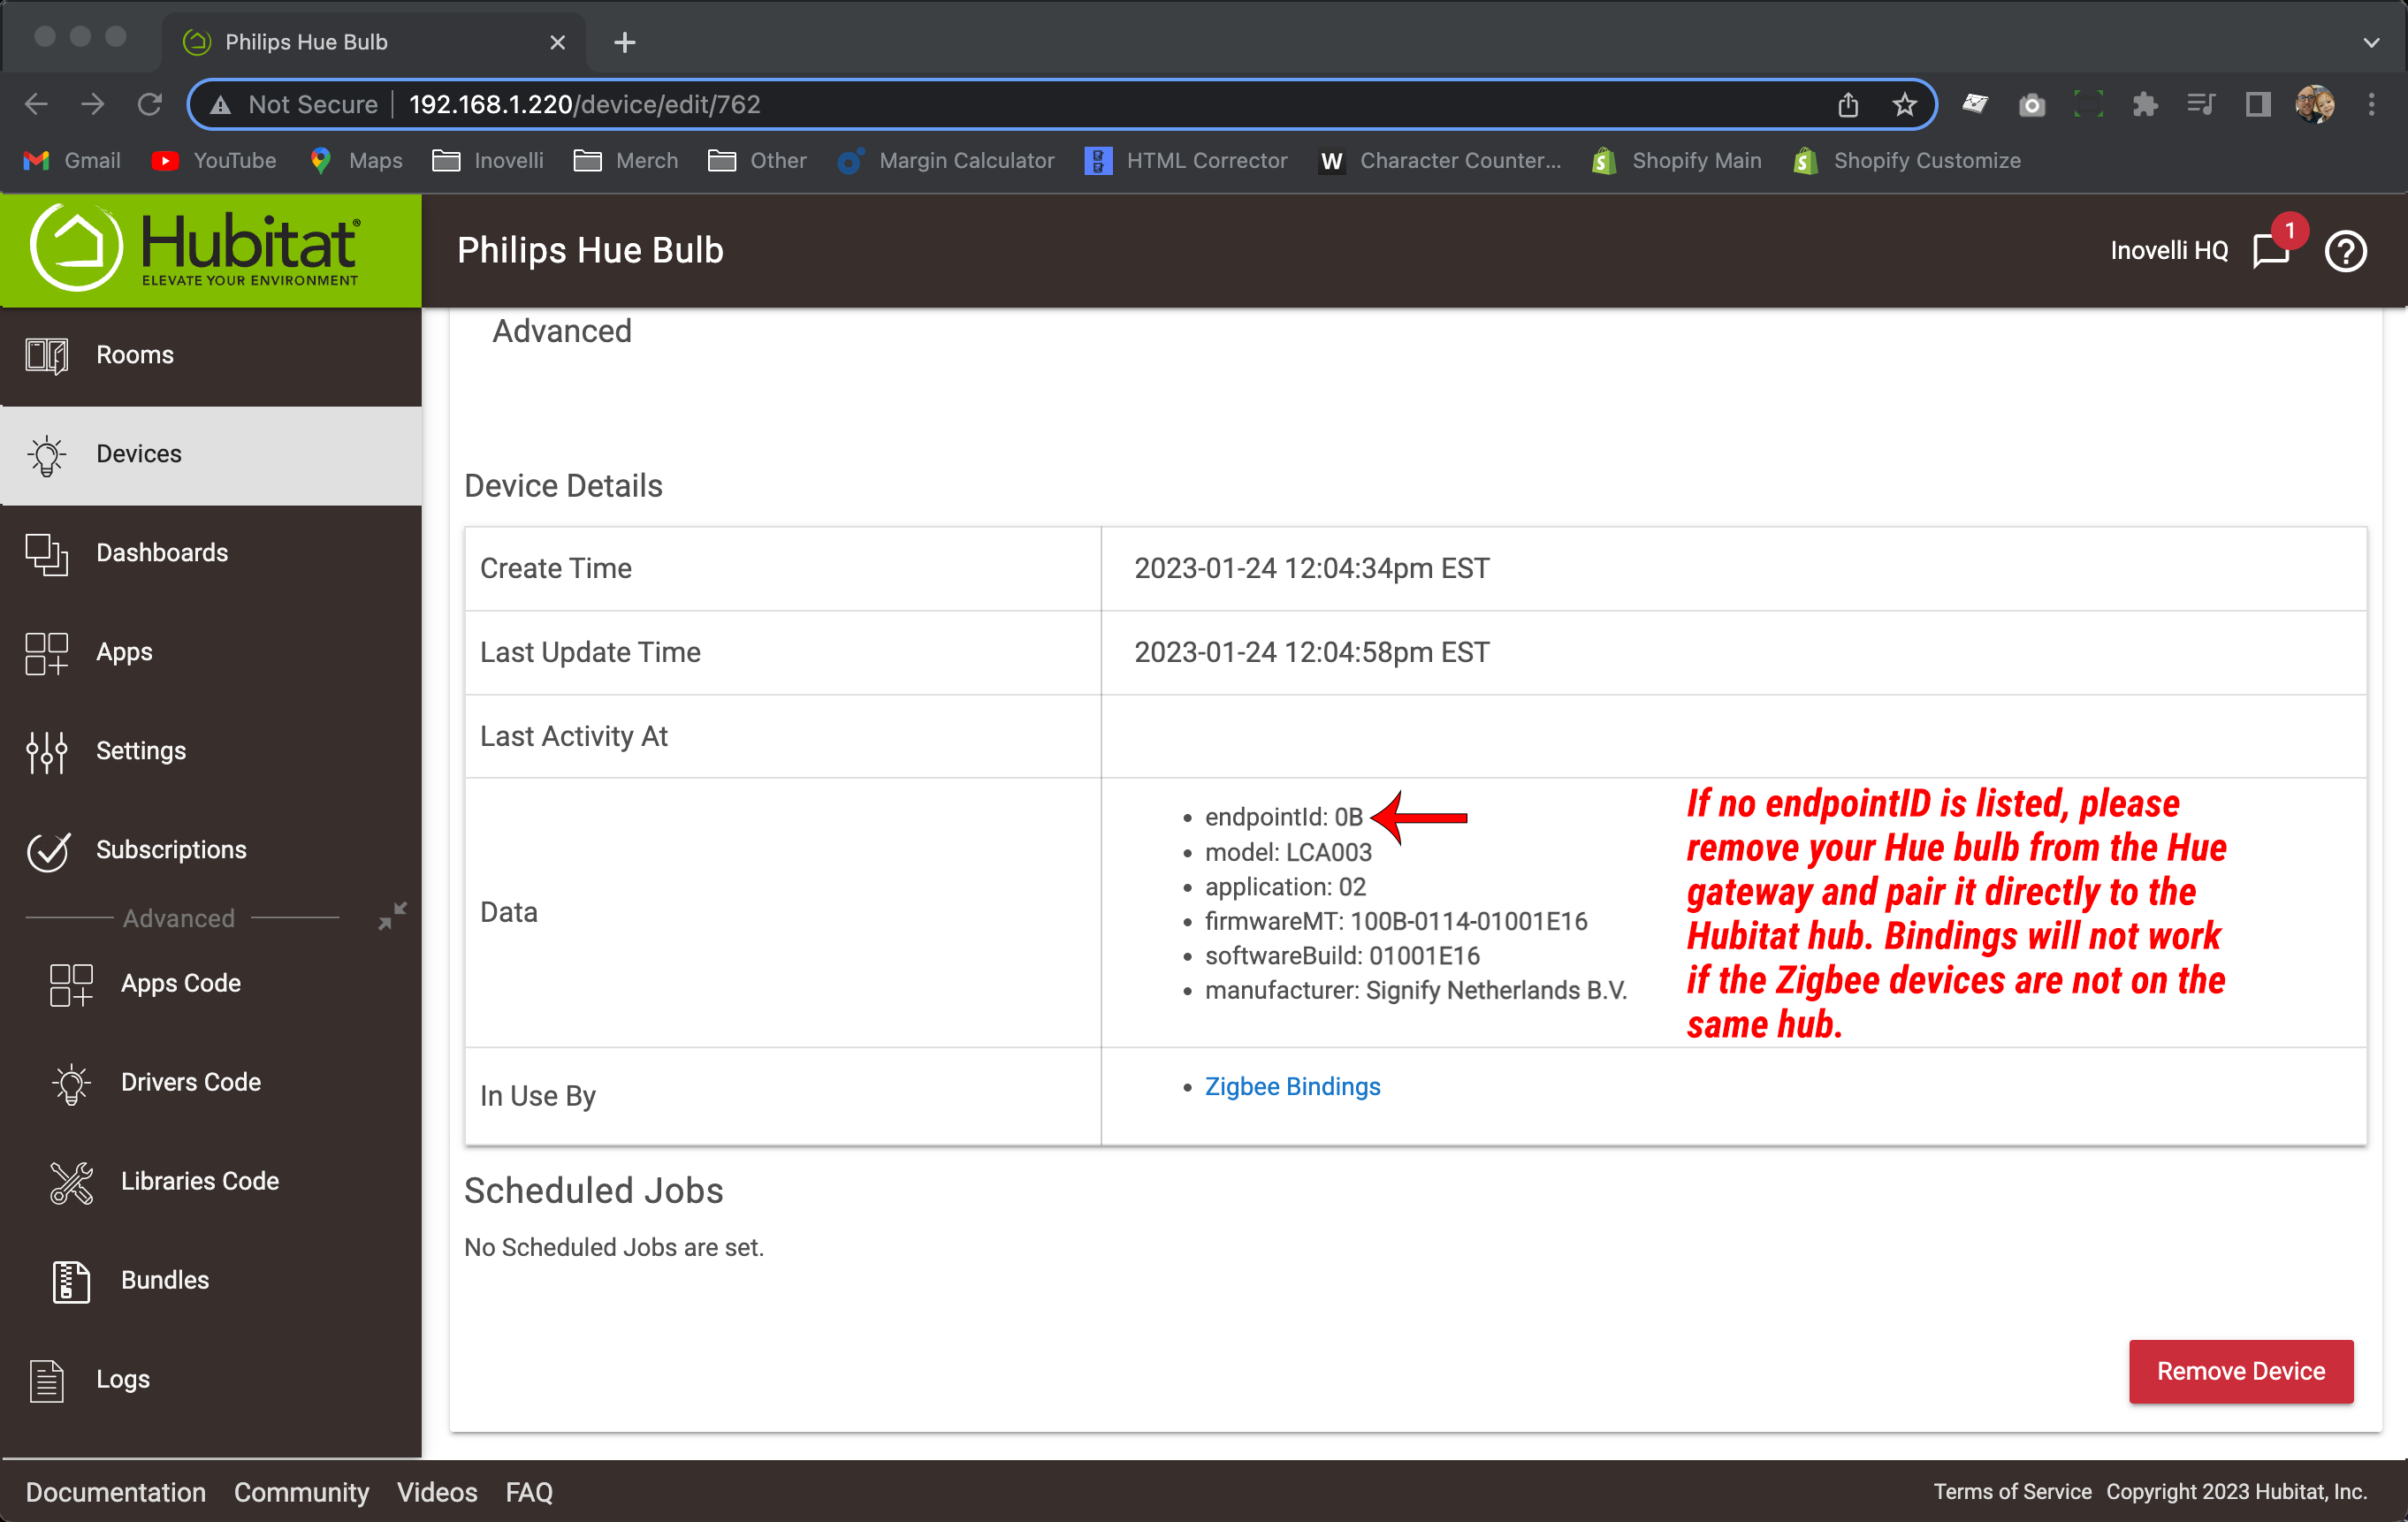
- Scroll down to the bottom where it says, “Device Details” and look for the section titled, “Data” – then write down (or memorize) the value next to where it says, “endpointID” (ie: 01, 02, 0B, etc). If no endpoint is showing, please make sure your bulb is connected directly to Hubitat (it cannot be connected to another Hub and API connected into Hubitat)—
- Click on, “Apps”, select, “Add User App” and click on, “Zigbee Bindings”—
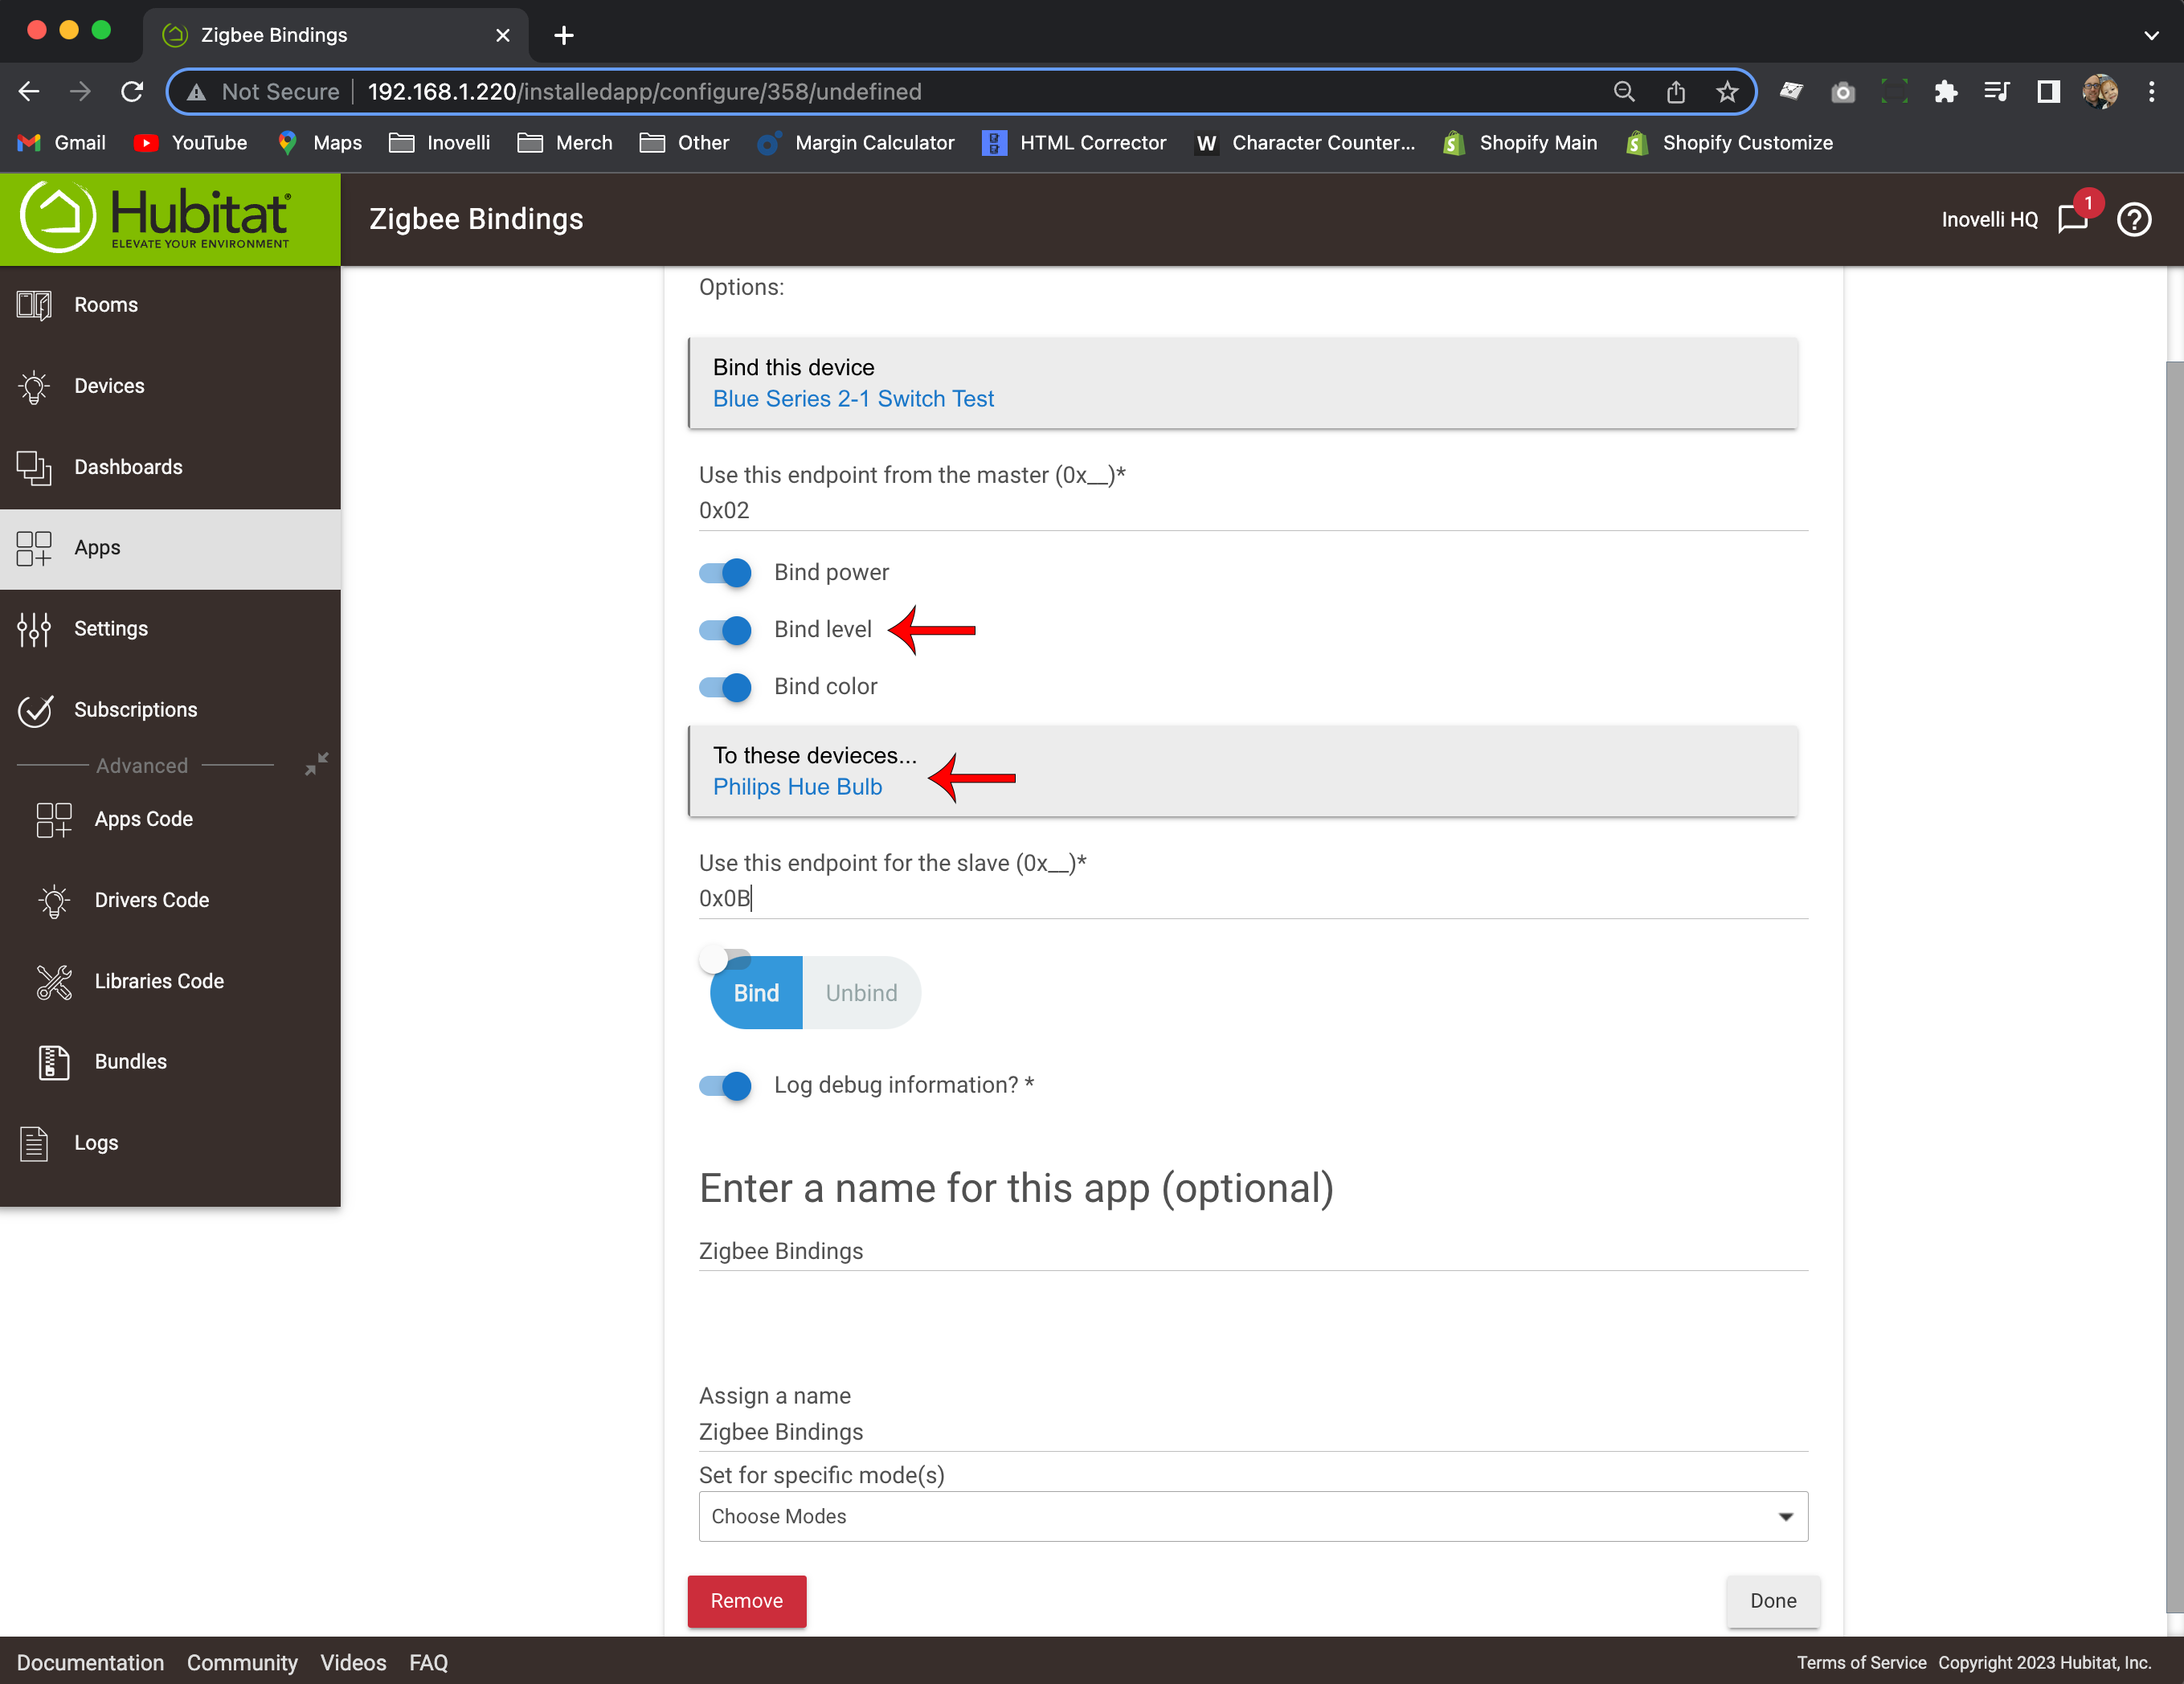
- Click on, “Bind this device” and select your Inovelli Blue Series 2-1 Switch (where it says, “Use this endpoint from the master (0x__)”, change it to 0x02)—
- Click on, “To these devices…” and select the bulb you’d like to bind your switch to (leave, “Bind power”, “Bind level”, and “Bind color” selected)—
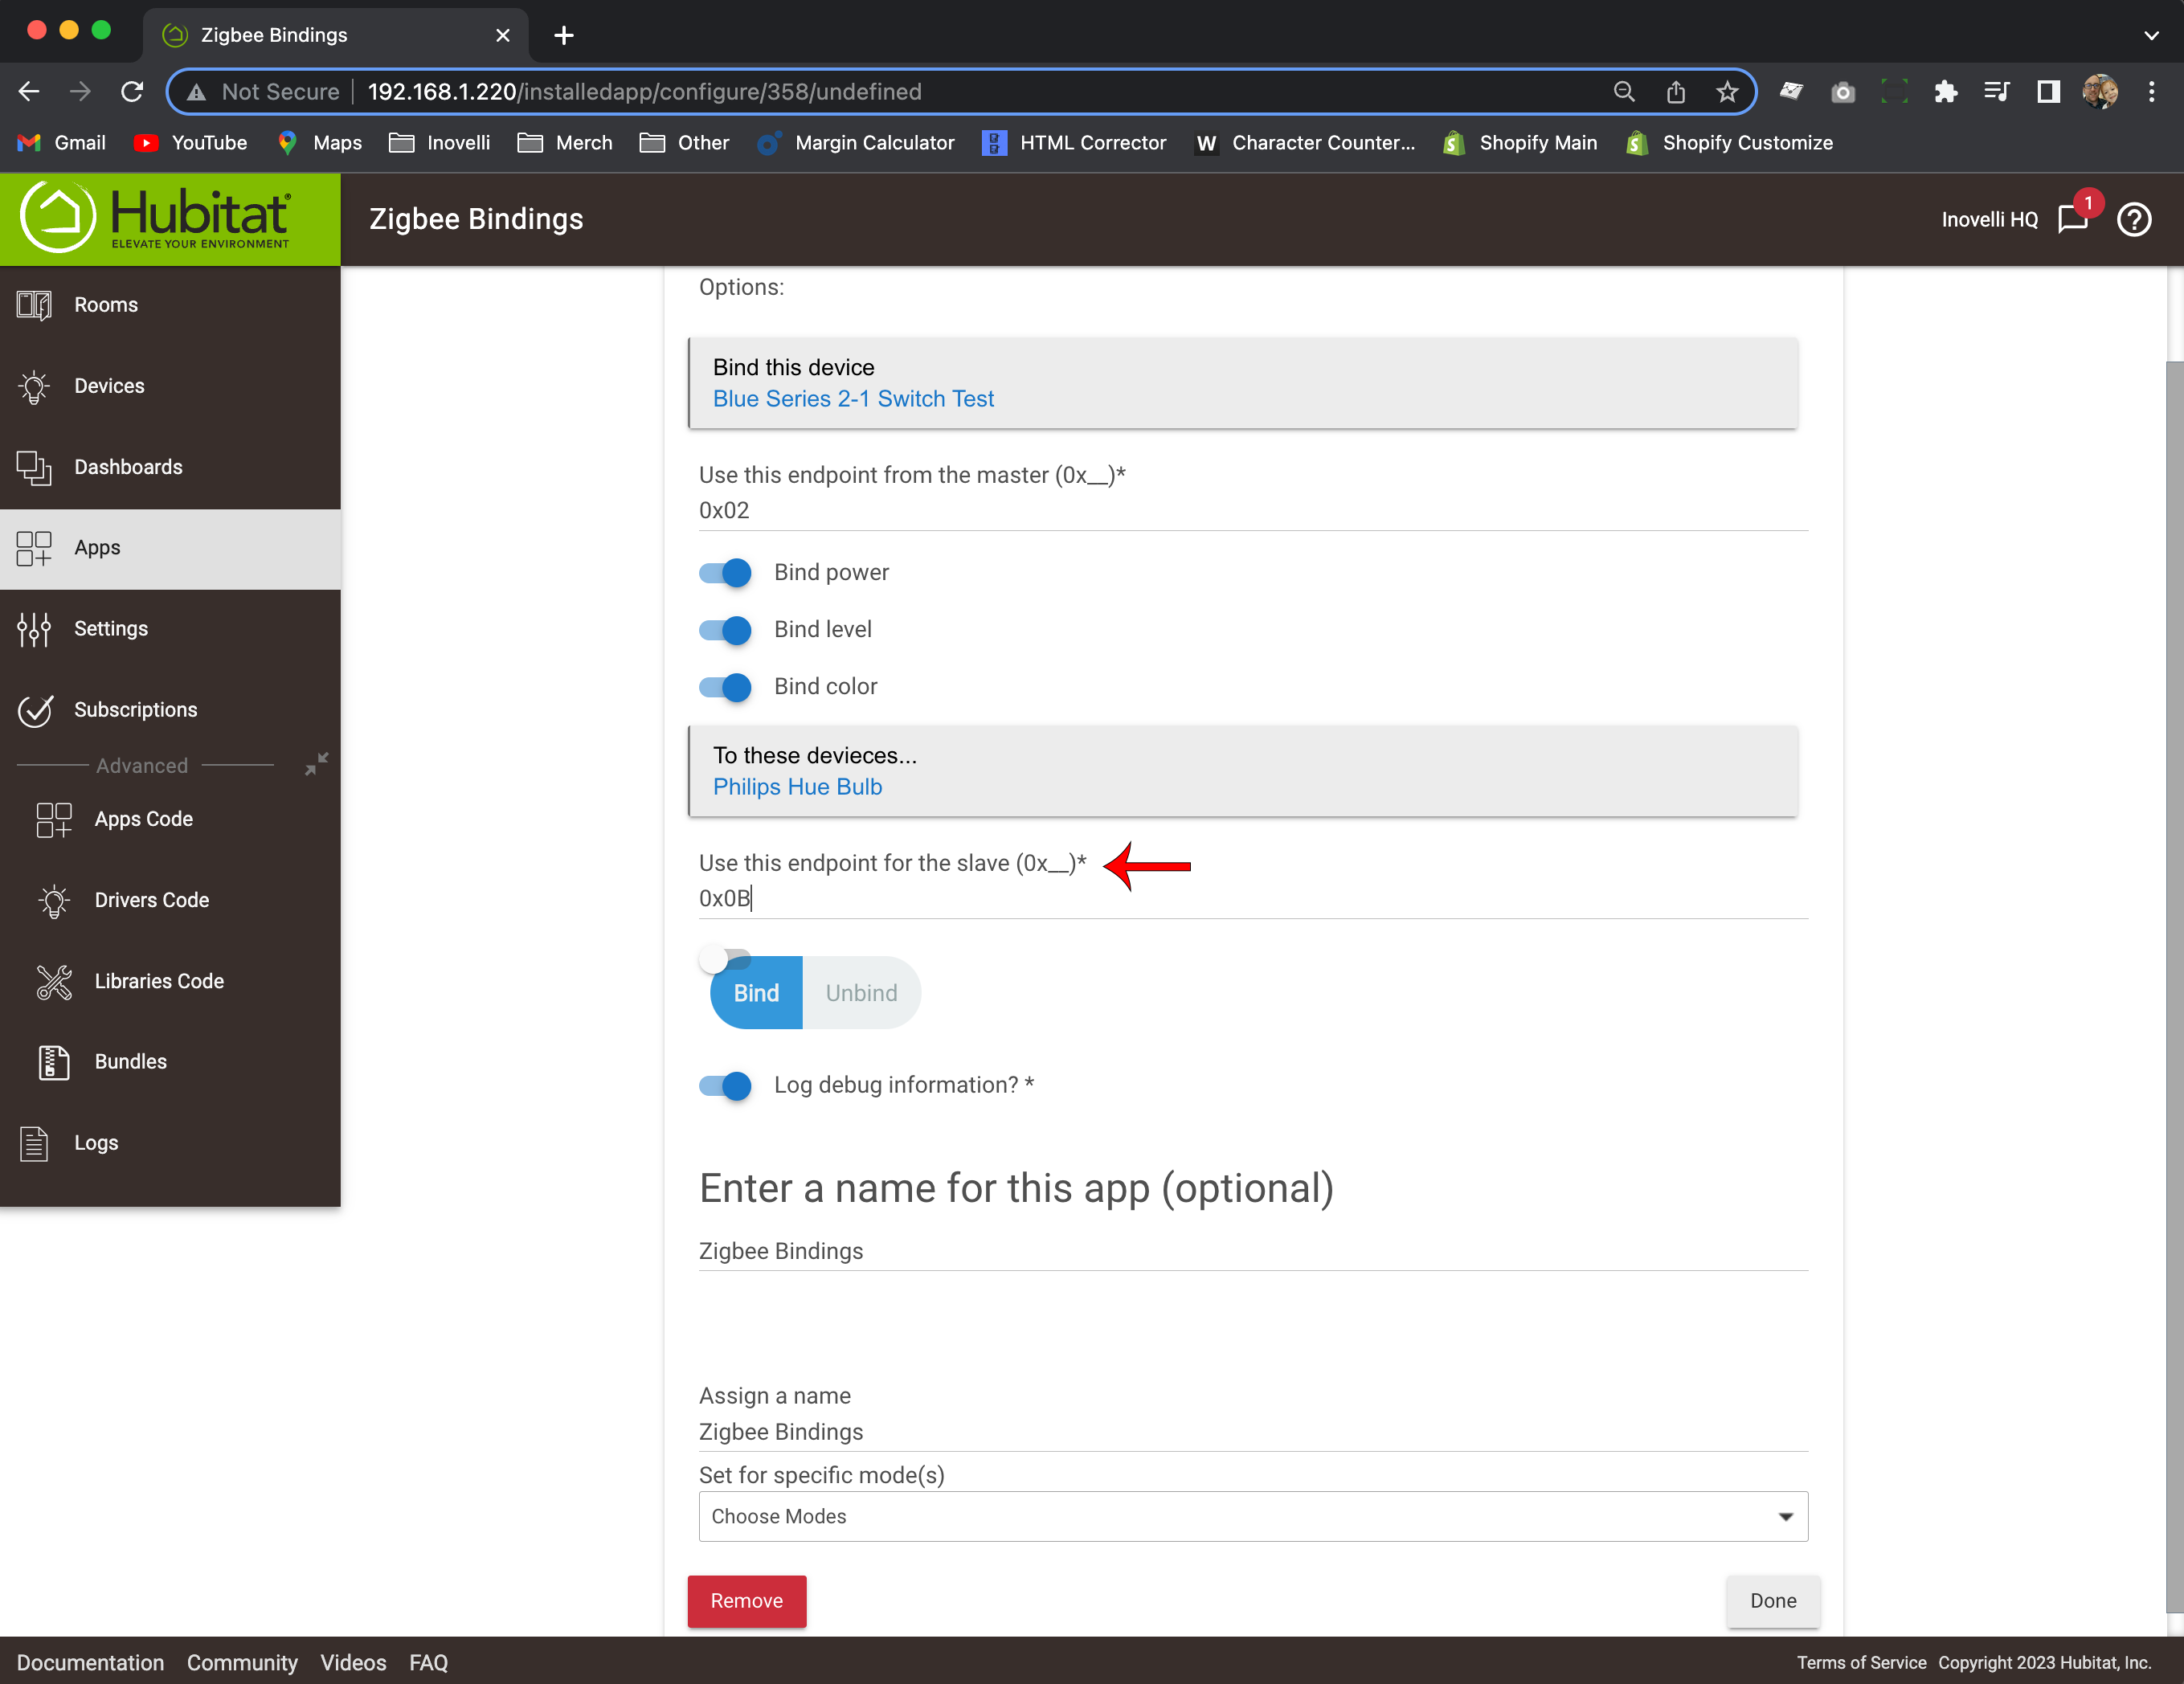
- Where it says, “Use this endpoint for the slave (0x__)*” enter in the endpointID you wrote down or memorized here (ie: 01, 02, 0B, etc)—
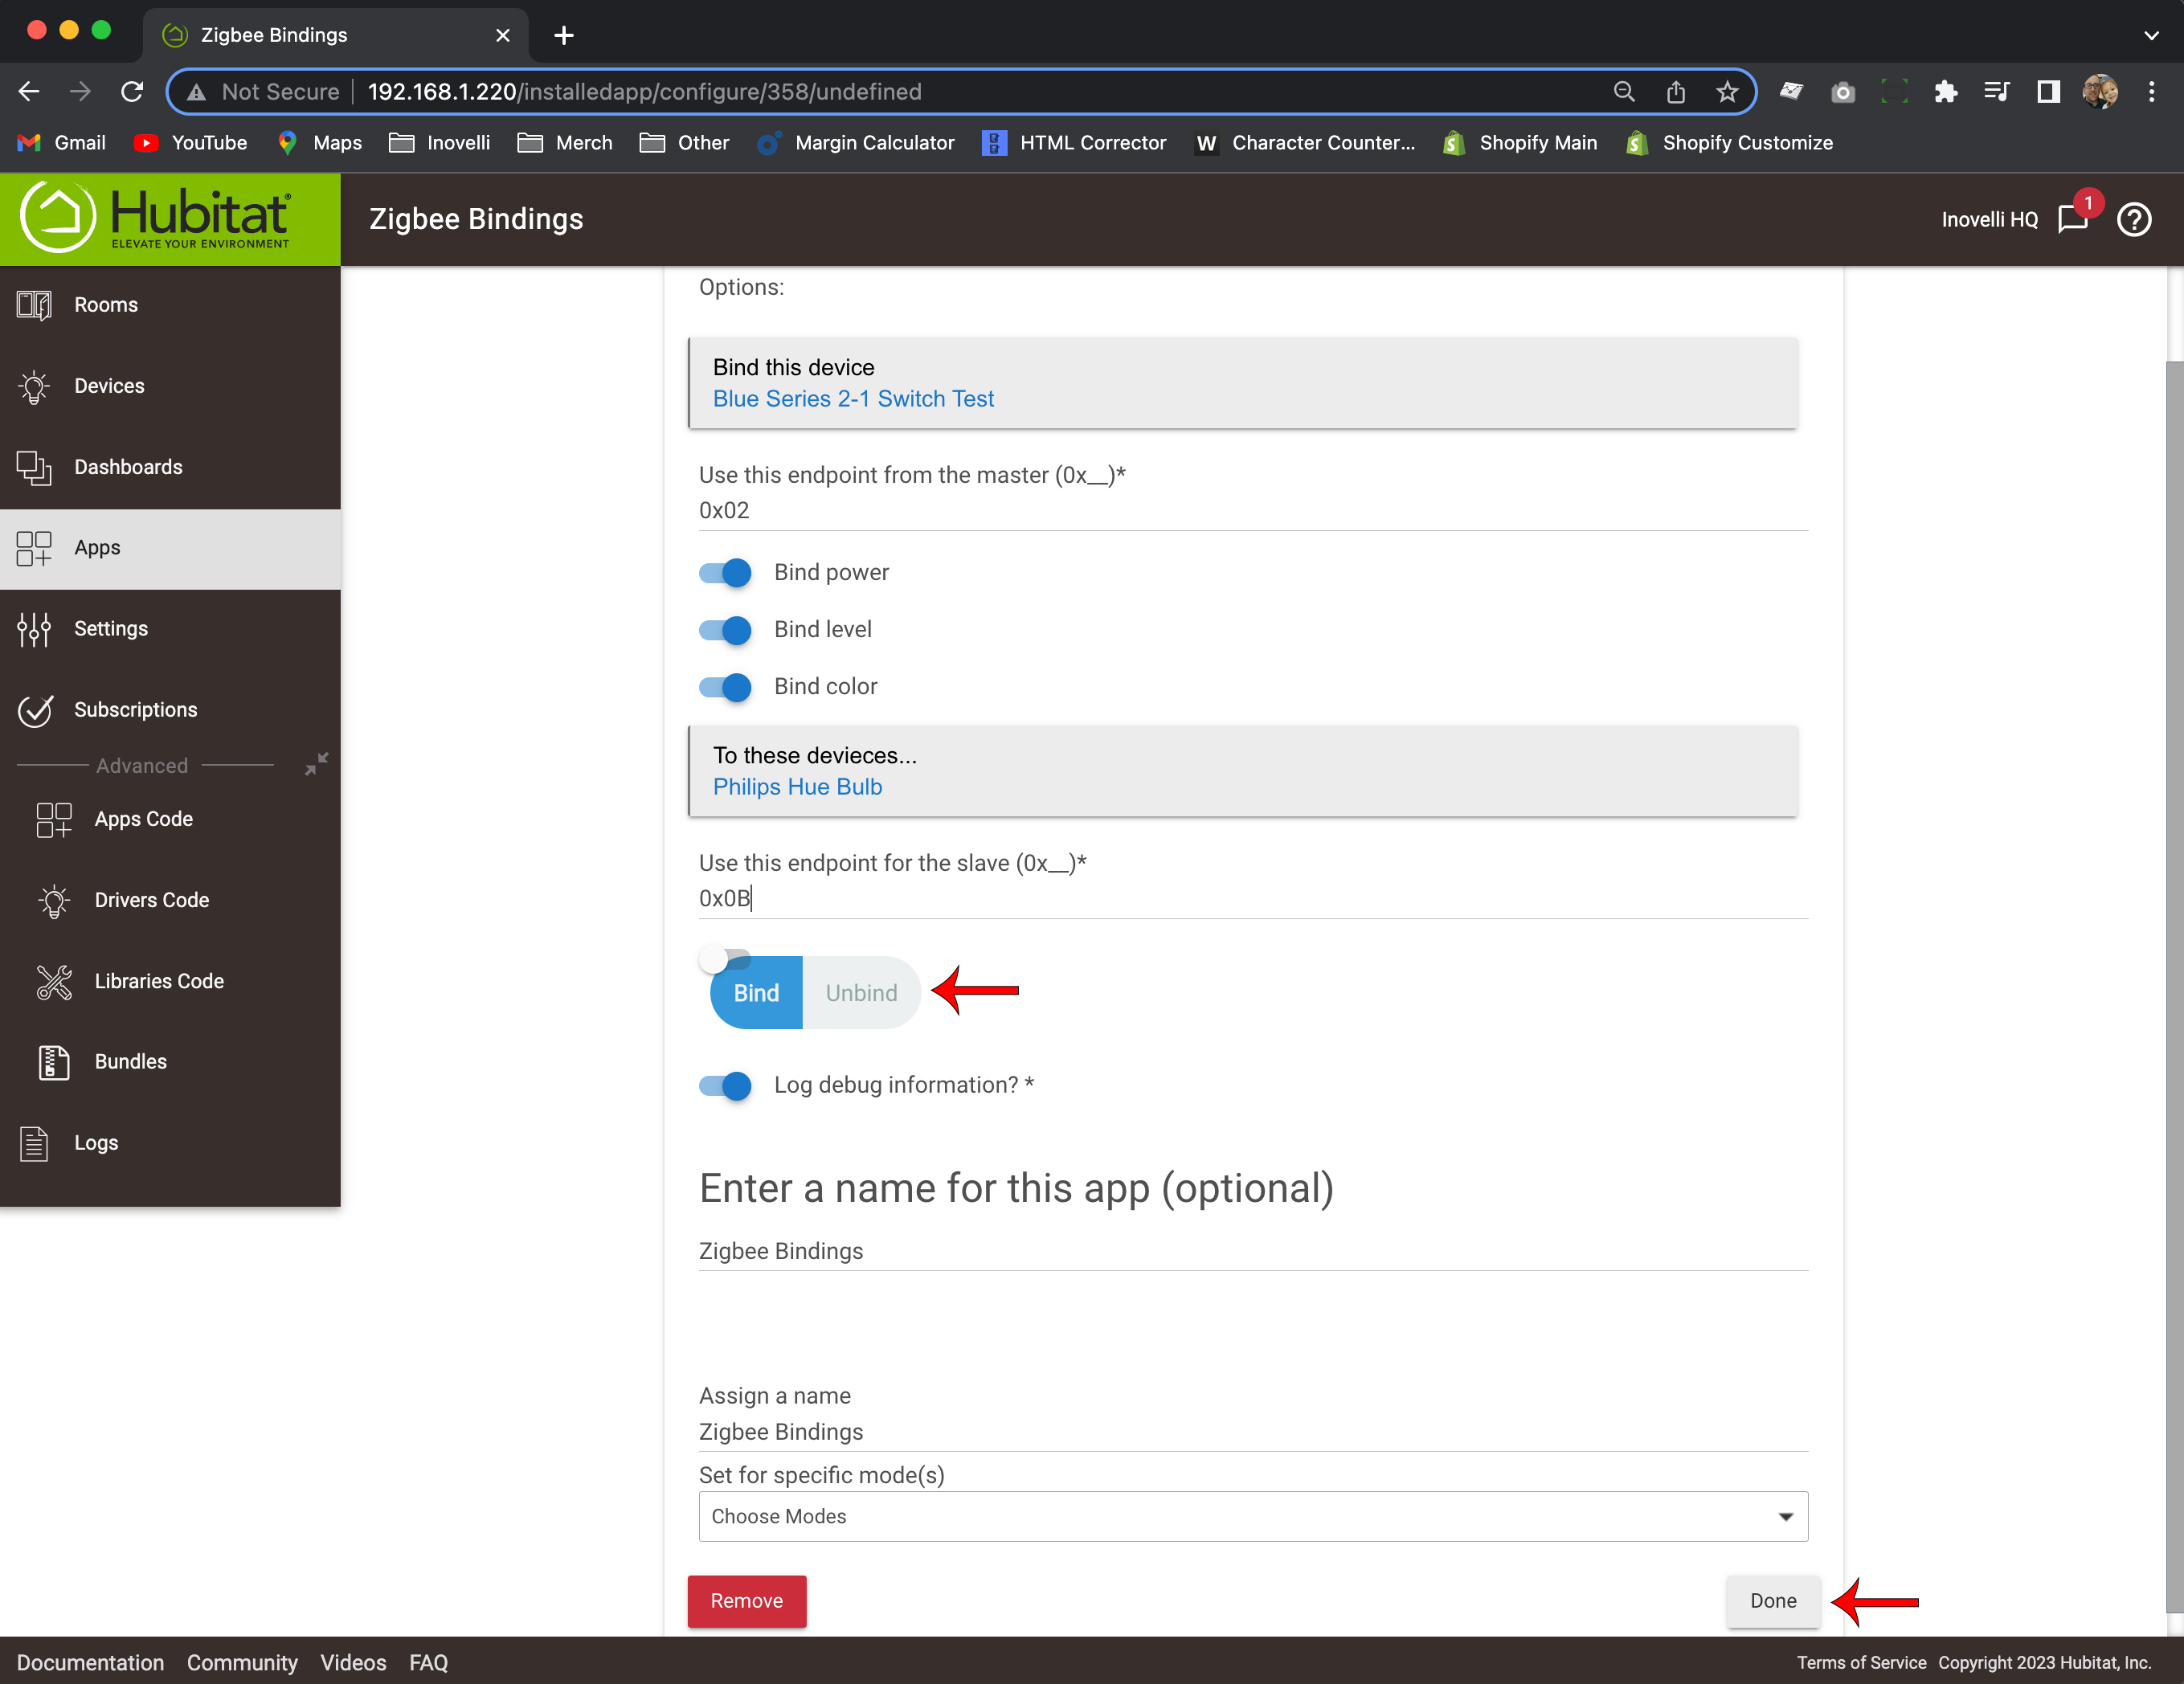
- Select, “Bind” (it should by default be selected), leave on, “Log debug information” and assign a name if you want (normally, you can describe what you are binding – ie: Switch to Bulb #1) – then click, “Done”—
- Test your binding by pressing up on your light switch (your bulb should turn on), pressing down on your light switch (bulb should turn off) or holding up/down on the switch (bulb should dim up/down)


Smart Switch to Multiple Smart Bulbs
In this example, we will use the combination of Smart Bulb Mode (to keep full power to your smart bulbs) plus Zigbee Group Binding. As a reminder, if you do not have the Zigbee Bindings App or the Device Driver installed, please follow the instructions here before proceeding below: Installing the Zigbee Bindings App / Installing the Inovelli Device Driver
Feel free to follow the written instructions below by clicking the drop downs below:
Written Instructions
- Open your Hubitat App (web or mobile) and click on the hamburger menu at the top left
- In the hamburger menu, click on, “Devices”, locate your Inovelli Blue Series 2-1 Switch and click on it—
- Scroll down to the, “Preferences” section, look for, “52. Smart Bulb Mode” and select, “Smart Bulb Mode” – then click, “Save Preferences”—
- Next, click on, “Devices” again and find the bulbs you want to bind your switch to and click on one of them.—
- Scroll down to the bottom of each bulb where it says, “Device Details” and look for the section titled, “Data” – then write down (or memorize) the value next to where it says, “endpointID” (ie: 01, 02, 0B, etc). If no endpoint is showing, please make sure your bulbs are connected directly to Hubitat (it cannot be connected to another Hub and API connected into Hubitat). NOTE: If each bulb has a separate endpoint, you will have to bind the switch to bulbs that have the same endpoints (ie: If you have 2x Hue bulbs with endpoints 0B and another Zigbee bulb with an endpoint of 01, you will have to bind the Hue bulbs first and then go back and redo these instructions to bind the other bulb with a different endpoint ID).—
- Click on, “Apps”, select, “Add User App” and click on, “Zigbee Bindings”—
- Click on, “Bind this device” and select your Inovelli Blue Series 2-1 Switch (where it says, “Use this endpoint from the master (0x__)”, change it to 0x02)—
- Click on, “To these devices…” and select the bulbs you’d like to bind your switch to (leave, “Bind power”, “Bind level”, and “Bind color” selected). Only select ones that have the same endpoint (ie: If you have 2x Hue bulbs with endpoints 0B and another Zigbee bulb with an endpoint of 01, you will have to bind the Hue bulbs first and then go back and redo steps 6-11 to bind the other bulb with a different endpoint ID).—
- Where it says, “Use this endpoint for the slave (0x__)*” enter in the endpointID you wrote down or memorized here (ie: 01, 02, 0B, etc) - Again, (sorry to keep saying this) if you have 2x Hue bulbs with endpoints 0B and another Zigbee bulb with an endpoint of 01, you will have to bind the Hue bulbs first and then go back and redo steps 6-11 to bind the other bulb with a different endpoint ID.—
- Select, “Bind” (it should by default be selected), leave on, “Log debug information” and assign a name if you want (normally, you can describe what you are binding – ie: Switch to Bulb #1) – then click, “Done”—
- Test your binding by pressing up on your light switch (your bulb should turn on), pressing down on your light switch (bulb should turn off) or holding up/down on the switch (bulb should dim up/down)
Smart Bulb(s) NOT Wired to Smart Switch
Please select from the following drop-downs based on the number of smart bulbs you have:
Smart Switch to 1x Smart Bulb
NOTE: If your smart bulb is wired directly to your smart switch, please follow the instructions in the above section titled, “Smart Bulb Wired to Smart Switch” as you will need to utilize, “Smart Bulb Mode”.
As a reminder, if you do not have the Zigbee Bindings App or the Device Driver installed, please follow the instructions here before proceeding below: Installing the Zigbee Bindings App / Installing the Inovelli Device Driver
Feel free to follow the written instructions below by clicking the drop down or follow along with the video below:
Written Instructions
- Click on, “Devices” and find the bulb you want to bind your switch to—
- Scroll down to the bottom where it says, “Device Details” and look for the section titled, “Data” – then write down (or memorize) the value next to where it says, “endpointID” (ie: 01, 02, 0B, etc). If no endpoint is showing, please make sure your bulb is connected directly to Hubitat (it cannot be connected to another Hub and API connected into Hubitat)—
- Click on, “Apps”, select, “Add User App” and click on, “Zigbee Bindings”—
- Click on, “Bind this device” and select your Inovelli Blue Series 2-1 Switch (where it says, “Use this endpoint from the master (0x__)”, change it to 0x02)—
- Click on, “To these devices…” and select the bulb you’d like to bind your switch to (leave, “Bind power”, “Bind level”, and “Bind color” selected)—
- Where it says, “Use this endpoint for the slave (0x__)*” enter in the endpointID you wrote down or memorized here (ie: 01, 02, 0B, etc)—
- Select, “Bind” (it should by default be selected), leave on, “Log debug information” and assign a name if you want (normally, you can describe what you are binding – ie: Switch to Bulb #1) – then click, “Done”—
- Test your binding by pressing up on your light switch (your bulb should turn on), pressing down on your light switch (bulb should turn off) or holding up/down on the switch (bulb should dim up/down)
Smart Switch to Multiple Smart Bulbs
In this example, we will use the combination of Smart Bulb Mode (to keep full power to your smart bulbs) plus Zigbee Group Binding. As a reminder, if you do not have the Zigbee Bindings App or the Device Driver installed, please follow the instructions here before proceeding below: Installing the Zigbee Bindings App / Installing the Inovelli Device Driver
Feel free to follow the written instructions below by clicking the drop downs below:
Written Instructions
- Click on, “Devices” again and find the bulbs you want to bind your switch to and click on one of them.—
- Scroll down to the bottom of each bulb where it says, “Device Details” and look for the section titled, “Data” – then write down (or memorize) the value next to where it says, “endpointID” (ie: 01, 02, 0B, etc). If no endpoint is showing, please make sure your bulbs are connected directly to Hubitat (it cannot be connected to another Hub and API connected into Hubitat). NOTE: If each bulb has a separate endpoint, you will have to bind the switch to bulbs that have the same endpoints (ie: If you have 2x Hue bulbs with endpoints 0B and another Zigbee bulb with an endpoint of 01, you will have to bind the Hue bulbs first and then go back and redo these instructions to bind the other bulb with a different endpoint ID).—
- Click on, “Apps”, select, “Add User App” and click on, “Zigbee Bindings”—
- Click on, “Bind this device” and select your Inovelli Blue Series 2-1 Switch (where it says, “Use this endpoint from the master (0x__)”, change it to 0x02)—
- Click on, “To these devices…” and select the bulbs you’d like to bind your switch to (leave, “Bind power”, “Bind level”, and “Bind color” selected). Only select ones that have the same endpoint (ie: If you have 2x Hue bulbs with endpoints 0B and another Zigbee bulb with an endpoint of 01, you will have to bind the Hue bulbs first and then go back and redo steps 6-11 to bind the other bulb with a different endpoint ID).—
- Where it says, “Use this endpoint for the slave (0x__)*” enter in the endpointID you wrote down or memorized here (ie: 01, 02, 0B, etc) - Again, (sorry to keep saying this) if you have 2x Hue bulbs with endpoints 0B and another Zigbee bulb with an endpoint of 01, you will have to bind the Hue bulbs first and then go back and redo steps 6-11 to bind the other bulb with a different endpoint ID.—
- Select, “Bind” (it should by default be selected), leave on, “Log debug information” and assign a name if you want (normally, you can describe what you are binding – ie: Switch to Bulb #1) – then click, “Done”—
- Test your binding by pressing up on your light switch (your bulb should turn on), pressing down on your light switch (bulb should turn off) or holding up/down on the switch (bulb should dim up/down)
Switch to Switch
In this scenario, you will be binding your Inovelli switch to another Inovelli switch (or switches). Please click on the drop-downs to select the option that best suits your setup.
2x Smart Switches (ie: Switch to Switch)
In this example, we will be binding two Inovelli switches together. As a reminder, if you do not have the Zigbee Bindings App or the Device Driver installed, please follow the instructions here before proceeding below: Installing the Zigbee Bindings App / Installing the Inovelli Device Driver
Feel free to follow the written instructions below by clicking the drop downs:
Written Instructions
- Click on, “Apps”, select, “Add User App” and click on, “Zigbee Bindings”.—
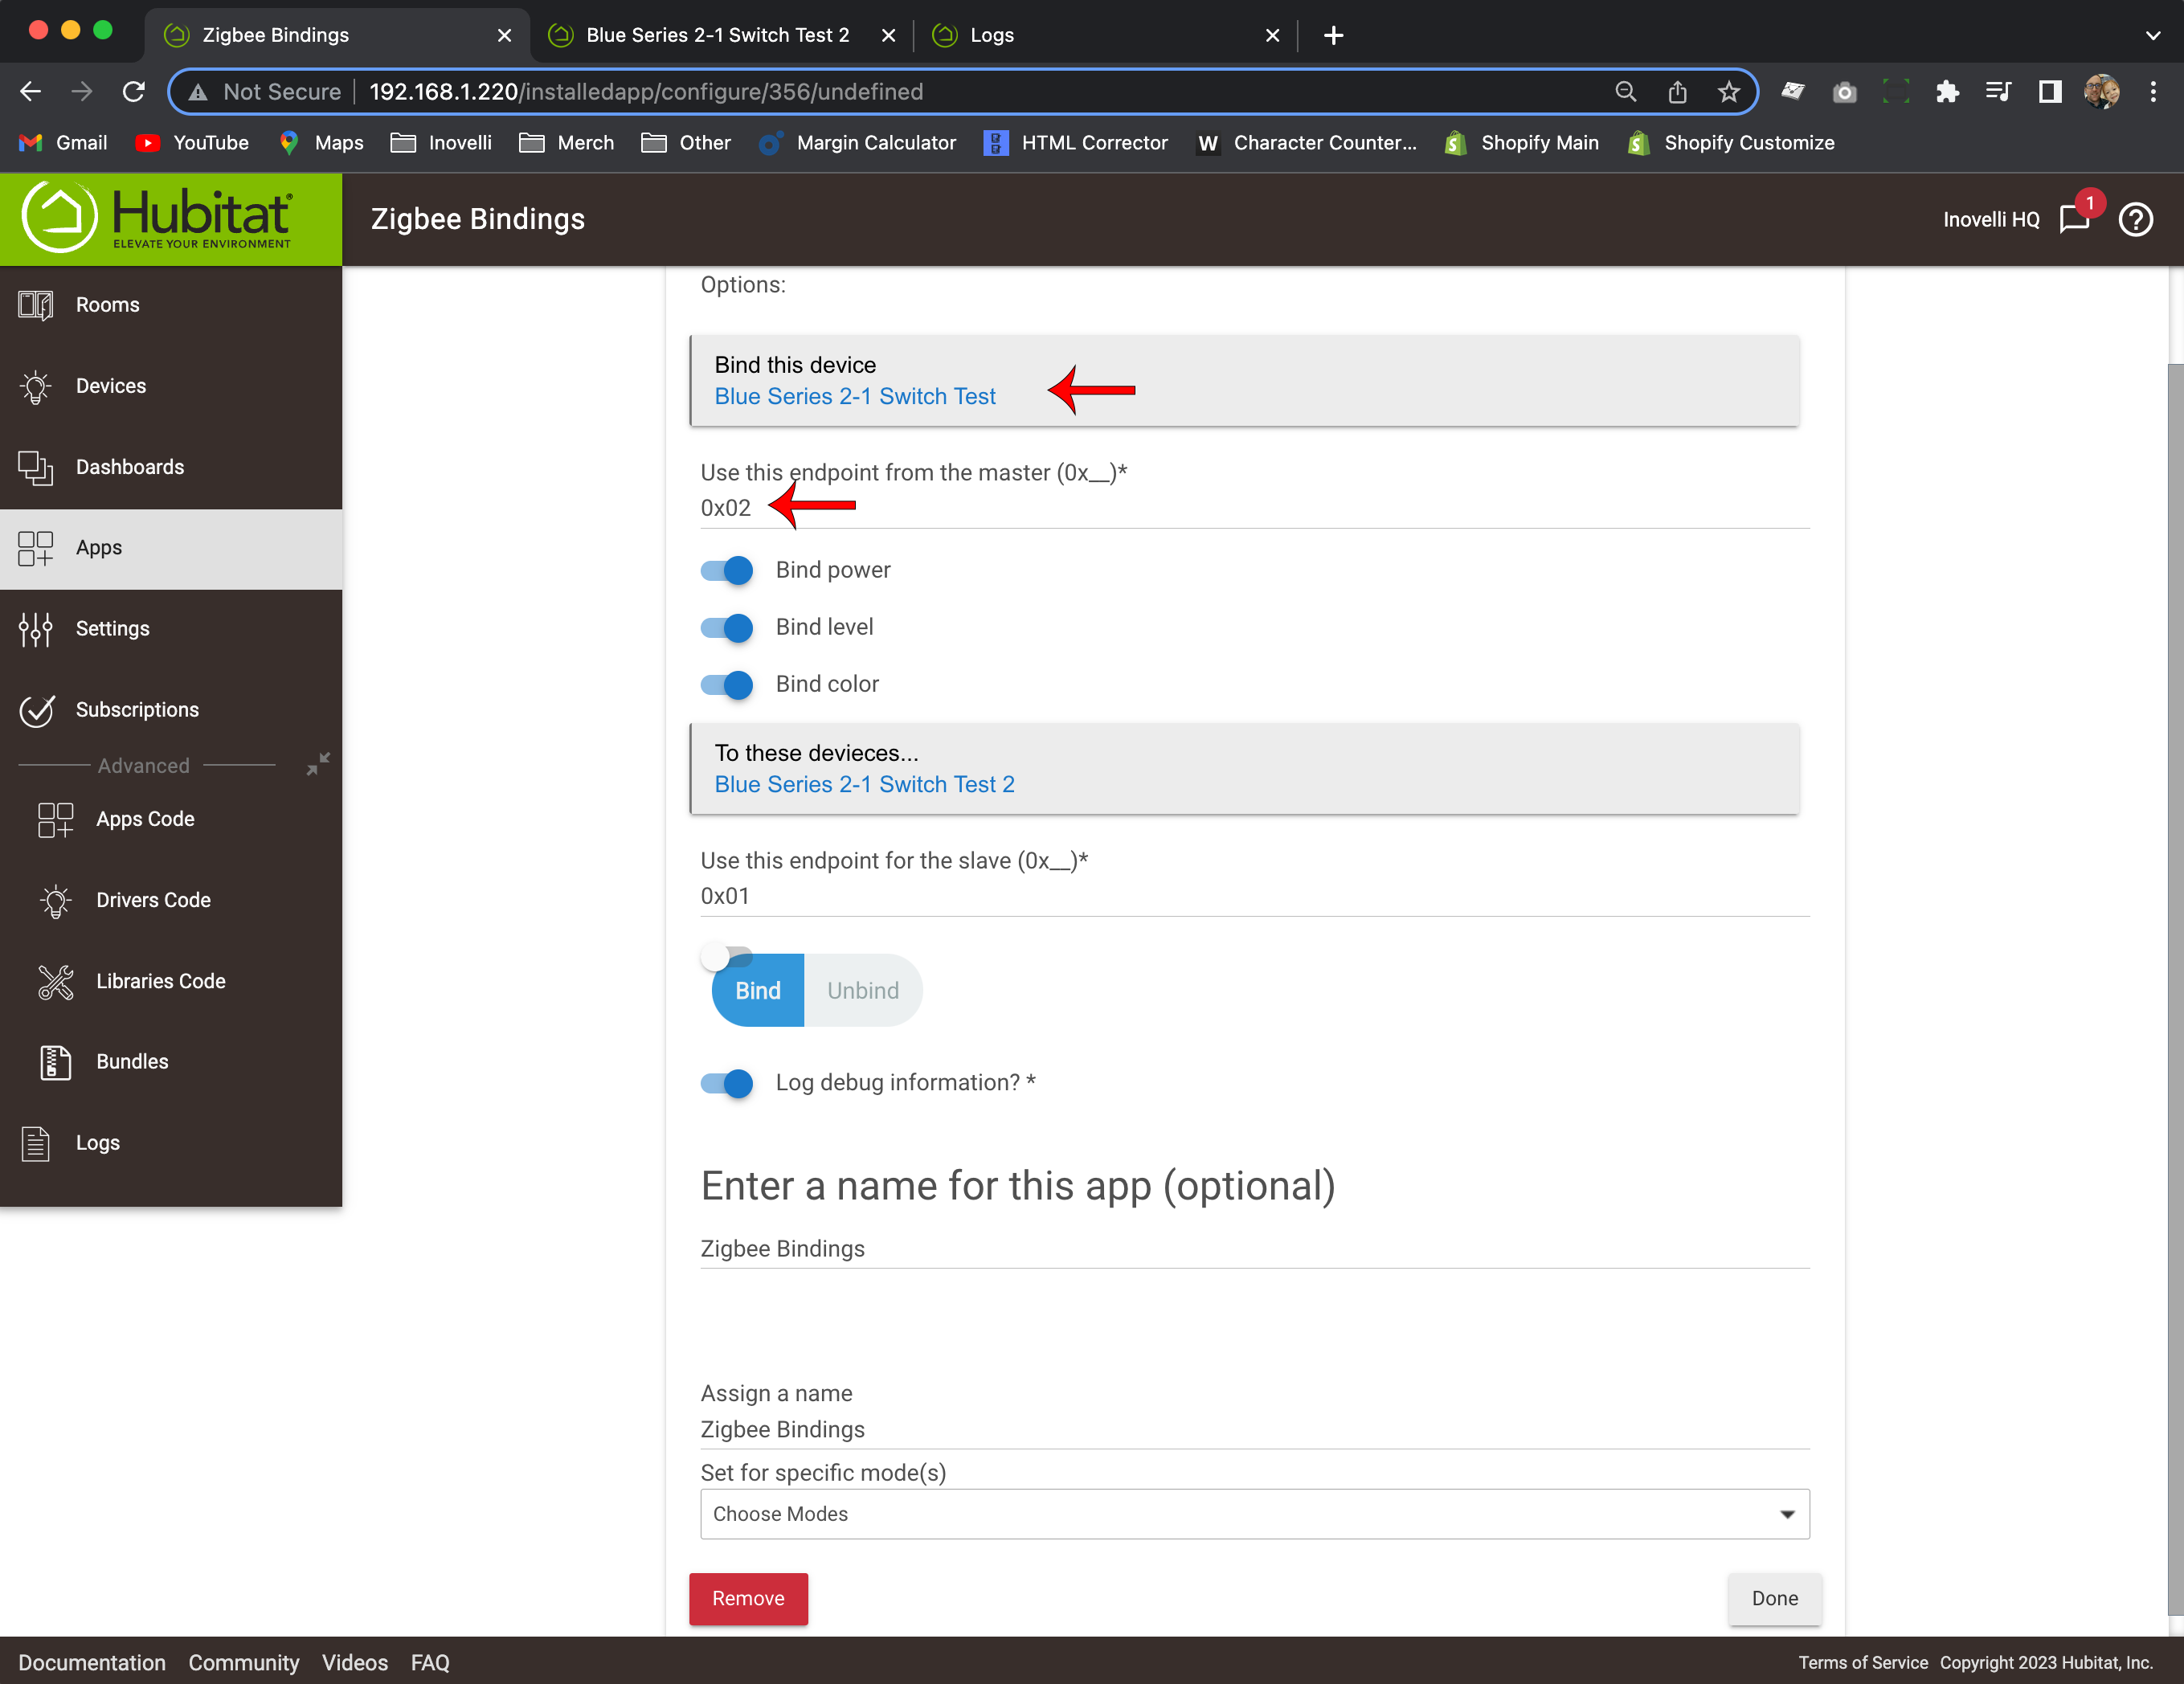
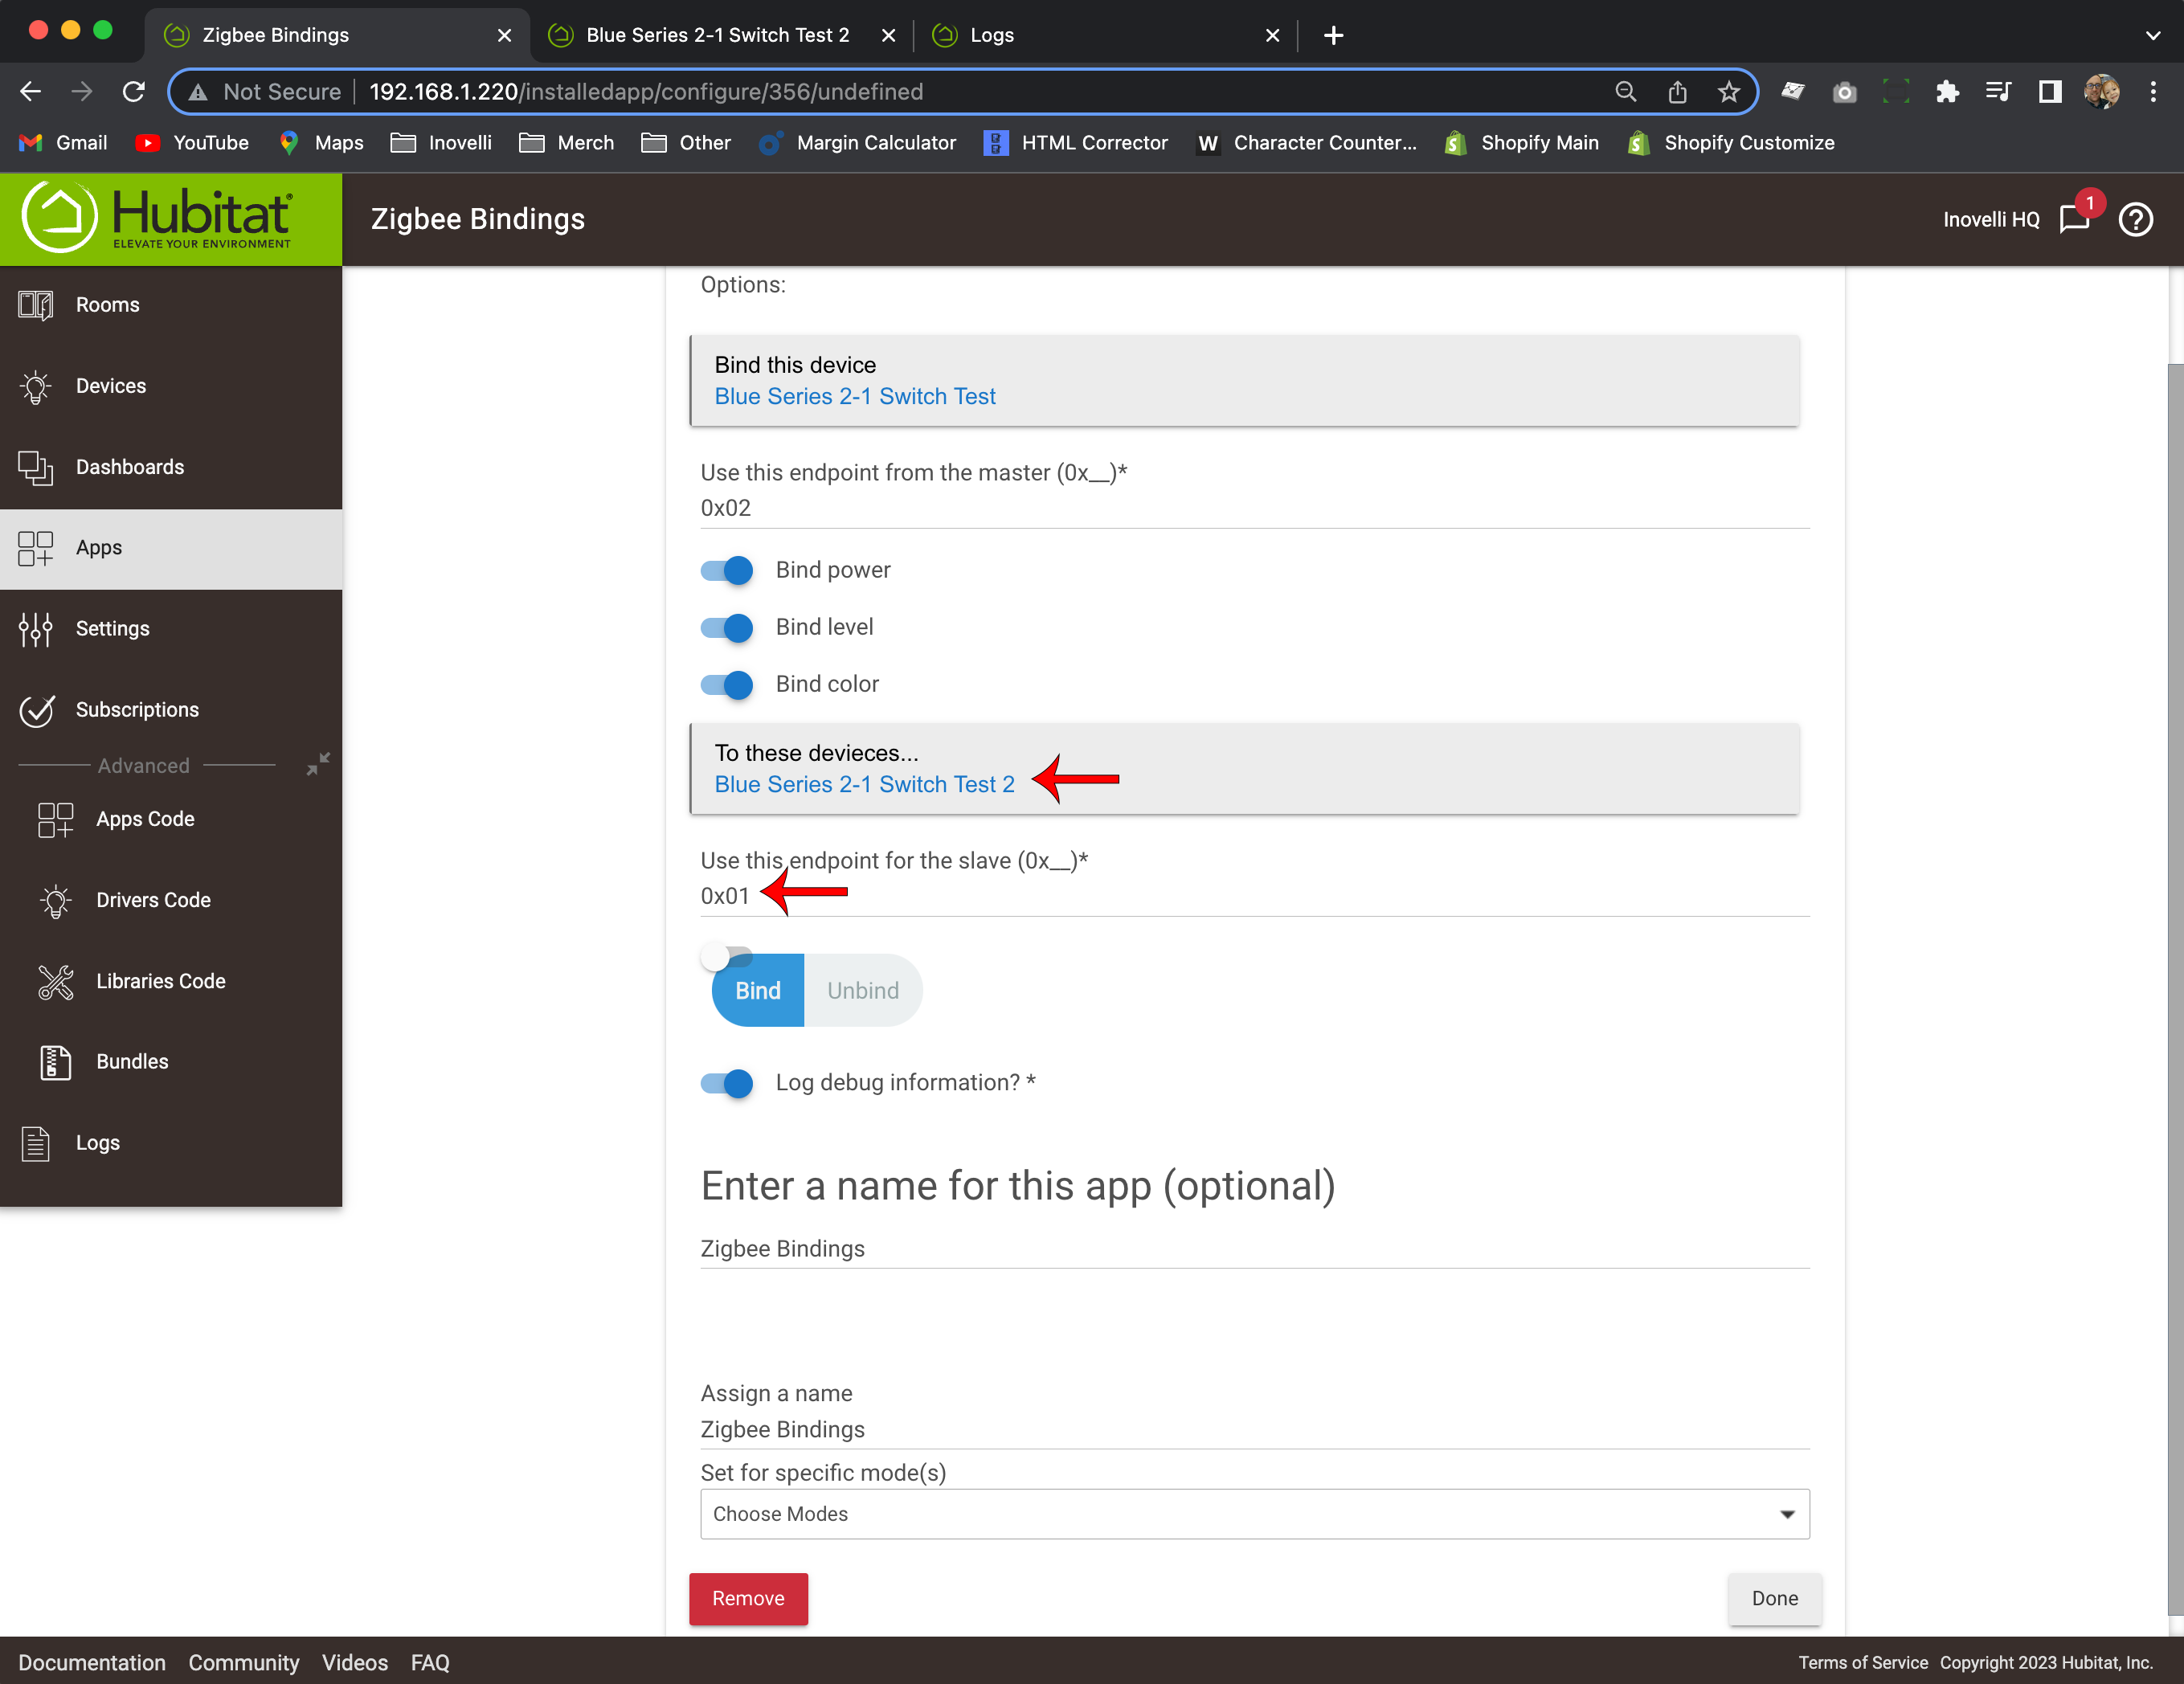
- Click on, “Bind this device” and select your Inovelli Blue Series 2-1 Switch (Switch #1). Where it says, “Use this endpoint from the master (0x__)”, change it to 0x02—
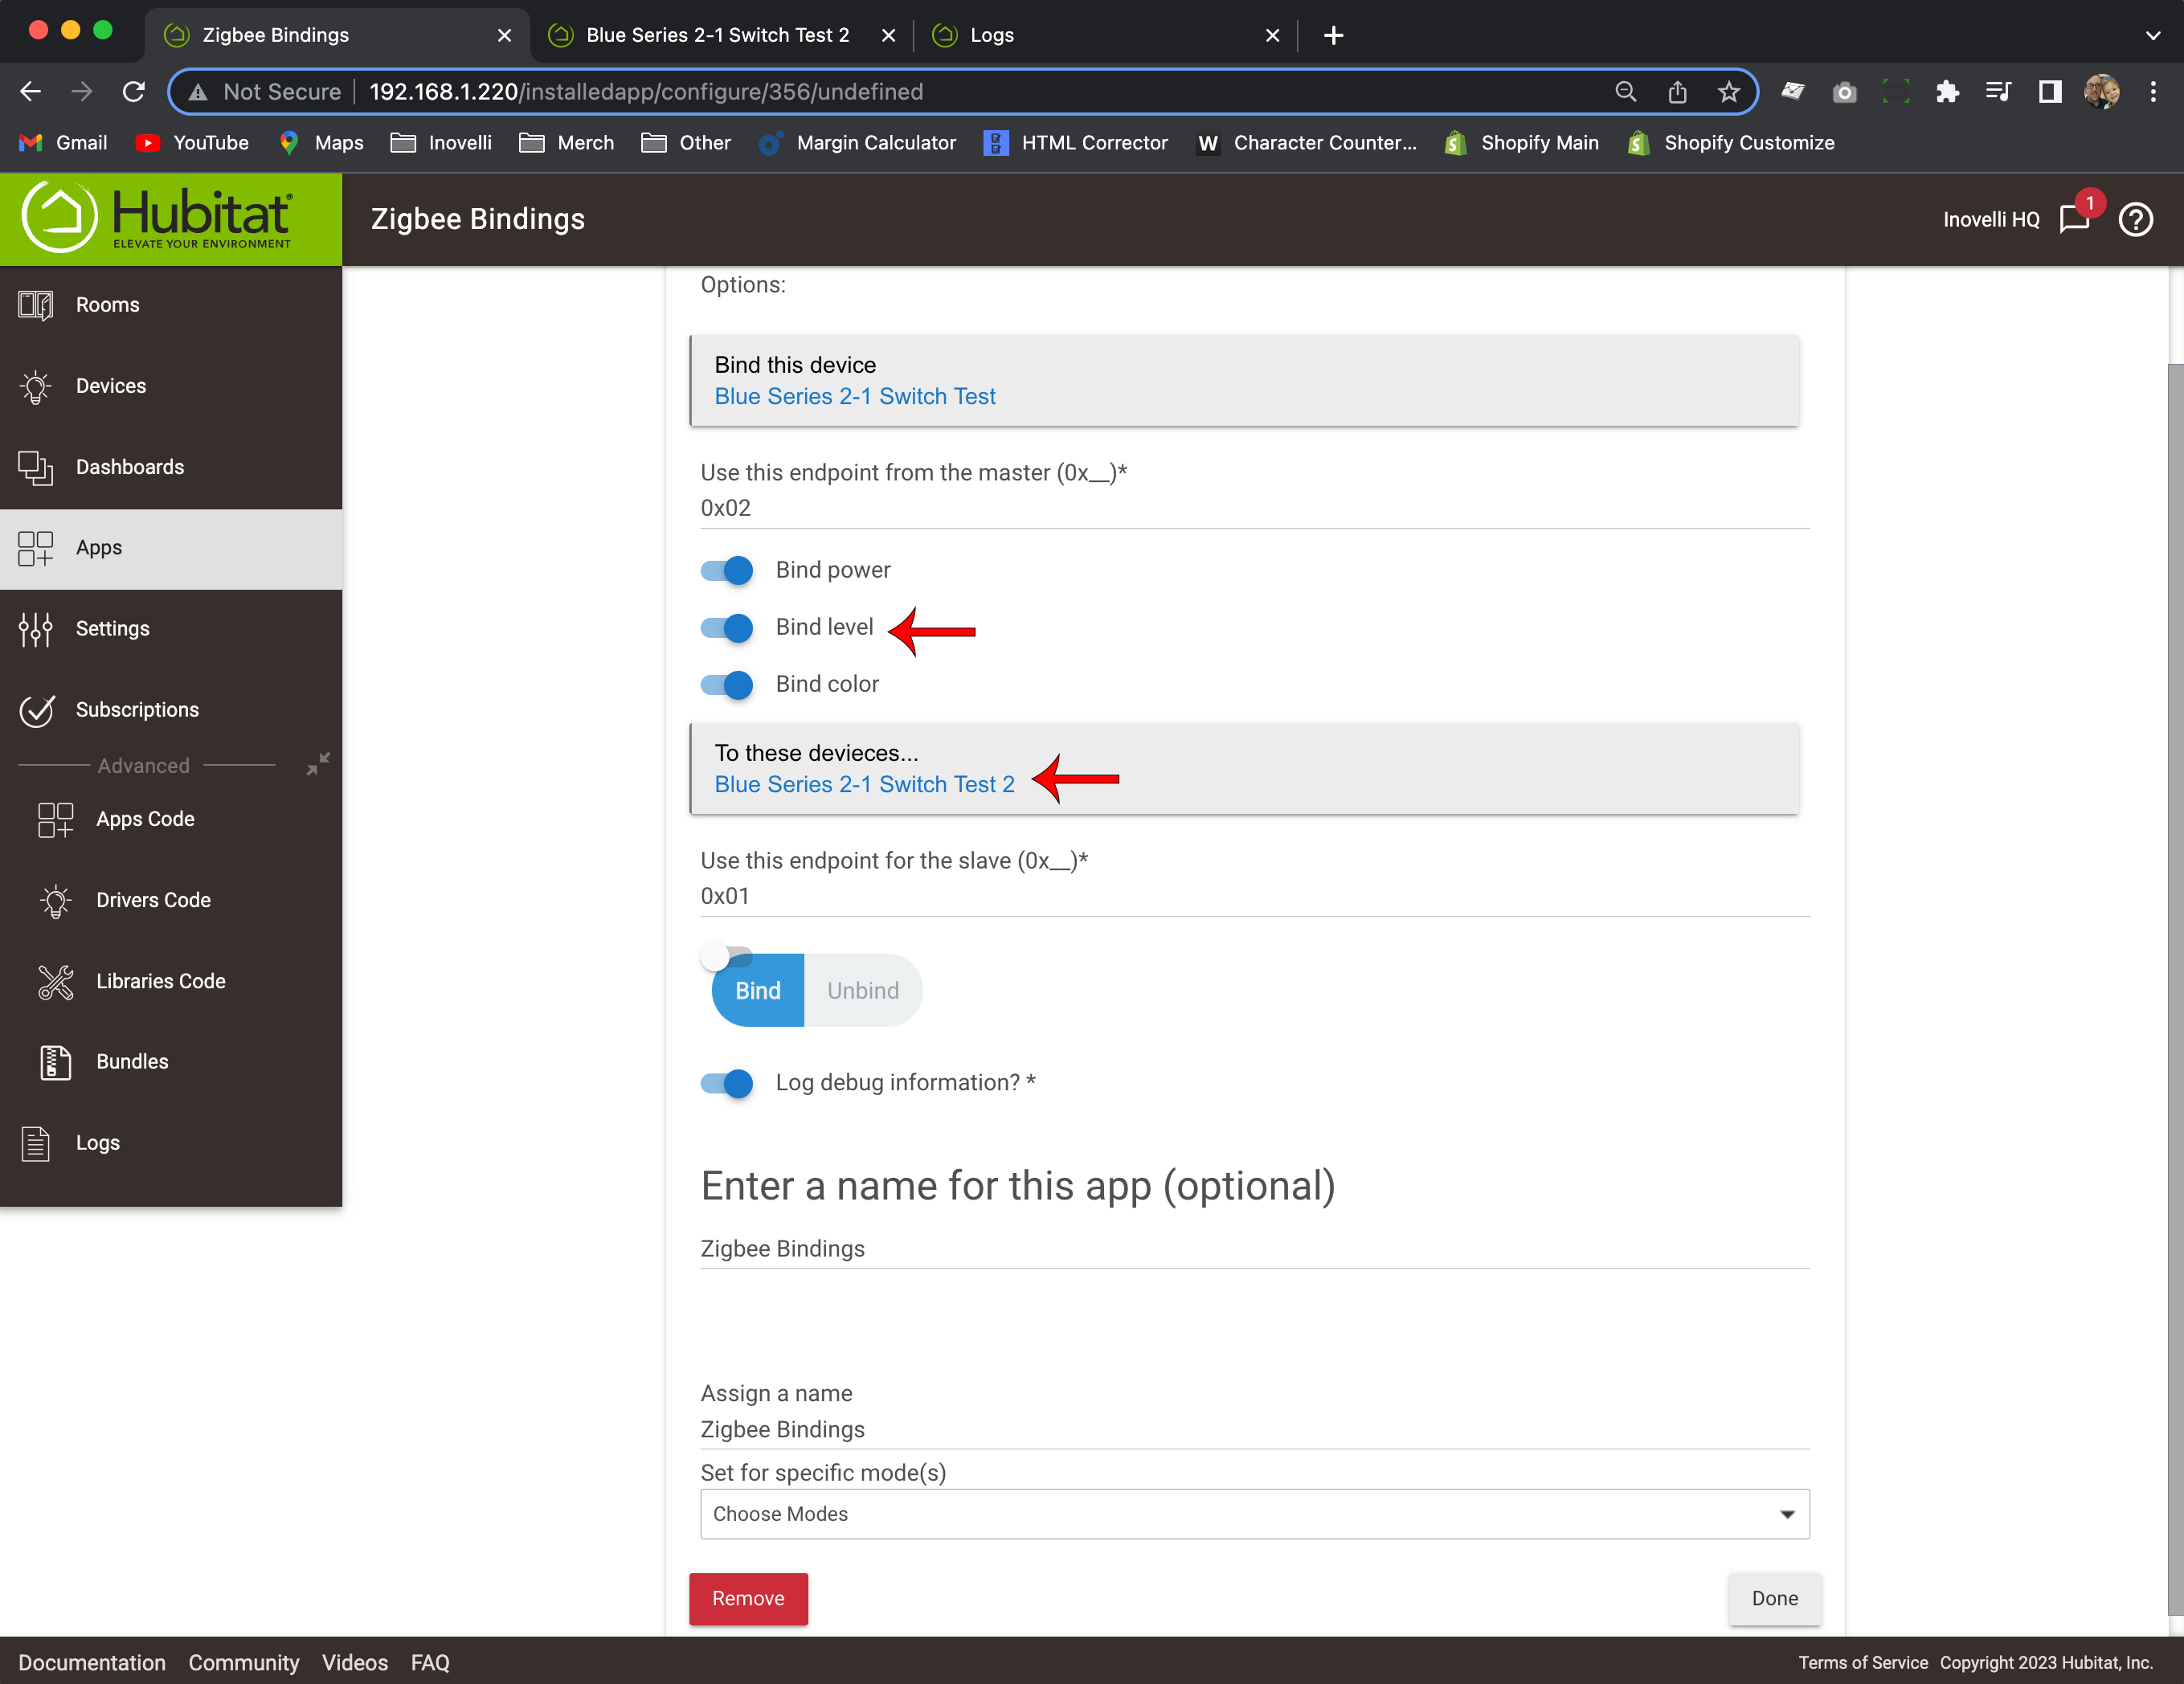
- Click on, “To these devices…” and select your other Inovelli Blue Series switch (Switch #2). Leave, “Bind power”, “Bind level”, and “Bind color” selected.—
- Where it says, “Use this endpoint for the slave (0x__)*”, change it to 0x01—
- Select, “Bind” (it should by default be selected), leave on, “Log debug information” and assign a name if you want (normally, you can describe what you are binding – ie: Switch to Bulb #1) – then click, “Done”—
- Repeat Steps 2-5, but for Step 2, change the “Bind this device” to your other switch (ie: Switch #2) and in Step 3, change, “To these devices” to the other switch (ie: Switch #1)
- Test your binding by pressing up and down on Switch #1 (Switch #2 should turn on/off), and then press up and down on Switch #2 (Switch #1 should turn on/off). You can also dim if both switches are set as dimming.
3+ Smart Switches (ie: Switch to Multiple Switches)
In this example, we will be binding three or more Inovelli switches together. As a reminder, if you do not have the Zigbee Bindings App or the Device Driver installed, please follow the instructions here before proceeding below: Installing the Zigbee Bindings App / Installing the Inovelli Device Driver
To give a visual of what we’ll be doing, we will be doing the following:
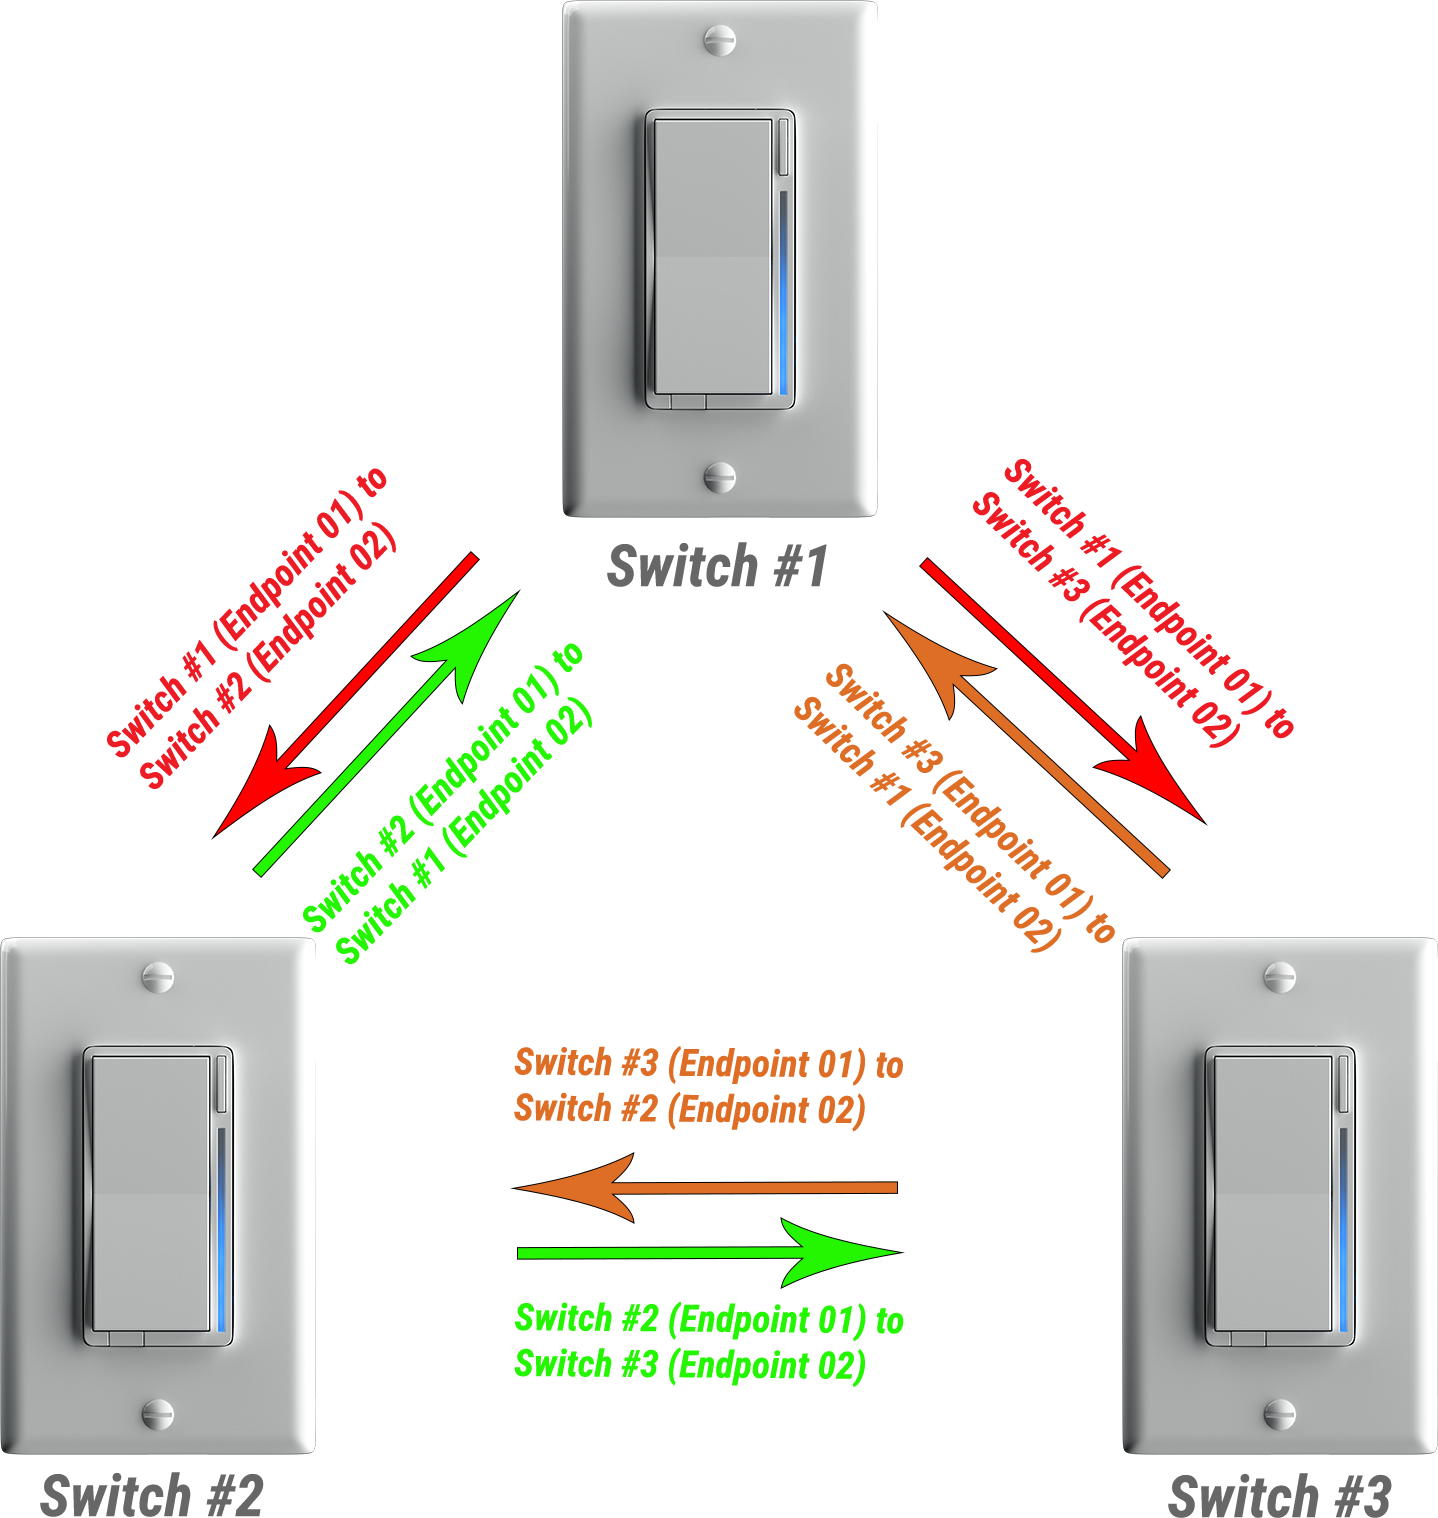
Essentially we are forward / backward binding each switch to one another so that no matter what switch you press, all of them will turn on and match.
Feel free to follow the written instructions below by clicking the drop downs:
Written Instructions
Referring to the diagram above, you will have to set up six (6) different bindings:
- Switch #1 - Bound to Switch #2 and Switch #3
- Switch #2 - Bound to Switch #1 and Switch #3
- Switch #3 - Bound to Switch #1 and Switch #2
We’ll go through one example below (binding Switch #1 to Switch #2) to show you the process. Then you’ll just repeat it five (5) more times. Feel free to use the diagram above as a cheat-sheet.
- Click on, “Apps”, select, “Add User App” and click on, “Zigbee Bindings”.—
- Click on, “Bind this device” and select your Inovelli Blue Series 2-1 Switch (Switch #1). Where it says, “Use this endpoint from the master (0x__)”, change it to 0x02—
- Click on, “To these devices…” and select your other Inovelli Blue Series switch (Switch #2). Leave, “Bind power”, “Bind level”, and “Bind color” selected.—
- Where it says, “Use this endpoint for the slave (0x__)*”, change it to 0x01—
- Select, “Bind” (it should by default be selected), leave on, “Log debug information” and assign a name if you want (normally, you can describe what you are binding – ie: Switch to Bulb #1) – then click, “Done”—
- Repeat Steps 2-5, for each of the remaining five (5) bindings (reference the diagram above to remember the endpoints and how to bind the switches)
- Test your binding by pressing up and down on Switch #1 (Switch #2 and Switch #3 should turn on/off), and then press up and down on Switch #2 (Switch #1 and Switch #3 should turn on/off). Finally, press up/down on Switch #3 and Switch #2 and Switch #1 should turn on/off. You can also dim if both switches are set as dimming.